2005 MERCEDES-BENZ SPRINTER engine
[x] Cancel search: enginePage 1155 of 1232
SOLENOID VALVE
DESCRIPTION
The rear A/C solenoid valve is a two-position elec-
trically operated shut-off valve, which is used to con-
trol refrigerant flow to the rear A/C evaporator from
the A/C compressor. The solenoid valve is located in
the rear A/C evaporator housing and is attached by a
bracket.
OPERATION
The solenoid valve is used by the rear A/C control
module to control rear A/C output temperature and
to prevent evaporator freezing. Evaporator tempera-
ture is controlled by cycling the solenoid valve open
and closed, thereby controlling refrigerant flow to the
rear evaporator. The normally closed valve only
allows refrigerant to flow through it when power is
supplied to the solenoid by the rear A/C control mod-
ule.
DIAGNOSIS AND TESTING
For circuit descriptions and diagrams, refer to Air
Conditioning/Heater in Group 8W - Wiring Diagrams.
NOTE: Prior to performing the following checks,
verify that the front A/C system is operating prop-
erly.
(1) With the engine running, the front A/C switch
in the On position and the rear A/C blower switch in
the Off position, check that the rear evaporator is not
colder than the ambient temperature. If the evapora-
tor temperature is colder than the ambient tempera-
ture, the solenoid is allowing refrigerant to flow
through the rear evaporator when in the closed posi-
tion. If OK, go to Step 2. If not OK, replace the rear
A/C solenoid valve (Refer to 24 - HEATING & AIR
CONDITIONING/CONTROLS/SOLENOID - REMOV-
AL).
(2) With the ignition switch in the Off position and
the rear A/C solenoid valve wire harness discon-
nected, check for continuity between the two solenoid
valve terminals. If OK, go to Step 3. If not OK,
replace the solenoid valve (Refer to 24 - HEATING &
AIR CONDITIONING/CONTROLS/SOLENOID -
REMOVAL).
(3) With the ignition switch in the Off position and
the rear A/C solenoid valve wire harness discon-
nected, check the solenoid valve ground circuits for a
good ground at all times. If OK, go to Step 4. If not
OK, repair the open circuit to ground as required.(4) With the ignition switch and the front A/C
switch in the On position and the rear A/C solenoid
valve wire harness disconnected, check the harness
for battery power at terminal 2. If OK, replace the
solenoid valve (Refer to 24 - HEATING & AIR CON-
DITIONING/CONTROLS/SOLENOID - REMOVAL).
If not OK, test the A/C control module as required
(Refer to 24 - HEATING & AIR CONDITIONING/
CONTROLS/POWER MODULE - DIAGNOSIS AND
TESTING).
REMOVAL
(1) Recover the refrigerant from the refrigerant
system (Refer to 24 - HEATING & AIR CONDITION-
ING/PLUMBING - STANDARD PROCEDURE).
(2) Disconnect and isolate the battery negative
cable.
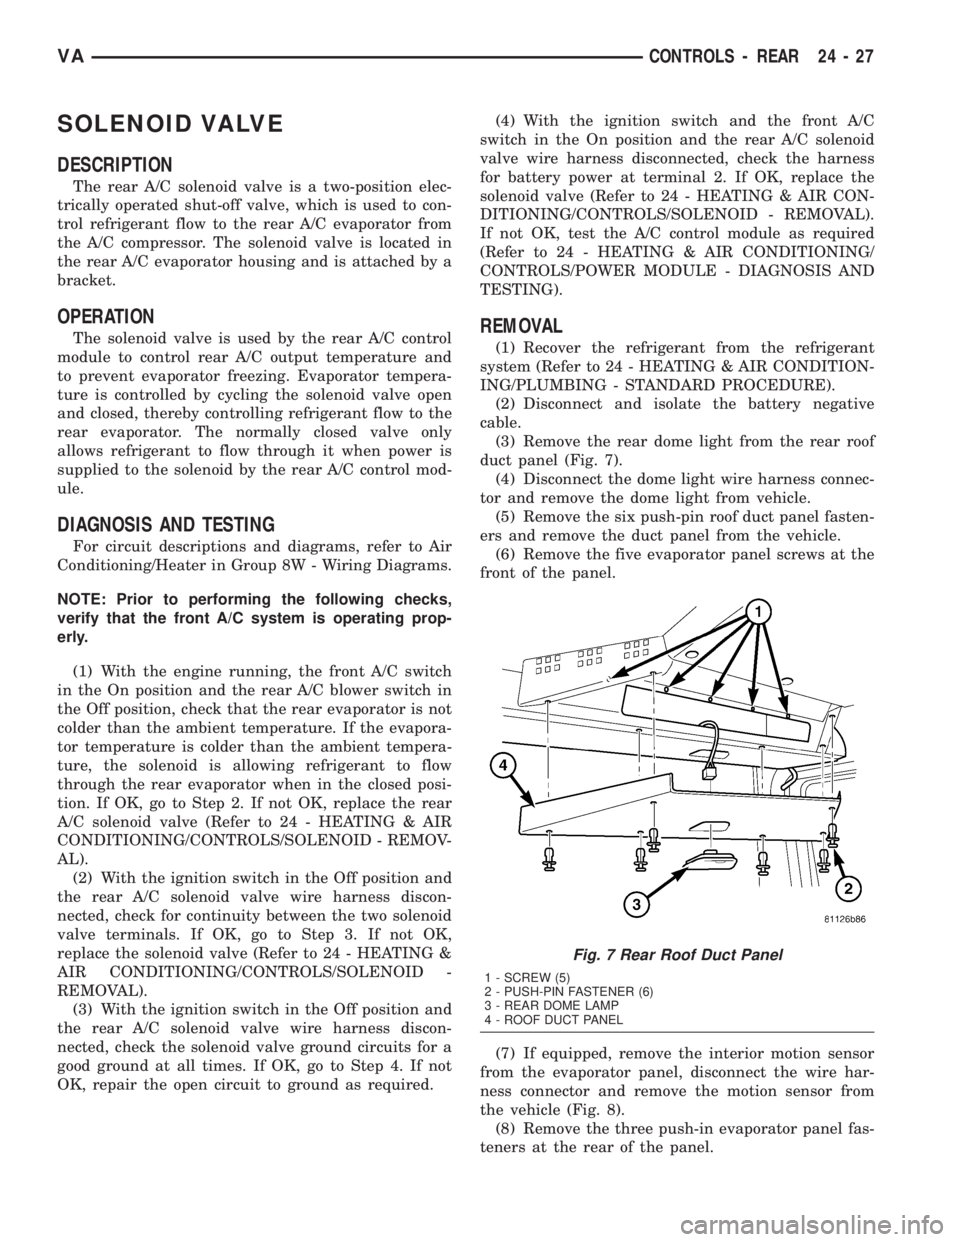
(3) Remove the rear dome light from the rear roof
duct panel (Fig. 7).
(4) Disconnect the dome light wire harness connec-
tor and remove the dome light from vehicle.
(5) Remove the six push-pin roof duct panel fasten-
ers and remove the duct panel from the vehicle.
(6) Remove the five evaporator panel screws at the
front of the panel.
(7) If equipped, remove the interior motion sensor
from the evaporator panel, disconnect the wire har-
ness connector and remove the motion sensor from
the vehicle (Fig. 8).
(8) Remove the three push-in evaporator panel fas-
teners at the rear of the panel.
Fig. 7 Rear Roof Duct Panel
1 - SCREW (5)
2 - PUSH-PIN FASTENER (6)
3 - REAR DOME LAMP
4 - ROOF DUCT PANEL
VACONTROLS - REAR 24 - 27
Page 1159 of 1232
DISTRIBUTION - FRONT
TABLE OF CONTENTS
page page
AIR FILTER
REMOVAL.............................31
INSTALLATION.........................31
AIR OUTLETS
REMOVAL.............................31
INSTALLATION.........................32
BLOWER MOTOR
REMOVAL.............................32
INSTALLATION.........................33
DEFROSTER DUCTS
REMOVAL.............................33
INSTALLATION.........................33FLOOR DISTRIBUTION DUCTS
REMOVAL.............................33
INSTALLATION.........................34
HVAC HOUSING
REMOVAL.............................34
DISASSEMBLY.........................36
ASSEMBLY............................36
INSTALLATION.........................36
INSTRUMENT PANEL DUCTS
REMOVAL.............................37
INSTALLATION.........................38
AIR FILTER
REMOVAL
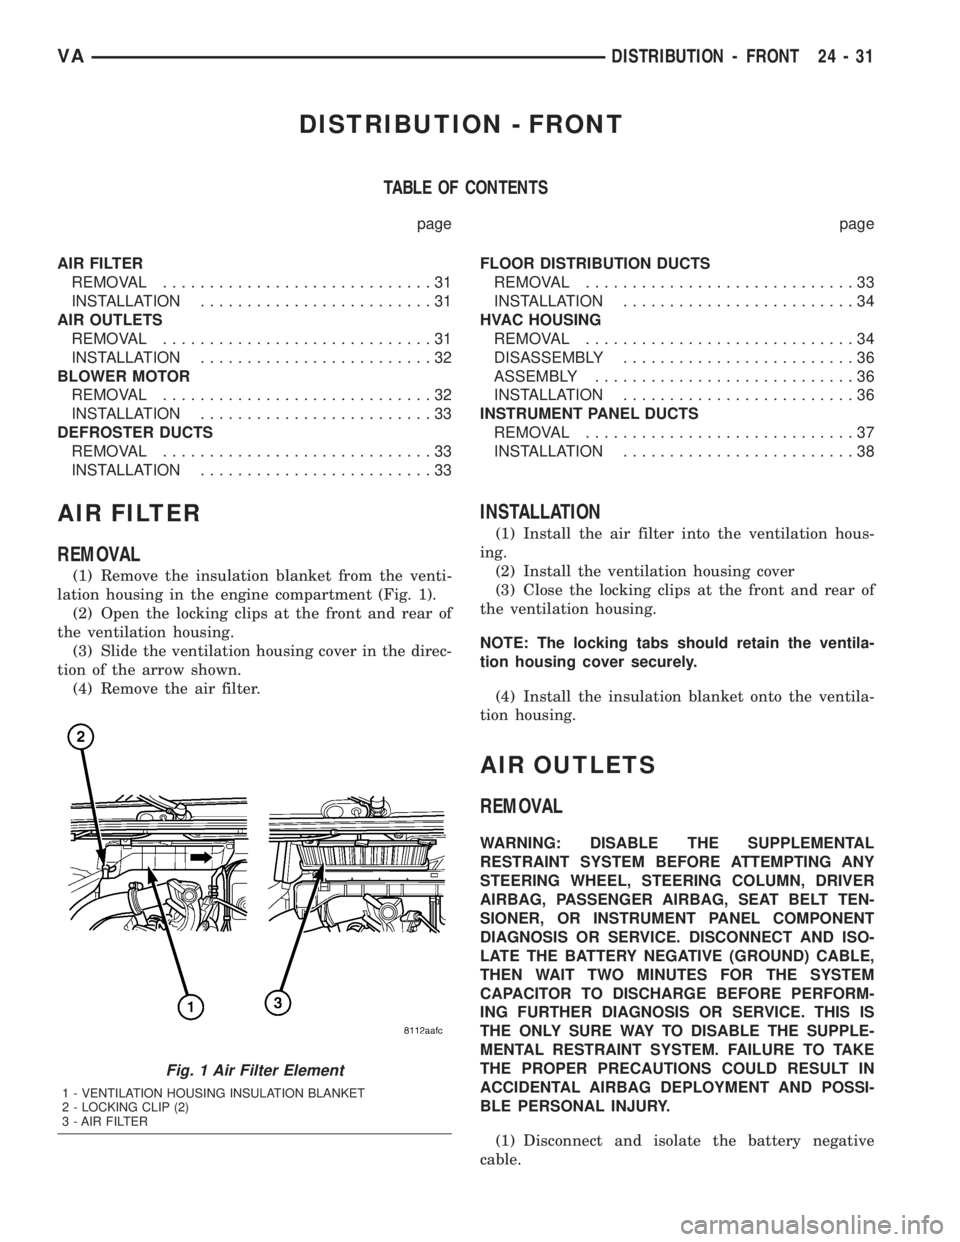
(1) Remove the insulation blanket from the venti-
lation housing in the engine compartment (Fig. 1).
(2) Open the locking clips at the front and rear of
the ventilation housing.
(3) Slide the ventilation housing cover in the direc-
tion of the arrow shown.
(4) Remove the air filter.
INSTALLATION
(1) Install the air filter into the ventilation hous-
ing.
(2) Install the ventilation housing cover
(3) Close the locking clips at the front and rear of
the ventilation housing.
NOTE: The locking tabs should retain the ventila-
tion housing cover securely.
(4) Install the insulation blanket onto the ventila-
tion housing.
AIR OUTLETS
REMOVAL
WARNING: DISABLE THE SUPPLEMENTAL
RESTRAINT SYSTEM BEFORE ATTEMPTING ANY
STEERING WHEEL, STEERING COLUMN, DRIVER
AIRBAG, PASSENGER AIRBAG, SEAT BELT TEN-
SIONER, OR INSTRUMENT PANEL COMPONENT
DIAGNOSIS OR SERVICE. DISCONNECT AND ISO-
LATE THE BATTERY NEGATIVE (GROUND) CABLE,
THEN WAIT TWO MINUTES FOR THE SYSTEM
CAPACITOR TO DISCHARGE BEFORE PERFORM-
ING FURTHER DIAGNOSIS OR SERVICE. THIS IS
THE ONLY SURE WAY TO DISABLE THE SUPPLE-
MENTAL RESTRAINT SYSTEM. FAILURE TO TAKE
THE PROPER PRECAUTIONS COULD RESULT IN
ACCIDENTAL AIRBAG DEPLOYMENT AND POSSI-
BLE PERSONAL INJURY.
(1) Disconnect and isolate the battery negative
cable.
Fig. 1 Air Filter Element
1 - VENTILATION HOUSING INSULATION BLANKET
2 - LOCKING CLIP (2)
3 - AIR FILTER
VADISTRIBUTION - FRONT 24 - 31
Page 1160 of 1232
(2) If servicing the driver side air outlets, remove
the instrument cluster bezel (Refer to 23 - BODY/IN-
STRUMENT PANEL/CLUSTER BEZEL - REMOV-
AL).
(3) If servicing the passenger side air outlets,
remove the passenger side airbag (Refer to 8 - ELEC-
TRICAL/RESTRAINTS/PASSENGER AIRBAG -
REMOVAL).
(4) If servicing the passenger side air outlets,
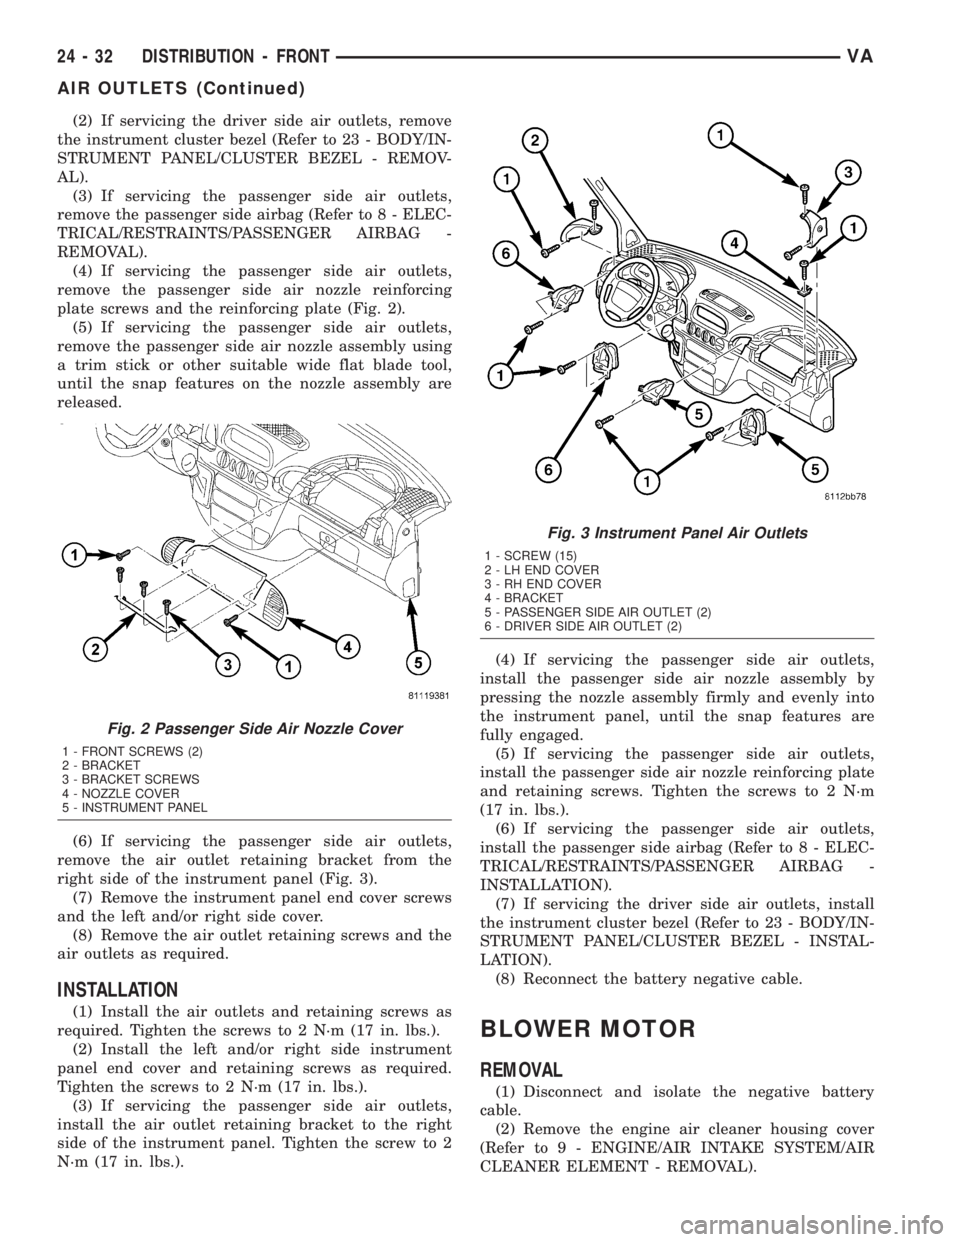
remove the passenger side air nozzle reinforcing
plate screws and the reinforcing plate (Fig. 2).
(5) If servicing the passenger side air outlets,
remove the passenger side air nozzle assembly using
a trim stick or other suitable wide flat blade tool,
until the snap features on the nozzle assembly are
released.
(6) If servicing the passenger side air outlets,
remove the air outlet retaining bracket from the
right side of the instrument panel (Fig. 3).
(7) Remove the instrument panel end cover screws
and the left and/or right side cover.
(8) Remove the air outlet retaining screws and the
air outlets as required.
INSTALLATION
(1) Install the air outlets and retaining screws as
required. Tighten the screws to 2 N´m (17 in. lbs.).
(2) Install the left and/or right side instrument
panel end cover and retaining screws as required.
Tighten the screws to 2 N´m (17 in. lbs.).
(3) If servicing the passenger side air outlets,
install the air outlet retaining bracket to the right
side of the instrument panel. Tighten the screw to 2
N´m (17 in. lbs.).(4) If servicing the passenger side air outlets,
install the passenger side air nozzle assembly by
pressing the nozzle assembly firmly and evenly into
the instrument panel, until the snap features are
fully engaged.
(5) If servicing the passenger side air outlets,
install the passenger side air nozzle reinforcing plate
and retaining screws. Tighten the screws to 2 N´m
(17 in. lbs.).
(6) If servicing the passenger side air outlets,
install the passenger side airbag (Refer to 8 - ELEC-
TRICAL/RESTRAINTS/PASSENGER AIRBAG -
INSTALLATION).
(7) If servicing the driver side air outlets, install
the instrument cluster bezel (Refer to 23 - BODY/IN-
STRUMENT PANEL/CLUSTER BEZEL - INSTAL-
LATION).
(8) Reconnect the battery negative cable.
BLOWER MOTOR
REMOVAL
(1) Disconnect and isolate the negative battery
cable.
(2) Remove the engine air cleaner housing cover
(Refer to 9 - ENGINE/AIR INTAKE SYSTEM/AIR
CLEANER ELEMENT - REMOVAL).
Fig. 2 Passenger Side Air Nozzle Cover
1 - FRONT SCREWS (2)
2 - BRACKET
3 - BRACKET SCREWS
4 - NOZZLE COVER
5 - INSTRUMENT PANEL
Fig. 3 Instrument Panel Air Outlets
1 - SCREW (15)
2 - LH END COVER
3 - RH END COVER
4 - BRACKET
5 - PASSENGER SIDE AIR OUTLET (2)
6 - DRIVER SIDE AIR OUTLET (2)
24 - 32 DISTRIBUTION - FRONTVA
AIR OUTLETS (Continued)
Page 1161 of 1232
(3) Position the ventilation housing insulation
blanket out of the way of the blower motor assembly.
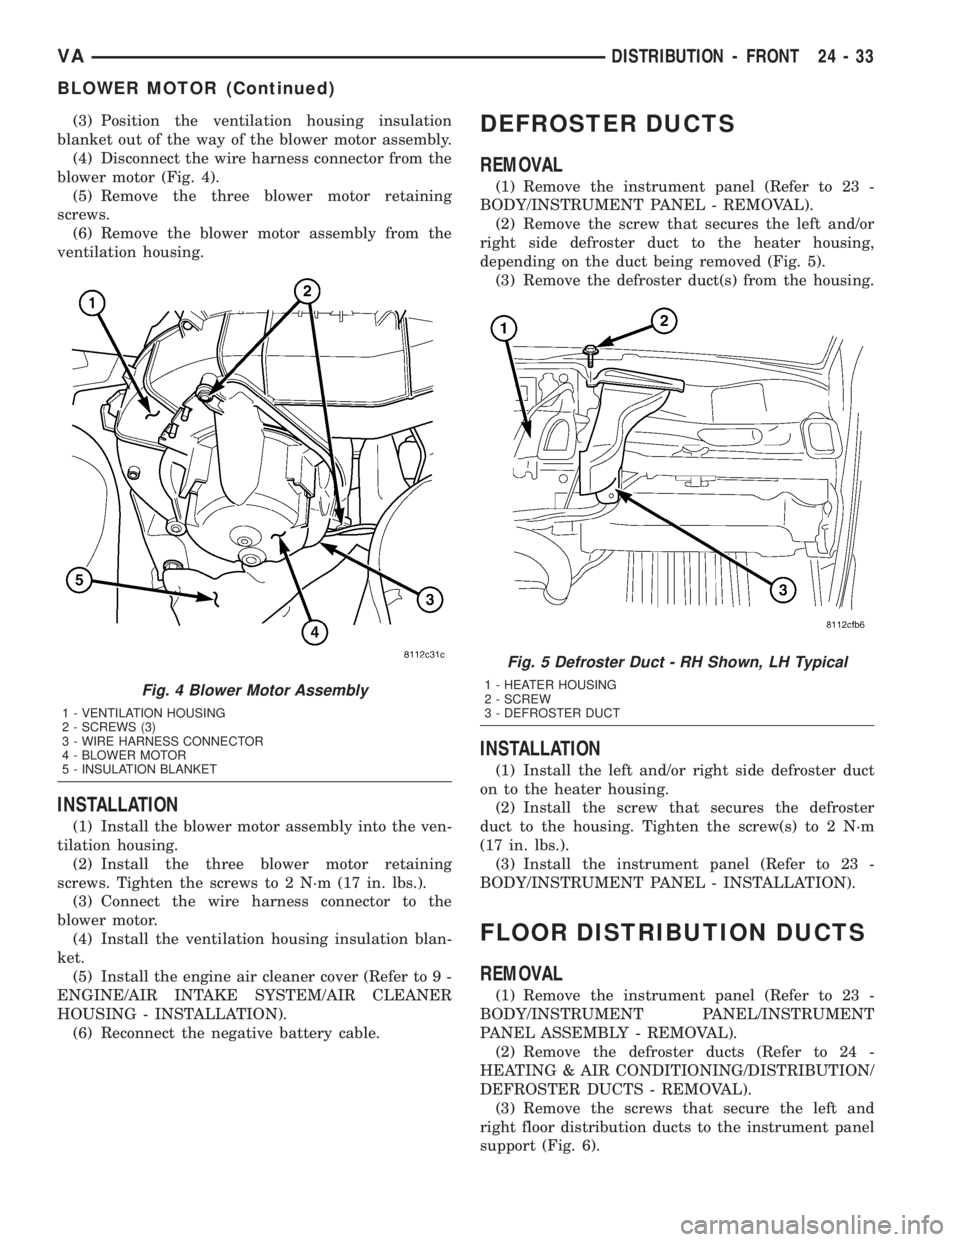
(4) Disconnect the wire harness connector from the
blower motor (Fig. 4).
(5) Remove the three blower motor retaining
screws.
(6) Remove the blower motor assembly from the
ventilation housing.
INSTALLATION
(1) Install the blower motor assembly into the ven-
tilation housing.
(2) Install the three blower motor retaining
screws. Tighten the screws to 2 N´m (17 in. lbs.).
(3) Connect the wire harness connector to the
blower motor.
(4) Install the ventilation housing insulation blan-
ket.
(5) Install the engine air cleaner cover (Refer to 9 -
ENGINE/AIR INTAKE SYSTEM/AIR CLEANER
HOUSING - INSTALLATION).
(6) Reconnect the negative battery cable.
DEFROSTER DUCTS
REMOVAL
(1) Remove the instrument panel (Refer to 23 -
BODY/INSTRUMENT PANEL - REMOVAL).
(2) Remove the screw that secures the left and/or
right side defroster duct to the heater housing,
depending on the duct being removed (Fig. 5).
(3) Remove the defroster duct(s) from the housing.
INSTALLATION
(1) Install the left and/or right side defroster duct
on to the heater housing.
(2) Install the screw that secures the defroster
duct to the housing. Tighten the screw(s) to 2 N´m
(17 in. lbs.).
(3) Install the instrument panel (Refer to 23 -
BODY/INSTRUMENT PANEL - INSTALLATION).
FLOOR DISTRIBUTION DUCTS
REMOVAL
(1) Remove the instrument panel (Refer to 23 -
BODY/INSTRUMENT PANEL/INSTRUMENT
PANEL ASSEMBLY - REMOVAL).
(2) Remove the defroster ducts (Refer to 24 -
HEATING & AIR CONDITIONING/DISTRIBUTION/
DEFROSTER DUCTS - REMOVAL).
(3) Remove the screws that secure the left and
right floor distribution ducts to the instrument panel
support (Fig. 6).
Fig. 4 Blower Motor Assembly
1 - VENTILATION HOUSING
2 - SCREWS (3)
3 - WIRE HARNESS CONNECTOR
4 - BLOWER MOTOR
5 - INSULATION BLANKET
Fig. 5 Defroster Duct - RH Shown, LH Typical
1 - HEATER HOUSING
2 - SCREW
3 - DEFROSTER DUCT
VADISTRIBUTION - FRONT 24 - 33
BLOWER MOTOR (Continued)
Page 1162 of 1232
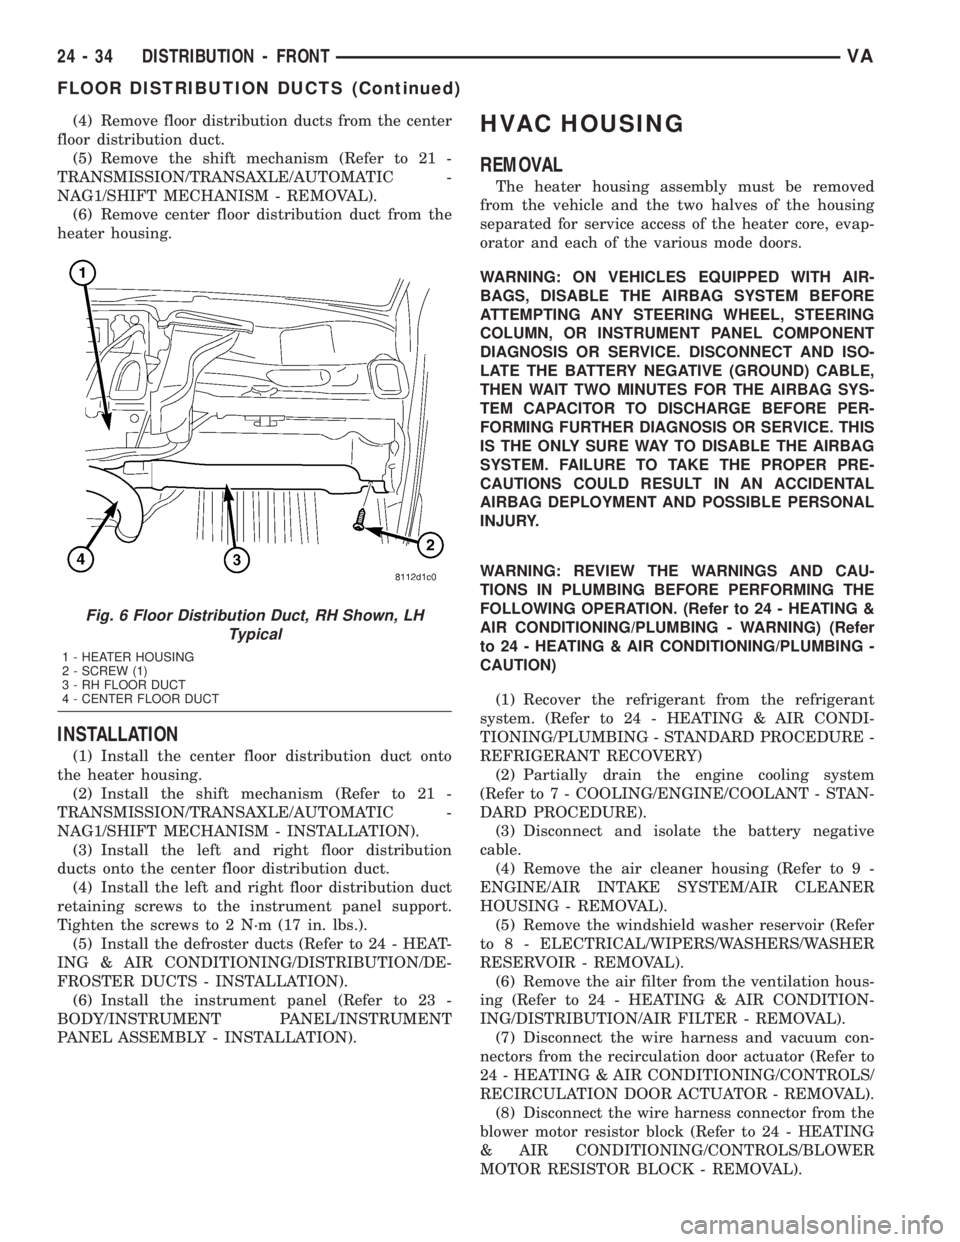
(4) Remove floor distribution ducts from the center
floor distribution duct.
(5) Remove the shift mechanism (Refer to 21 -
TRANSMISSION/TRANSAXLE/AUTOMATIC -
NAG1/SHIFT MECHANISM - REMOVAL).
(6) Remove center floor distribution duct from the
heater housing.
INSTALLATION
(1) Install the center floor distribution duct onto
the heater housing.
(2) Install the shift mechanism (Refer to 21 -
TRANSMISSION/TRANSAXLE/AUTOMATIC -
NAG1/SHIFT MECHANISM - INSTALLATION).
(3) Install the left and right floor distribution
ducts onto the center floor distribution duct.
(4) Install the left and right floor distribution duct
retaining screws to the instrument panel support.
Tighten the screws to 2 N´m (17 in. lbs.).
(5) Install the defroster ducts (Refer to 24 - HEAT-
ING & AIR CONDITIONING/DISTRIBUTION/DE-
FROSTER DUCTS - INSTALLATION).
(6) Install the instrument panel (Refer to 23 -
BODY/INSTRUMENT PANEL/INSTRUMENT
PANEL ASSEMBLY - INSTALLATION).
HVAC HOUSING
REMOVAL
The heater housing assembly must be removed
from the vehicle and the two halves of the housing
separated for service access of the heater core, evap-
orator and each of the various mode doors.
WARNING: ON VEHICLES EQUIPPED WITH AIR-
BAGS, DISABLE THE AIRBAG SYSTEM BEFORE
ATTEMPTING ANY STEERING WHEEL, STEERING
COLUMN, OR INSTRUMENT PANEL COMPONENT
DIAGNOSIS OR SERVICE. DISCONNECT AND ISO-
LATE THE BATTERY NEGATIVE (GROUND) CABLE,
THEN WAIT TWO MINUTES FOR THE AIRBAG SYS-
TEM CAPACITOR TO DISCHARGE BEFORE PER-
FORMING FURTHER DIAGNOSIS OR SERVICE. THIS
IS THE ONLY SURE WAY TO DISABLE THE AIRBAG
SYSTEM. FAILURE TO TAKE THE PROPER PRE-
CAUTIONS COULD RESULT IN AN ACCIDENTAL
AIRBAG DEPLOYMENT AND POSSIBLE PERSONAL
INJURY.
WARNING: REVIEW THE WARNINGS AND CAU-
TIONS IN PLUMBING BEFORE PERFORMING THE
FOLLOWING OPERATION. (Refer to 24 - HEATING &
AIR CONDITIONING/PLUMBING - WARNING) (Refer
to 24 - HEATING & AIR CONDITIONING/PLUMBING -
CAUTION)
(1) Recover the refrigerant from the refrigerant
system. (Refer to 24 - HEATING & AIR CONDI-
TIONING/PLUMBING - STANDARD PROCEDURE -
REFRIGERANT RECOVERY)
(2) Partially drain the engine cooling system
(Refer to 7 - COOLING/ENGINE/COOLANT - STAN-
DARD PROCEDURE).
(3) Disconnect and isolate the battery negative
cable.
(4) Remove the air cleaner housing (Refer to 9 -
ENGINE/AIR INTAKE SYSTEM/AIR CLEANER
HOUSING - REMOVAL).
(5) Remove the windshield washer reservoir (Refer
to 8 - ELECTRICAL/WIPERS/WASHERS/WASHER
RESERVOIR - REMOVAL).
(6) Remove the air filter from the ventilation hous-
ing (Refer to 24 - HEATING & AIR CONDITION-
ING/DISTRIBUTION/AIR FILTER - REMOVAL).
(7) Disconnect the wire harness and vacuum con-
nectors from the recirculation door actuator (Refer to
24 - HEATING & AIR CONDITIONING/CONTROLS/
RECIRCULATION DOOR ACTUATOR - REMOVAL).
(8) Disconnect the wire harness connector from the
blower motor resistor block (Refer to 24 - HEATING
& AIR CONDITIONING/CONTROLS/BLOWER
MOTOR RESISTOR BLOCK - REMOVAL).
Fig. 6 Floor Distribution Duct, RH Shown, LH
Typical
1 - HEATER HOUSING
2 - SCREW (1)
3 - RH FLOOR DUCT
4 - CENTER FLOOR DUCT
24 - 34 DISTRIBUTION - FRONTVA
FLOOR DISTRIBUTION DUCTS (Continued)
Page 1164 of 1232
DISASSEMBLY
(1) Remove the heater and ventilation housings
from the vehicle (Refer to 24 - HEATING & AIR
CONDITIONING/DISTRIBUTION/HVAC HOUSING
- REMOVAL).
(2) Place the heater housing in the upright posi-
tion on a work bench, making allowance for leakage
of fluids.
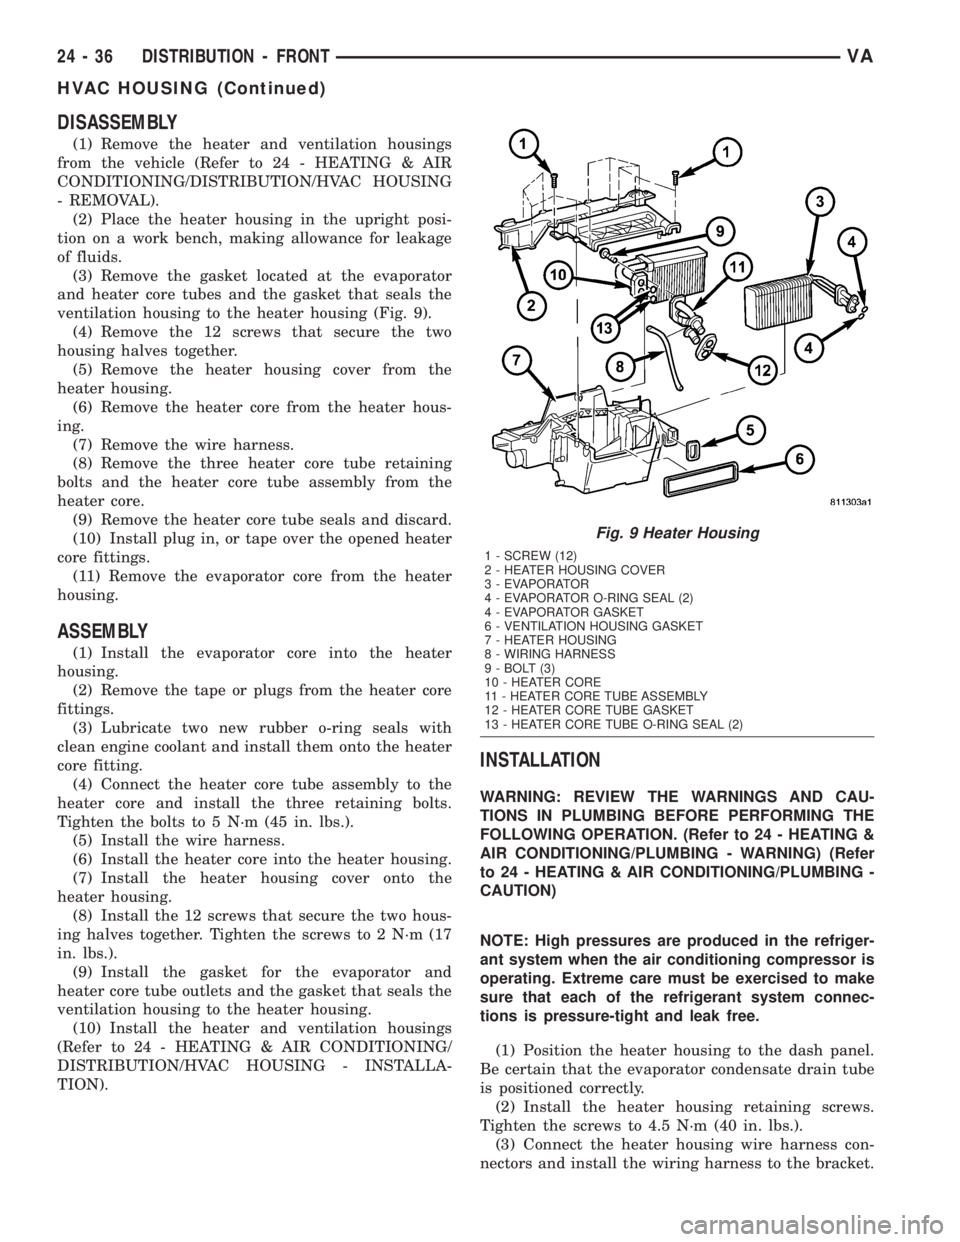
(3) Remove the gasket located at the evaporator
and heater core tubes and the gasket that seals the
ventilation housing to the heater housing (Fig. 9).
(4) Remove the 12 screws that secure the two
housing halves together.
(5) Remove the heater housing cover from the
heater housing.
(6) Remove the heater core from the heater hous-
ing.
(7) Remove the wire harness.
(8) Remove the three heater core tube retaining
bolts and the heater core tube assembly from the
heater core.
(9) Remove the heater core tube seals and discard.
(10) Install plug in, or tape over the opened heater
core fittings.
(11) Remove the evaporator core from the heater
housing.
ASSEMBLY
(1) Install the evaporator core into the heater
housing.
(2) Remove the tape or plugs from the heater core
fittings.
(3) Lubricate two new rubber o-ring seals with
clean engine coolant and install them onto the heater
core fitting.
(4) Connect the heater core tube assembly to the
heater core and install the three retaining bolts.
Tighten the bolts to 5 N´m (45 in. lbs.).
(5) Install the wire harness.
(6) Install the heater core into the heater housing.
(7) Install the heater housing cover onto the
heater housing.
(8) Install the 12 screws that secure the two hous-
ing halves together. Tighten the screws to 2 N´m (17
in. lbs.).
(9) Install the gasket for the evaporator and
heater core tube outlets and the gasket that seals the
ventilation housing to the heater housing.
(10) Install the heater and ventilation housings
(Refer to 24 - HEATING & AIR CONDITIONING/
DISTRIBUTION/HVAC HOUSING - INSTALLA-
TION).
INSTALLATION
WARNING: REVIEW THE WARNINGS AND CAU-
TIONS IN PLUMBING BEFORE PERFORMING THE
FOLLOWING OPERATION. (Refer to 24 - HEATING &
AIR CONDITIONING/PLUMBING - WARNING) (Refer
to 24 - HEATING & AIR CONDITIONING/PLUMBING -
CAUTION)
NOTE: High pressures are produced in the refriger-
ant system when the air conditioning compressor is
operating. Extreme care must be exercised to make
sure that each of the refrigerant system connec-
tions is pressure-tight and leak free.
(1) Position the heater housing to the dash panel.
Be certain that the evaporator condensate drain tube
is positioned correctly.
(2) Install the heater housing retaining screws.
Tighten the screws to 4.5 N´m (40 in. lbs.).
(3) Connect the heater housing wire harness con-
nectors and install the wiring harness to the bracket.
Fig. 9 Heater Housing
1 - SCREW (12)
2 - HEATER HOUSING COVER
3 - EVAPORATOR
4 - EVAPORATOR O-RING SEAL (2)
4 - EVAPORATOR GASKET
6 - VENTILATION HOUSING GASKET
7 - HEATER HOUSING
8 - WIRING HARNESS
9 - BOLT (3)
10 - HEATER CORE
11 - HEATER CORE TUBE ASSEMBLY
12 - HEATER CORE TUBE GASKET
13 - HEATER CORE TUBE O-RING SEAL (2)
24 - 36 DISTRIBUTION - FRONTVA
HVAC HOUSING (Continued)
Page 1165 of 1232
(4) Connect the heater-A/C control cables to the
mode door levers (Refer to 24 - HEATING & AIR
CONDITIONING/CONTROLS/MODE DOOR CABLE
- INSTALLATION).
(5) Reinstall the passenger airbag bracket (Refer
to 8 - ELECTRICAL/RESTRAINTS/PASSENGER
AIRBAG - INSTALLATION).
(6) Reconnect the two bulkhead ground connection
near the instrument cluster area.
(7) Reinstall the defroster, floor distribution and
instrument panel ducts.
(8) Reinstall the instrument panel (Refer to 23 -
BODY/INSTRUMENT PANEL/INSTRUMENT
PANEL ASSEMBLY - INSTALLATION).
(9) Unplug or remove the tape from the opened
refrigerant line fittings.
(10) Lubricate two new rubber o-ring seals with
clean refrigerant oil and install them onto the evap-
orator core fittings.
(11) Connect the refrigerant line terminal block to
the evaporator tubes.
(12) Install the two bolts that secure the refriger-
ant line terminal block to the evaporator. Tighten the
bolts to 5 N´m (45 in. lbs.).
(13) Unplug or remove the tape from the heater
core hoses and tubes.
(14) Connect the heater hoses to the heater core
tubes and install the heater hose clamps.
(15) Install the ventilation housing to the dash
panel.
(16) Install the nuts and washers that secure the
ventilation housing to the dash panel. Tighten the
nuts to 5 N´m (45 in. lbs.).
(17) Connect the wire harness connectors to the
blower motor, blower motor resistor block and the
recirculation door actuator.
(18) Connect the vacuum harness connector to the
recirculation door actuator.
(19) Install the air filter into the ventilation hous-
ing (Refer to 24 - HEATING & AIR CONDITION-
ING/DISTRIBUTION/AIR FILTER -
INSTALLATION).
(20) Install the windshield washer reservoir (Refer
to 8 - ELECTRICAL/WIPERS/WASHERS/WASHER
RESERVOIR - INSTALLATION).
(21) Install the air cleaner housing (Refer to 9 -
ENGINE/AIR INTAKE SYSTEM/AIR CLEANER
HOUSING - INSTALLATION).
(22) Reconnect the battery negative cable.
(23) Refill the engine cooling system (Refer to 7 -
COOLING/ENGINE/COOLANT - STANDARD PRO-
CEDURE).
(24) Evacuate the refrigerant system (Refer to 24 -
HEATING & AIR CONDITIONING/PLUMBING -
STANDARD PROCEDURE - REFRIGERANT SYS-
TEM EVACUATE).(25) Charge the refrigerant system (Refer to 24 -
HEATING & AIR CONDITIONING/PLUMBING -
STANDARD PROCEDURE - REFRIGERANT SYS-
TEM CHARGE).
(26) Start the engine and check for proper opera-
tion of the heating and air conditioning systems.
INSTRUMENT PANEL DUCTS
REMOVAL
(1) Remove the instrument panel (Refer to 23 -
BODY/INSTRUMENT PANEL/INSTRUMENT
PANEL ASSEMBLY - REMOVAL).
(2) Remove the defroster ducts (Refer to 24 -
HEATING & AIR CONDITIONING/DISTRIBUTION/
DEFROSTER DUCTS - REMOVAL).
(3) Remove the floor distribution ducts (Refer to 24
- HEATING & AIR CONDITIONING/DISTRIBU-
TION/FLOOR DISTRIBUTION DUCTS - REMOV-
AL).
(4) If removing the right instrument panel duct,
remove the passenger air bag module and bracket
(Refer to 8 - ELECTRICAL/RESTRAINTS/PASSEN-
GER AIRBAG - REMOVAL).
(5) Remove the screws that secure the left and/or
right instrument panel duct and remove the duct(s)
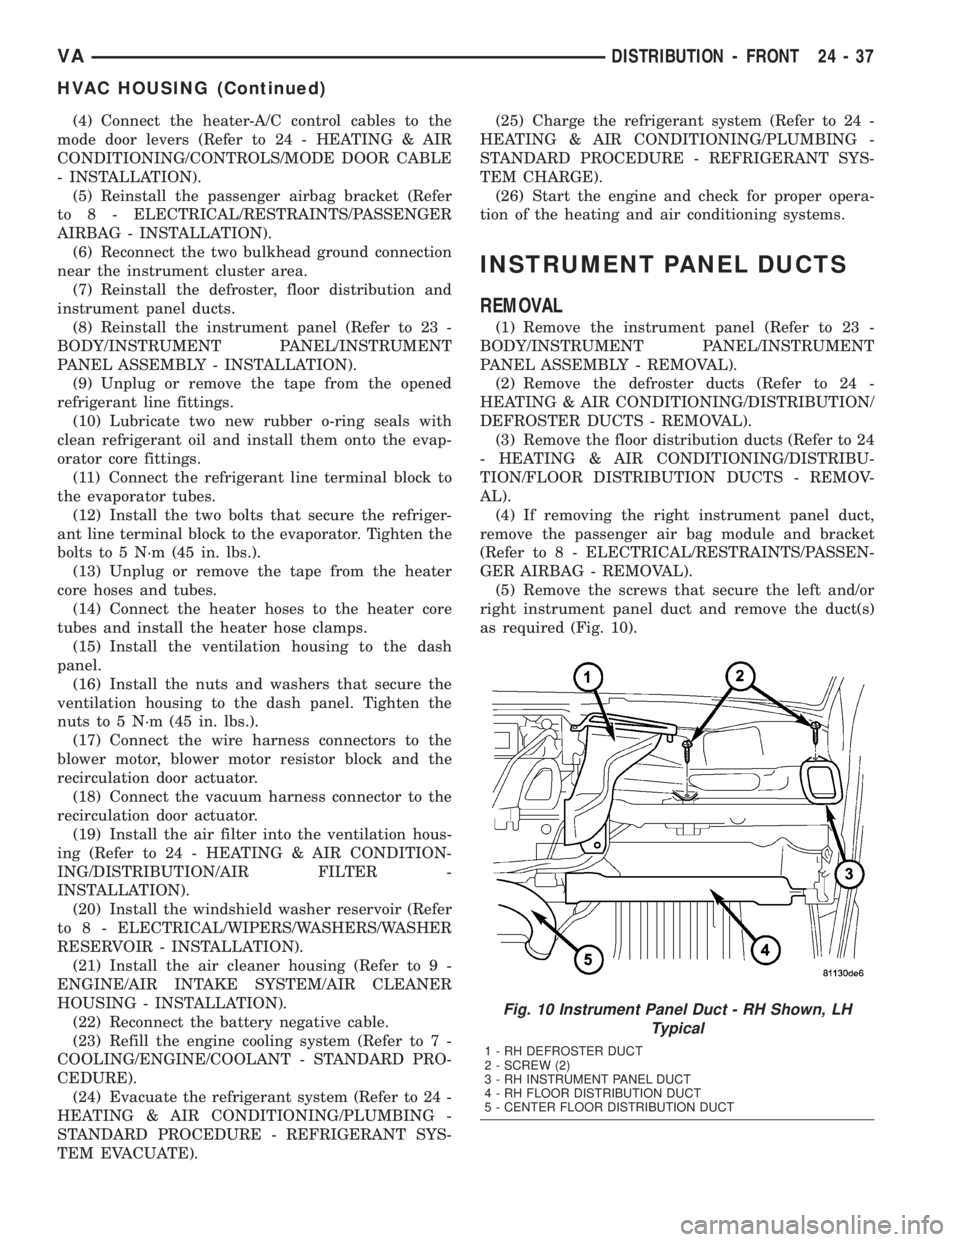
as required (Fig. 10).
Fig. 10 Instrument Panel Duct - RH Shown, LH
Typical
1 - RH DEFROSTER DUCT
2 - SCREW (2)
3 - RH INSTRUMENT PANEL DUCT
4 - RH FLOOR DISTRIBUTION DUCT
5 - CENTER FLOOR DISTRIBUTION DUCT
VADISTRIBUTION - FRONT 24 - 37
HVAC HOUSING (Continued)
Page 1174 of 1232
When it is necessary to open the refrigerant sys-
tem, have everything needed to service the system
ready. The refrigerant system should not be left open
to the atmosphere any longer than necessary. Cap or
plug all lines and fittings as soon as they are opened
to prevent the entrance of dirt and moisture. All lines
and components in parts stock should be capped or
sealed until they are to be installed.
All tools, including the refrigerant recycling equip-
ment, the manifold gauge set, and test hoses should
be kept clean and dry. All tools and equipment must
be designed for R-134a refrigerant.
DIAGNOSIS AND TESTING - REFRIGERANT
SYSTEM LEAKS
WARNING: REVIEW THE WARNINGS AND CAU-
TIONS IN THE FRONT OF THIS SECTION BEFORE
PERFORMING THE FOLLOWING OPERATION.
(Refer to 24 - HEATING & AIR CONDITIONING/
PLUMBING - WARNING) (Refer to 24 - HEATING &
AIR CONDITIONING/PLUMBING - CAUTION)
If the air conditioning system is not cooling prop-
erly, determine if the refrigerant system is fully-
charged. (Refer to 24 - HEATING & AIR
CONDITIONING - DIAGNOSIS AND TESTING -
A/C PERFORMANCE)
An electronic leak detector designed for R-134a
refrigerant is recommended for locating and confirm-
ing refrigerant system leaks. Refer to the operating
instructions supplied by the equipment manufacturer
for proper care and use of this equipment.
An oily residue on or near refrigerant system lines,
connector fittings, components, or component seals
can indicate the general location of a possible refrig-
erant leak. However, the exact leak location should
be confirmed with an electronic leak detector prior to
component repair or replacement.
To detect a leak in the refrigerant system, perform
one of the following procedures:
SYSTEM EMPTY
(1) Evacuate the refrigerant system. (Refer to 24 -
HEATING & AIR CONDITIONING/PLUMBING -
STANDARD PROCEDURE - REFRIGERANT SYS-
TEM EVACUATE)
(2) Connect and dispense 0.283 kilograms (0.625
pounds or 10 ounces) of R-134a refrigerant into the
evacuated refrigerant system. (Refer to 24 - HEAT-
ING & AIR CONDITIONING/PLUMBING - STAN-
DARD PROCEDURE - REFRIGERANT SYSTEM
CHARGE)
(3) Position the vehicle in a wind-free work area.
This will aid in detecting small leaks.(4) With the engine not running, use a electronic
R-134a leak detector and search for leaks. Because
R-134a refrigerant is heavier than air, the leak detec-
tor probe should be moved slowly along the bottom
side of all refrigerant lines, connector fittings and
components.
(5) To inspect the evaporator coil for leaks, insert
the electronic leak detector probe into the center
instrument panel outlet. Set the blower motor switch
to the lowest speed position, the A/C button in the
On position, and select the Recirculation Mode.
SYSTEM LOW
(1) Position the vehicle in a wind-free work area.
This will aid in detecting small leaks.
(2) Bring the refrigerant system up to operating
temperature and pressure. This is done by allowing
the engine to run with the air conditioning system
turned on for five minutes.
(3) With the engine not running, use a electronic
R-134a leak detector and search for leaks. Because
R-134a refrigerant is heavier than air, the leak detec-
tor probe should be moved slowly along the bottom
side of all refrigerant lines, connector fittings and
components.
(4) To inspect the evaporator coil for leaks, insert
the electronic leak detector probe into the center
instrument panel outlet. Set the blower motor switch
to the lowest speed position, the A/C button in the
On position, and select the Recirculation Mode.
STANDARD PROCEDURE
STANDARD PROCEDURE - REFRIGERANT
SYSTEM SERVICE EQUIPMENT
WARNING: EYE PROTECTION MUST BE WORN
WHEN SERVICING AN AIR CONDITIONING REFRIG-
ERANT SYSTEM. TURN OFF (ROTATE CLOCKWISE)
ALL VALVES ON THE EQUIPMENT BEING USED,
BEFORE CONNECTING TO OR DISCONNECTING
FROM THE REFRIGERANT SYSTEM. FAILURE TO
OBSERVE THESE WARNINGS MAY RESULT IN PER-
SONAL INJURY.
WARNING: REVIEW THE WARNINGS AND CAU-
TIONS IN THE FRONT OF THIS SECTION BEFORE
PERFORMING THE FOLLOWING OPERATION.
(Refer to 24 - HEATING & AIR CONDITIONING/
PLUMBING - WARNING) (Refer to 24 - HEATING &
AIR CONDITIONING/PLUMBING - CAUTION)
24 - 46 PLUMBINGVA
PLUMBING (Continued)