Page 568 of 969
(a)
(a)
(b) 2 Retainers
Socket Hexagon
Wrench 5
A86252
(a)
(b)
(d)
(e)
(b)
(b)
(b)
(c)
(d)
(e)
(f)
A86253
(a)
(c) (b)
- ENGINE CONTROL SYSTEMTHROTTLE BODY ASSY (3MZ-FE)
10-1")
100J5-01
A86250
A86251
(a)(a)
(a)
(b) 2 Retainers
Socket Hexagon
Wrench 5
A86252
(a)
(b)
(d)
(e)
(b)
(b)
(b)
(c)
(d)
(e)
(f)
A86253
(a)
(c) (b)
- ENGINE CONTROL SYSTEMTHROTTLE BODY ASSY (3MZ-FE)
10-1 1
2016 Author�: Date�:
2005 LEXUS ES330 REPAIR MANUAL (RM1124U)
REPLACEMENT
1. DISCONNECT ENGINE WIRE NO. 3 (BATTERY NEGATIVE TERMINAL)
2. REMOVE RADIATOR LOWER AIR DEFLECTOR (See page 19-5)
3. DRAIN ENGINE COOLANT (See page 19-5)
4. REMOVE FRONT SUSPENSION UPPER BRACE
CENTER (W/O TEMS)
(a) Remove the 4 nuts, then remove the front suspension up-
per brace center and 4 spacers.
(b) Temporarily tighten the 4 nuts.
5. REMOVE V-BANK COVER SUB-ASSY
(a) Using a socket hexagon wrench 5, remove the 3 nuts.
(b) Unfasten the 2 retainers, then remove the V-bank cover.
6. REMOVE AIR CLEANER CAP SUB-ASSY
(a) Disconnect the mass air flow meter connector.
(b) Disconnect the 4 vacuum hoses.
(c) Disconnect the ventilation hose No. 2.
(d) Disconnect the fuel vapor feed hose from the 2 hose
clamps.
(e) Loosen the 2 air cleaner cap bolts.
(f) Loosen the air cleaner hose clamp bolt, then remove the
air cleaner cap.
(g) Remove the air cleaner filter element.
7. REMOVE THROTTLE BODY ASSY
(a) Disconnect the throttle motor connector.
(b) Disconnect the water by-pass hose No. 2.
(c) Disconnect the water by-pass hose No. 3.
Page 573 of 969

(b)
(b)
(b)
(b)
A86263
Fuel Pipe
Clamp
Pinch
Pinch
Pull Out
A75650
Tube Connector
Pipe O-ring Nylon Tube
Quick Connector
A86264
(b) 10-16
- ENGINE CONTROL SYSTEMKNOCK SENSOR (3MZ-")
100J7-02
A86262
(a)
(b)
(b)
(b)
(b)
A86263
Fuel Pipe
Clamp
Pinch
Pinch
Pull Out
A75650
Tube Connector
Pipe O-ring Nylon Tube
Quick Connector
A86264
(b) 10-16
- ENGINE CONTROL SYSTEMKNOCK SENSOR (3MZ-FE)
2021 Author�: Date�:
2005 LEXUS ES330 REPAIR MANUAL (RM1124U)
REPLACEMENT
1. DISCHARGE FUEL SYSTEM PRESSURE (See page 11-1)
2. DISCONNECT ENGINE WIRE NO. 3 (BATTERY NEGATIVE TERMINAL)
3. DRAIN ENGINE COOLANT (See page 16-9)
4. REMOVE FRONT SUSPENSION UPPER BRACE CENTER (W/O TEMS) (See page 10-1 1)
5. REMOVE V-BANK COVER SUB-ASSY (See page 10-1 1)
6. REMOVE AIR CLEANER CAP SUB-ASSY (See page 10-1 1)
7. REMOVE EMISSION CONTROL VALVE SET (See page 11-13)
8. REMOVE INTAKE AIR SURGE TANK (See page 11-13)
9. REMOVE ENGINE MOVING CONTROL ROD
(a) Remove the pipe from the clamp.
(b) Remove the 4 bolts, then remove the engine moving con-
trol rod and radio setting condenser.
10. REMOVE INTAKE MANIFOLD
(a) Disconnect the fuel pipe No. 1.
(1) Remove the fuel pipe clamp.
(2) Pinch the tube connector, then pull out the fuel pipe
No. 1.
NOTICE:
�Check around the quick connector for dirt or mud be-
fore this operation. Remove the dirt if necessary.
�Be careful of mud because the quick connector has
an O-ring which seals the pipe and quick connector
that can be contaminated.
�Do not use any tools in this operation.
�Do not bend or twist the nylon tube. Protect the quick
connector by covering it with a vinyl or plastic bag.
�When the pipe and quick connector are stuck, push
and pull the quick connector to release and pull the
quick connector out carefully.
(b) Disconnect the heater inlet water hose.
Page 581 of 969

11-1
2029 Author�: Date�:
2005 LEXUS ES330 REPAIR MANUAL (RM1124U)
FUEL SYSTEM (3MZ-FE)
PRECAUTION
1. PRECAUTION
(a) Before working o")
110XR-01
A62391
Circuit Opening Relay
- FUELFUEL SYSTEM (3MZ-FE)
11-1
2029 Author�: Date�:
2005 LEXUS ES330 REPAIR MANUAL (RM1124U)
FUEL SYSTEM (3MZ-FE)
PRECAUTION
1. PRECAUTION
(a) Before working on the fuel system, disconnect the engine wire No. 3 (battery negative terminal) from
battery.
(b) Do not smoke or work near open flame when working on the fuel system.
(c) Keep gasoline away from the rubber or leather parts.
2. DISCHARGE FUEL SYSTEM PRESSURE
CAUTION:
�Do not disconnect any parts of the fuel system pres-
sure until you have discharging the fuel system pres-
sure.
�Even after discharge the fuel pressure, place a shop
rag over fittings as you separate them in order to re-
duce risk of fuel spray on yourself or in the engine
compartment.
(a) Disconnect the engine wire No. 3 (battery negative termi-
nal).
(b) Remove the circuit opening relay from the engine room
relay block.
(c) Connect the engine wire No. 3 (battery negative terminal).
Torque: 5.4 NVm (55 kgfVcm, 48 in.Vlbf)
(d) Start the engine. After the engine has stopped on its own,
turn the ignition switch OFF.
HINT:
There is a case that DTC P0171 (system to lean) is output.
(e) Check that the engine does not start.
(f) Remove the fuel tank cap, then let the air out of the fuel
tank.
(g) Disconnect battery negative terminal.
(h) Reinstall the circuit opening relay.
3. FUEL SYSTEM
(a) When disconnecting the high fuel pressure line, a large
amount of gasoline will spill out. So observe these proce-
dures.
(1) Work in order to prevent gasoline from spilling out.
(2) Disconnect the fuel pump tube (see page 11-20).
(3) Drain the fuel remaining inside the fuel pump tube.
Page 593 of 969
(a)
(a)
A86300(c)
(e)
(e)(f)
(d)
(g)
(g)
A86297
(b)
(a)
(c)
(d)
A79706
(e)
- FUELFUEL INJECTOR ASSY (3MZ-FE)
11-13
2041 Author�: Date�:
2005 LEXUS ES330 REPAIR MANUAL (RM1124U)
RE")
110XV-01
A79751
(b)(a)
(a)
A86300(c)
(e)
(e)(f)
(d)
(g)
(g)
A86297
(b)
(a)
(c)
(d)
A79706
(e)
- FUELFUEL INJECTOR ASSY (3MZ-FE)
11-13
2041 Author�: Date�:
2005 LEXUS ES330 REPAIR MANUAL (RM1124U)
REPLACEMENT
1. DISCHARGE FUEL SYSTEM PRESSURE (See page 11-1)
2. DISCONNECT ENGINE WIRE NO. 3 (BATTERY NEGATIVE TERMINAL)
3. DRAIN ENGINE COOLANT (See page 16-9)
4. REMOVE FRONT SUSPENSION UPPER BRACE CENTER (W/O TEMS) (See page 10-1 1)
5. REMOVE V-BANK COVER SUB-ASSY (See page 10-1 1)
6. REMOVE AIR CLEANER CAP SUB-ASSY (See page 10-1 1)
7. REMOVE EMISSION CONTROL VALVE SET
(a) Disconnect the 2 VSV connectors.
(b) Remove the wire harness clamp.
(c) Disconnect the fuel vapor feed hose No. 1.
(d) Disconnect the fuel vapor feed hose No. 2.
(e) Disconnect the 2 vacuum hoses.
(f) Remove the clamp.
(g) Remove the 2 nuts, then remove the emission control
valve set.
8. REMOVE INTAKE AIR SURGE TANK
(a) Disconnect the throttle motor connector.
(b) Disconnect the water by-pass hose No. 3.
(c) Disconnect the water by-pass hose No. 2.
(d) Disconnect the union to check valve hose.
(e) Disconnect the ventilation hose.
Page 608 of 969
110XZ-01
A86274
(a)
(b)
(a)
(a)
(a)
(b)
A79472
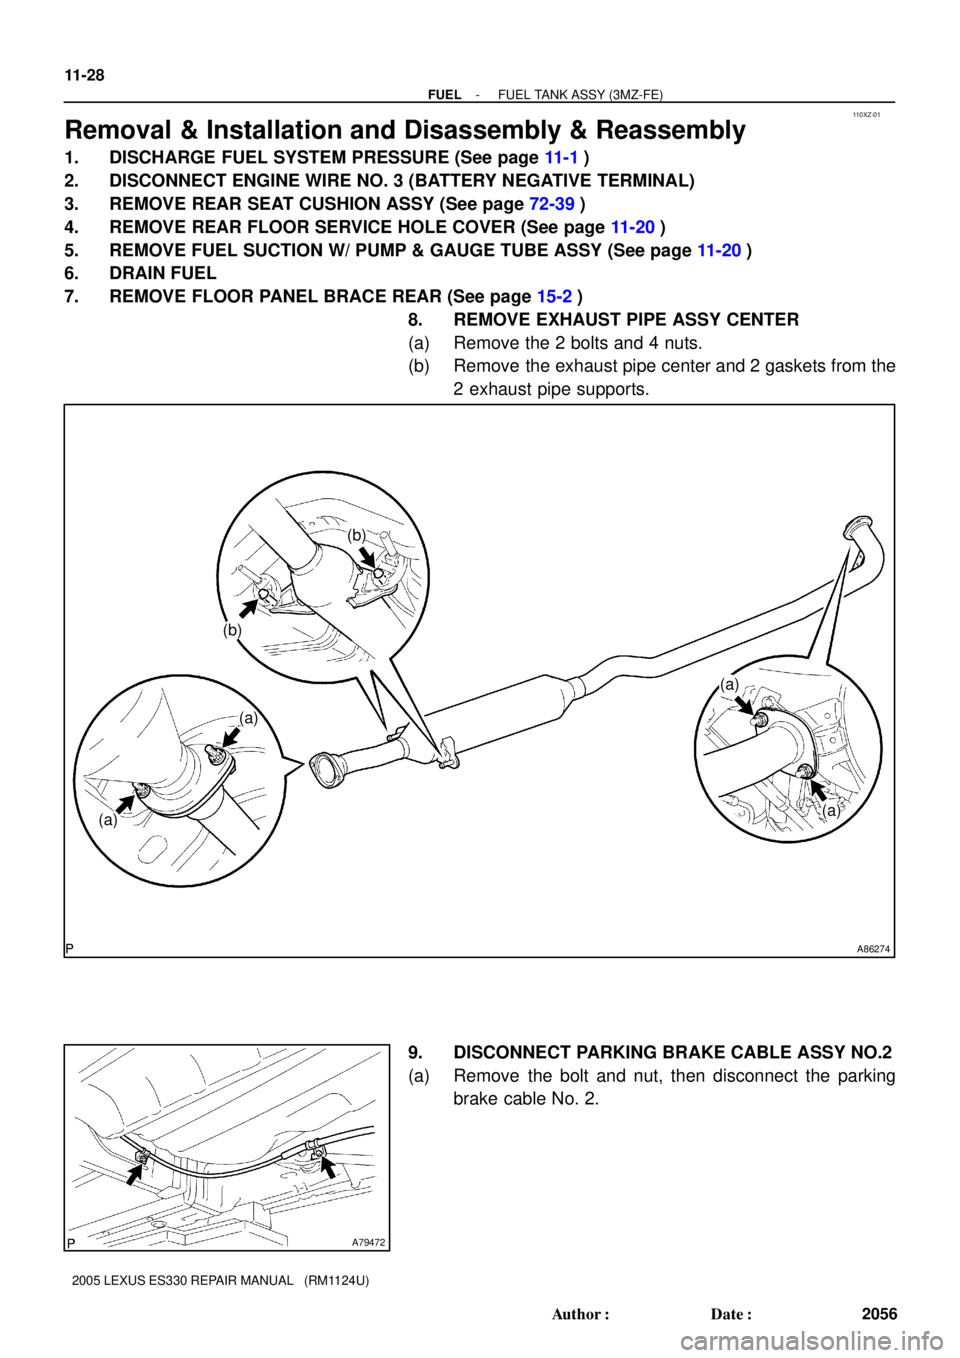
11-28
- FUELFUEL TANK ASSY (3MZ-FE)
2056 Author�: Date�:
2005 LEXUS ES330 REPAIR MANUAL (RM1124U)
Removal & Installation and Disassembly & Reassembly
1. DISCHARGE FUEL SYSTEM PRESSURE (See page 11-1)
2. DISCONNECT ENGINE WIRE NO. 3 (BATTERY NEGATIVE TERMINAL)
3. REMOVE REAR SEAT CUSHION ASSY (See page 72-39)
4. REMOVE REAR FLOOR SERVICE HOLE COVER (See page 11-20)
5. REMOVE FUEL SUCTION W/ PUMP & GAUGE TUBE ASSY (See page 11-20)
6. DRAIN FUEL
7. REMOVE FLOOR PANEL BRACE REAR (See page 15-2)
8. REMOVE EXHAUST PIPE ASSY CENTER
(a) Remove the 2 bolts and 4 nuts.
(b) Remove the exhaust pipe center and 2 gaskets from the
2 exhaust pipe supports.
9. DISCONNECT PARKING BRAKE CABLE ASSY NO.2
(a) Remove the bolt and nut, then disconnect the parking
brake cable No. 2.
Page 621 of 969

2069 Author�: Date�:
2005 LEXUS ES330 REPAIR MANUAL (RM1124U)
(8) Remove the vinyl or plastic bag from the fuel")
A86352
Air
A86344
VoltmeterE10 12-8
- EMISSION CONTROLEMISSION CONTROL SYSTEM (3MZ-FE)
2069 Author�: Date�:
2005 LEXUS ES330 REPAIR MANUAL (RM1124U)
(8) Remove the vinyl or plastic bag from the fuel tank
to filler pipe port, then check that the pressure
drops.
If the pressure does not drop, replace the fuel tank.
(9) Drain fuel from the fuel tank.
(10) Reinstall the fuel tank vent hose to the fuel tank (see
page 11-28).
(11) Reinstall the fuel tank (see page 11-28).
7. CHECK AIR INLET LINE
(a) Disconnect the fuel tank vent hose (see page 12-18).
(b) Check that there is ventilation in fuel tank vent hose.
If necessary, replace the charcoal canister filter.
(c) Reconnect the fuel tank vent hose (see page 12-18).
8. INSPECT VAPOR PRESSURE SENSOR
(a) Inspect the voltage (power source).
(1) Turn the ignition switch ON.
(2) Using a voltmeter, measure the voltage between
the terminals of the ECM.
Voltage:
Tester ConnectionSpecified Condition
VC (E10-18) - E2 (E10-28)4.5 to 5.5 V
CAUTION:
Connect the test leads from the back side of the ECM con-
nector to the terminals.
(3) Turn the ignition switch OFF.
Page 629 of 969

(b)
(b)(c)
A86393
A A
PushPinch
Pinch
A86360
(e)
(e)
(f) 12-16
- EMISSION CONTROLCHARCOAL CANISTER ASSY (3MZ-FE)
2077 Author�: Date�:
2005 LEXUS ES330 REPAIR MANUAL (RM1124U)
CHA")
120BT-01
A86270
(a)
(b)
(b)(c)
A86393
A A
PushPinch
Pinch
A86360
(e)
(e)
(f) 12-16
- EMISSION CONTROLCHARCOAL CANISTER ASSY (3MZ-FE)
2077 Author�: Date�:
2005 LEXUS ES330 REPAIR MANUAL (RM1124U)
CHARCOAL CANISTER ASSY (3MZ-FE)
REPLACEMENT
1. DISCHARGE FUEL SYSTEM PRESSURE (See page 11-1)
2. DISCONNECT ENGINE WIRE NO. 3 (BATTERY NEGATIVE TERMINAL)
3. REMOVE REAR SEAT CUSHION ASSY (See page 72-39)
4. REMOVE REAR FLOOR SERVICE HOLE COVER (See page 11-20)
5. REMOVE FUEL SUCTION W/ PUMP & GAUGE TUBE ASSY (See page 11-20)
6. DRAIN FUEL
7. REMOVE FLOOR PANEL BRACE REAR (See page 15-2)
8. REMOVE EXHAUST PIPE ASSY CENTER (See page 11-28)
9. DISCONNECT PARKING BRAKE CABLE ASSY NO.2 (See page 11-28)
10. DISCONNECT PARKING BRAKE CABLE ASSY NO.3 (See page 11-28)
11. REMOVE FUEL TANK PROTECTOR LOWER CENTER (See page 11-28)
12. REMOVE FUEL TANK ASSY (See page 11-28)
13. REMOVE CHARCOAL CANISTER ASSY
(a) Disconnect the VSV connector.
(b) Remove the 2 wire harness clamps.
(c) Disconnect the fuel hose No. 1.
(d) Disconnect the fuel tank vent hose.
(1) Deeply push the quick connector to release the lock
pin.
(2) Pinch portion A.
(3) Pull out the fuel tank vent hose.
(e) Remove the 2 bolts.
(f) Unfasten the claw, then remove the charcoal canister.
Page 658 of 969

16-9
2287 Author�: Date�:
2005 LEXUS ES330 REPAIR MANUAL (RM1124U)
ENGINE COOLAN")
160QF-01
A86582
Drain Cock Plug
Radiator Drain Plug
Drain Cock Plug
Water Outlet Cap
- COOLINGENGINE COOLANT (3MZ-FE)
16-9
2287 Author�: Date�:
2005 LEXUS ES330 REPAIR MANUAL (RM1124U)
ENGINE COOLANT (3MZ-FE)
REPLACEMENT
1. DRAIN ENGINE COOLANT
(a) Remove the water outlet cap from the water outlet.
CAUTION:
To avoid the danger of being burned, do not remove the wa-
ter outlet cap while the engine and radiator are still hot.
Thermal expansion will cause hot engine coolant and
steam to blow out from the radiator.
(b) Loosen the radiator drain plug and 2 drain cock plugs,
then drain the coolant.
(c) Close the radiator drain plug.
(d) Tighten the 2 drain cock plugs.
Torque: 13 NVm (130 kgfVcm, 9 ftVlbf)
2. ADD ENGINE COOLANT
(a) Slowly fill the cooling system with coolant.
Capacity: 9.2 liters (9.7 US qts, 8.1 lmp. qts)
HINT:
�Use of improper coolants may damage the engine cooling system.
�Use ºToyota Super Long Life Coolantº or similar high quality ethylene glycol based non-silicate, non-
amine, non-nitrite, and non-borate coolant with long-life hybrid organic acid technology.
�New Toyota vehicles are filled with Toyota Super Long Life Coolant (color is pink, premixed ethylene-
glycol concentration is approximately 50% and freezing temperature is -35�C (-31�F)). When replac-
ing the coolant, Toyota Super Long Life Coolant is recommended.
�Observe the coolant level inside the radiator by pressing the inlet and outlet radiator hoses several
times by hand. If the coolant level goes down, add the coolant.
NOTICE:
Do not use plain water alone.
3. CHECK FOR ENGINE COOLANT LEAKS
(a) Fill the radiator with coolant, then attach a radiator cap tester.
(b) Pump it to 118 kPa (1.2
kgf/cm2
17.1 psi), then check for leakage.