Page 662 of 969

16-13
2291 Author�: Date�:
2005 LEXUS ES330 REPAIR MANUAL (RM1124U)
REPLACEMENT
1. DRAIN ENGINE COOLANT (See page 16-9)
2. REMOVE FRONT WHEEL RH
3.")
160QH-01
A78535
- COOLINGWATER PUMP ASSY (3MZ-FE)
16-13
2291 Author�: Date�:
2005 LEXUS ES330 REPAIR MANUAL (RM1124U)
REPLACEMENT
1. DRAIN ENGINE COOLANT (See page 16-9)
2. REMOVE FRONT WHEEL RH
3. REMOVE FRONT FENDER APRON SEAL RH
4. REMOVE V (COOLER COMPRESSOR TO CRANKSHAFT PULLEY) BELT NO.1
(See page 14-5)
5. REMOVE VANE PUMP V BELT (See page 14-5)
6. REMOVE ENGINE MOVING CONTROL ROD (See page 14-79)
7. REMOVE ENGINE MOUNTING STAY NO.2 RH (See page 14-79)
8. REMOVE GENERATOR BRACKET NO.2 (See page 14-79)
9. REMOVE CRANKSHAFT PULLEY (See page 14-79)
SST 09213-54015 (91651-60855), 09330-00021, 09950-50013 (09951-05010, 09952-05010,
09953-05020, 09954-05031)
10. REMOVE TIMING BELT NO.1 COVER
11. REMOVE TIMING BELT NO.2 COVER (See page 14-79)
12. REMOVE ENGINE MOUNTING BRACKET RH (See page 14-79)
13. REMOVE TIMING BELT GUIDE NO.2
14. REMOVE TIMING BELT (See page 14-79)
15. REMOVE TIMING BELT IDLER SUB-ASSY NO.2
16. REMOVE CAMSHAFT TIMING PULLEY (See page 14-93)
SST 09960-10010 (09962-01000, 09963-01000), 09249-63010
17. REMOVE TIMING BELT NO.3 COVER (See page 14-93)
18. REMOVE TIMING BELT IDLER SUB-ASSY NO.1
(a) Using a socket hexagon wrench 10, remove the pivot bolt, timing belt idler No. 1 and plate washer.
19. REMOVE WATER PUMP ASSY
(a) Remove the 3 bolts and 3 nuts, then remove the water
pump and gasket.
20. INSTALL WATER PUMP ASSY
(a) Install a new gasket and the water pump with the 3 bolts and 3 nuts.
Torque: 8.0 NVm (82 kgfVcm,
71 in.Vlbf)
21. INSTALL TIMING BELT IDLER SUB-ASSY NO.1
(a) Using a socket hexagon wrench 10, install the plate washer and timing belt idler No.1 with the pivot
bolt.
Torque: 34 NVm (347 kgfVcm,
25 ftVlbf)
22. INSTALL TIMING BELT NO.3 COVER (See page 14-93)
23. INSTALL CAMSHAFT TIMING PULLEY (See page 14-93)
SST 09960-10010 (09962-01000, 09963-01000), 09249-63010
24. INSTALL TIMING BELT IDLER SUB-ASSY NO.2 (See page 14-93)
25. INSPECT TIMING BELT (See page 14-79)
26. INSTALL TIMING BELT (See page 14-79)
SST 09960-10010 (09962-01000, 09963-01000)
Page 664 of 969
160LM-03
P12487
- COOLINGWATER PUMP ASSY (3MZ-FE)
16-15
2293 Author�: Date�:
2005 LEXUS ES330 REPAIR MANUAL (RM1124U)
INSPECTION
1. INSPECT WATER PUMP ASSY
(a) Visually check the drain hole for coolant leakage.
(b) Turn the pulley, then check that the water pump bearing
moves smoothly without making a niose.
If not, replace the water pump.
Page 665 of 969
160QI-01
A80823
A80824
A80298
Jiggle Valve15�
15� 16-16
- COOLINGTHERMOSTAT (3MZ-FE)
2294 Author�: Date�:
2005 LEXUS ES330 REPAIR MANUAL (RM1124U)
THERMOSTAT (3MZ-FE)
REPLACEMENT
1. DISCONNECT BATTERY NEGATIVE TERMINAL
2. DRAIN ENGINE COOLANT (See page 16-9)
3. REMOVE RADIATOR LOWER AIR DEFLECTOR (See page 19-5)
4. REMOVE AIR CLEANER INLET ASSY (See page 19-5)
5. REMOVE AIR CLEANER ASSY (See page 19-5)
6. REMOVE WATER INLET PIPE
(a) Remove the bolt and water inlet pipe.
(b) Remove the O-ring from the water inlet pipe.
7. REMOVE WATER INLET
(a) Disconnect the wire harness clamp.
(b) Remove the 3 nuts and water inlet.
8. REMOVE THERMOSTAT
9. INSTALL THERMOSTAT
(a) Install a new gasket to the thermostat.
(b) Align the thermostat jiggle valve with the upper stud bolt,
then insert the thermostat in the water inlet housing.
HINT:
The jiggle valve may be set within 15 � of either side of the pre-
scribed position.
10. INSTALL WATER INLET
Torque: 8.0 NVm (82 kgfVcm, 71 in.Vlbf)
Page 669 of 969
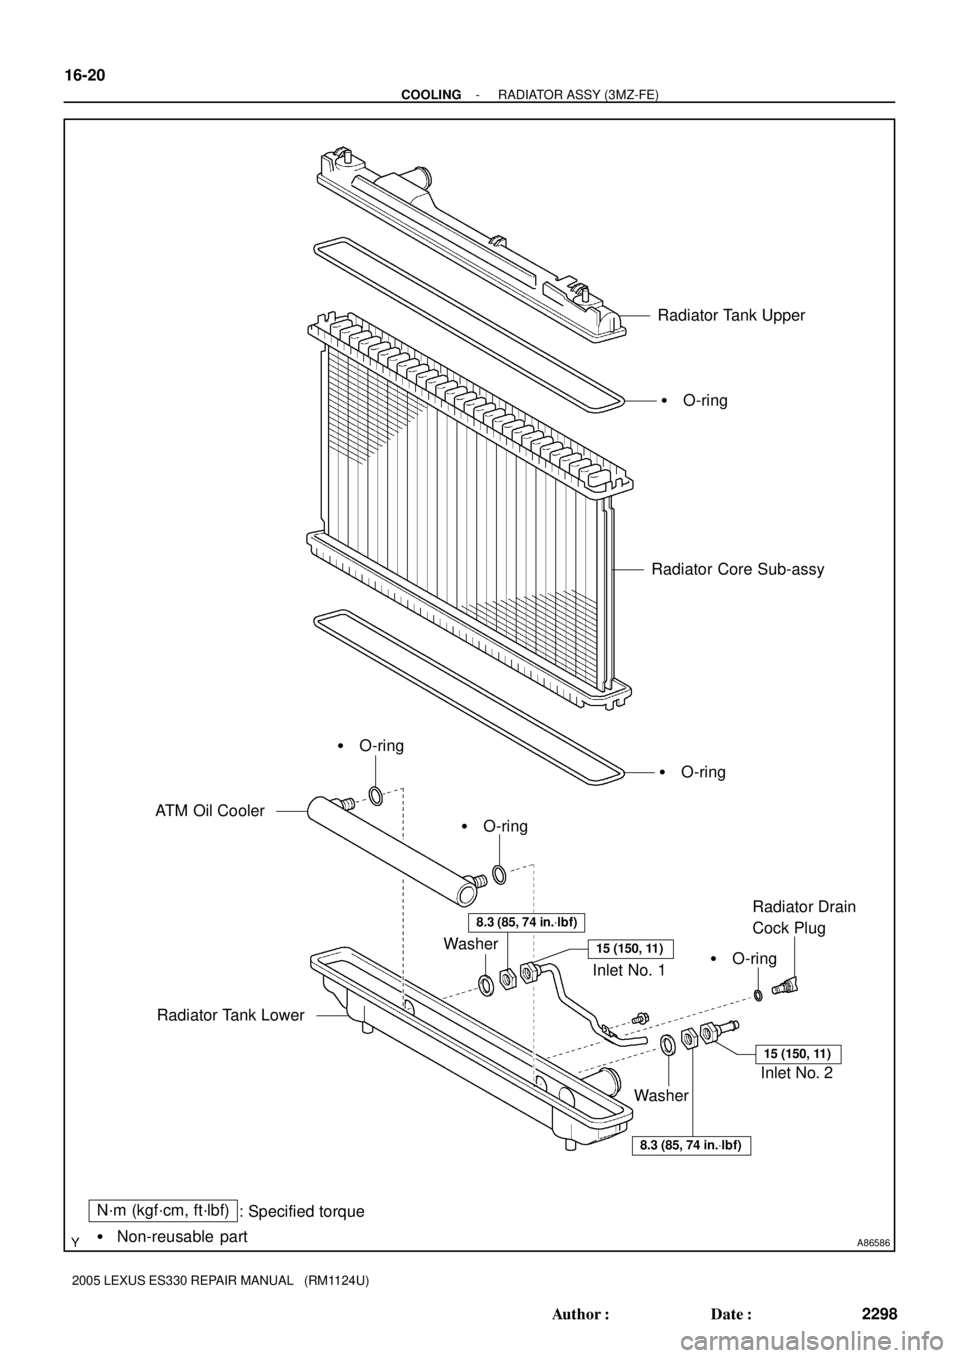
A86586
Radiator Tank Upper
Radiator Tank LowerInlet No. 1
Inlet No. 2 ATM Oil CoolerRadiator Core Sub-assy
Radiator Drain
Cock Plug � O-ring
� O-ring� O-ring
� O-ring
� O-ring
Washer
Washer
8.3 (85, 74 in.Vlbf)
15 (150, 11)
8.3 (85, 74 in.Vlbf)
15 (150, 11)
N´m (kgf´cm, ft´lbf)
: Specified torque
� Non-reusable part 16-20
- COOLINGRADIATOR ASSY (3MZ-FE)
2298 Author�: Date�:
2005 LEXUS ES330 REPAIR MANUAL (RM1124U)
Page 670 of 969

16-21
2299 Author�: Date�:
2005 LEXUS ES330 REPAIR MANUAL (RM1124U)
REPLACEMENT
1. DISCONNECT BATTERY NEGATIVE TERMINAL
2. DRAIN EN")
160QK-01
A61350
Clip
A86560
A86561
- COOLINGRADIATOR ASSY (3MZ-FE)
16-21
2299 Author�: Date�:
2005 LEXUS ES330 REPAIR MANUAL (RM1124U)
REPLACEMENT
1. DISCONNECT BATTERY NEGATIVE TERMINAL
2. DRAIN ENGINE COOLANT (See page 16-9)
3. REMOVE ENGINE UNDER COVER NO.1
4. REMOVE ENGINE UNDER COVER NO.2
5. REMOVE RADIATOR LOWER AIR DEFLECTOR (See page 19-5)
6. REMOVE BATTERY
7. REMOVE BATTERY TRAY
8. REMOVE AIR CLEANER INLET ASSY (See page 19-5)
9. REMOVE AIR CLEANER ASSY (See page 19-5)
10. REMOVE AIR CLEANER BRACKET (See page 19-5)
11. REMOVE AIR CLEANER INLET NO.1 (See page 19-5)
12. DISCONNECT RADIATOR HOSE INLET
13. DISCONNECT RADIATOR HOSE OUTLET
14. DISCONNECT OIL COOLER INLET HOSE
15. DISCONNECT OIL COOLER OUTLET HOSE
16. REMOVE HOOD LOCK RELEASE LEVER
PROTECTOR
(a) Using a screwdriver with the tip wrapped in tape, remove
the protector.
NOTICE:
Removing the protector damages the clips inside the pro-
tector, therefore it is necessary to use a new protector
when installing.
17. SEPARATE HOOD LOCK ASSY
(a) Disconnect the hood switch connector.
(b) Remove the 3 bolts, then separate the hood lock.
18. REMOVE RADIATOR SUPPORT UPPER
(a) Disconnect the horn connectors.
(b) Remove the 5 bolts, then remove the radiator support up-
per.
Page 672 of 969

16-23
2301 Author�: Da")
160QL-01
A87082
Dimension ºBº
Overhaul HandleStopper Bolt SSTPart ºAº
Claw
A86587Stopper Bolt
Core Plate
SST
Radiator Tank
A86588
Ta p
A86589
- COOLINGRADIATOR ASSY (3MZ-FE)
16-23
2301 Author�: Date�:
2005 LEXUS ES330 REPAIR MANUAL (RM1124U)
OVERHAUL
1. REMOVE RADIATOR DRAIN COCK PLUG
(a) Remove the drain cock plug.
(b) Remove the O-ring from the drain cock plug.
2. ASSEMBLE SST
SST 09230-01010 (09231-01010, 09231-01030)
(a) Install the claw to the overhaul handle by inserting it in the
hole in part ºAº as shown in the illustration.
(b) While gripping the handle, adjust the stopper bolt so that
dimension ºBº is as shown in the illustration.
Dimension ºBº: 0.2 to 0.3 mm (0.008 to 0.012 in)
NOTICE:
If the stopper bolt is not adjusted, the claw may be dam-
aged.
3. UNCAULK CORE PLATE
(a) Using SST to release the core plate, grip the handle until
stopped by the stopper bolt.
SST 09230-01010 (09231-01010, 09231-01030)
4. REMOVE RADIATOR TANK UPPER
(a) Lightly tap the bracket of the radiator tank (or radiator tank
pipe) with a soft-faced hammer, then remove the radiator
tank.
(b) Remove the O-ring.
5. REMOVE RADIATOR TANK LOWER
HINT:
Perform the same procedures as the radiator tank upper.
6. REMOVE INLET NO.1
(a) Remove the bolt.
(b) Remove the nut and inlet No. 1.
Page 676 of 969
- COOLINGRADIATOR ASSY (3MZ-FE)
16-27
2305 Author�: Date�:
2005 LEXUS ES330 REPAIR MANUAL (RM1124U)
17. INSTALL RADIATOR DRAIN COCK PLUG
(a) Install a new O-ring to the drain cock plug.
(b) Install the drain cock plug.
Page 683 of 969
A86564
N´m (kgf´cm, ft´lbf)
: Specified torque
� Non-reusable part� Gasket� O-ring
� Oil Pump Seal
20 (199, 14)
20 (199, 14)
20 (199, 14)
8.0 (82, 71 in.Vlbf)
20 (199, 14)
20 (199, 14)
8.0 (82, 71 in.Vlbf)
45 (459, 33)
� Gasket
8.0 (82, 71 in.Vlbf)
7.8 (80, 69 in.Vlbf)
8.0 (82, 71 in.Vlbf)
37 (379, 27)
20 (199, 14)
8.0 (82, 71 in.Vlbf)
8.0 (80, 71 in.Vlbf)
Crankshaft Position Sensor
Oil Pan Sub-assy
Oil Strainer Sub-assy
Oil Pan Drain Plug
Oil Pan Sub-assy No. 2Flywheel Housing
Under Cover
43 (439, 32)
8.0 (82, 71 in.Vlbf)
20 (199, 14)
Oil Pump Assy
- LUBRICATIONOIL PUMP ASSY (3MZ-FE)
17-7
2312 Author�: Date�:
2005 LEXUS ES330 REPAIR MANUAL (RM1124U)