Page 228 of 969

40-29
2544 Author�: Date�:
2005 LEXUS ES330 REPAIR MANUAL (RM1124U)
FRONT DIFFERENTIAL O")
4010X-04
D25831
SST
D25832
SST
D25833
SST
- AUTOMATIC TRANSMISSION / TRANSFRONT DIFFERENTIAL OIL SEAL (U151E)
40-29
2544 Author�: Date�:
2005 LEXUS ES330 REPAIR MANUAL (RM1124U)
FRONT DIFFERENTIAL OIL SEAL (U151E)
REPLACEMENT
1. REMOVE FRONT WHEELS
2. REMOVE ENGINE UNDER COVER NO.1
3. DRAIN AUTOMATIC TRANSAXLE FLUID
(a) Remove the drain plug, gasket and drain ATF.
(b) Install a new gasket and drain plug.
Torque: 49 NVm (500 kgfVcm, 36 ftVlbf)
4. REMOVE FRONT DRIVE SHAFT ASSY RH (SEE PAGE 30-8)
5. REMOVE FRONT DRIVE SHAFT ASSY LH (SEE PAGE 30-8)
6. REMOVE TRANSAXLE HOUSING OIL SEAL
(a) Using SST, pull out the oil seal.
SST 09308-00010
7. REMOVE DIFFERENTIAL SIDE BEARING RETAINER
OIL SEAL
(a) Using SST, pull out the oil seal.
SST 09308-00010
8. INSTALL DIFFERENTIAL SIDE BEARING RETAINER
OIL SEAL
(a) Using SST and a hammer, drive in a new oil seal.
SST 09316-6001 1 (09316-00011)
Oil seal drive in depth:
0 � 0.5 mm (0 � 0.020 in.)
(b) Coat the lip of the oil seal with MP grease.
SST 09316-6001 1 (09316-00011)
Page 266 of 969

BRAKE MASTER CYLINDER SUB-ASSY (Fr")
320DY-06
F40991
Front Brake Tube
Frame No.1
F40992
F40004
- BRAKEBRAKE MASTER CYLINDER SUB-ASSY
32-21
2455 Author�: Date�:
2005 LEXUS ES330 REPAIR MANUAL (RM1124U)
BRAKE MASTER CYLINDER SUB-ASSY (From August,
2002)
OVERHAUL
1. REMOVE AIR CLEANER ASSY
2. DRAIN BRAKE FLUID
NOTICE:
Wash off the brake fluied immediately if it comes into contact with a painted surface.
3. REMOVE BRAKE MASTER CYLINDER SUB-ASSY
(a) Disconnect the level warning switch connector.
(b) Using SST, remove the front brake tube frame No.1.
SST 09023-00101
(c) Using SST, disconnect the 4 brake tubes from the master
cylinder.
SST 09023-00101
(d) Remove the 2 nuts, pull out the 2-way and brake master
cylinder sub-assy.
4. REMOVE BRAKE MASTER CYLINDER RESERVOIR FILLER CAP ASSY
(a) Remove the master cylinder reservoir filler cap assy.
5. REMOVE BRAKE MASTER CYLINDER RESERVOIR STRAINER
(a) Remove the master cylinder reservoir strainer.
6. REMOVE BRAKE MASTER CYLINDER RESERVOIR SUB-ASSY
(a) Remove the screw and pull out the master cylinder reservoir sub-assy.
7. REMOVE MASTER CYLINDER RESERVOIR GROMMET
(a) Remove the 2 master cylinder reservoir grommets.
8. REMOVE BRAKE MASTER CYLINDER KIT (W/O VSC)
(a) Place master cylinder in vise.
(b) Remove the O-ring.
(c) Push in the piston and remove the snap ring with snap
ring pliers.
Page 273 of 969

REPLACEMENT
1. REMOVE AIR CLEANER ASSY
2. DRAIN BRAKE FLUID
NOTICE:
Wash o")
3211X-04
F40995
F40996
BR3753
32-28
- BRAKEBRAKE BOOSTER ASSY
2462 Author�: Date�:
2005 LEXUS ES330 REPAIR MANUAL (RM1124U)
REPLACEMENT
1. REMOVE AIR CLEANER ASSY
2. DRAIN BRAKE FLUID
NOTICE:
Wash off the brake fluid immediately if it comes into contact with a painted surface.
3. REMOVE BRAKE MASTER CYLINDER SUB-ASSY (SEE PAGE 32-21)
SST 09023-00101
4. REMOVE VACUUM HOSE ASSY
(a) Remove the bolt and separate the vacuum hose from the
vacuum hose bracket.
(b) Slide the clip and disconnect the vacuum hose from the
brake booster.
5. REMOVE FRONT DOOR SCUFF PLATE LH (SEE PAGE 71-1 1)
6. REMOVE INSTRUMENT PANEL SUB-ASSY UPPER (SEE PAGE 71-1 1)
7. REMOVE INSTRUMENT PANEL INSERT SUB-ASSY LOWER LH (SEE PAGE 71-1 1)
8. REMOVE BRAKE PEDAL RETURN SPRING
9. REMOVE PUSH ROD PIN
(a) Remove the clip and push rod pin.
10. REMOVE BRAKE MASTER CYLINDER PUSH ROD CLEVIS
(a) Loosen the lock nut and remove the push rod clevis.
11. REMOVE FRONT BRAKE TUBE NO.5
(a) Using SST and remove the front brake tube No.5.
SST 09023-00101
12. REMOVE BRAKE BOOSTER ASSY
(a) Remove the 4 nuts.
(b) Pull out the brake booster assy.
Page 278 of 969

OVERHAUL
HINT:
Overhaul the RH side by the same procedures with LH side.
1. REMOV")
320E6-04
F41534
F41535
F41536
- BRAKEFRONT BRAKE
32-33
2467 Author�: Date�:
2005 LEXUS ES330 REPAIR MANUAL (RM1124U)
OVERHAUL
HINT:
Overhaul the RH side by the same procedures with LH side.
1. REMOVE FRONT WHEEL
2. DRAIN BRAKE FLUID
NOTICE:
Wash the brake fluid off immediately if it comes into contact with any painted surfaces.
3. DISCONNECT FRONT FLEXIBLE HOSE
(a) Remove the union bolt and a gasket from the disc brake cylinder, then disconnect the flexible hose
from the disc brake cylinder.
4. REMOVE DISC BRAKE CYLINDER ASSY LH
(a) Remove the 2 bolts and disc brake cylinder.
5. REMOVE DISC BRAKE PAD KIT FRONT (PAD ONLY)
(a) Remove the 2 brake pads with anti
squeal shims.
6. REMOVE ANTI SQUEAL SHIM KIT FRONT
(a) Remove the 2 anti squeal shims from 2 brake pads.
(b) Using a screwdriver, remove the wear indicator from 2
brake pads.
7. REMOVE FRONT DISC BRAKE PAD SUPPORT PLATE
(a) Remove the upper side front disc brake pad support plate.
8. REMOVE FRONT DISC BRAKE PAD SUPPORT PLATE
(a) Remove the bottom side front disc brake pad support plate.
9. REMOVE FRONT DISC BRAKE CYLINDER SLIDE PIN
(a) Remove the 2 cylinder slide pins from the disc brake cylin-
der mounting.
Page 286 of 969
320E8-04
F41547
F41548
F41550
- BRAKEREAR BRAKE
32-41
2475 Author�: Date�:
2005 LEXUS ES330 REPAIR MANUAL (RM1124U)
OVERHAUL
HINT:
�Overhaul the RH side by the same procedures with LH side.
�Two types of brake pad exist; one is with slit and the other without slit.
1. REMOVE REAR WHEEL
2. DRAIN BRAKE FLUID
NOTICE:
Wash the brake fluid off immediately if it comes into contact with any painted surfaces.
3. DISCONNECT REAR LH FLEXIBLE HOSE
(a) Remove the union bolt and a gasket from the disc brake cylinder, then disconnect the flexible hose
from the disc brake cylinder.
4. REMOVE REAR DISC BRAKE CYLINDER SLIDE PIN
(a) Remove the rear disc brake cylinder slide pin.
5. REMOVE DISC BRAKE CYLINDER ASSY REAR LH
(a) Lift up the disc brake cylinder and remove the disc brake
cylinder.
6. REMOVE REAR DISC BRAKE CYLINDER SLIDE
BUSH
(a) Remove the cylinder slide bush from the disc brake cylin-
der.
Page 293 of 969

2482 Author�: Date�:
2005 LEXUS ES330 REPAIR MANUAL (RM1124")
320E2-04
F40998
C84798
To RL W/C
To FR W/C
To FL W/C
To RR W/C From M/C 2nd
From M/C 1st
F40998
32-48
- BRAKEBRAKE ACTUATOR ASSY (W/O VSC)
2482 Author�: Date�:
2005 LEXUS ES330 REPAIR MANUAL (RM1124U)
REPLACEMENT
1. DRAIN BRAKE FLUID
NOTICE:
Wash off the brake fluid immediately if it comes into contact with a painted surface.
2. REMOVE BRAKE ACTUATOR WITH BRACKET
(a) Using SST, disconnect the 6 brake lines from the actuator.
SST 09023-00101
(b) Use tags or make a memo to identify the place to recon-
nect.
(c) Disconnect the brake actuator connector.
(d) Remove the 3 nuts and brake actuator with bracket.
3. REMOVE BRAKE ACTUATOR ASSY
(a) Remove the 2 nuts and brake actuator from the bracket.
(b) Remove the 2 holders and 3 cushions from the brake actuator.
4. INSTALL BRAKE ACTUATOR ASSY
(a) Install the 3 cushions and 2 holders to the brake actuator.
(b) Install the brake actuator to the bracket with the 2 nuts.
Torque: 5.4 NVm (55 kgfVcm, 48 in.Vlbf)
5. INSTALL BRAKE ACTUATOR WITH BRACKET
(a) Install the brake actuator with the 3 nuts.
Torque: 19 NVm (194 kgfVcm, 14 ftVlbf)
(b) Connect the brake actuator connector.
Page 296 of 969
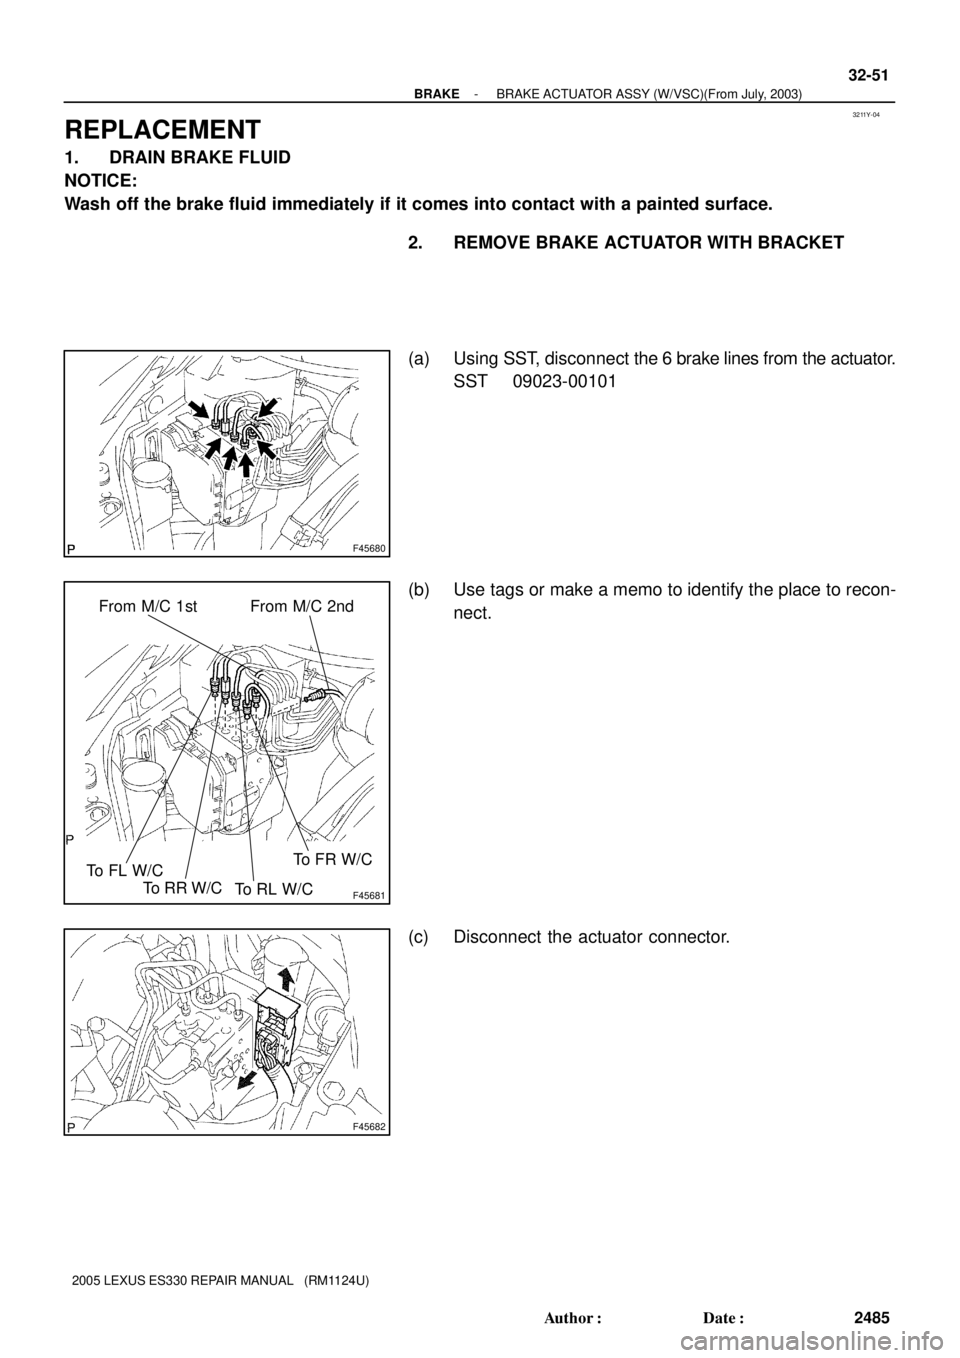
3211Y-04
F45680
F45681
From M/C 1st
To FL W/CFrom M/C 2nd
To RR W/C
To RL W/CTo FR W/C
F45682
- BRAKEBRAKE ACTUATOR ASSY (W/VSC)(From July, 2003)
32-51
2485 Author�: Date�:
2005 LEXUS ES330 REPAIR MANUAL (RM1124U)
REPLACEMENT
1. DRAIN BRAKE FLUID
NOTICE:
Wash off the brake fluid immediately if it comes into contact with a painted surface.
2. REMOVE BRAKE ACTUATOR WITH BRACKET
(a) Using SST, disconnect the 6 brake lines from the actuator.
SST 09023-00101
(b) Use tags or make a memo to identify the place to recon-
nect.
(c) Disconnect the actuator connector.
Page 353 of 969

2411 Author�: Date�:
2005 LEXUS ES330 REPAIR MANUAL (RM1124U)
FRONT DRIVE SHAFT (From")
300M5-01
C91611
SST
F40136
C83022
F40147
30-8
- DRIVE SHAFT / PROPELLER SHAFTFRONT DRIVE SHAFT (From July, 2003)
2411 Author�: Date�:
2005 LEXUS ES330 REPAIR MANUAL (RM1124U)
FRONT DRIVE SHAFT (From July, 2003)
OVERHAUL
HINT:
�COMPONENTS: See page 30-4
�Overhaul the RH side following the same procedures as for the LH side.
1. DRAIN AUTOMATIC TRANSAXLE FLUID
2. REMOVE FRONT WHEEL
3. REMOVE FRONT AXLE HUB LH NUT
(a) Using SST and a hammer, unstake the staked part of the
front axle hub LH nut.
SST 09930-00010
NOTICE:
Loosen the staked part of the lock nut completely, other-
wise the screw of the drive shaft may be damaged.
(b) While applying the brake, remove the front axle hub LH
nut.
4. DISCONNECT FRONT STABILIZER LINK ASSY LH
(a) Remove the nut, and separate the stabilizer link assy LH.
HINT:
If the ball joint turns together with the nut, use a hexagon
wrench (6 mm) to hold the stud.
5. DISCONNECT SPEED SENSOR FRONT LH
(a) Remove the bolt and clip, and separate the sensor wire
and hose from the shock absorber.
NOTICE:
Be careful not to damage the speed sensor.
(b) Remove the bolt, and separate the speed sensor front LH
from the steering knuckle.
NOTICE:
Prevent foreign matter from adhering to the speed sensor.