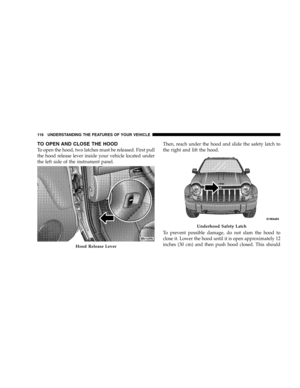
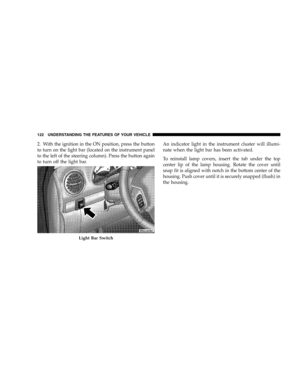
Page 241 of 424

The PART TIME indicator light, located on the instru-
ment cluster, illuminates when the transfer case is shifted
to the 4 PART TIME position.
The FULL TIME indicator light, located on the instru-
ment cluster, illuminates when the transfer case is shifted
to the 4 FULL TIME position.
The 4LO MODE indicator light, located on the instru-
ment cluster, illuminates when the transfer case is shifted
to the 4LO position. There is no light for the 2WD, or N
(Neutral) positions.CAUTION!
•Do not attempt to make a shift while only the
front or rear wheels are spinning. The Selec-Trac
transfer case is not equipped with a synchronizer
and therefore the front and rear driveshaft speeds
must be equal for the shift to take place. Shifting
while only the front or rear wheels are spinning
can cause damage to the transfer case.
•When operating your vehicle in 4LO, the engine
speed is approximately three times that of the
2WD, 4 PART TIME, or 4 FULL TIME positions at
a given road speed. Take care not to overspeed the
engine and do not exceed 25 mph (40 km/h).
STARTING AND OPERATING 241
5
Page 242 of 424

Proper operation of 4-wheel drive vehicles depends on
tires of equal size, type, and circumference on each
wheel. Any difference will adversely affect shifting and
can cause damage to the transfer case.
WARNING!
•Because 4-wheel drive provides improved trac-
tion, there is a tendency to exceed safe turning and
stopping speeds. Do not go faster than road con-
ditions permit.
•You or others could be injured if you leave the
vehicle unattended with the transfer case in the
Neutral (N) position without first fully engaging
the parking brake. The transfer case Neutral (N)
position disengages both the front and rear drive-
shafts from the powertrain and will allow the
vehicle to move regardless of the transmission
position. The parking brake should always be
applied when the driver is not in the vehicle.
Shift Positions
For additional information on the appropriate use of each
transfer case mode position see the information below:
2WD
Rear Wheel Drive High Range - Normal street and
highway driving. Dry hard surfaced roads.
4 PART TIME
Part Time 4–Wheel Drive High Range - Locks the transfer
case inter-axle differential. Forces the front and rear
wheels to rotate at the same speed. Additional traction
for loose, slippery road surfaces only.
4 FULL TIME
Full Time 4-Wheel Drive High Range - Employs an
inter-axle differential. This allows front and rear wheels
to rotate at different speeds, on all road surfaces.
242 STARTING AND OPERATING
Page 243 of 424

N
Neutral - Disengages both the front and rear driveshafts
from the powertrain. To be used for flat towing behind
another vehicle. Refer to “Recreational Towing” in Sec-
tion 5 for more information.
4LO
Part Time 4–Wheel Drive Low Range - Low speed
4–wheel drive. Locks the transfer case inter-axle differ-
ential. Forces the front and rear wheels to rotate at the
same speed. Additional traction and maximum pulling
power for loose, slippery road surfaces only. Do not
exceed 25 mph (40 km/h).
Shifting Procedure
2WDto4PARTTIMEor4PARTTIMEto2WD
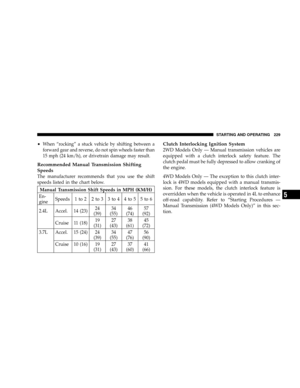
Shifting between 2WD and 4 PART TIME can be made
with the vehicle stopped or in motion. If the vehicle is in
motion, shifts can be made up to 55 mph (88 km/h). With
the vehicle in motion two momentary releases of theaccelerator pedal may be required after shifting. This will
induce a torque interrupt and allow full engagement of
the newly selected position. With the vehicle stationary it
may be necessary to shift the automatic transmission
from D (Drive) to R (Reverse) and back to D (Drive) after
shifting. This will allow full engagement of the newly
selected position. Apply a constant force when shifting
the transfer case lever.
4 PART TIME to 4 FULL TIME or 4 FULL TIME to
4 PART TIME
Shifting between 4 PART TIME and 4 FULL TIME can be
made with the vehicle stopped or in motion. If the vehicle
is in motion shifts can be made up to 55 mph (88 km/h).
With the vehicle in motion two momentary releases of the
accelerator pedal may be required after shifting. This will
induce a torque interrupt and allow full engagement of
the newly selected position. With the vehicle stationary it
may be necessary to shift the automatic transmission
from D (Drive) to R (Reverse) and back to D (Drive) after
STARTING AND OPERATING 243
5
Page 244 of 424

shifting. This will allow full engagement of the newly
selected position. Apply a constant force when shifting
the transfer case lever.
4 FULL TIME to 4 LO or 4 LO to 4 FULL TIME
With the vehicle rolling at 2 to 3 mph (3 to 5 km/h), shift
an automatic transmission to N (Neutral). While the
vehicle is coasting at 2 to 3 mph (3 to 5 km/h), shift the
transfer case lever firmly to the desired position. Do not
pause in transfer case N (Neutral).
NOTE:To shift from 4 FULL TIME to 4LO, the shift
lever should be pushed away from the driver, and then
rearward into 4LO. In 4 FULL TIME, there is a neutral
stop to prevent shifting into N (Neutral) by accident.
NOTE:Pausing in transfer case N (Neutral) in vehicles
equipped with an automatic transmission may require
shutting the engine OFF to avoid gear clash whilecompleting the shift. If difficulty occurs, shift transmis-
sion to N (Neutral), hold foot on brake, and turn engine
OFF. Make shift to desired mode.
NOTE:Shifting into or out of 4LO is possible with the
vehicle completely stopped, however difficulty may oc-
cur due to the mating clutch teeth not being properly
aligned. Several attempts may be required for clutch
teeth alignment and shift completion to occur. The pre-
ferred method is with the vehicle rolling 2 to 3 mph (3 to
5 km/h). Avoid attempting to engage or disengage 4LO
with the vehicle moving faster than 2 to 3 mph (3 to 5
km/h).
244 STARTING AND OPERATING
Page 245 of 424

TRAC-LOK™ REAR AXLE — IF EQUIPPED
The optional Trac-Lok™ rear axle provides a constant
driving force to both rear wheels and reduces wheel spin
caused by the loss of traction at one driving wheel. If
traction differs between the two rear wheels, the differ-
ential automatically proportions the usable torque by
providing more torque to the wheel that has traction.
Trac-Lok™ is especially helpful during slippery driving
conditions. With both rear wheels on a slippery surface, a
slight application of the accelerator will supply maxi-
mum traction. When starting with only one rear wheel on
an excessively slippery surface, slight application of the
parking brake may be necessary to gain maximum trac-
tion.WARNING!
On vehicles equipped with a limited-slip differen-
tial, never run the engine with one rear wheel off the
ground. The vehicle may drive through the rear
wheel remaining on the ground and cause you to
lose control of your vehicle.
PARKING BRAKE
To set the parking brake, pull the lever up as firmly as
possible. When the parking brake is applied with the
ignition ON, the “Brake Warning Light” in the instru-
ment cluster will light.
NOTE:The instrument cluster “Brake Warning Light”
indicates only that the parking brake is applied. You must
be sure the parking brake is fully applied before leaving
the vehicle.
STARTING AND OPERATING 245
5
Page 246 of 424

To release the parking brake, pull up slightly, press the
center button, then lower the lever completely.
Before leaving the vehicle parked on a hill, you must
make sure the parking brake is fully applied and place
the gear selector in the P (Park) position. Make certain the
transfer case is in gear. Failure to do so may cause the
vehicle to roll and cause damage or injury.
When parking on a hill, it is important to set the parking
brake before placing the gear selector in P (Park), other-
wise the load on the transmission locking mechanism
may make it difficult to move the selector out of P (Park).WARNING!
•Leaving children unattended in a vehicle is dan-
gerous for a number of reasons. A child or others
could be injured. Children should be warned not
to touch the parking brake or the gear selector
lever. Don’t leave the keys in the ignition. A child
could operate power windows, other controls, or
move the vehicle.
•Do not leave children or animals inside parked
vehicles in hot weather. Interior heat build up
may cause serious injury or death.
Be sure the parking brake is fully disengaged before
driving. Failure to do so can lead to brake failure.
NOTE:Parking brake adjustment and maintenance
should be performed by your authorized dealer.
246 STARTING AND OPERATING
Page 247 of 424

ANTI-LOCK BRAKE SYSTEM — IF EQUIPPED
The Anti-Lock Brake System is designed to aid the driver
in maintaining vehicle control under adverse braking
conditions. The system operates with a separate com-
puter to modulate hydraulic pressure to prevent wheel
lock-up and help avoid skidding on slippery surfaces.
All vehicle wheels and tires must be the same size and
type and tires must be properly inflated to produce
accurate signals for the computer.
WARNING!
Significant over or under-inflation of tires, or mixing
sizes of tires or wheels on the vehicle can lead to loss
of braking effectiveness.
The Anti-Lock Brake System conducts a low speed self-test
at about 12 mph (20 km/h). If for any reason, your foot is
on the brake when the vehicle reaches 12 mph (20 km/h),
this check will be delayed until 25 mph (40 km/h).
The Anti-Lock Brake System pump motor runs during
the self-test and during an ABS stop to provide the
regulated hydraulic pressure. The motor pump makes a
low humming noise during operation, this is normal.
During off-road use, loss of traction can temporarily
defeat the system and cause the warning light to illumi-
nate. Turn the ignition OFF and ON again to restore
Anti-Lock Brake System function.
STARTING AND OPERATING 247
5
Page 248 of 424
WARNING!
Pumping of the Anti-Lock Brakes will diminish
their effectiveness and may lead to an accident.
Pumping makes the stopping distance longer. Just
press firmly on your brake pedal when you need to
slow down or stop.
WARNING!
•Anti-lock system (ABS) cannot prevent the natu-
ral laws of physics from acting on the vehicle, nor
can it increase braking or steering efficiency be-
yond that afforded by the condition of the vehicle
brakes and tires or the traction afforded.
•The ABS cannot prevent accidents, including
those resulting from excessive speed in turns,
following another vehicle too closely, or hydro-
planing. Only a safe, attentive, and skillful driver
can prevent accidents.
•The capabilities of an ABS equipped vehicle must
never be exploited in a reckless or dangerous
manner which could jeopardize the user’s safety
or the safety of others.
248 STARTING AND OPERATING