Page 1038 of 2870

LU(H4SO)-10
LUBRICATION
Engine Oil
3. Engine Oil
A: INSPECTION
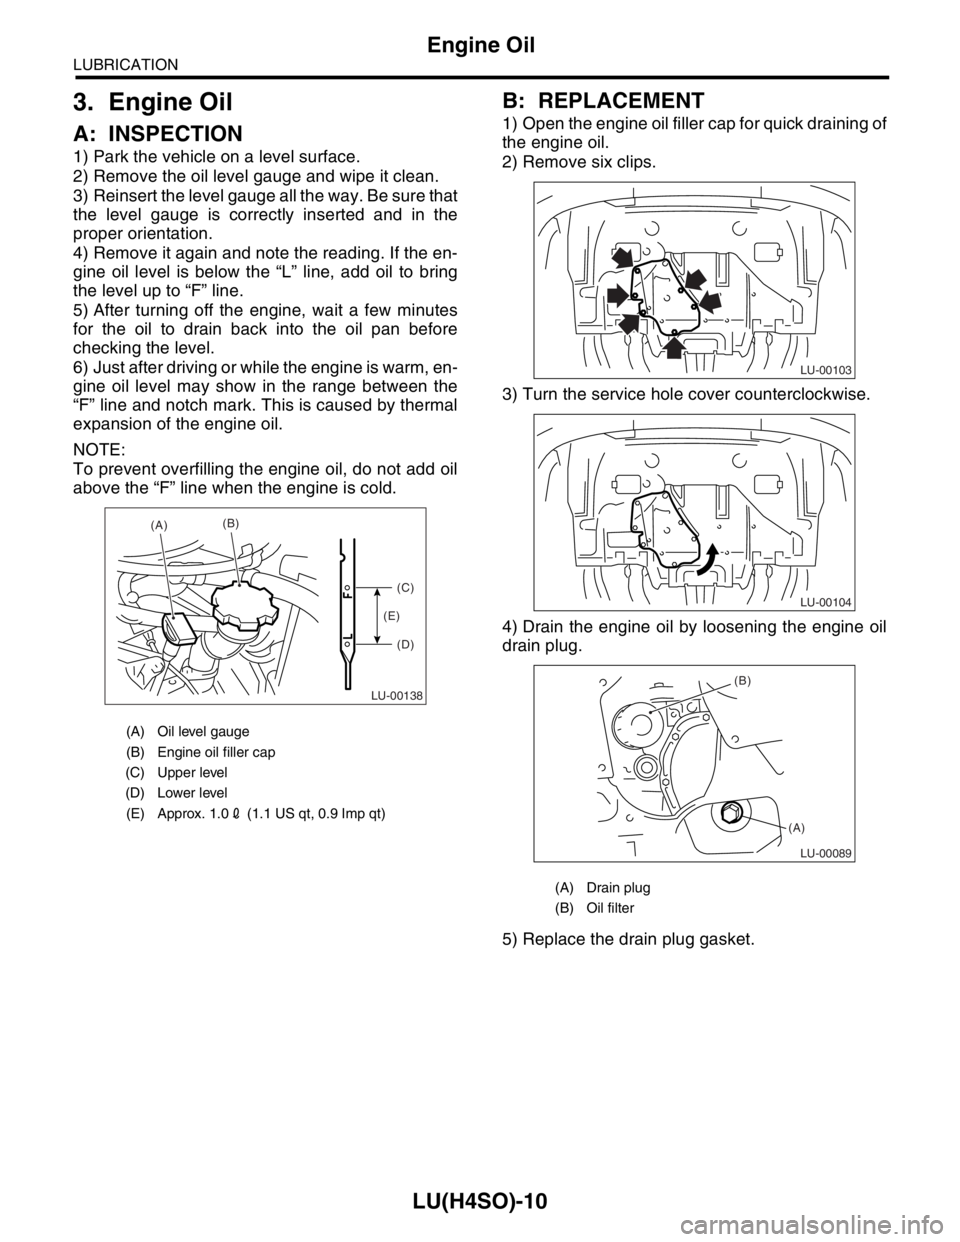
1) Park the vehicle on a level surface.
2) Remove the oil level gauge and wipe it clean.
3) Reinsert the level gauge all the way. Be sure that
the level gauge is correctly inserted and in the
proper orientation.
4) Remove it again and note the reading. If the en-
gine oil level is below the “L” line, add oil to bring
the level up to “F” line.
5) After turning off the engine, wait a few minutes
for the oil to drain back into the oil pan before
checking the level.
6) Just after driving or while the engine is warm, en-
gine oil level may show in the range between the
“F” line and notch mark. This is caused by thermal
expansion of the engine oil.
NOTE:
To prevent overfilling the engine oil, do not add oil
above the “F” line when the engine is cold.
B: REPLACEMENT
1) Open the engine oil filler cap for quick draining of
the engine oil.
2) Remove six clips.
3) Turn the service hole cover counterclockwise.
4) Drain the engine oil by loosening the engine oil
drain plug.
5) Replace the drain plug gasket.
(A) Oil level gauge
(B) Engine oil filler cap
(C) Upper level
(D) Lower level
(E) Approx. 1.02 (1.1 US qt, 0.9 Imp qt)
LU-00138
(A)(B)
(C)
(D) (E)
(A) Drain plug
(B) Oil filter
LU-00103
LU-00104
LU-00089
(B)
(A)
Page 1039 of 2870

LU(H4SO)-11
LUBRICATION
Engine Oil
6) Tighten the engine oil drain plug after draining
engine oil.
Tightening torque:
44 N
⋅m (4.5 kgf-m, 32.5 ft-lb)
7) Install the service hole cover.
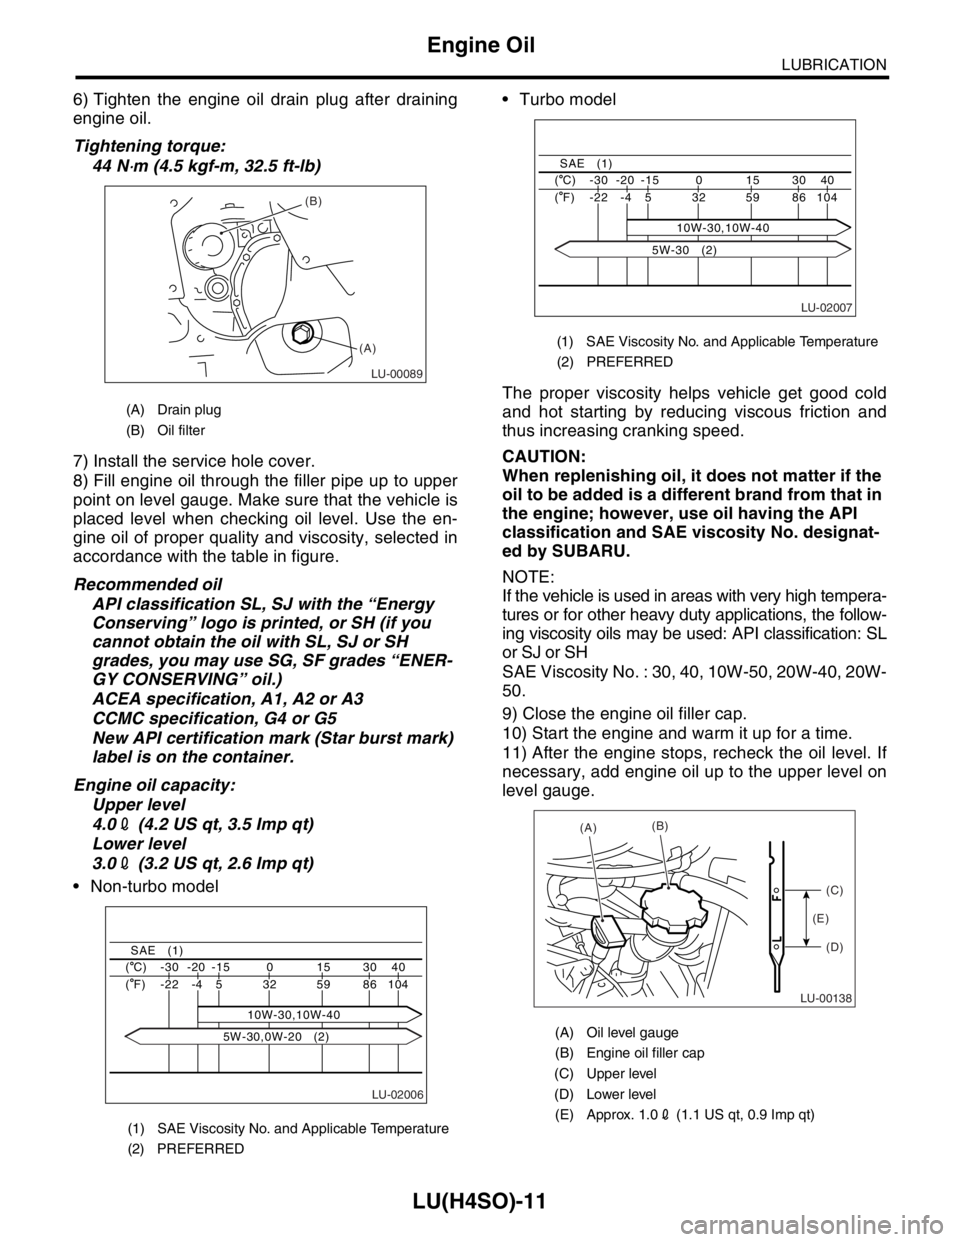
8) Fill engine oil through the filler pipe up to upper
point on level gauge. Make sure that the vehicle is
placed level when checking oil level. Use the en-
gine oil of proper quality and viscosity, selected in
accordance with the table in figure.
Recommended oil
API classification SL, SJ with the “Energy
Conserving” logo is printed, or SH (if you
cannot obtain the oil with SL, SJ or SH
grades, you may use SG, SF grades “ENER-
GY CONSERVING” oil.)
ACEA specification, A1, A2 or A3
CCMC specification, G4 or G5
New API certification mark (Star burst mark)
label is on the container.
Engine oil capacity:
Upper level
4.02 (4.2 US qt, 3.5 Imp qt)
Lower level
3.02 (3.2 US qt, 2.6 Imp qt)
Non-turbo model Turbo model
The proper viscosity helps vehicle get good cold
and hot starting by reducing viscous friction and
thus increasing cranking speed.
CAUTION:
When replenishing oil, it does not matter if the
oil to be added is a different brand from that in
the engine; however, use oil having the API
classification and SAE viscosity No. designat-
ed by SUBARU.
NOTE:
If the vehicle is used in areas with very high tempera-
tures or for other heavy duty applications, the follow-
ing viscosity oils may be used: API classification: SL
or SJ or SH
SAE Viscosity No. : 30, 40, 10W-50, 20W-40, 20W-
50.
9) Close the engine oil filler cap.
10) Start the engine and warm it up for a time.
11) After the engine stops, recheck the oil level. If
necessary, add engine oil up to the upper level on
level gauge.
(A) Drain plug
(B) Oil filter
(1) SAE Viscosity No. and Applicable Temperature
(2) PREFERRED
LU-00089
(B)
(A)
LU-02006
40 30 15 0 -15 -20 -30 ( C)
104 86 59 32
10W-30,10W-40 5 -4 -22 ( F)
SAE (1)
5W-30,0W-20 (2)
(1) SAE Viscosity No. and Applicable Temperature
(2) PREFERRED
(A) Oil level gauge
(B) Engine oil filler cap
(C) Upper level
(D) Lower level
(E) Approx. 1.02 (1.1 US qt, 0.9 Imp qt)
LU-02007
40 30 15 0 -15 -20 -30 ( C)
104 86 59 32 5 -4 -22 ( F)
SAE (1)
10W-30,10W-40
5W-30 (2)
LU-00138
(A)(B)
(C)
(D) (E)
Page 1041 of 2870

LU(H4SO)-13
LUBRICATION
Oil Pump
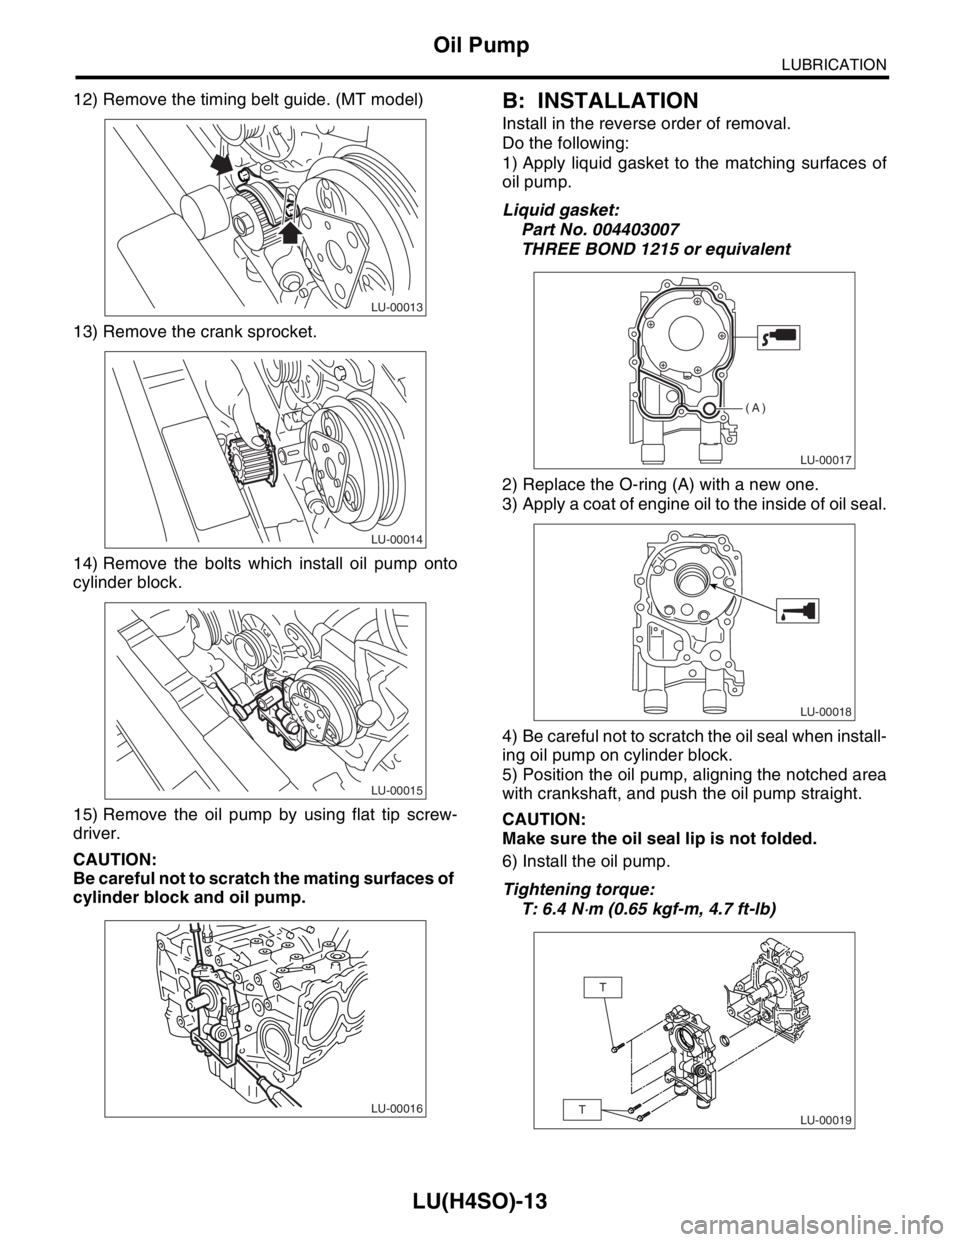
12) Remove the timing belt guide. (MT model)
13) Remove the crank sprocket.
14) Remove the bolts which install oil pump onto
cylinder block.
15) Remove the oil pump by using flat tip screw-
driver.
CAUTION:
Be careful not to scratch the mating surfaces of
cylinder block and oil pump.B: INSTALLATION
Install in the reverse order of removal.
Do the following:
1) Apply liquid gasket to the matching surfaces of
oil pump.
Liquid gasket:
Part No. 004403007
THREE BOND 1215 or equivalent
2) Replace the O-ring (A) with a new one.
3) Apply a coat of engine oil to the inside of oil seal.
4) Be careful not to scratch the oil seal when install-
ing oil pump on cylinder block.
5) Position the oil pump, aligning the notched area
with crankshaft, and push the oil pump straight.
CAUTION:
Make sure the oil seal lip is not folded.
6) Install the oil pump.
Tightening torque:
T: 6.4 N
⋅m (0.65 kgf-m, 4.7 ft-lb)
LU-00013
LU-00014
LU-00015
LU-00016
LU-00017
(A)
LU-00018
LU-00019
T
T
Page 1042 of 2870
LU(H4SO)-14
LUBRICATION
Oil Pump
C: DISASSEMBLY
Remove the screws which secure oil pump cover
and disassemble oil pump. Inscribe alignment
marks on the inner and outer rotors so that they can
be replaced in their original positions during reas-
sembly.
CAUTION:
Before disassembling the oil pump, remove the
relief valve.
D: ASSEMBLY
1) Install the front oil seal by using ST.
ST 499587100 OIL SEAL INSTALLER
NOTE:
Use a new oil seal.
2) Apply a coat of engine oil to the inner and outer
rotors.
3) Install the inner and outer rotors in their original
positions.
4) Install the oil relief valve and relief valve spring
and plug.
NOTE:
Use a new gasket.
5) Install the oil pump cover.
Tightening torque:
T1: 5 N
⋅m (0.5 kgf-m, 3.6 ft-lb)
T2: 44 N
⋅m (4.5 kgf-m, 32.5 ft-lb)
(A) Oil seal
(B) Pump case
(C) Inner rotor
(D) Outer rotor
(E) Pump cover
(F) Relief valve
(G) Relief valve spring
(H) Plug
(I) Gasket
LU-00020
(E)
(D)
(C)
(B)
(A)
(F)
(G)(I)
(H)
LU-00021
ST
LU-00022
T1
T2
Page 1044 of 2870
LU(H4SO)-16
LUBRICATION
Oil Pan and Strainer
5. Oil Pan and Strainer
A: REMOVAL
1) Set the vehicle on lift arms.
2) Remove the front wheels.
3) Disconnect the ground cable from battery.
4) Remove the air intake duct and air cleaner case.
(Non-turbo model)
Case.>
5) Disconnect the connector from mass air flow
sensor. (Turbo model)
6) Remove the air intake boot and air cleaner upper
cover. (Turbo model)
7) Remove the intercooler (Turbo model)
IN(H4DOTC)-10, REMOVAL, Intercooler.>8) Remove the pitching stopper.
9) Remove the radiator upper brackets.
10) Support the engine with a lifting device and
wire ropes.
11) Lift-up the vehicle.
CAUTION:
When lifting up the vehicle, rise up the wire
rope together.
12) Remove the under cover.
FU-00009
LU-00026
LU-00070
ME-00213
LU-00027
LU-00028
Page 1045 of 2870
LU(H4SO)-17
LUBRICATION
Oil Pan and Strainer
13) Drain the engine oil.
Set a container under the vehicle, and remove the
drain plug from oil pan.
14) Remove the front and center exhaust pipes.
(Non-turbo model)
AL, Front Exhaust Pipe.>
15) Remove the nuts which install front cushion
rubber onto front crossmember.
16) Remove the bolts which install oil pan on cylin-
der block while raising up engine.
17) Insert the oil pan cutter blade between the cyl-
inder block to oil pan clearance.
CAUTION:
Do not use a screwdriver or similar tool in place
of oil pan cutter.18) Remove the oil strainer.
19) Remove the baffle plate.
(A) Gasket
(B) Drain plug
LU-00029
(B)(A)
LU-00030
LU-00031
LU-00032
LU-00033
Page 1046 of 2870

LU(H4SO)-18
LUBRICATION
Oil Pan and Strainer
B: INSTALLATION
CAUTION:
Before installing the oil pan, clean sealant from
oil pan and engine block.
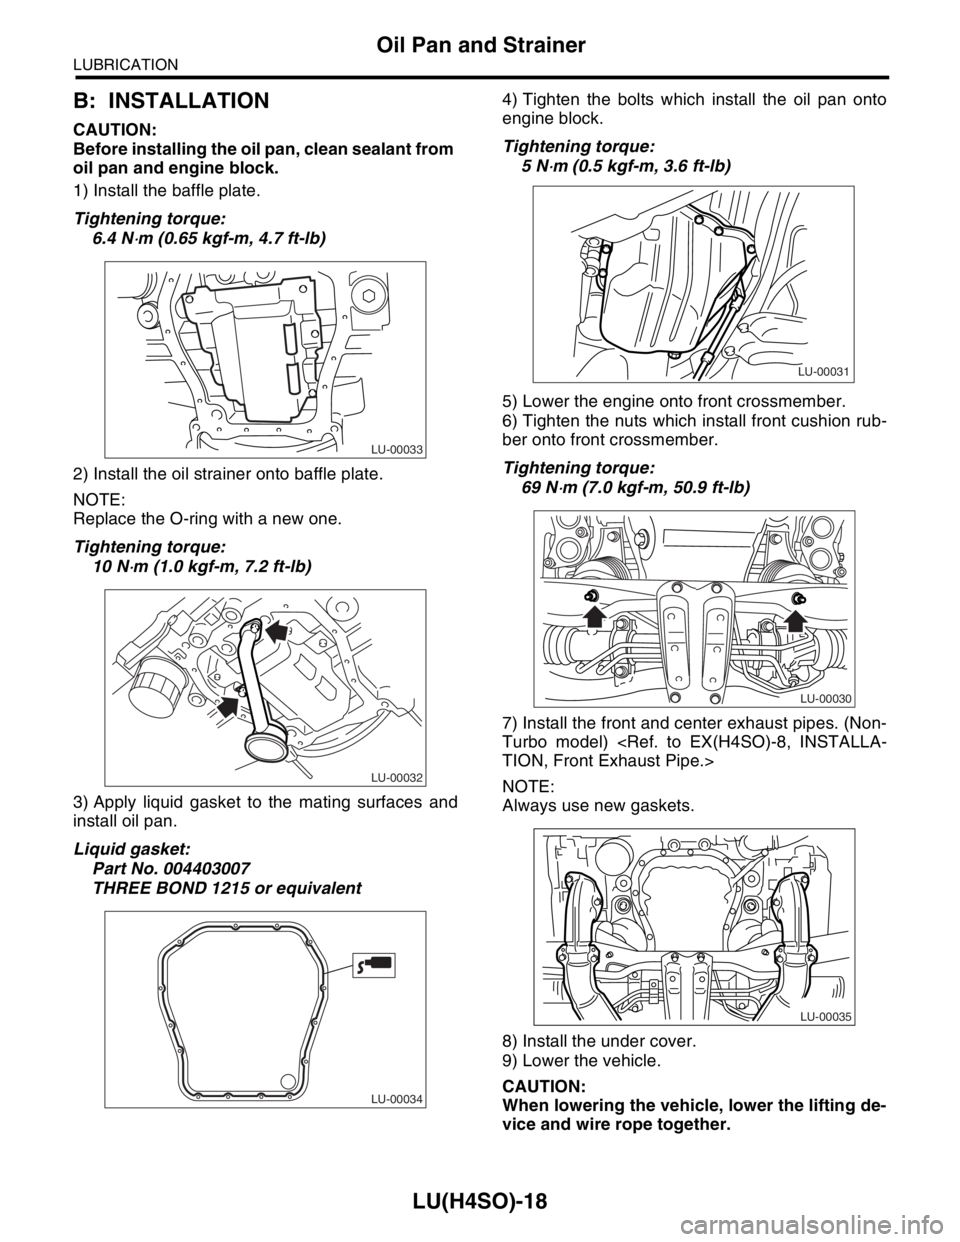
1) Install the baffle plate.
Tightening torque:
6.4 N
⋅m (0.65 kgf-m, 4.7 ft-lb)
2) Install the oil strainer onto baffle plate.
NOTE:
Replace the O-ring with a new one.
Tightening torque:
10 N
⋅m (1.0 kgf-m, 7.2 ft-lb)
3) Apply liquid gasket to the mating surfaces and
install oil pan.
Liquid gasket:
Part No. 004403007
THREE BOND 1215 or equivalent4) Tighten the bolts which install the oil pan onto
engine block.
Tightening torque:
5 N
⋅m (0.5 kgf-m, 3.6 ft-lb)
5) Lower the engine onto front crossmember.
6) Tighten the nuts which install front cushion rub-
ber onto front crossmember.
Tightening torque:
69 N
⋅m (7.0 kgf-m, 50.9 ft-lb)
7) Install the front and center exhaust pipes. (Non-
Turbo model)
TION, Front Exhaust Pipe.>
NOTE:
Always use new gaskets.
8) Install the under cover.
9) Lower the vehicle.
CAUTION:
When lowering the vehicle, lower the lifting de-
vice and wire rope together.
LU-00033
LU-00032
LU-00034
LU-00031
LU-00030
LU-00035
Page 1047 of 2870
LU(H4SO)-19
LUBRICATION
Oil Pan and Strainer
10) Remove the lifting device and steel cables.
11) Install the pitching stopper.
Tightening torque:
T1: 50 N
⋅m (5.1 kgf-m, 36.9 ft-lb)
T2: 58 N
⋅m (5.9 kgf-m, 42.8 ft-lb)
12) Install the radiator upper brackets.
13) Install the air intake duct and air cleaner case.
(Non-turbo model)
LATION, Air Intake Duct.>
INSTALLATION, Air Cleaner Case.>
14) Install the intercooler. (Turbo model)
IN(H4DOTC)-11, INSTALLATION, Intercooler.>15) Install the air intake boot and air cleaner upper
cover. (Turbo model)
16) Connect the connector to mass air flow sensor.
(Turbo model)
17) Install the front wheels.
18) Connect the battery ground cable to battery.
19) Fill engine oil.
TION, Engine Oil.>
C: INSPECTION
By visual check make sure the oil pan, oil strainer,
oil strainer stay and baffle plate are not damaged.
LU-00028
ME-00218T2T1
LU-00027
LU-00070
LU-00026
FU-00009