2004 SUBARU FORESTER wheel
[x] Cancel search: wheelPage 561 of 2870

CC-9
CRUISE CONTROL SYSTEM
Cruise Control Command Switch
5. Cruise Control Command
Switch
A: REMOVAL
WARNING:
Before servicing, be sure to read the notes in
the AB section for proper handling of the driv-
er’s airbag module.
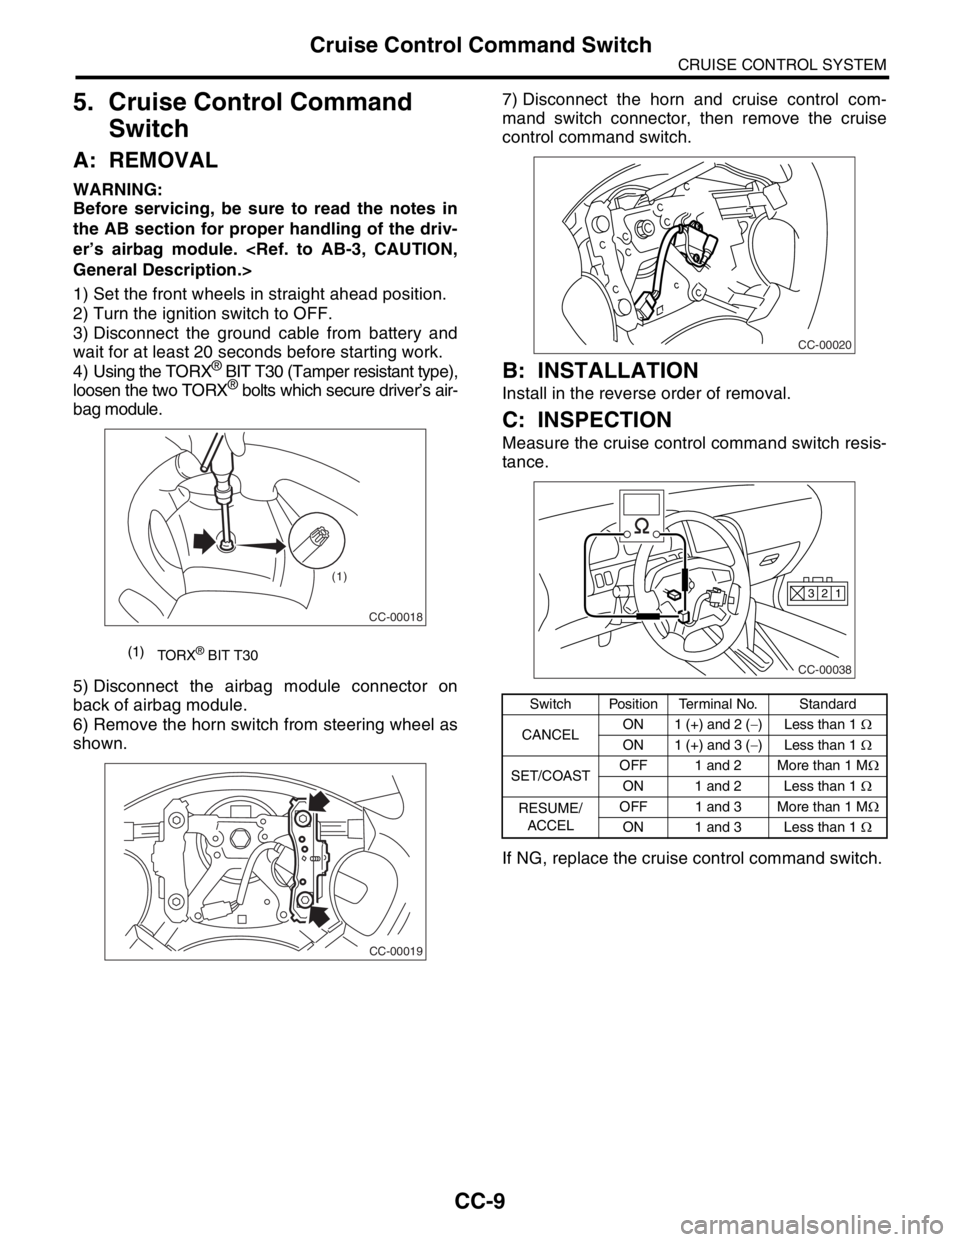
1) Set the front wheels in straight ahead position.
2) Turn the ignition switch to OFF.
3) Disconnect the ground cable from battery and
wait for at least 20 seconds before starting work.
4) Using the TORX
® BIT T30 (Tamper resistant type),
loosen the two TORX® bolts which secure driver’s air-
bag module.
5) Disconnect the airbag module connector on
back of airbag module.
6) Remove the horn switch from steering wheel as
shown.7) Disconnect the horn and cruise control com-
mand switch connector, then remove the cruise
control command switch.
B: INSTALLATION
Install in the reverse order of removal.
C: INSPECTION
Measure the cruise control command switch resis-
tance.
If NG, replace the cruise control command switch.
(1)
TORX® BIT T30
CC-00018
(1)
CC-00019
Switch Position Terminal No. Standard
CANCELON 1 (+) and 2 (−) Less than 1 Ω
ON 1 (+) and 3 (−) Less than 1 Ω
SET/COASTOFF 1 and 2 More than 1 MΩ
ON 1 and 2 Less than 1 Ω
RESUME/
ACCELOFF 1 and 3 More than 1 MΩ
ON 1 and 3 Less than 1 Ω
CC-00020
CC-00038
1 2 3
Page 576 of 2870

CC(H4SO)-8
CRUISE CONTROL SYSTEM (DIAGNOSTIC)
Cruise Control Module I/O Signal
B: WIRING DIAGRAM
Brake switch/Clutch switch
(MT model)16 Leave clutch pedal released (MT model), while cruise control main switch is
turned ON.
Then check that;
Battery voltage is present when brake pedal is released.
“0” volt is present when brake pedal is depressed.
Additionally only in MT model, keep the cruise control main switch to ON and
leave brake pedal released.
Then check that;
Battery voltage is present when clutch pedal is released.
“0” volt is present when clutch pedal is depressed.
Data link connector 17 —
Data link connector 18 —
Vehicle speed sensor (MT
model)
TCM (AT model)19 Lift-up the vehicle until all four wheels are raised off ground, and then rotate any
wheel manually.
Approx. “5” and “0” volt pulse signals are alternately input to cruise control mod-
ule.
Stop light switch 20 Turn ignition switch to OFF.
Then check that;
Battery voltage is present when brake pedal is depressed.
“0” volt is present when brake pedal is released.
NOTE:
Voltage at terminals 5, 7, 13 and 14 cannot be checked unless vehicle is driving by cruise control operation.Content Terminal No. Measuring conditions and I/O signals (ignition switch ON and engine idling)
Page 599 of 2870

CC(H4SO)-31
CRUISE CONTROL SYSTEM (DIAGNOSTIC)
Diagnostic Procedure with Diagnostic Trouble Code (DTC)
Step Check Yes No
1 CHECK TRANSMISSION TYPE.Is the target MT model? Go to step 2.Go to step 6.
2 CHECK HARNESS BETWEEN BATTERY
AND VEHICLE SPEED SENSOR.
1) Turn the ignition switch to OFF.
2) Disconnect the harness connector from
vehicle speed sensor.
3) Turn the ignition switch to ON.
4) Measure the voltage between vehicle
speed sensor harness connector terminal and
chassis ground.
Connector & terminal
(B17) No. 3 (+) — Chassis ground (
−):Is the voltage more than 10 V? Go to step 3.Check the harness
for open or short
between fuse relay
and vehicle speed
sensor.
3 CHECK HARNESS BETWEEN CRUISE CON-
TROL MODULE AND VEHICLE SPEED SEN-
SOR.
1) Turn the ignition switch to OFF.
2) Disconnect the harness connector from
cruise control module.
3) Measure the resistance between vehicle
speed sensor harness connector terminal and
cruise control module harness connector ter-
minal.
Connector & terminal
(B17) No. 1 — (B94) No. 19:Is the resistance less than 10
Ω?Go to step 4.Repair the har-
ness.
4 CHECK HARNESS BETWEEN VEHICLE
SPEED SENSOR AND ENGINE GROUND.
1) Turn the ignition switch to OFF.
2) Measure the resistance between vehicle
speed sensor harness connector terminal and
engine ground.
Connector & terminal
(B17) No. 2 — Engine ground:Is the resistance less than 10
Ω?Go to step 5.Repair the har-
ness.
5 CHECK VEHICLE SPEED SENSOR.
1) Connect the harness connector to vehicle
speed sensor.
2) Lift-up the vehicle and support with rigid
racks.
3) Drive the vehicle at speed greater than 20
km/h (12 MPH).
Warning:
Be careful not to be caught up by the run-
ning wheels.
4) Measure the voltage between cruise control
module harness connector terminal and chas-
sis ground.
Connector & terminal
(B94) No. 19 (+) — Chassis ground (
−):Is the voltage less than 0 V ←
→ more than 5 V?Replace the cruise
control module.
Module.>Replace the vehi-
cle speed sensor.
6 CHECK HARNESS BETWEEN CRUISE CON-
TROL MODULE AND TCM.
1) Turn the ignition switch to OFF.
2) Disconnect the harness connector from
TCM and cruise control module.
3) Measure the resistance between cruise
control module harness connector terminal
and TCM harness connector terminal.
Connector & terminal
(B94) No. 19 — (B56) No. 17:Is the resistance less than 10
Ω?Go to step 7.Repair the har-
ness.
Page 600 of 2870

CC(H4SO)-32
CRUISE CONTROL SYSTEM (DIAGNOSTIC)
Diagnostic Procedure with Diagnostic Trouble Code (DTC)
7 CHECK TCM.
1) Connect the harness connector to TCM.
2) Lift-up the vehicle and support with rigid
racks.
3) Drive the vehicle faster than 10 km/h (6
MPH).
Warning:
Be careful not to be caught by the running
wheels.
4) Measure the voltage between TCM har-
ness connector terminal and chassis ground.
Connector & terminal
(B56) No. 17 (+) — Chassis ground (
−):Is the voltage less than 0 V ←
→ more than 5 V?Replace the cruise
control module.
Module.>Replace the TCM.
trol Module
(TCM).> Step Check Yes No
Page 618 of 2870

CC(H4DOTC 2.5)-6
CRUISE CONTROL SYSTEM (DIAGNOSTIC)
Engine Control Module (ECM) I/O Signal
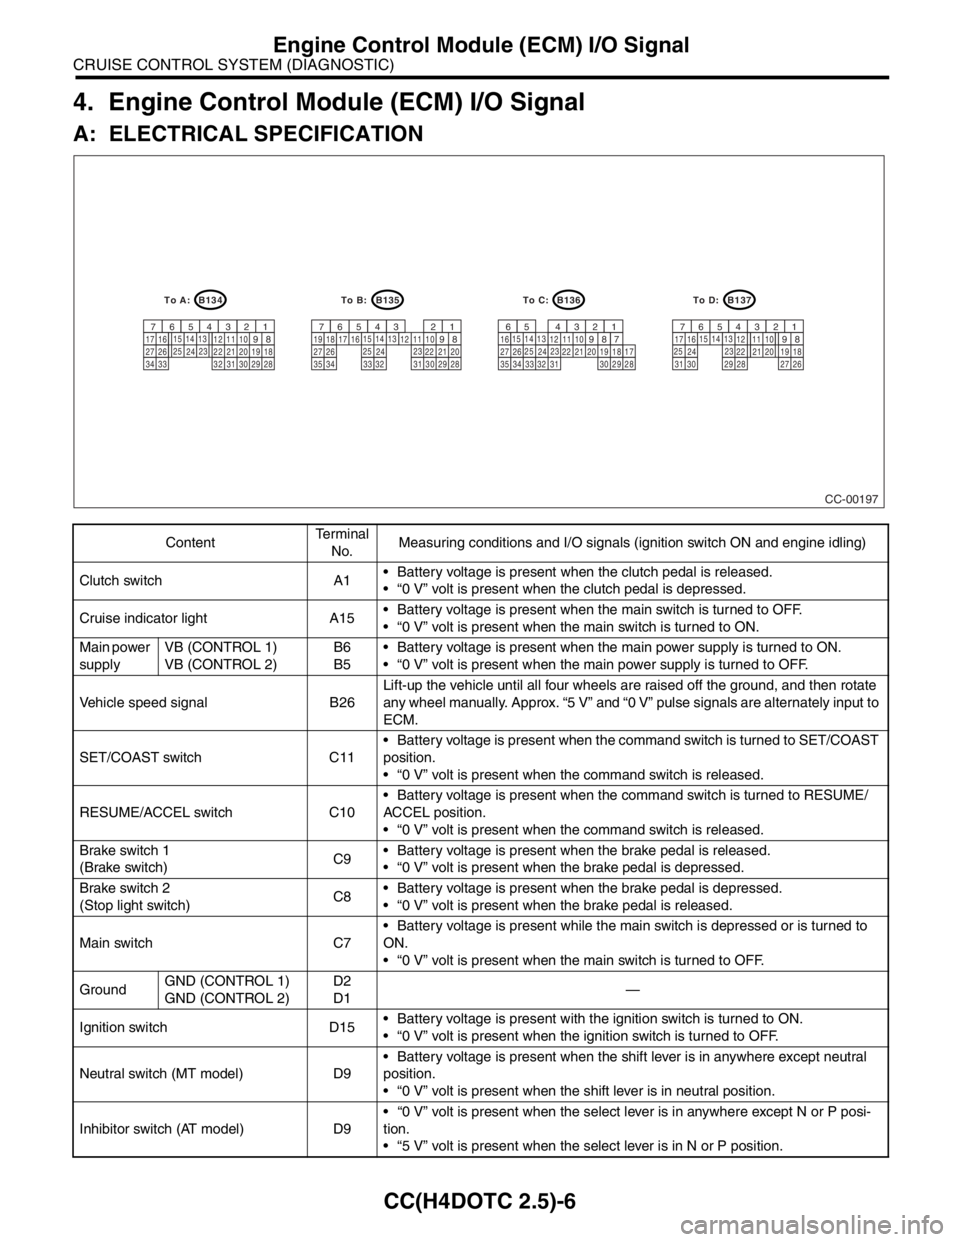
4. Engine Control Module (ECM) I/O Signal
A: ELECTRICAL SPECIFICATION
ContentTe r m i n a l
No.Measuring conditions and I/O signals (ignition switch ON and engine idling)
Clutch switch A1 Battery voltage is present when the clutch pedal is released.
“0 V” volt is present when the clutch pedal is depressed.
Cruise indicator light A15 Battery voltage is present when the main switch is turned to OFF.
“0 V” volt is present when the main switch is turned to ON.
Main power
supplyVB (CONTROL 1)
VB (CONTROL 2)B6
B5 Battery voltage is present when the main power supply is turned to ON.
“0 V” volt is present when the main power supply is turned to OFF.
Vehicle speed signal B26Lift-up the vehicle until all four wheels are raised off the ground, and then rotate
any wheel manually. Approx. “5 V” and “0 V” pulse signals are alternately input to
ECM.
SET/COAST switch C11 Battery voltage is present when the command switch is turned to SET/COAST
position.
“0 V” volt is present when the command switch is released.
RESUME/ACCEL switch C10 Battery voltage is present when the command switch is turned to RESUME/
ACCEL position.
“0 V” volt is present when the command switch is released.
Brake switch 1
(Brake switch)C9 Battery voltage is present when the brake pedal is released.
“0 V” volt is present when the brake pedal is depressed.
Brake switch 2
(Stop light switch)C8 Battery voltage is present when the brake pedal is depressed.
“0 V” volt is present when the brake pedal is released.
Main switch C7 Battery voltage is present while the main switch is depressed or is turned to
ON.
“0 V” volt is present when the main switch is turned to OFF.
GroundGND (CONTROL 1)
GND (CONTROL 2)D2
D1—
Ignition switch D15 Battery voltage is present with the ignition switch is turned to ON.
“0 V” volt is present when the ignition switch is turned to OFF.
Neutral switch (MT model) D9 Battery voltage is present when the shift lever is in anywhere except neutral
position.
“0 V” volt is present when the shift lever is in neutral position.
Inhibitor switch (AT model) D9 “0 V” volt is present when the select lever is in anywhere except N or P posi-
tion.
“5 V” volt is present when the select lever is in N or P position.
CC-00197
B134
9
30 29 28 32 3120 19 18 22 2110 12 1114
24
34 3327 2617 16123456713
23 15
258
B135
9
30 29 28
323120 22 2110 12 1114
24
35
3327 2617 16123456713
23 15
258
B136
9
30 29 28
32 3120 19 18 22 2110 12 1114
24
34 3327 261612345613
23 15
258
B137
9
29 2820 19 18 22
2110 12
1114
2417 16123456713
23 15
2581819
34
7173530 3127 26
To D: To C: To B: To A:
Page 639 of 2870

CC(H4DOTC 2.5)-27
CRUISE CONTROL SYSTEM (DIAGNOSTIC)
Diagnostic Procedure with Diagnostic Trouble Code (DTC)
Step Check Yes No
1 CHECK TRANSMISSION TYPE.Is the target MT model? Go to step 2.Go to step 6.
2 CHECK HARNESS BETWEEN BATTERY
AND VEHICLE SPEED SENSOR.
1) Turn the ignition switch to OFF.
2) Disconnect the harness connector from
vehicle speed sensor.
3) Turn the ignition switch to ON.
4) Measure the voltage between vehicle
speed sensor harness connector terminal and
chassis ground.
Connector & terminal
(B17) No. 3 (+) — Chassis ground (
−):Is the voltage more than 10 V? Go to step 3.Check the harness
for open or short
between fuse and
vehicle speed sen-
sor.
3 CHECK HARNESS BETWEEN ECM AND VE-
HICLE SPEED SENSOR.
1) Turn the ignition switch to OFF.
2) Disconnect the harness connector from
ECM.
3) Measure the resistance between vehicle
speed sensor harness connector terminal and
ECM harness connector terminal.
Connector & terminal
(B17) No. 1 — (B135) No. 26:Is the resistance less than 10
Ω?Go to step 4.Repair the har-
ness.
4 CHECK HARNESS BETWEEN VEHICLE
SPEED SENSOR AND ENGINE GROUND.
1) Turn the ignition switch to OFF.
2) Measure the resistance between vehicle
speed sensor harness connector terminal and
engine ground.
Connector & terminal
(B17) No. 2 — Engine ground:Is the resistance less than 10
Ω?Go to step 5.Repair the har-
ness.
5 CHECK VEHICLE SPEED SENSOR.
1) Connect the harness connector to vehicle
speed sensor.
2) Lift-up the vehicle and support with rigid
racks.
3) Drive the vehicle at speed greater than 20
km/h (12 MPH).
Warning:
Be careful not to be caught up by the run-
ning wheels.
4) Measure the voltage between ECM har-
ness connector terminal and chassis ground.
Connector & terminal
(B135) No. 26 (+) — Chassis ground (
−):Is the voltage 1 V ← → 5 V? Check the poor
contact of ECM
connector.Replace the vehi-
cle speed sensor.
6 CHECK HARNESS BETWEEN ECM AND
TCM.
1) Turn the ignition switch to OFF.
2) Disconnect the harness connector from
ECM and TCM.
3) Measure the resistance between ECM har-
ness connector terminal and TCM harness
connector terminal.
Connector & terminal
(B135) No. 26 — (B56) No. 1:Is the resistance less than 10
Ω?Go to step 7.Repair the har-
ness.
Page 640 of 2870

CC(H4DOTC 2.5)-28
CRUISE CONTROL SYSTEM (DIAGNOSTIC)
Diagnostic Procedure with Diagnostic Trouble Code (DTC)
7 CHECK TCM
1) Connect the harness connector to TCM.
2) Lift-up the vehicle and support with rigid
racks.
3) Drive the vehicle at speed greater than 10
km/h (6 MPH).
Warning:
Be careful not to be caught up by the run-
ning wheels.
4) Measure the voltage between TCM har-
ness connector terminal and chassis ground.
Connector & terminal
(B56) No. 1 (+) — Chassis ground (
−):Is the voltage 1 V ← → 5 V? Check the poor
contact of ECM
harness connec-
tor.Check the poor
contact of TCM
harness connec-
tor. Step Check Yes No
Page 665 of 2870

FUJI HEAVY INDUSTRIES LTD. G8080GE6
2004 FORESTER SERVICE MANUAL QUICK REFERENCE INDEX
CHASSIS SECTION
This service manual has been prepared
to provide SUBARU service personnel
with the necessary information and data
for the correct maintenance and repair
of SUBARU vehicles.
This manual includes the procedures
for maintenance, disassembling, reas-
sembling, inspection and adjustment of
components and diagnostics for guid-
ance of experienced mechanics.
Please peruse and utilize this manual
fully to ensure complete repair work for
satisfying our customers by keeping
their vehicle in optimum condition.
When replacement of parts during
repair work is needed, be sure to use
SUBARU genuine parts.
All information, illustration and specifi-
cations contained in this manual are
based on the latest product information
available at the time of publication
approval.FRONT SUSPENSION FS
REAR SUSPENSION RS
WHEEL AND TIRE SYSTEM WT
DIFFERENTIAL DI
TRANSFER CASE TC
DRIVE SHAFT SYSTEM DS
ABS ABS
ABS (DIAGNOSTIC) ABS
BRAKE BR
PARKING BRAKE PB
POWER ASSISTED SYSTEM
(POWER STEERING)PS