Page 951 of 2870
ME(H4SO)-80
MECHANICAL
Cylinder Block
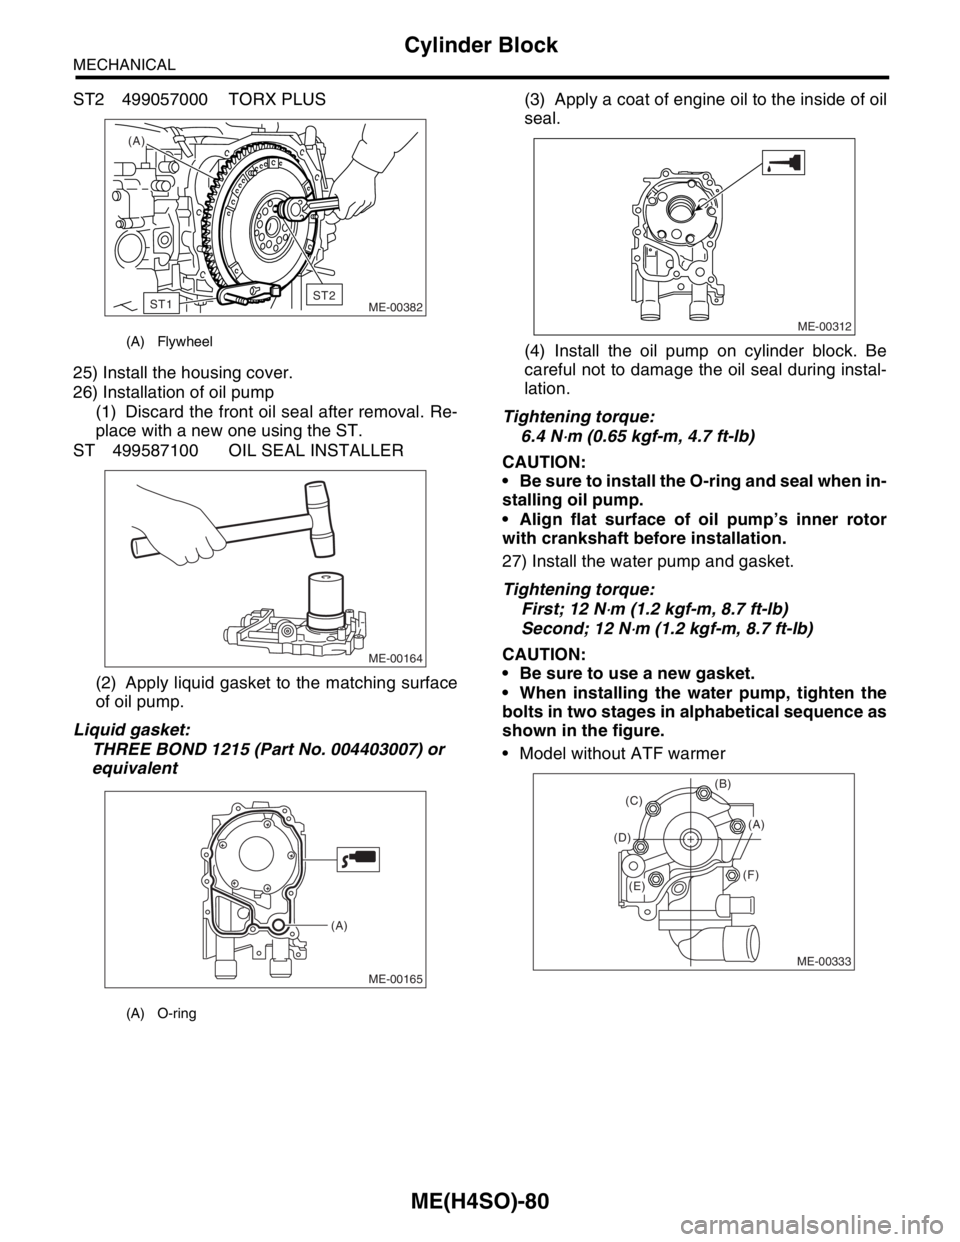
ST2 499057000 TORX PLUS
25) Install the housing cover.
26) Installation of oil pump
(1) Discard the front oil seal after removal. Re-
place with a new one using the ST.
ST 499587100 OIL SEAL INSTALLER
(2) Apply liquid gasket to the matching surface
of oil pump.
Liquid gasket:
THREE BOND 1215 (Part No. 004403007) or
equivalent(3) Apply a coat of engine oil to the inside of oil
seal.
(4) Install the oil pump on cylinder block. Be
careful not to damage the oil seal during instal-
lation.
Tightening torque:
6.4 N
⋅m (0.65 kgf-m, 4.7 ft-lb)
CAUTION:
Be sure to install the O-ring and seal when in-
stalling oil pump.
Align flat surface of oil pump’s inner rotor
with crankshaft before installation.
27) Install the water pump and gasket.
Tightening torque:
First; 12 N
⋅m (1.2 kgf-m, 8.7 ft-lb)
Second; 12 N
⋅m (1.2 kgf-m, 8.7 ft-lb)
CAUTION:
Be sure to use a new gasket.
When installing the water pump, tighten the
bolts in two stages in alphabetical sequence as
shown in the figure.
Model without ATF warmer
(A) Flywheel
(A) O-ring
(A)
ME-00382
ST1ST2
ME-00164
ME-00165
(A)
ME-00312
ME-00333
(B)
(F) (D)(C)
(A)
(E)
Page 1415 of 2870
FU(H4DOTC)-60
FUEL INJECTION (FUEL SYSTEM)
Fuel Filler Pipe
6) Insert the fuel filler hose (A) approx. 35 to 40 mm
(1.38 to 1.57 in) over the lower end of fuel filler pipe
and tighten the clamp.
CAUTION:
Do not allow clips to touch the air vent hose (B)
and rear suspension crossmember.
7) Insert the air vent hose approx. 25 to 30 mm
(0.98 to 1.18 in) into the lower end of air vent pipe
and hold clip.
L = 27.5
±2.5 mm (1.083±0.098 in)
8) Tighten the bolt which holds the fuel filler pipe
bracket on body.
Tightening torque:
7.4 N
⋅m (0.75 kgf-m, 5.4 ft-lb)9) Hold the evaporation hoses onto clip of fuel filler
pipe.
10) Install the fuel filler pipe protector.
11) Install the rear right wheel.
12) Lower the vehicle.
13) Tighten the wheel nuts.
14) Connect the connector to the fuel pump relay.
(1) Hose
(2) Clip
(3) Pipe
(A)
(B)
FU-00101
FU-00104
(1)(2)
L/2
L(3)
FU-00100
FU-00098
FU-00097
FU-00096
FU-00871
Page 1474 of 2870
ME(H4DOTC)-18
MECHANICAL
General Description
5. CRANKSHAFT AND PISTON
2.0 L MODEL
(1) Flywheel (MT model) (9) Piston pin (17) Crankshaft bearing #1, #3
(2) Ball bearing (MT model) (10) Circlip (18) Crankshaft bearing #2, #4
(3) Reinforcement (AT model) (11) Connecting rod bolt (19) Crankshaft bearing #5
(4) Drive plate (AT model) (12) Connecting rod
(5) Top ring (13) Connecting rod bearingTightening torque: N
⋅m (kgf-m, ft-lb)
(6) Second ring (14) Connecting rod capT1: 45 (4.6, 33.3)
(7) Oil ring (15) CrankshaftT2: 72 (7.3, 52.8)
(8) Piston (16) Woodruff key
ME-00005
(10)(1)
(17)
(18)(18)(13) (12) (11)
(8)(10) (10)
(9)
(16)
(19)
(10)
(9) (11) (13)
(12) (8)
(14)
(13)(14) (13) (15)
(7)(6)(5)
(17)
T2
(2)
(4)
(3)
(5)
(6) (7)
T2
T1
Page 1475 of 2870
ME(H4DOTC)-19
MECHANICAL
General Description
2.5 L MODEL
(1) Flywheel (MT model) (9) Piston pin (17) Crankshaft bearing #1, #3
(2) Ball bearing (MT model) (10) Circlip (18) Crankshaft bearing #2, #4
(3) Reinforcement (AT model) (11) Connecting rod bolt (19) Crankshaft bearing #5
(4) Drive plate (AT model) (12) Connecting rod
(5) Top ring (13) Connecting rod bearingTightening torque: N
⋅m (kgf-m, ft-lb)
(6) Second ring (14) Connecting rod capT1: 52 (5.3, 38.4)
(7) Oil ring (15) CrankshaftT2: 72 (7.3, 52.8)
(8) Piston (16) Woodruff key
ME-00822
T1
(5)
(6)
(7)
(10)
(8)(10)
(12)
(13)
(13)
(16)(13)
(12)
(19)
(18)
(17)
(17)(18)(10)(10)
(7)
(6)
(5)
(9)(8) (13) (15)
(14)
(11) (14)(9)
T1(11)
(1)
T2
(2)(4)
(3)
T2
Page 1478 of 2870
ME(H4DOTC)-22
MECHANICAL
General Description
C: CAUTION
Wear working clothing, including a cap, protec-
tive goggles, and protective shoes during opera-
tion.
Remove contamination including dirt and corro-
sion before removal, installation or disassembly.
Keep the disassembled parts in order and pro-
tect them from dust or dirt.
Before removal, installation or disassembly, be
sure to clarify the failure. Avoid unnecessary re-
moval, installation, disassembly, and replacement.
Be careful not to burn yourself, because each
part in the vehicle is hot after running.
Be sure to tighten fasteners including bolts and
nuts to the specified torque.
Place shop jacks or rigid racks at the specified
points.
Before disconnecting electrical connectors of
sensors or units, be sure to disconnect the ground
cable from battery.
All parts should be thoroughly cleaned, paying
special attention to the engine oil passages, pis-
tons and bearings.
Rotating parts and sliding parts such as piston,
bearing and gear should be coated with oil prior to
assembly.
Be careful not to let oil, grease or coolant contact
the timing belt, clutch disc and flywheel.
All removed parts, if to be reused, should be re-
installed in the original positions and directions.
Bolts, nuts and washers should be replaced with
new ones as required.
Even if necessary inspections have been made
in advance, proceed with assembly work while
making rechecks.
Remove or install the engine in an area where
chain hoists, lifting devices, etc. are available for
ready use.
Be sure not to damage coated surfaces of body
panels with tools or stain seats and windows with
coolant or oil. Place a cover over fenders, as re-
quired, for protection.
Prior to starting work, prepare the following:
Service tools, clean cloth, containers to catch cool-
ant and oil, wire ropes, chain hoist, transmission
jacks, etc.
Lift-up or lower the vehicle when necessary.
Make sure to support the correct positions.
Page 1548 of 2870
ME(H4DOTC)-88
MECHANICAL
Cylinder Block
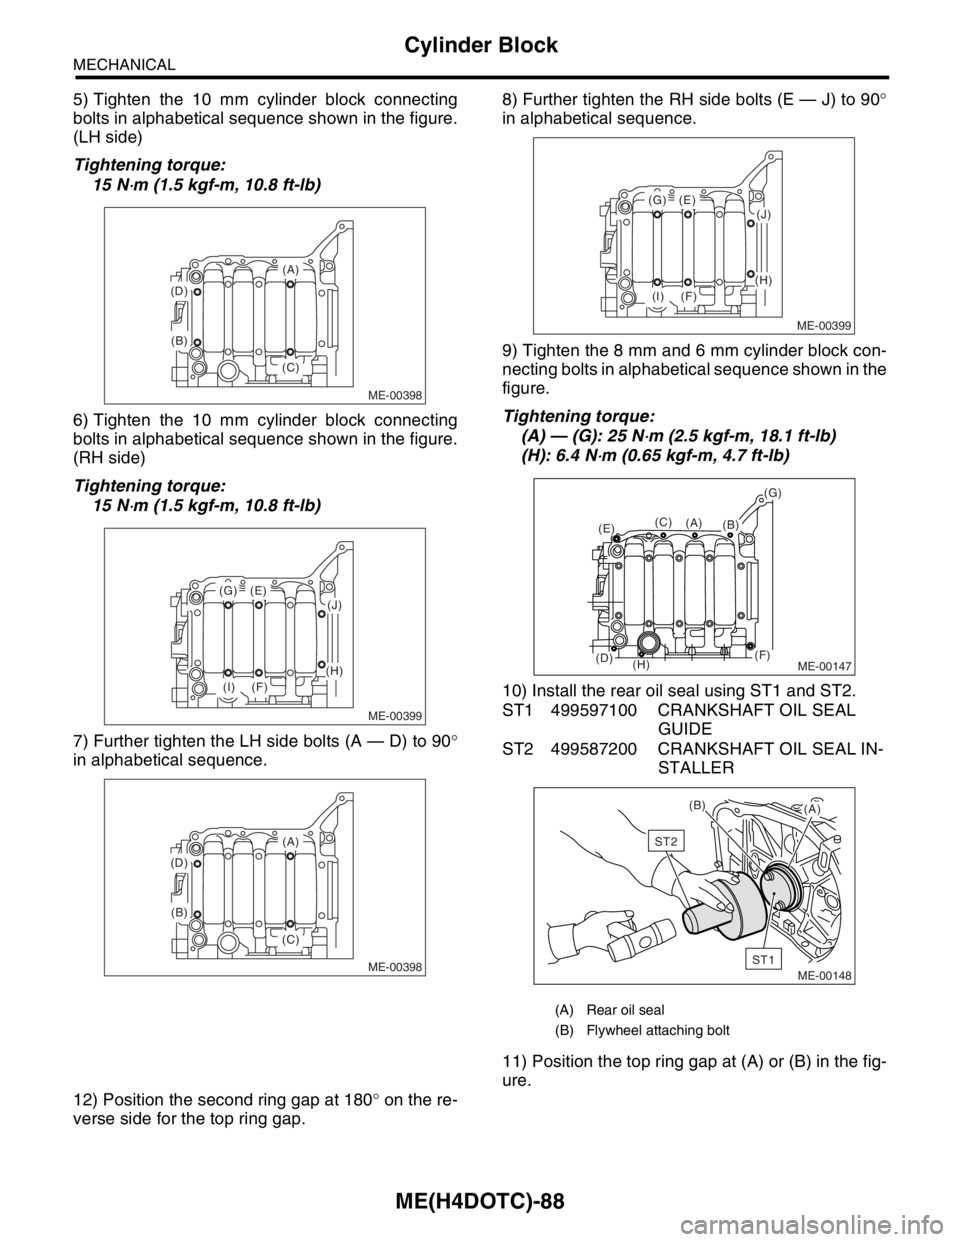
5) Tighten the 10 mm cylinder block connecting
bolts in alphabetical sequence shown in the figure.
(LH side)
Tightening torque:
15 N
⋅m (1.5 kgf-m, 10.8 ft-lb)
6) Tighten the 10 mm cylinder block connecting
bolts in alphabetical sequence shown in the figure.
(RH side)
Tightening torque:
15 N
⋅m (1.5 kgf-m, 10.8 ft-lb)
7) Further tighten the LH side bolts (A — D) to 90°
in alphabetical sequence.8) Further tighten the RH side bolts (E — J) to 90°
in alphabetical sequence.
9) Tighten the 8 mm and 6 mm cylinder block con-
necting bolts in alphabetical sequence shown in the
figure.
Tightening torque:
(A) — (G): 25 N
⋅m (2.5 kgf-m, 18.1 ft-lb)
(H): 6.4 N
⋅m (0.65 kgf-m, 4.7 ft-lb)
10) Install the rear oil seal using ST1 and ST2.
ST1 499597100 CRANKSHAFT OIL SEAL
GUIDE
ST2 499587200 CRANKSHAFT OIL SEAL IN-
STALLER
11) Position the top ring gap at (A) or (B) in the fig-
ure.
12) Position the second ring gap at 180° on the re-
verse side for the top ring gap.
ME-00398
(A)
(B)
(C) (D)
ME-00399
(E)(G)
(F)(I)
(J)
(H)
ME-00398
(A)
(B)
(C) (D)
(A) Rear oil seal
(B) Flywheel attaching bolt
ME-00399
(E)(G)
(F)(I)
(J)
(H)
ME-00147
(B)(C)
(D)
(E)
(F)
(G)
(H)
(A)
ME-00148
ST1
ST2
(B)
(A)
Page 1557 of 2870
ME(H4DOTC)-97
MECHANICAL
Cylinder Block
Tightening torque:
(E), (F), (G), (I): 20 N
⋅m (2.0 kgf-m, 14.8 ft-lb)
(H), (J): 18 N
⋅m (1.8 kgf-m, 13.3 ft-lb)
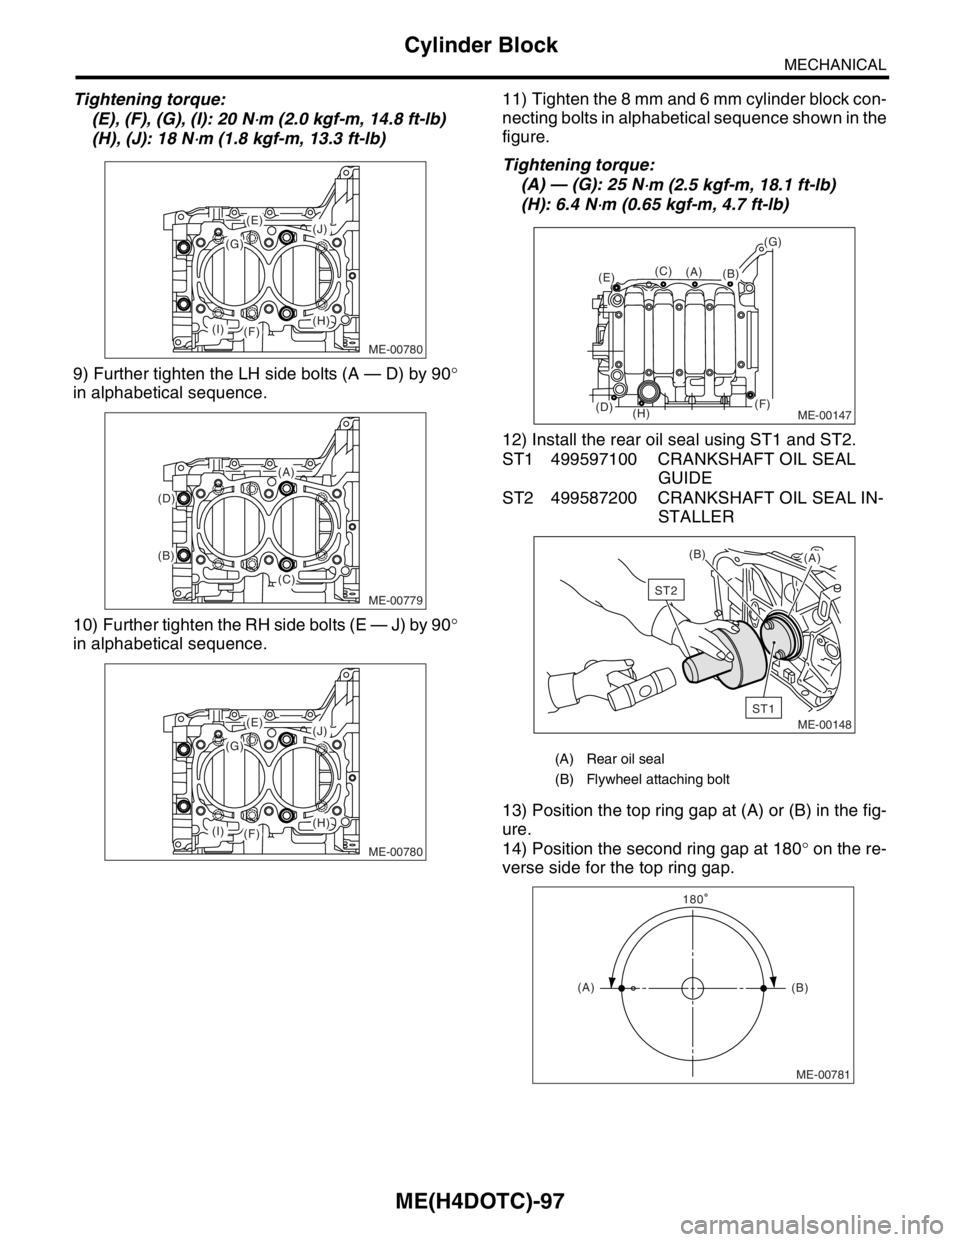
9) Further tighten the LH side bolts (A — D) by 90°
in alphabetical sequence.
10) Further tighten the RH side bolts (E — J) by 90°
in alphabetical sequence.11) Tighten the 8 mm and 6 mm cylinder block con-
necting bolts in alphabetical sequence shown in the
figure.
Tightening torque:
(A) — (G): 25 N
⋅m (2.5 kgf-m, 18.1 ft-lb)
(H): 6.4 N
⋅m (0.65 kgf-m, 4.7 ft-lb)
12) Install the rear oil seal using ST1 and ST2.
ST1 499597100 CRANKSHAFT OIL SEAL
GUIDE
ST2 499587200 CRANKSHAFT OIL SEAL IN-
STALLER
13) Position the top ring gap at (A) or (B) in the fig-
ure.
14) Position the second ring gap at 180° on the re-
verse side for the top ring gap.
ME-00780
(J)
(H)
(G)
(E)
(F)(I)
ME-00779
(A)
(B)
(D)
(C)
ME-00780
(J)
(H)
(G)
(E)
(F)(I)
(A) Rear oil seal
(B) Flywheel attaching bolt
ME-00147
(B)(C)
(D)
(E)
(F)
(G)
(H)
(A)
ME-00148
ST1
ST2
(B)
(A)
ME-00781
(A)(B) 180
Page 1598 of 2870
EX(H4DOTC)-12
EXHAUST
Center Exhaust Pipe
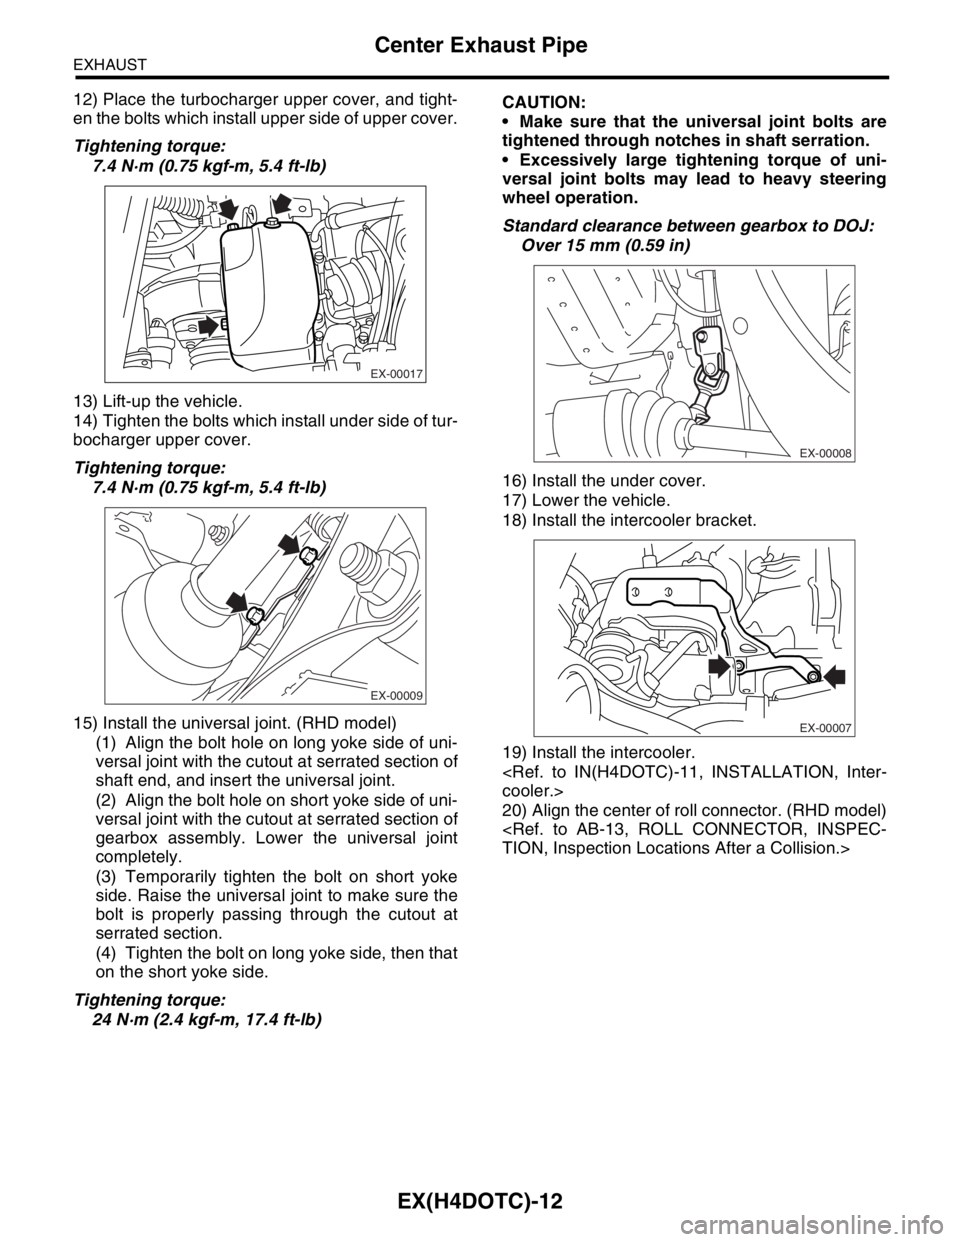
12) Place the turbocharger upper cover, and tight-
en the bolts which install upper side of upper cover.
Tightening torque:
7.4 N·m (0.75 kgf-m, 5.4 ft-lb)
13) Lift-up the vehicle.
14) Tighten the bolts which install under side of tur-
bocharger upper cover.
Tightening torque:
7.4 N·m (0.75 kgf-m, 5.4 ft-lb)
15) Install the universal joint. (RHD model)
(1) Align the bolt hole on long yoke side of uni-
versal joint with the cutout at serrated section of
shaft end, and insert the universal joint.
(2) Align the bolt hole on short yoke side of uni-
versal joint with the cutout at serrated section of
gearbox assembly. Lower the universal joint
completely.
(3) Temporarily tighten the bolt on short yoke
side. Raise the universal joint to make sure the
bolt is properly passing through the cutout at
serrated section.
(4) Tighten the bolt on long yoke side, then that
on the short yoke side.
Tightening torque:
24 N·m (2.4 kgf-m, 17.4 ft-lb)CAUTION:
Make sure that the universal joint bolts are
tightened through notches in shaft serration.
Excessively large tightening torque of uni-
versal joint bolts may lead to heavy steering
wheel operation.
Standard clearance between gearbox to DOJ:
Over 15 mm (0.59 in)
16) Install the under cover.
17) Lower the vehicle.
18) Install the intercooler bracket.
19) Install the intercooler.
cooler.>
20) Align the center of roll connector. (RHD model)
TION, Inspection Locations After a Collision.>
EX-00017
EX-00009
EX-00008
EX-00007