Page 1400 of 2870

FU(H4DOTC)-45
FUEL INJECTION (FUEL SYSTEM)
Front Oxygen (A/F) Sensor
17.Front Oxygen (A/F) Sensor
A: REMOVAL
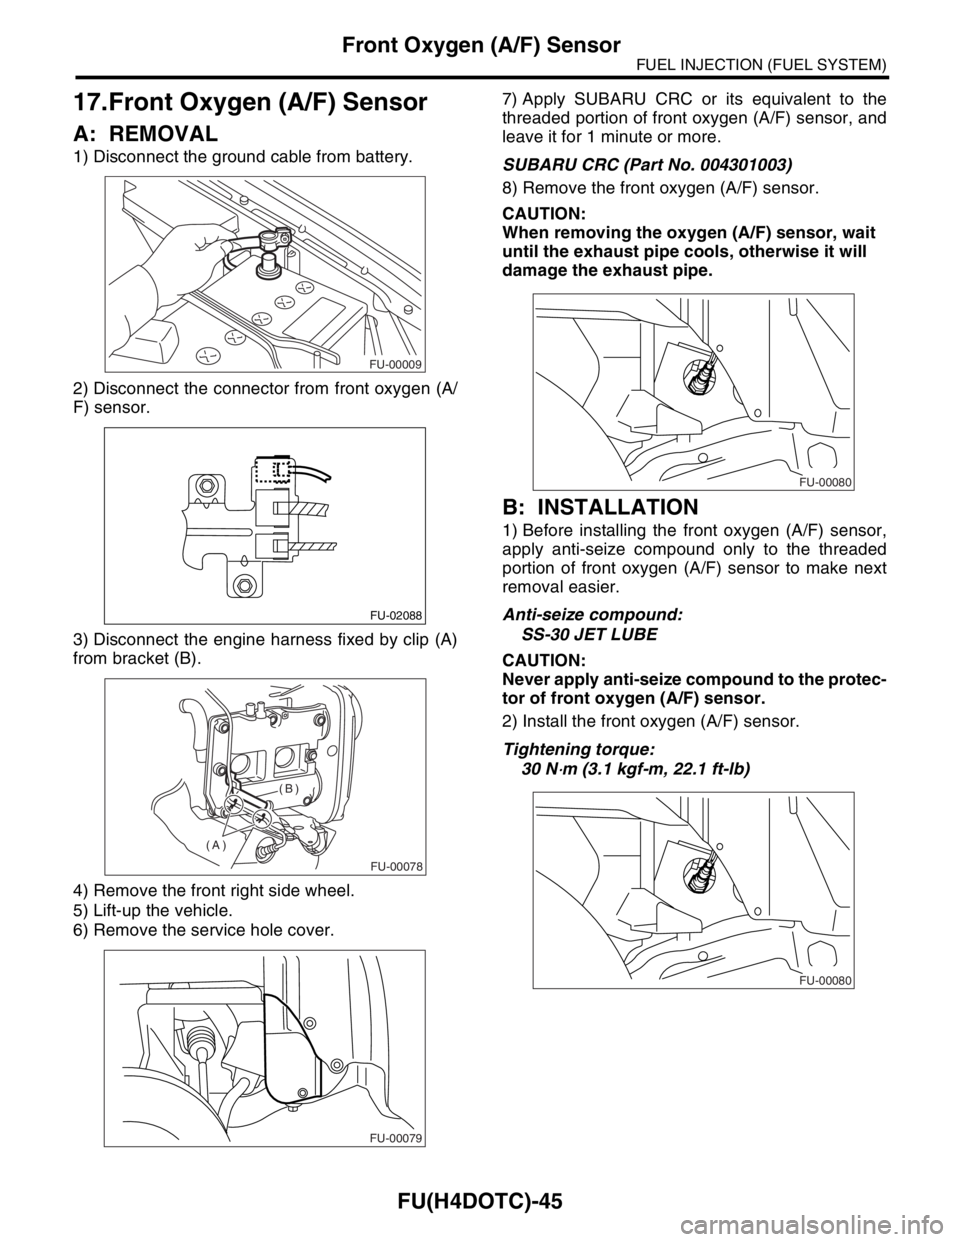
1) Disconnect the ground cable from battery.
2) Disconnect the connector from front oxygen (A/
F) sensor.
3) Disconnect the engine harness fixed by clip (A)
from bracket (B).
4) Remove the front right side wheel.
5) Lift-up the vehicle.
6) Remove the service hole cover.7) Apply SUBARU CRC or its equivalent to the
threaded portion of front oxygen (A/F) sensor, and
leave it for 1 minute or more.
SUBARU CRC (Part No. 004301003)
8) Remove the front oxygen (A/F) sensor.
CAUTION:
When removing the oxygen (A/F) sensor, wait
until the exhaust pipe cools, otherwise it will
damage the exhaust pipe.
B: INSTALLATION
1) Before installing the front oxygen (A/F) sensor,
apply anti-seize compound only to the threaded
portion of front oxygen (A/F) sensor to make next
removal easier.
Anti-seize compound:
SS-30 JET LUBE
CAUTION:
Never apply anti-seize compound to the protec-
tor of front oxygen (A/F) sensor.
2) Install the front oxygen (A/F) sensor.
Tightening torque:
30 N
⋅m (3.1 kgf-m, 22.1 ft-lb)
FU-00009
FU-02088
FU-00078
(A)(B)
FU-00079
FU-00080
FU-00080
Page 1401 of 2870
FU(H4DOTC)-46
FUEL INJECTION (FUEL SYSTEM)
Front Oxygen (A/F) Sensor
3) Install the service hole cover.
4) Lower the vehicle.
5) Install the front right side wheel.
6) Connect the engine harness with clip (A) to
bracket (B).
7) Connect the connector of front oxygen (A/F)
sensor.
8) Connect the battery ground cable to battery.
FU-00079
FU-00078
(A)(B)
FU-02088
FU-00009
Page 1413 of 2870
FU(H4DOTC)-58
FUEL INJECTION (FUEL SYSTEM)
Fuel Filler Pipe
26.Fuel Filler Pipe
A: REMOVAL
WARNING:
Place “NO FIRE” signs near working area.
Be careful not to spill fuel on floor.
1) Set the vehicle on a lift.
2) Release the fuel pressure.
FU(H4DOTC)-54, RELEASING OF FUEL PRES-
SURE, OPERATION, Fuel.>
3) Open the fuel filler flap lid and remove the fuel
filler cap.
4) Disconnect the ground cable from battery.
5) Remove the screws holding the packing in place.
6) Loosen the rear right side wheel nuts.
7) Lift-up the vehicle.
8) Remove the rear right side wheel.9) Drain fuel from fuel tank. Set a container under
vehicle and remove the drain plug from fuel tank.
10) Tighten the fuel drain plug, and install the front
right side tank cover.
Tightening torque:
26 N
⋅m (2.7 kgf-m, 19.2 ft-lb)
11) Remove the fuel filler pipe protector.
12) Separate the evaporation hoses from clip of
fuel filler pipe.
FU-00009
FU-00095
FU-00096
FU-00089
FU-00089
FU-00097
FU-00098
Page 1415 of 2870
FU(H4DOTC)-60
FUEL INJECTION (FUEL SYSTEM)
Fuel Filler Pipe
6) Insert the fuel filler hose (A) approx. 35 to 40 mm
(1.38 to 1.57 in) over the lower end of fuel filler pipe
and tighten the clamp.
CAUTION:
Do not allow clips to touch the air vent hose (B)
and rear suspension crossmember.
7) Insert the air vent hose approx. 25 to 30 mm
(0.98 to 1.18 in) into the lower end of air vent pipe
and hold clip.
L = 27.5
±2.5 mm (1.083±0.098 in)
8) Tighten the bolt which holds the fuel filler pipe
bracket on body.
Tightening torque:
7.4 N
⋅m (0.75 kgf-m, 5.4 ft-lb)9) Hold the evaporation hoses onto clip of fuel filler
pipe.
10) Install the fuel filler pipe protector.
11) Install the rear right wheel.
12) Lower the vehicle.
13) Tighten the wheel nuts.
14) Connect the connector to the fuel pump relay.
(1) Hose
(2) Clip
(3) Pipe
(A)
(B)
FU-00101
FU-00104
(1)(2)
L/2
L(3)
FU-00100
FU-00098
FU-00097
FU-00096
FU-00871
Page 1474 of 2870
ME(H4DOTC)-18
MECHANICAL
General Description
5. CRANKSHAFT AND PISTON
2.0 L MODEL
(1) Flywheel (MT model) (9) Piston pin (17) Crankshaft bearing #1, #3
(2) Ball bearing (MT model) (10) Circlip (18) Crankshaft bearing #2, #4
(3) Reinforcement (AT model) (11) Connecting rod bolt (19) Crankshaft bearing #5
(4) Drive plate (AT model) (12) Connecting rod
(5) Top ring (13) Connecting rod bearingTightening torque: N
⋅m (kgf-m, ft-lb)
(6) Second ring (14) Connecting rod capT1: 45 (4.6, 33.3)
(7) Oil ring (15) CrankshaftT2: 72 (7.3, 52.8)
(8) Piston (16) Woodruff key
ME-00005
(10)(1)
(17)
(18)(18)(13) (12) (11)
(8)(10) (10)
(9)
(16)
(19)
(10)
(9) (11) (13)
(12) (8)
(14)
(13)(14) (13) (15)
(7)(6)(5)
(17)
T2
(2)
(4)
(3)
(5)
(6) (7)
T2
T1
Page 1475 of 2870
ME(H4DOTC)-19
MECHANICAL
General Description
2.5 L MODEL
(1) Flywheel (MT model) (9) Piston pin (17) Crankshaft bearing #1, #3
(2) Ball bearing (MT model) (10) Circlip (18) Crankshaft bearing #2, #4
(3) Reinforcement (AT model) (11) Connecting rod bolt (19) Crankshaft bearing #5
(4) Drive plate (AT model) (12) Connecting rod
(5) Top ring (13) Connecting rod bearingTightening torque: N
⋅m (kgf-m, ft-lb)
(6) Second ring (14) Connecting rod capT1: 52 (5.3, 38.4)
(7) Oil ring (15) CrankshaftT2: 72 (7.3, 52.8)
(8) Piston (16) Woodruff key
ME-00822
T1
(5)
(6)
(7)
(10)
(8)(10)
(12)
(13)
(13)
(16)(13)
(12)
(19)
(18)
(17)
(17)(18)(10)(10)
(7)
(6)
(5)
(9)(8) (13) (15)
(14)
(11) (14)(9)
T1(11)
(1)
T2
(2)(4)
(3)
T2
Page 1478 of 2870

ME(H4DOTC)-22
MECHANICAL
General Description
C: CAUTION
Wear working clothing, including a cap, protec-
tive goggles, and protective shoes during opera-
tion.
Remove contamination including dirt and corro-
sion before removal, installation or disassembly.
Keep the disassembled parts in order and pro-
tect them from dust or dirt.
Before removal, installation or disassembly, be
sure to clarify the failure. Avoid unnecessary re-
moval, installation, disassembly, and replacement.
Be careful not to burn yourself, because each
part in the vehicle is hot after running.
Be sure to tighten fasteners including bolts and
nuts to the specified torque.
Place shop jacks or rigid racks at the specified
points.
Before disconnecting electrical connectors of
sensors or units, be sure to disconnect the ground
cable from battery.
All parts should be thoroughly cleaned, paying
special attention to the engine oil passages, pis-
tons and bearings.
Rotating parts and sliding parts such as piston,
bearing and gear should be coated with oil prior to
assembly.
Be careful not to let oil, grease or coolant contact
the timing belt, clutch disc and flywheel.
All removed parts, if to be reused, should be re-
installed in the original positions and directions.
Bolts, nuts and washers should be replaced with
new ones as required.
Even if necessary inspections have been made
in advance, proceed with assembly work while
making rechecks.
Remove or install the engine in an area where
chain hoists, lifting devices, etc. are available for
ready use.
Be sure not to damage coated surfaces of body
panels with tools or stain seats and windows with
coolant or oil. Place a cover over fenders, as re-
quired, for protection.
Prior to starting work, prepare the following:
Service tools, clean cloth, containers to catch cool-
ant and oil, wire ropes, chain hoist, transmission
jacks, etc.
Lift-up or lower the vehicle when necessary.
Make sure to support the correct positions.
Page 1479 of 2870
ME(H4DOTC)-23
MECHANICAL
General Description
D: PREPARATION TOOL
1. SPECIAL TOOL
ILLUSTRATION TOOL NUMBER DESCRIPTION REMARKS
498267600 CYLINDER HEAD
TABLE Used for replacing valve guides.
Used for removing and installing valve springs.
498457000 ENGINE STAND
ADAPTER RHUsed with ENGINE STAND (499817000).
498457100 ENGINE STAND
ADAPTER LHUsed with ENGINE STAND (499817000).
498497100 CRANKSHAFT
STOPPERUsed for stopping rotation of flywheel when loos-
ening and tightening crankshaft pulley bolt, etc.
ST-498267600
ST-498457000
ST-498457100
ST-498497100