Page 105 of 152

103
OVERVIEW REPAIRSOPERATIONCONTROLS DATA INDEX
CARING FOR YOUR VEHICLESuitable car-care products
Use the cleaning and car-care prod-
ucts available at your MINI Dealer.<
Washing your vehicleYou can wash your new MINI from the out-
set in automatic car washes. Preference
should be for cloth car washes. If, due to
lack of availability, brush car washes must
be used, modern systems with soft brushes
should be given preference.
When using steam cleaners or high-
pressure cleaners, maintain sufficient
distance to the vehicle and do not exceed a
maximum temperature of 1407/ 606 .
If the jet is too close or the pressure is too
high, this can lead to damage or initial
damage that can develop into more serious
damage. Water that enters vehicle compo-
nents can lead to damage over the long
term.<
After washing the vehicle, apply the
brakes briefly to dry them, otherwise
water can reduce braking efficiency over
the short term and the brake rotors can cor-
rode.<
Switch the rain sensor off when pass-
ing through an automatic car wash,
refer to page 50. Failure to do so could
result in damage caused by undesired
wiper activation.<
Rod antenna
If necessary, for example before
entering a car wash or a garage with
elevator ramp, remove the rod antenna.
To do so, grip the rod antenna at the base
and unscrew it from the antenna foot by
turning it to the left.<
Headlamps
When cleaning the headlamps,
please observe the following: do not
rub them dry, and never use abrasives or
strong solvents. Remove dirt and contami-
nation, such as insects, by soaking with
shampoo and then rinsing with plenty of
water. Always use a deicer spray to remove
accumulated ice and snow; never use a
scraper.<
Vehicle paintwork Regular care contributes greatly to driving
safety and value retention.
Environmental influences varying from one
region to the next can affect the vehicle
paintwork. Please base the frequency and
scope of car care on these various influ-
ences.Care of upholsteryDepressions that come about on the uphol-
stery material of the seats in daily use can
be brushed out using a slightly damp brush
against the grain.
The fact that velour lays down is not a qual-
ity defect, but rather is inevitable in the
case of home textiles or clothing materials.
In the case of strong sunlight and longer
parking periods, cover the seats or all win-
dows to prevent discoloration.
Page 106 of 152

104
CARING FOR YOUR VEHICLECare of special parts>Light-alloy wheels
*:
Use wheel cleaner especially during the
winter months, but do not use any ag-
gressive, acidic, strong alkali or rough
cleansers or steam jets above 1407/
606 . Observe the manufacturer's in-
structions
>Chrome parts
* such as bonnet grill, door
handles, etc.:
Especially if exposed to road salt, care-
fully clean these parts with plenty of
water and possibly with a shampoo addi-
tive.
For additional treatment, use chrome
polish
>Rubber parts:
Treat only with water or rubber care
products
Do not use silicon sprays or other
silicon-containing care products,
otherwise noise and damage could
occur.<
>Plastic parts, imitation leather surfaces,
headliner, lamp glass, covering glass for
the display elements, as well as matt
black molded parts:
Clean with water and, if necessary, plas-
tic care products. Do not dampen seats
and the headliner.
Never use solvents such as lacquer thin-
ner, heavy-duty grease remover, fuel or
similar
>Wood paneling
*:
Please clean wood paneling and other
wood parts only with a damp cloth. Dry
off with a soft cloth
>Safety belts:
Only clean using mild soap, leaving the
belts fitted.
Do not dry clean, as the fabric can be
destroyed.
Always roll up safety belts only when dry.
Dirty safety belts prevent unrolling and
thus negatively affect safety>Floor carpets and floor mats
*:
If heavily soiled, clean using interior
cleaner. Floor mats can be removed to
allow the interior to be cleaned
>Wiper blades:
Clean with soapy water. Replace wiper
blades twice a year, before and after the
cold season. This is particularly impor-
tant on vehicles fitted with a rain sensor.
Page 107 of 152

105
OVERVIEW REPAIRSOPERATIONCONTROLS DATA INDEX
CARING FOR YOUR VEHICLE VEHICLE STORAGE Caring for leather* and imitation
leather The leather and imitation leather used by
the manufacturer of your MINI are high
quality products processed using state-of-
the-art methods and will retain their qual-
ity level for many years if cared for prop-
erly.
Regular cleaning and care are necessary, as
dust and road dirt scratch in pores and
creases and lead to heavy wear as well as
premature brittleness of the leather and
imitation leather surface.
This is why you should use a cloth or vac-
uum cleaner to remove dust on a regular
basis.
Since dirt and oil slowly destroy the protec-
tive layer of the leather and imitation
leather, a treatment with a leather care
product is necessary twice a year. This pre-
serves the quality of the leather and pre-
vents electrostatic charging.Cleaning agents can contain hazard-
ous or health-damaging substances.
For this reason, always observe the warn-
ings on the package. For interior cleaning,
always open the doors or windows of the
vehicle.
Do not use any products that are not
intended for cleaning the vehicle.<
Your MINI Dealer will be glad to advise you
on what is important if the vehicle is to be
decommissioned for longer than three
months.
Page 108 of 152

106
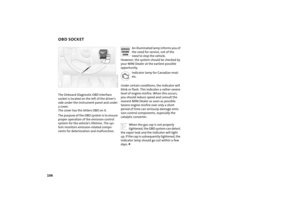
OBD SOCKETThe Onboard Diagnostic OBD interface
socket is located on the left of the driver's
side under the instrument panel and under
a cover.
The cover has the letters OBD on it.
The purpose of the OBD system is to ensure
proper operation of the emission control
system for the vehicle's lifetime. The sys-
tem monitors emission-related compo-
nents for deterioration and malfunction.
An illuminated lamp informs you of
the need for service, not of the
need to stop the vehicle.
However, the system should be checked by
your MINI Dealer at the earliest possible
opportunity.
Indicator lamp for Canadian mod-
els.
Under certain conditions, the indicator will
blink or flash. This indicates a rather severe
level of engine misfire. When this occurs,
you should reduce speed and consult the
nearest MINI Dealer as soon as possible.
Severe engine misfire over only a short
period of time can seriously damage emis-
sion control components, especially the
catalytic converter.
When the gas cap is not properly
tightened, the OBD system can detect
the vapor leak and the indicator will light
up. If the cap is subsequently tightened, the
indicator lamp should go out within a few
days.<
Page 109 of 152
107
OVERVIEW REPAIRSOPERATIONCONTROLS DATA INDEX
CALIFORNIA PROPOSITION 65 WARNINGCalifornia laws require us to state the fol-
lowing warning:
Engine exhaust and a wide variety of
automobile components and parts,
including components found in the interior
furnishings in a vehicle, contain or emit
chemicals known to the State of California
to cause cancer and birth defects and
reproductive harm.
In addition, certain fluids contained in vehi-
cles and certain products of component
wear contain or emit chemicals known to
the State of California to cause cancer and
birth defects or other reproductive harm.
Battery posts, terminals and related acces-
sories contain lead and lead compounds.
Wash your hands after handling. Used
engine oil contains chemicals that have
caused cancer in laboratory animals.
Always protect your skin by washing thor-
oughly with soap and water.<
Page 110 of 152
Page 111 of 152
OVERVIEW
CONTROLS
OPERATION, CARE, MAINTENANCE
OWNER SERVICE PROCEDURES
INDEX TECHNICAL DATA
109
OVERVIEW REPAIRSOPERATION CONTROLS DATA INDEX
Repairs
Page 112 of 152

110
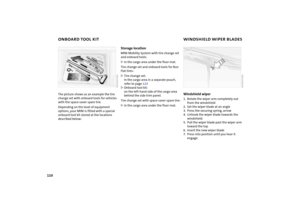
ONBOARD TOOL KIT WINDSHIELD WIPER BLADES The picture shows as an example the tire
change set with onboard tools for vehicles
with the space-saver spare tire.
Depending on the level of equipment
options, your MINI is fitted with a special
onboard tool kit stored at the locations
described below:
Storage locationMINI Mobility System with tire change set
and onboard tools:
>In the cargo area under the floor mat.
Tire change set and onboard tools for Run
Flat tires:
>Tire change set:
In the cargo area in a separate pouch,
refer to page 123
>Onboard tool kit:
on the left-hand side of the cargo area
behind the side trim panel.
Tire change set with space-saver spare tire:
>In the cargo area under the floor mat.
Windshield wiper1. Rotate the wiper arm completely out
from the windshield
2. Set the wiper blade at an angle
3. Press the securing spring, arrow
4. Unhook the wiper blade towards the
windshield
5. Pull the wiper blade past the wiper arm
toward the top
6. Insert the new wiper blade
7. Press into position until you hear it
engage.