Page 531 of 4264
CAB 10-23
RTW3A0SH000401
Important Operations
1. Switch Bezel/Window Regulator Handle
�
Remove the 2 screws and disconnect the connector.
�
To remove the regulator handle, remove the clip at the
root of the handle by using wire.
2. Power Window Switch
�
Pry the 4 clip positions.
3. Bezel
�
Remove the screw.
RTQ3A0SH000501
4. Door Trim Panel
� Pull out the trim panel at the 7 clip positions (Powe
r
window type).
�
Remove the 2 screws and pull out the trim panel at the 7
clip positions (Window regulator handle type).
Page 532 of 4264
10-24 CAB
5. Bracket
6. Speaker assembly
�
Remove the fixing bolt and then remove the connector.
7. Waterproof Sheet
�
Take care not to damage the sheet when peeling it off.
8. Inside Lever
�
Disconnect the door lock cables.
9. Outer Waste Seal
10. Window Regulator/Power Window Regulator
�
Remove the 2 bolts fixing the window glass through the
access hole.
� Move the window glass upward and hold it with adhesive
tape.
�
Remove the 5 bolts fixing the window regulator.
�
Disconnect the power window motor connector.
11. Glass Run Rear Channel
� Remove the bolt.
12. Door Lock Assembly
�
Disconnect the lock cable from the anti rattler.
�
Remove the 3 fixing screws and the bolt.
�
Disconnect the linkage and harness connector.
13. Glass Run
�
Remove the adhesive tape and move the window glass
downward.
�
Pull it out from the door frame of the channel.
14. Window Glass
� Pull out the window glass upward.
15. Outside Handle
�
Remove the 2 fixing bolts.
Page 533 of 4264
CAB 10-25
REASSEMBLY
RTW3A0LF000701
Reassembly Steps
1. Anti rattler
2. Door harness assembly
� 3. Outside handle
4. Window glass
5. Glass run
6. Door lock assembly
7. Glass run rear channel
8. Window regulator/Power window regulator
9. Outer waste seal
10. Inside lever
11. Waterproof sheet
12. Speaker assembly
13. Bracket
14. Door trim panel
15. Bezel
16. Power window switch
� 17. Switch bezel/Window regulator handle
Page 534 of 4264
10-26 CAB
Important Operations
3. Outside Handle
�
Tighten the outside handle fixing bolts to the specified
torque.
Torque N�
m (kgf�
m/lb�
in)
9 (0.9/78)
17. Window Regulator Handle
�
Install the regulator handle as illustrated when closing
the window glass.
Page 661 of 4264

ELECTRICAL-BODY AND CHASSIS 8A-3
PAGE
Power Window ........................................................................................................... 8A- 310
Audio, Clock and Cigarette Lighter .......................................................................... 8A- 329
Power Door Mirror ...................................................................................................... 8A- 337
Rear Defogger ............................................................................................................ 8A- 349
SRS-Air Bag ................................................................................................................ 8A- 358
Transfer Case Control Module .................................................................................. 8A- 361
Anti-Lock Brake System ............................................................................................ 8A- 373
Immobilizer ................................................................................................................. 8A- 376
Keyless Entry ............................................................................................................. 8A- 385
Anti Theft ....................................................................................................................8A- 400
Auto Cruise ................................................................................................................. 8A- 412
Trailer Hitch ................................................................................................................ 8A- 415
Connector List ................................................................................................................8A- 418
Page 688 of 4264
8A-30 ELECTRICAL-BODY AND CHASSIS
RELAY LOCATION
(CABIN)
RELAY
Connector No. B-7 B-8 B-40
C24SE
6VE1
4JA1-TC, 4JH1-TC
4JA1-L REAR DEFOGGER
POWER WINDOW ACC SOCKET
Page 960 of 4264
8A-302 ELECTRICAL-BODY AND CHASSIS
TROUBLESHOOTING
QUICK CHART FOR CHECK POINTS
Check Points
Fuse
C-14
(20A) Power
Window &
Door Lock
Switch Door
Lock
SwitchKey CYLN
Der switch Door Lock Actuator
Cable
Trouble Mode Driver’s
side Driver’s
side D/S P/S Passen
ger’s
side RR-RH RR-LHHarness
1. All the doors do not
lock and unlock
2. All the doors do not
get locked (or
unlocked)
3. Driver’s side door
does not get locked
(or unlocked)
4. FRT passenger’s side
door does not get
locked (or unlocked)
5. RR door-RH does not
get locked (or
unlocked)
6. RR door-LH does not
get locked (or
unlocked)
7. Door lock does not
operate when
operating from the
driver’s seat side
Page 961 of 4264

ELECTRICAL-BODY AND CHASSIS 8A-303
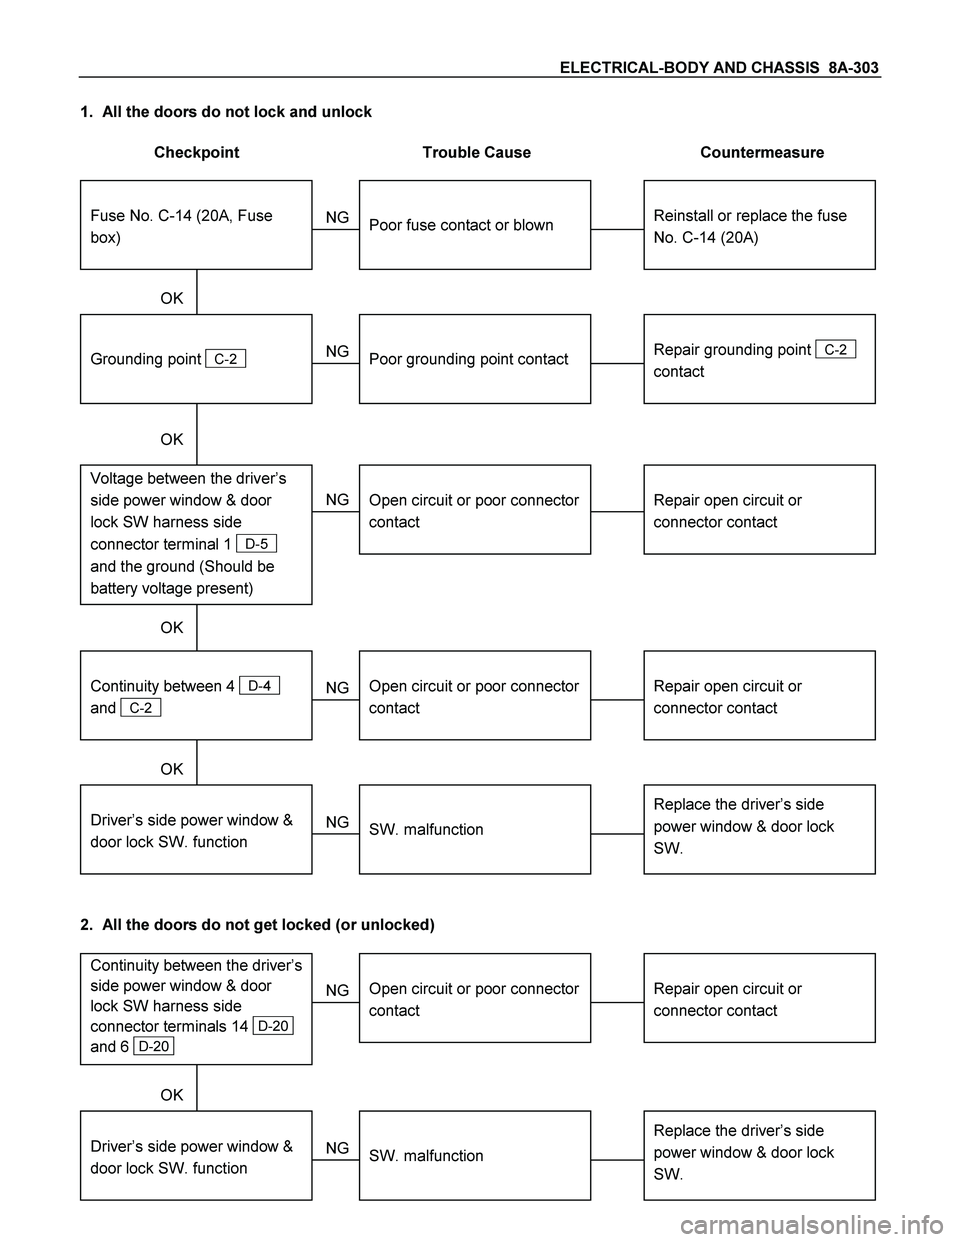
1. All the doors do not lock and unlock
Checkpoint Trouble Cause Countermeasure
Reinstall or replace the fuse
No. C-14 (20A)
Poor fuse contact or blown
NG
Repair grounding point
C-2
contact
Grounding point
C-2
Poor grounding point contact
Repair open circuit or
connector contact
Voltage between the driver’s
side power window & door
lock SW harness side
connector terminal 1
D-5
and the ground (Should be
battery voltage present)
Open circuit or poor connector
contact
NG NG OK
OK OK
Fuse No. C-14 (20A, Fuse
box)
Repair open circuit or
connector contact
Open circuit or poor connector
contact
NG
Replace the driver’s side
power window & door lock
SW.
Driver’s side power window &
door lock SW. function
SW. malfunction
NG OK
Continuity between 4
D-4
and
C-2
2. All the doors do not get locked (or unlocked)
Repair open circuit or
connector contact
Open circuit or poor connector
contact
NG
Replace the driver’s side
power window & door lock
SW.
Driver’s side power window &
door lock SW. function
SW. malfunction
NG OK
Continuity between the driver’s
side power window & door
lock SW harness side
connector terminals 14
D-20
and 6
D-20