Page 435 of 4264

BRAKES 5C-9
MAIN DATA AND SPECIFICATIONS
FRONT DISC BRAKE mm(in.) 4 �
2 4 �
4, 4 �
2 HIGH RIDE
Caliper type Pin slide
Disc outside diameter 256(10.079) 280 (11.023)
Disc thickness 26(1.024) 27 (1.063)
Piston diameter 42.8 (1.685) �
2 45.5 (1.79)
Adjustment method Self-adjusting
REAR DRUM BRAKE mm(in.) 4 �
2 4 �
4
Type Leading and Trailing
Drum inside diameter 254(10.008) 295 (11.614)
Brake lining dimension 244 �
50 �
5 283 �
45 �
5
(Length � Width � Thickness) (9.57 � 1.97 � 0.20) (11.14 � 1.77 � 0.20)
Adjustment method Self-adjusting
WHEEL CYLINDER mm(in.)
Inside diameter : rear 25.4 (1.000) 23.8 (0.937)
MASTER CYLINDER mm(in.)
Type Split
Bore diameter 25.4 (1.000)
Piston stroke (Primary + Secondary) 21.8 + 12 (0.86 + 0.47)
VACUUM SERVO mm(in.) 6VE1/C24NE 4JA1-T/4JA1-TC/4JH1-TC
Diaphragm diameter 205(8.077) + 230(9.055) 180(7.087) + 205(8.077)
4JA1-T
Power cylinder stroke 35 (1.378)
PEDAL RATIO 3.7
BALANCE EBD (with ABS)
Type Load sensing proportioning valve (without ABS)
Blend valve (without ABS)
Page 450 of 4264

5C-24 BRAKES
RTW35CSH000201
3) Rear wheel cylinder fluid pressure measurement
Step on the brake pedal until the fluid pressure of the
front wheel cylinder gets to 9.8Mpa (100kg/cm
2), and
check the rear wheel cylinder fluid pressure. (Read the
value of the front wheel cylinder fluid pressure 2
seconds after the measurement. When measuring the
L.S.V fluid pressure, keep the brake pedal pressed
down without stepping it down twice or releasing it.)
Rear Wheel Cylinder Fluid Pressure MPa (kg/cm
2)
2WD 6.77�0.83 (69.0�8.5)
2WD (With High Ride
Suspension), 4WD 6.77�
0.83 (69.0�
8.5)
RTW35CSH000401
2. Oil Pressure Adjustment
1) LSPV spring length adjustment
Loosen the adjust nut of the LSPV spring joint, and
adjust the length of the LSPV spring.
When the oil pressure is insufficient, turn the adjust nu
t
clockwise to extend the span “A”. When the oil pressure
is too high, turn the adjust nut counterclockwise to
reduce the span “A”.
2) After adjustment, tighten the lock nut securely.
Lock Nut Torque N�m (kg�m/lb in)
11-20 (1.1-2.0/95-174)
Page 476 of 4264
5C-50 BRAKES
20. Lever ; adjuster
21. Ring ; Adjuster lever
�
Apply grease to the lever ; adjuster sliding surface.
Install the lever ; adjuster and the ring to the shoe ;
trailing.
�
Be sure to use new ring.
P1010008B
23. Pin ; shoe hold
24. Spring ; shoe hold
� Install the brake drum.
�
Install the rear wheel.
�
If the wheel cylinder has been removed, the brake
system must be bled.
�
Pump the brake pedal 10 times. Check that there is little
or no stroke length variation as the pedal is pumped.
�
Adjust the lining clearance.
� Brake Line
Torque N�
m(kgf�
m/Ib�
ft)
13 - 19 (1.3 - 1.9 / 9 - 14)
Page 487 of 4264
BRAKES 5C-61
4) Measure dimension (A)
RTW35CSH000801
5) Calculate the gap (B-A) when assembling the master
cylinder and vacuum booster.
GAP mm (in
)
0 �
0.4 (0 �
0.0157)
6) If dimension (A) is out of the standard range, adjust the
push rod.
�
Loosen the push rod lock nut (1) on the vacuum
booster.
�
Set the clevis (2).
�
Use the adjuster (3) to adjust the length of the
protruding portion of the push rod.
Vacuum (negative) pressure should be GASOLINE
ENGINE: 66.7 kPa (500mm Hg) or DIESEL
ENGINE: 93.3 kPa (700mm Hg) after adjustment.
�
Tighten the push rod lock nut to the specified torque.
Torque N�
m(kgf�
m/lb�
ft)
18 – 25 (1.8 – 2.5 / 13 – 18)
7) Install the vacuum booster assembly to the dash panel
and pedal mounting bracket.
Torque N�
m(kgf�
m/lb�
ft)
18 – 24 (1.8 – 2.4 / 13 – 17)
Page 513 of 4264

CAB 10-5
Important Operations - Installation
1. Engine Hood Rear Seal
Install the engine hood rear seal as shown in the illustration.
1 : Seal
2 : Clip
3 : Rear (windshield glass side)
4 : Front
RTW3A0SH000201
3. Windshield Glass
1) Clean the windshield glass bonding surface.
2) Use a soft rag and unleaded gasoline to wipe off an
y
adhesive remaining on the body.
3) Mount the body window glass as shown in the illustration.
Attach spacers at five locations.
�
Always use new spacer.
4) Install the windshield upper molding.
�
Peel off the tear-away paper from the windshield uppe
r
molding, and start applying it with one end of the glass
and cut away the surplus at the other end of the glass
for length adjustment.
�
Always use new upper molding.
5) Temporary install the windshield support.
6) Apply primer
1 Sunstar #435-98 or equivalent to the body
side bonding surface. The primer should extend at least 25
mm (1 in).
Apply primer Sunstar #435-40 or equivalent to the
windshield glass side bonding surface.
The primer should extend 16.5 mm (0.6 in) and 25 mm (1.0
in) from end of the glass.
Page 662 of 4264

8A-4 ELECTRICAL-BODY AND CHASSIS
GENERAL INFORMATION
The body and chassis electrical system operates on a twelve volt power supply with negative ground polarity.
The main harness consists of the engine harness, the instrument harness, the body harness, and the chassis
harness.
The harnesses use a split corrugated tube to protect the wires from the elements.
Wire size is determined by current flow, circuit length, and voltage drop.
All wires have color-coded insulation.
Wire color-codes are shown in the circuit diagrams.
This makes it easier to trace circuits and to make the proper connections.
Each circuit consists of the following:
1. Power source - The battery and the alternator
2. Wires - To carry electrical current through the circuit
3. Fuses - To protect the circuit against current overload
4. Relays - To protect voltage drop between the battery and the circuit parts and to protect the switch points against
burning
5. Switches - To open and close the circuit
6. Load - Any device, such as a light or motor, which converts the electrical current into useful work
7. Ground - To allow the current to flow back to the power source
Page 667 of 4264

ELECTRICAL-BODY AND CHASSIS 8A-9
SPLICING WIRE
Open the Harness
If the harness is taped, remove the tape.
To avoid wire insulation damage, use a sewing "seam ripper"
(available from sewing supply stores) to cut open the harness.
If the harness has a black plastic conduit, simply pull out the
desired wire.
Cut the wire
Begin by cutting as little wire off the harness as possible.
You may need the extra length of wire later if you decide to cut
more wire off to change the location of a splice.
You may have to adjust splice locations to make certain that
each splice is at least 1-1/2" (40 mm) away from other splices,
harness branches, or connectors.
Strip the insulation
When replacing a wire, use a wire of the same size as the
original wire.
Check the stripped wire for nicks or cut strands.
If the wire is damaged, repeat the procedure on a new section
of wire.
The two stripped wire ends should be equal in length.
Crimp the Wires
Select the proper clip to secure the splice.
To determine the proper clip size for the wire being spliced,
follow the directions included with your clips.
Select the correct anvil on the crimper.
(On most crimpers your choice is limited to either a small or
large anvil.)
Overlap the two stripped wire ends and hold them between
your thumb and forefinger.
Then, enter the splice clip under the stripped wires and hold it
in place.
� Open the crimping tool to its full width and rest one handle
on a firm flat surface.
� Center the back of the splice clip on the proper anvil and
close the crimping tool to the point where the back of the
splice clip touches the wings of the clip.
� Make sure that the clip and wires are still in the correc
t
position. Then, apply pressure until the crimping tool closes.
Before crimping the ends of the clip, be sure that:
� The wires extend beyond the clip in each direction.
� No strands of wire are cut loose.
� No insulation is caught under the clip.
Crimp the splice again, once on each end.
Do not let the crimping tool extend beyond the edge of the clip
or you may damage or nick the wires.
Page 1230 of 4264

6A – 90 ENGINE MECHANICAL
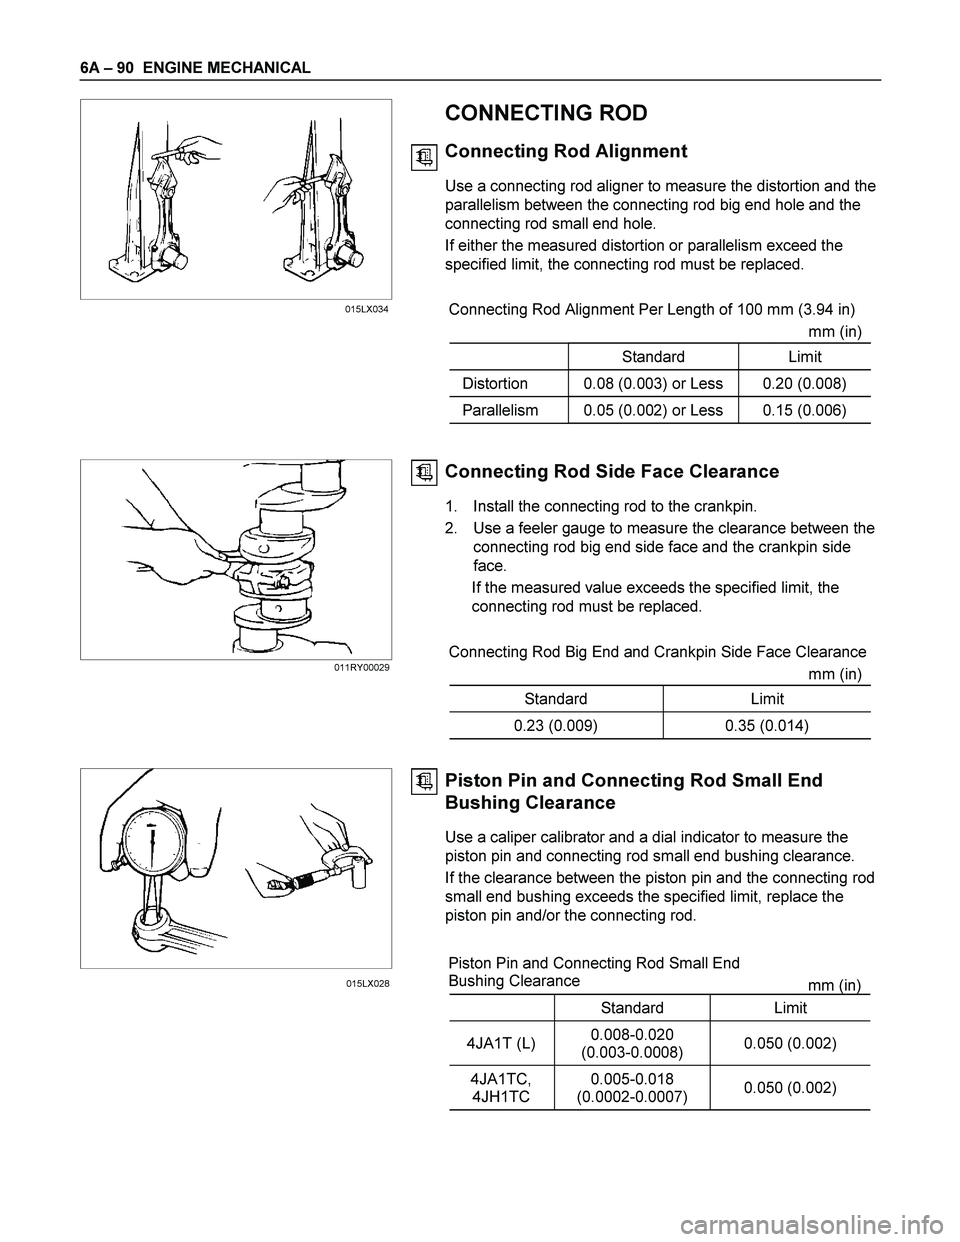
CONNECTING ROD
Connecting Rod Alignment
Use a connecting rod aligner to measure the distortion and the
parallelism between the connecting rod big end hole and the
connecting rod small end hole.
If either the measured distortion or parallelism exceed the
specified limit, the connecting rod must be replaced.
Connecting Rod Alignment Per Length of 100 mm (3.94 in)
mm (in)
Standard Limit
Distortion 0.08 (0.003) or Less 0.20 (0.008)
Parallelism 0.05 (0.002) or Less 0.15 (0.006)
Connecting Rod Side Face Clearance
1. Install the connecting rod to the crankpin.
2. Use a feeler gauge to measure the clearance between the
connecting rod big end side face and the crankpin side
face.
If the measured value exceeds the specified limit, the
connecting rod must be replaced.
Connecting Rod Big End and Crankpin Side Face Clearance
mm (in)
Standard Limit
0.23 (0.009) 0.35 (0.014)
Piston Pin and Connecting Rod Small End
Bushing Clearance
Use a caliper calibrator and a dial indicator to measure the
piston pin and connecting rod small end bushing clearance.
If the clearance between the piston pin and the connecting rod
small end bushing exceeds the specified limit, replace the
piston pin and/or the connecting rod.
Piston Pin and Connecting Rod Small End
Bushing Clearance
mm (in)
Standard Limit
4JA1T (L) 0.008-0.020
(0.003-0.0008) 0.050 (0.002)
4JA1TC,
4JH1TC 0.005-0.018
(0.0002-0.0007) 0.050 (0.002)
015LX034
011RY00029
015LX028