Page 458 of 4264
5C-32 BRAKES
5. After doing so, pull PEDAL ARM to yourself a little so
that PEDAL ARM is not pushed in.
6. Making PEDAL ARM not movable with one hand, push
in the whole SWITCH with the other hand until the
PLUNGER of SWTCH is pushed in and SWITCH itself
hits the RUBBER of PEDAL ARM.
In the condition, turn SWITCH clock-wise until “click”
sound is made and lock it.
By doing this the SWITCH is adjusted at 0.7�0.5mm
clearance.
Page 493 of 4264

Nut
(2)
Bolt and Washer
(3)
Adjust Nut
(4)
Bolt")
PARKING BRAKE SYSTEM 5D-3
This illustration shows RHD model
LHD model is opposite.
RTW35DLH000101
Legend
(1)
Nut
(2)
Bolt and Washer
(3)
Adjust Nut
(4)
Bolt
(5)
Front Parking Brake Cable
(6)
Clip
(7)
Switch
(8)
Bolt
(9)
Parking Lever Assembly
Removal
1. Remove instrument panel assembly & cross beam
in legend numbers order.
Refer to section 10.
2. Bolts (2)(8) are already removed in step 1.
3. Remove adjust nut (3).
4. Pull out clip (6) and take out front parking brake
cable (5) from parking lever assembly (9).
5. Remove bolts (4) and nut (1) and take out parking
lever assembly (9).
6. Remove switch (7).
Installation
1. Install switch (7).
Torque: 1.5 N�
�� �m (0.15 kg�
�� �m/13 lb in)
2. Set parking lever assembly (9).
3. Install bolts (4) and nut (1) and tighten them to the
specified torque.
Torque: 15 N
�
�� �m (1.5 kg
�
�� �m/11 lb ft)
4. Set front parking brake cable (5) in parking leve
r
assembly (9).
5. Drive clip (6) into the outer cable groove of front
parking brake cable (5) at the outside of parking
lever assembly (9).
Page 498 of 4264

RTW35DSF000101
Legend
(1)
Rear Floor Console
(2)
Parking Brake Cable")
5D-8 PARKING BRAKE SYSTEM
Parking Brake Lever
Parking Brake Lever Assembly and Associated Parts (Bucket Seat)
RTW35DSF000101
Legend
(1)
Rear Floor Console
(2)
Parking Brake Cable T-end
(3)
Adjust Nut
(4)
Switch
(5)
Parking Brake Lever Assembly
(6)
Bolt
(7)
Equalizer
Removal
1. Remove rear floor console (1).
Refer to section 10.
2. Loosen adjust nut (3).
3. Remove bolt (6).
4. Remove switch (4).
5. Disconnect parking brake cable T-end (2) from
parking brake lever assembly (5).
6. Take out parking brake lever assembly (5).
Installation
1. Apply grease (multipurpose type grease) to the
connecting portion of parking brake rear cable T-
end (2) and parking brake lever equalizer (7).
(arrow mark)
2. Connect parking brake rear cable T-end (2) to
equalizer (7).
3. Install switch (4).
4. Tighten the parking brake lever fixing bolt (6) to
the specified torque.
Torque: 15 N�
�� �m (1.5 kg�
�� �m/11 lb ft)
5. Drive adjust nut (3) on parking brake assembly so
that parking brake cable T-end fits into equalize
r
(7).
6. Install rear floor console (1).
Refer to section 10.
7. Pull parking brake lever with a force equivalent to
operating force: 490 N (50 kg/110 lb), 10 times fo
r
conditioning.
8.
Adjust nut (3) so that parking brake lever goes
through 6�
8 notches, when pulled with a operation
force of 294 N (30 kg/66 lb).
9. Check brake for no drag.
Page 520 of 4264
10-12 CAB
DISASSEMBLY
This illustration is based on RHD model
RTW4A0LF000701
Disassembly Steps
� 1. Switch bezel/Window regulator handle
� 2. Power window switch
� 3. Bezel
� 4. Door mirror cover
� 5. Door trim panel
� 6. Tweeter (Required Option)
� 7. Door mirror assembly
� 8. Outer waste seal
� 9. Bracket
� 10. Speaker assembly
� 11. Waterproof sheet
� 12. Inside lever
� 13. Window glass
�
14. Window regulator/Power window
regulator
� 15. Glass run
� 16. Glass run rear channel / Glass ran rear
channel with Door lock control or Anti
theft (EC)
� 17. Door lock assembly/Door lock assembly
with super lock
� 18. Outside handle protector (EUROPE)
� 19. Outside handle
� 20. Door lock cylinder protector (EUROPE)
� 21. Door lock cylinder / Door lock cylinder
with door lock switch (EC)
22. Door harness assembly
23. Anti rattler
Page 521 of 4264
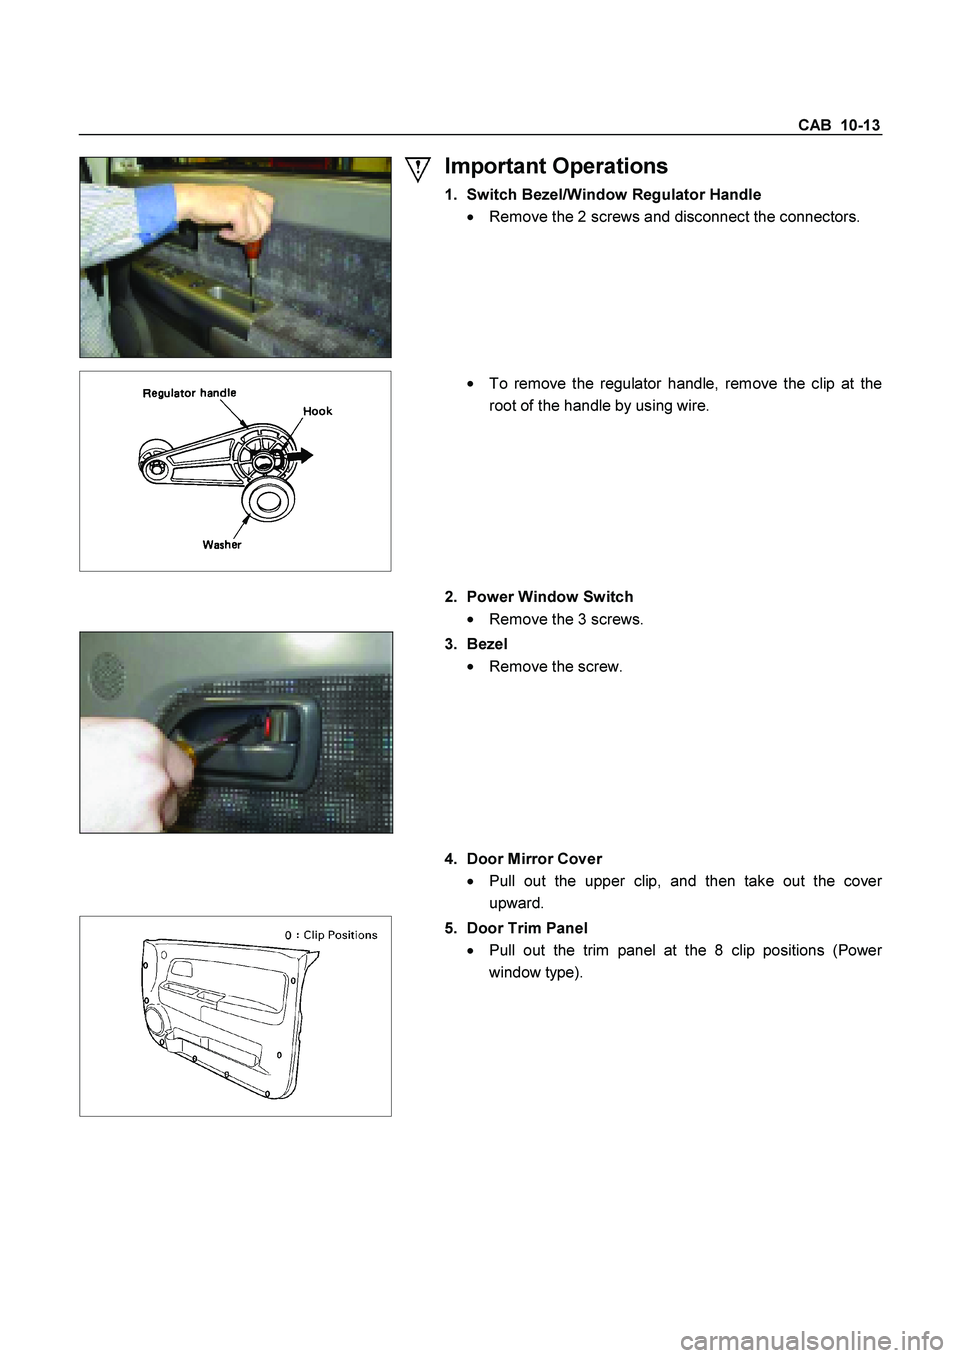
CAB 10-13
Important Operations
1. Switch Bezel/Window Regulator Handle
�
Remove the 2 screws and disconnect the connectors.
�
To remove the regulator handle, remove the clip at the
root of the handle by using wire.
2. Power Window Switch
�
Remove the 3 screws.
3. Bezel
�
Remove the screw.
4. Door Mirror Cover
�
Pull out the upper clip, and then take out the cove
r
upward.
5. Door Trim Panel
�
Pull out the trim panel at the 8 clip positions (Powe
r
window type).
Page 523 of 4264
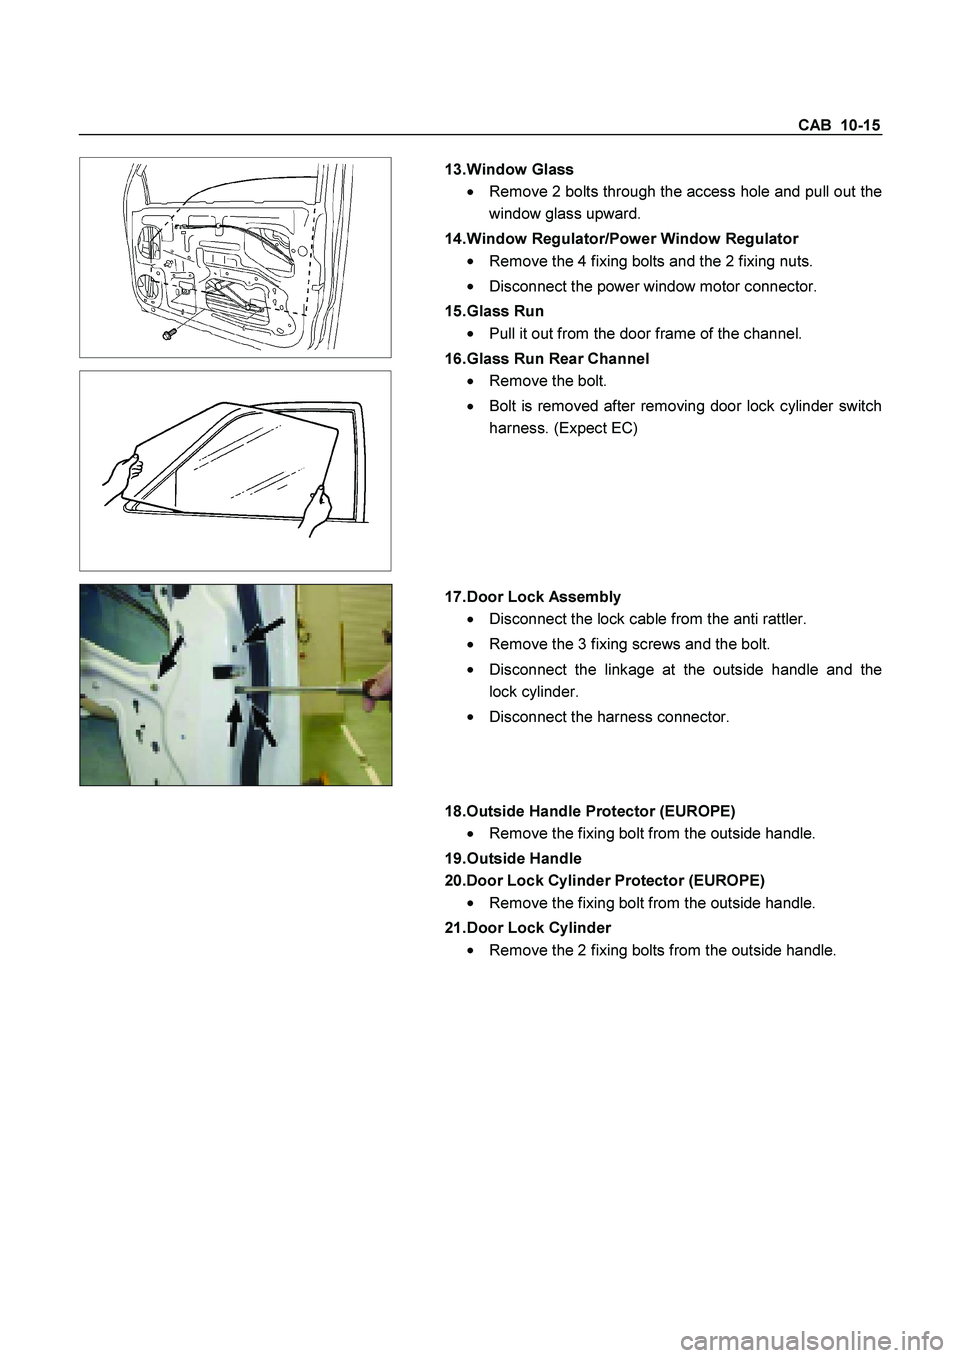
CAB 10-15
13. Window Glass
� Remove 2 bolts through the access hole and pull out the
window glass upward.
14. Window Regulator/Power Window Regulator
�
Remove the 4 fixing bolts and the 2 fixing nuts.
�
Disconnect the power window motor connector.
15. Glass Run
�
Pull it out from the door frame of the channel.
16. Glass Run Rear Channel
�
Remove the bolt.
�
Bolt is removed after removing door lock cylinder switch
harness. (Expect EC)
17. Door Lock Assembly
�
Disconnect the lock cable from the anti rattler.
� Remove the 3 fixing screws and the bolt.
�
Disconnect the linkage at the outside handle and the
lock cylinder.
�
Disconnect the harness connector.
18.Outside Handle Protector (EUROPE)
� Remove the fixing bolt from the outside handle.
19. Outside Handle
20.Door Lock Cylinder Protector (EUROPE)
�
Remove the fixing bolt from the outside handle.
21. Door Lock Cylinder
�
Remove the 2 fixing bolts from the outside handle.
Page 524 of 4264
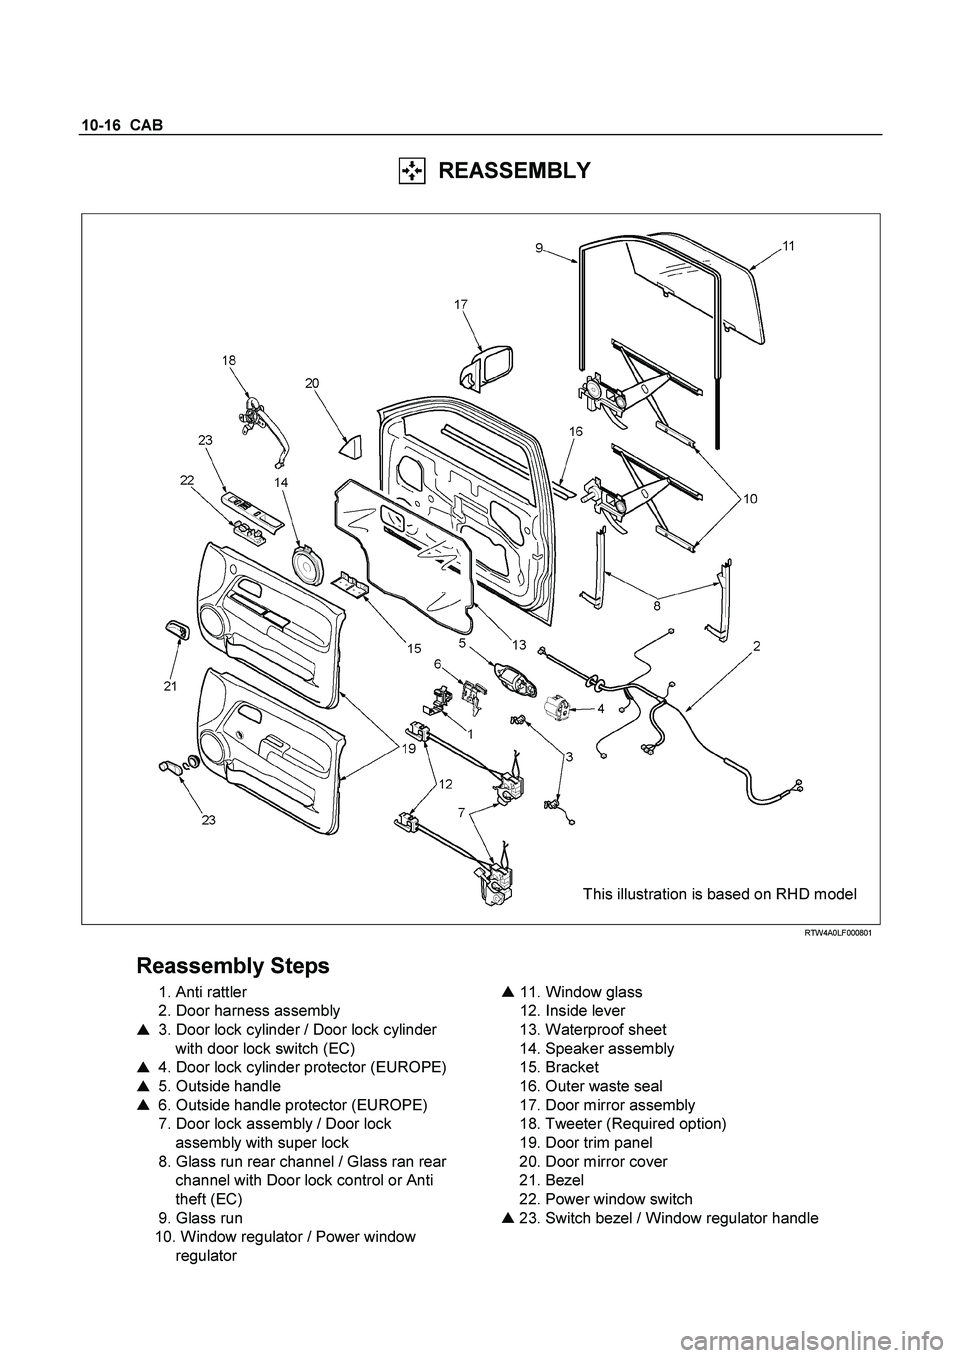
10-16 CAB
REASSEMBLY
This illustration is based on RHD model
RTW4A0LF000801
Reassembly Steps
1. Anti rattler
2. Door harness assembly
� 3. Door lock cylinder / Door lock cylinder
with door lock switch (EC)
� 4. Door lock cylinder protector (EUROPE)
� 5. Outside handle
� 6. Outside handle protector (EUROPE)
7. Door lock assembly / Door lock
assembly with super lock
8. Glass run rear channel / Glass ran rear channel with Door lock control or Anti
theft (EC)
9. Glass run
10. Window regulator / Power window
regulator
�
11. Window glass
12. Inside lever
13. Waterproof sheet
14. Speaker assembly
15. Bracket
16. Outer waste seal
17. Door mirror assembly
18. Tweeter (Required option)
19. Door trim panel
20. Door mirror cover
21. Bezel
22. Power window switch
� 23. Switch bezel / Window regulator handle
Page 530 of 4264
10-22 CAB
DISASSEMBLY
RTW3A0LF000601
Disassembly Steps
� 1. Switch bezel/Window regulator handle
� 2. Power window switch
� 3. Bezel
� 4. Door trim panel
� 5. Bracket
� 6. Speaker assembly
� 7. Waterproof sheet
� 8. Inside lever
� 9. Outer waste seal
�
10. Window regulator/Power window
regulator
� 11. Glass run rear channel
� 12. Door lock assembly
� 13. Glass run
� 14. Window glass
� 15. Outside handle
16. Door harness assembly
17. Anti rattler