Page 338 of 4264

5A-22 BRAKE CONTROL SYSTEM
“ABS” Warning Lamp
When ABS and trouble occurs to actuate “ABS”
warning lamp, the trouble code corresponding to the
trouble is stored in the EHCU. Only ordinary brake is
available with ABS being unactuated. Even when
“ABS” warning lamp is actuated, if the starter switch is
set ON after setting it OFF once, the EHCU checks up
on the entire system and, if there is no abnormality,
judges ABS to work currently and the warning lamp is lit
normally even though the trouble code is stored.
NOTE: Illumination of the “ABS” warning lamp indicates
that anti-lock braking is no longer available. Power
assisted braking without anti-lock control is still
available.
Normal Operation
“ABS ” Warning Lamp
When the ignition is first moved from “OFF” to “RUN”,
the amber “ABS” warning lamp will turn “ON”. The
“ABS” warning lamp will turn “ON” during engine
starting and will usually stay “ON” for approximately
three seconds after the ignition switch is returned to the
“ON” position. The warning lamp should remain “OFF”
at all other times.
Brake (EBD) Warning Lamp
825L300001
Vehicles equipped with the EBD (Electronic Brake-force
Distribution) System have an have “Brake” warning
lamp in the instrument panel.
If ABS warning lamp and Brake warning lamp are turn
"ON", then EBD is failed. ( Parking brake switch is
"OFF")
In the following conditions, EBD warning lamp is "ON".
Starter switch is "ON", engine "OFF".
( Parking brake switch is "OFF")
If engine is started, then EBD warning lamp is "OFF".
( Parking brake switch is "OFF")
Page 342 of 4264

5A-26 BRAKE CONTROL SYSTEM
DATA LIST (Tech 2)
The data displayed by DATA LIST are as follows:
Strings Units Description 2WD 4WD
Front Left Wheel Speed km/h (MPH)
Front Right Wheel Speed km/h (MPH)
Rear Left Wheel Speed km/h (MPH)
Rear Right Wheel Speed km/h (MPH) Start the vehicle and make sure of linear
change in each wheel speed
Brake Switch Open/Closed Brake switch is “closed” when brake pedal is
stepped on.
ABS Warning Lamp On/Off To be “Off” usually
EBD Warning Lamp On/Off To be “Off” usually
ABS Stop State On/Off To be “Off” usually
ABS Relay Active/Inactive To be “Active” usually
Return Pump Active/Inactive To be “Inactive” usually
DTC Status No DTC To be “No DTC” usually
4 Wheel Drive Status Yes/No To be “Yes” usually
-
FL Dump Valve Commanded
(Front Left) Active/Inactive
FL Isolation Valve Commanded
(Front Left) Active/Inactive
FR Dump Valve Commanded
(Front Right) Active/Inactive
FR Isolation Valve Commanded
(Front Right) Active/Inactive
Rear Dump Valve Commanded Active/Inactive
Rear Isolation Valve Commanded Active/Inactive
FL Dump Valve Feedback
(Front Left) Active/Inactive
FL Isolation Valve Feedback
(Front Left) Active/Inactive
FR Dump Valve Feedback
(Front Right) Active/Inactive
FR Isolation Valve Feedback
(Front Right) Active/Inactive
Rear Dump Valve Feedback Active/Inactive
Rear Isolation Valve Feedback Active/InactiveEach valve is “Active” when each valve is
opereted.
G-Sensor Output V 2.0~3.0V when vehicle speed is 0 km/h (flat
place) -
Battery Voltage V The voltage value currently supplied to EHCU
Diagnostics Connector Open/Closed Diagnostics connector is “Open” when
diagnostics connector is connected.
Page 349 of 4264

BRAKE CONTROL SYSTEM 5A-33
How to display and erase DTCs:
Note:
DTCs can be displayed also by TECH 2 use
“Diagnostic Trouble Codes“ mode.
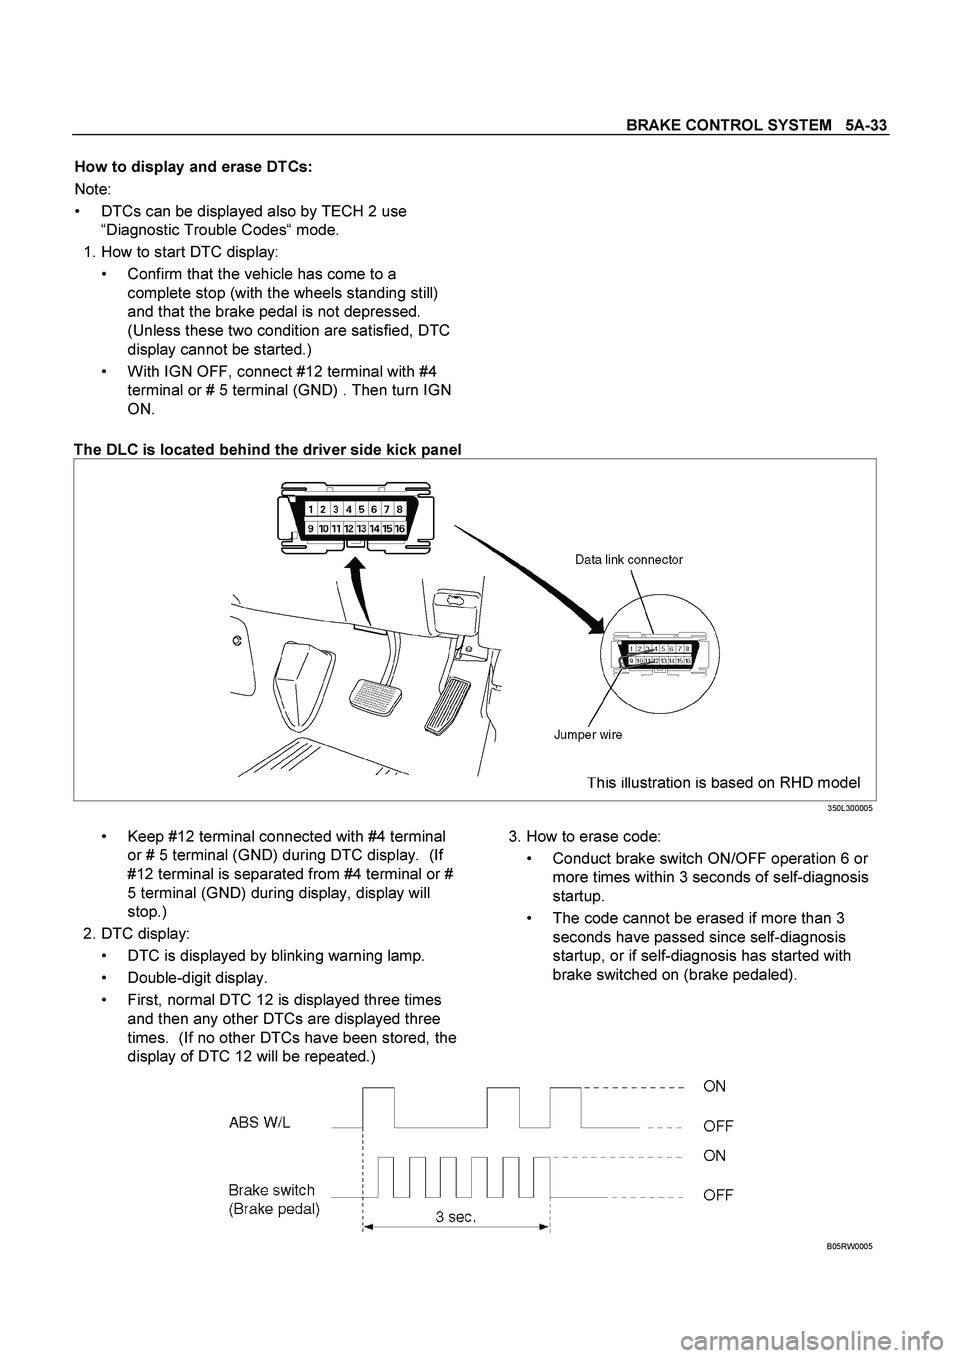
1. How to start DTC display:
Confirm that the vehicle has come to a
complete stop (with the wheels standing still)
and that the brake pedal is not depressed.
(Unless these two condition are satisfied, DTC
display cannot be started.)
With IGN OFF, connect #12 terminal with #4
terminal or # 5 terminal (GND) . Then turn IGN
ON.
The DLC is located behind the driver side kick panel
This illustration is based on RHD model
350L300005
Keep #12 terminal connected with #4 terminal
or # 5 terminal (GND) during DTC display. (If
#12 terminal is separated from #4 terminal or #
5 terminal (GND) during display, display will
stop.)
2. DTC display:
DTC is displayed by blinking warning lamp.
Double-digit display.
First, normal DTC 12 is displayed three times
and then any other DTCs are displayed three
times. (If no other DTCs have been stored, the
display of DTC 12 will be repeated.)
3. How to erase code:
Conduct brake switch ON/OFF operation 6 or
more times within 3 seconds of self-diagnosis
startup.
The code cannot be erased if more than 3
seconds have passed since self-diagnosis
startup, or if self-diagnosis has started with
brake switched on (brake pedaled).
B05RW0005
Page 350 of 4264
5A-34 BRAKE CONTROL SYSTEM
4. Notes
If the following should occur during Diagnostic
Trouble Code (DTC) display, the display will be
discontinued. After initial check, the status that
is under the control of ABS will be returned :
– The vehicle starts (The wheels turn) or the
brake pedal is depressed.
Up to 3 different codes can be stored.
If the ABS should turn OFF due to an
intermittent defect, the system will be restored
at the next key cycle, if the initial check finds no
abnormality (when IGN is switched from OFF to
ON).
5. An example of DTC display
Display of DTC 23
B05R100001
After displaying DTC 12 three times, one DTC after
another is displayed. DTC is displayed on small
order.
C05L300017
The DTC 12 is displayed repeatedly.
Page 351 of 4264
BRAKE CONTROL SYSTEM 5A-35
Basic Diagnostic Flow Chart
RTW45AMF000101
Step Action Value(s) Yes No
1 1. Ignition “ON,”engine “OFF.”
2. Observe the ABS warning lamp.
Note: If a starter switch is turned ON, ABS warning
lamp will turn on and a ABS warning lamp will be
turned off after 3 seconds.
Is the ABS warning lamp “ON”?
- Go to Step 2 Go to “No
ABS warning
lamp”
2 1. Ignition “OFF.”
2. Install Tech2.
3. Ignition “ON.”
4. Attempt to display ABS data with the Tech 2.
Does the Tech 2 display ABS data?
- Go to Step 5 Go to Step 3
3 1. Ignition “OFF,” disconnect the EHCU.
2. Check the DLC (Data Link Connector) circuit for an
open, short to ground, or short to voltage.
Also, check the DLC ignition feed circuit for an
open or short to ground and the DLC ground circuit
for an open.
3. If a problem is found, repair as necessary.
Was a problem found?
- Go to Step 2 Go to Step 4
Page 357 of 4264
BRAKE CONTROL SYSTEM 5A-41
Brake Pedal Feed Is Abnormal
Step Action
Value(s) Yes No
1 Is the stop light actuated when the brake pedal is
depressed?
- Go to Step 2 Go to Step 3
2 1. Turn the ignition switch off.
2. Disconnected EHCU connector.
Is the check voltage for EHCU connector terminals
when brake pedal is depressed than battery voltage?
- Go to Step 4 Harness NG
between stop
light SW and
EHCU.
Go to Step 6
3 Is stop light fuse normal?
- Go to Step 5 Replace stop
light fuse.
Go to Step 6
4 Is the check continuity between EHCU connector to
body grounded?
- Go to Step 6 Repair body
grounded
harness.
Go to Step 6
5 Is stop light switch operation normal?
- Repair stop
light harness.
Go to Step 6 Replace stop
light switch.
Go to Step 6
6 Reconnect all components, ensure all components
are properly mounted.
Was this step finished?
- Repeat the
“Basic
diagnostic
flow chart” Go to Step 6
Page 358 of 4264

5A-42 BRAKE CONTROL SYSTEM
Braking Sound (From EHCU) Is Heard While Not Braking
Step Action Value(s) Yes No
1 Is this the first vehicle start after engine start?
- It is self
checking
sound
Normal. Go to Step 2
2 Is vehicle speed under 10 km/h?
- It is self
checking
sound
Normal. Go to Step 3
3 Check for the following condition:
At the time of shift down or clutch operation.
At the time of low road friction drive (ice or snow
road) or rough road drive.
At the time of high-speed turn.
At the time of passing curb.
At the time of operating electrical equipment
switches.
At the time of racing the engine.
Did it occur under any one condition above?
- ABS may
sometimes be
actuated even
when brake
pedal is not
applied. Go to Step 4
4 Is there play in each or any sensor/wheel speed
sensor rotor?
- Repair.
Go to Step 7 Go to Step 5
5 Damage or powdered iron sticking to each or any
sensor/wheel speed sensor rotor?
- Repair.
Go to Step 7 Go to Step 6
6 Is each sensor normal?
Note : Check the EHCU type for specification, the
EHCU is replaced.
(Specification; 2WD or 4WD Model)
- Check
harness/
connector for
suspected
disconnection
If no
disconnection
is found,
replace EHCU
Go to Step 7 Repair.
Go to Step 7
7 Reconnect all components, ensure all components
are properly mounted.
Was this step finished?
- Repeat the
“Basic
diagnostic
flow chart” Go to Step 7
Page 457 of 4264

BRAKES 5C-31
ADJUSTMENT PROCEDURE OF BRAKE PEDAL
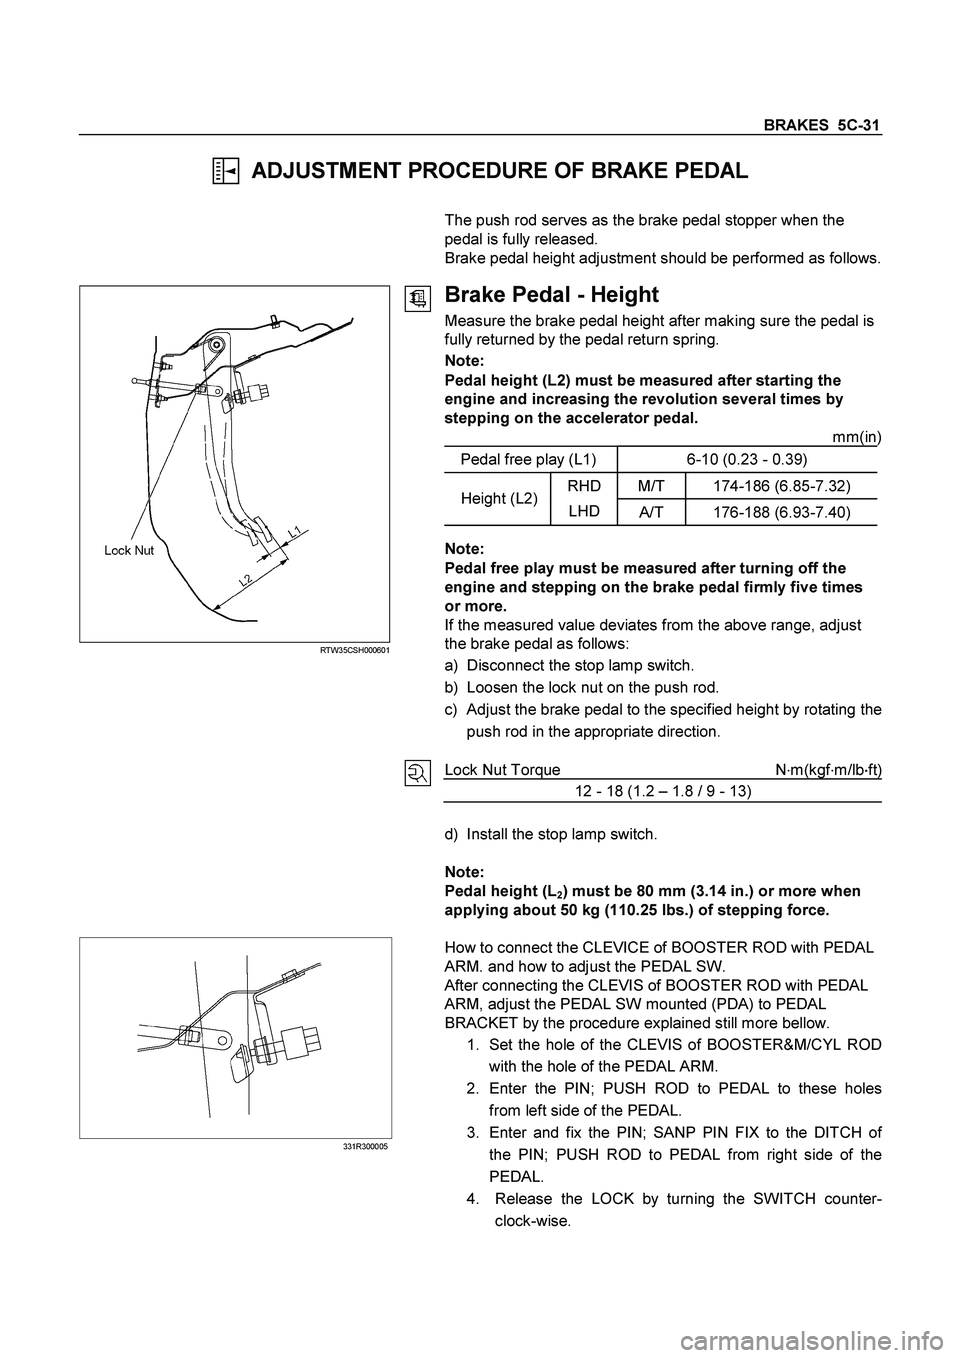
The push rod serves as the brake pedal stopper when the
pedal is fully released.
Brake pedal height adjustment should be performed as follows.
RTW35CSH000601
Brake Pedal - Height
Measure the brake pedal height after making sure the pedal is
fully returned by the pedal return spring.
Note:
Pedal height (L2) must be measured after starting the
engine and increasing the revolution several times by
stepping on the accelerator pedal.
mm(in)
Pedal free play (L1) 6-10 (0.23 - 0.39)
M/T 174-186 (6.85-7.32)
RHD
LHD
A/T 176-188 (6.93-7.40) Height (L2)
Note:
Pedal free play must be measured after turning off the
engine and stepping on the brake pedal firmly five times
or more.
If the measured value deviates from the above range, adjust
the brake pedal as follows:
a) Disconnect the stop lamp switch.
b) Loosen the lock nut on the push rod.
c)
Adjust the brake pedal to the specified height by rotating the
push rod in the appropriate direction.
Lock Nut Torque N�
m(kgf�
m/lb�
�� �
ft)
12 - 18 (1.2 – 1.8 / 9 - 13)
d) Install the stop lamp switch.
Note:
Pedal height (L
2) must be 80 mm (3.14 in.) or more when
applying about 50 kg (110.25 lbs.) of stepping force.
331R300005
How to connect the CLEVICE of BOOSTER ROD with PEDAL
ARM. and how to adjust the PEDAL SW.
After connecting the CLEVIS of BOOSTER ROD with PEDAL
ARM, adjust the PEDAL SW mounted (PDA) to PEDAL
BRACKET by the procedure explained still more bellow.
1. Set the hole of the CLEVIS of BOOSTER&M/CYL ROD
with the hole of the PEDAL ARM.
2. Enter the PIN; PUSH ROD to PEDAL to these holes
from left side of the PEDAL.
3. Enter and fix the PIN; SANP PIN FIX to the DITCH o
f
the PIN; PUSH ROD to PEDAL from right side of the
PEDAL.
4. Release the LOCK by turning the SWITCH counter-
clock-wise.