Page 488 of 4449
TROUBLE DIAGNOSIS
ATC-59
C
D
E
F
G
H
I
K
L
MA
B
AT C
Revision: 2004 November 2004 FX35/FX45
AUXILIARY MECHANISM: TEMPERATURE SETTING TRIMMER
The trimmer compensates for differences in range of ±3°C (±6°F) between temperature setting (displayed dig-
itally) and temperature felt by driver.
Operating procedures for this trimmer are as follows:
1. Begin Self-diagnosis STEP-5 mode. Refer to AT C - 5 3 , "
Self-diagnosis Function" .
2. Press (fan) UP switch to set system in auxiliary mode.
3. Display shows 61 in auxiliary mechanism. It takes approximately 3 seconds.
4. Press temperature switch (driver side) as desired. Temperature will change at a rate of 0.5°C (1.0°F) each
time a switch is pressed.
CAUTION:
A decimal point is not indicated when the display shows “°C”.
When battery cable is disconnected, trimmer operation is canceled. Temperature set becomes that of initial
condition, i.e. 0°C (0°F).
RJIA1970E
Page 494 of 4449

TROUBLE DIAGNOSIS
ATC-65
C
D
E
F
G
H
I
K
L
MA
B
AT C
Revision: 2004 November 2004 FX35/FX45
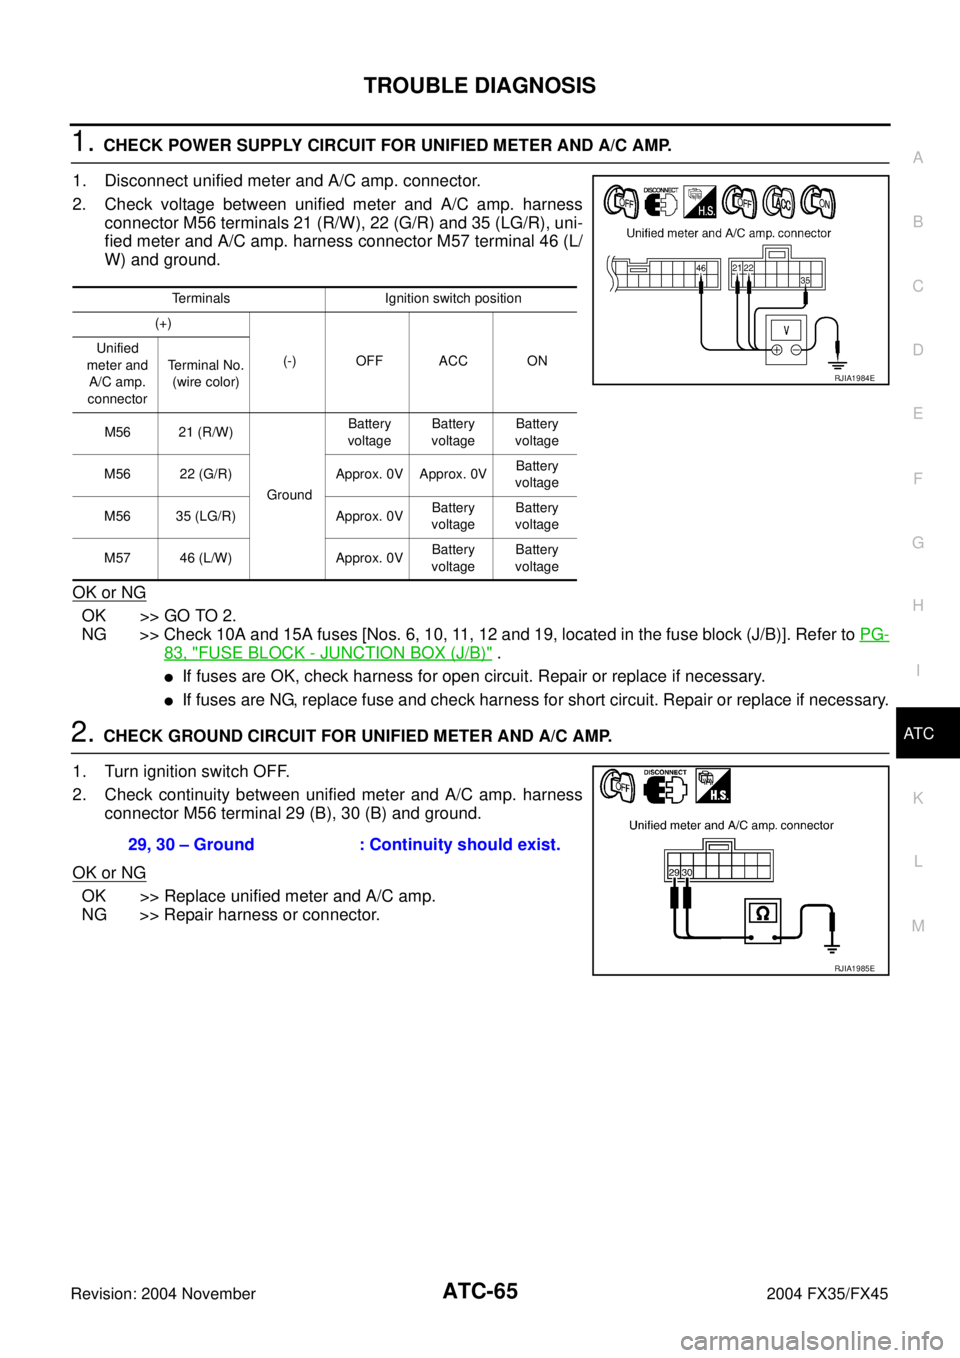
1. CHECK POWER SUPPLY CIRCUIT FOR UNIFIED METER AND A/C AMP.
1. Disconnect unified meter and A/C amp. connector.
2. Check voltage between unified meter and A/C amp. harness
connector M56 terminals 21 (R/W), 22 (G/R) and 35 (LG/R), uni-
fied meter and A/C amp. harness connector M57 terminal 46 (L/
W) and ground.
OK or NG
OK >> GO TO 2.
NG >> Check 10A and 15A fuses [Nos. 6, 10, 11, 12 and 19, located in the fuse block (J/B)]. Refer to PG-
83, "FUSE BLOCK - JUNCTION BOX (J/B)" .
�If fuses are OK, check harness for open circuit. Repair or replace if necessary.
�If fuses are NG, replace fuse and check harness for short circuit. Repair or replace if necessary.
2. CHECK GROUND CIRCUIT FOR UNIFIED METER AND A/C AMP.
1. Turn ignition switch OFF.
2. Check continuity between unified meter and A/C amp. harness
connector M56 terminal 29 (B), 30 (B) and ground.
OK or NG
OK >> Replace unified meter and A/C amp.
NG >> Repair harness or connector.
Terminals Ignition switch position
(+)
(-) OFF ACC ON Unified
meter and
A/C amp.
connectorTerminal No.
(wire color)
M56 21 (R/W)
GroundBattery
voltageBattery
voltageBattery
voltage
M56 22 (G/R) Approx. 0V Approx. 0VBattery
voltage
M56 35 (LG/R) Approx. 0VBattery
voltageBattery
voltage
M57 46 (L/W) Approx. 0VBattery
voltageBattery
voltage
RJIA1984E
29, 30 – Ground : Continuity should exist.
RJIA1985E
Page 495 of 4449
ATC-66
TROUBLE DIAGNOSIS
Revision: 2004 November 2004 FX35/FX45
LAN System CircuitAJS0014S
SYMPTOM: Mode door motor, intake door motor and/or air mix door motor(s) does not operate normally.
DIAGNOSTIC PROCEDURE FOR LAN CIRCUIT
1. CHECK POWER SUPPLY FOR UNIFIED METER AND A/C AMP.
1. Turn ignition switch ON.
2. Check voltage between unified meter and A/C amp. harness
connector M57 terminal 54 (Y/R) and ground.
OK or NG
OK >> GO TO 2.
NG >> Replace unified meter and A/C amp.
2. CHECK SIGNAL FOR UNIFIED METER AND A/C AMP.
Confirm A/C LAN signal between unified meter and A/C amp. har-
ness connector M57 terminal 43 (G/B) and ground using an oscillo-
scope.
OK or NG
OK >> GO TO 3.
NG >> Replace unified meter and A/C amp.
RJIA1775E
54 – Ground : Battery voltage
RJIA1986E
Terminals
Voltage (+)
(−)
Unified meter and A/
C amp. connectorTerminal No.
(wire color)
M57 43 (G/B) Ground
RJIA1987E
HAK0652D
Page 496 of 4449

TROUBLE DIAGNOSIS
ATC-67
C
D
E
F
G
H
I
K
L
MA
B
AT C
Revision: 2004 November 2004 FX35/FX45
3. CHECK POWER SUPPLY FOR MOTOR
Check voltage between mode door motor harness connector M258
terminal 1 (G), driver side air mix door motor harness connector
M252 terminal 1 (G), passenger side air mix door motor harness
connector M257 terminal 1 (G), intake door motor harness connector
M253 terminal 1 (G) and ground.
OK or NG
OK >> GO TO 4.
NG >> Repair harness or connector.
4. CHECK SIGNAL FOR MOTOR
Confirm A/C LAN signal between mode door motor harness connec-
tor M258 terminal 3 (L), driver side air mix door motor harness con-
nector M252 terminal 3 (L), passenger side air mix door motor
harness connector M257 terminal 3 (L), intake door motor harness
connector M253 terminal 3 (G/B) and ground using an oscilloscope.
OK or NG
OK >> GO TO 5.
NG >> Repair harness or connector.
5. CHECK MOTOR GROUND CIRCUIT
1. Turn ignition switch OFF.
2. Disconnect door motor connector.
3. Check continuity between mode door motor harness connector
M258 terminal 2 (B), driver side air mix door motor harness con-
nector M252 terminal 2 (B), passenger side air mix door motor
harness connector M257 terminal 2 (B), intake door motor har-
ness connector M253 terminal 2 (B) and ground.
OK or NG
OK >> GO TO 6.
NG >> Repair harness or connector.1 – Ground : Battery voltage
RJIA1988E
Door motorTerminals
Voltage (+)
(−)
Con-
nectorTerminal
No.
(wire color)
Mode M258 3 (L)
Ground Air mix
(Driver
side)M252 3 (L)
Air mix
(Passen-
ger side)M257 3 (L)
Intake M253 3 (L)
RJIA1989E
HAK0652D
2 – Ground : Continuity should exist.
RJIA1990E
Page 511 of 4449

ATC-82
TROUBLE DIAGNOSIS
Revision: 2004 November 2004 FX35/FX45
1. CHECK POWER SUPPLY FOR BLOWER MOTOR
1. Disconnect blower motor connector.
2. Turn ignition switch ON.
3. Check voltage between blower motor harness connector M78
terminal 1 (L/W) and ground.
OK or NG
OK >> GO TO 2.
NG >> Check power supply circuit and 15A fuses [Nos. 10 and
11, located in the fuse block (J/B)]. Refer to PG-83,
"FUSE BLOCK - JUNCTION BOX (J/B)" .
�If OK, check for open circuit in wiring harness. Repair or replace if necessary.
�If NG, replace fuse and check wiring harness for short circuit. Repair or replace if necessary.
2. CHECK BLOWER MOTOR GROUND CIRCUIT
1. Turn ignition switch OFF.
2. Check continuity between blower motor harness connector M78
terminal 3 (B) and ground.
OK or NG
OK >> GO TO 3.
NG >> Repair harness or connector.
3. CHECK CIRCUIT CONTINUITY BETWEEN BLOWER MOTOR AND UNIFIED METER AND A/C AMP.
1. Disconnect unified meter and A/C amp. connector.
2. Check continuity between blower motor harness connector M78
terminal 2 (G) and unified meter and A/C amp. harness connec-
tor M57 terminal 53 (G).
OK or NG
OK >> GO TO 4.
NG >> Repair harness or connector.
4. CHECK UNIFIED METER AND A/C AMP. OUTPUT SIGNAL
1. Reconnect blower motor connector and unified meter and A/C amp. connector.
2. Turn ignition switch ON.
3. Vary the fan speed between Lo and Hi and confirm the duty
ratios between blower motor harness connector M78 terminal 21 – Ground : Battery voltage
RJIA1997E
3 – Ground : Continuity should exist.
RJIA1998E
2 – 53 : Continuity should exist.
RJIA1999E
RJIA2000E
Page 515 of 4449

ATC-86
TROUBLE DIAGNOSIS
Revision: 2004 November 2004 FX35/FX45
1. CHECK INTAKE SENSOR CIRCUIT
Check ambient sensor and intake sensor. Refer to AT C - 5 4 , "
FUNCTION CONFIRMATION PROCEDURE" ,
see No. 9 and 11.
OK or NG
OK >> GO TO 2.
NG >>
�Malfunctioning ambient sensor: Refer to ATC-104, "Ambient Sensor Circuit" .
�Malfunctioning intake sensor: Refer to AT C - 11 3 , "Intake Sensor Circuit" .
2. PERFORM AUTO ACTIVE TEST
Refer to PG-24, "
Auto Active Test" .
Does the magnet clutch operate?
YES >>�WITH CONSULT-II
GO TO 5.
�WITHOUT CONSULT-II
GO TO 6.
NO >> Check 10A fuse (No. 79, located in IPDM E/R), and GO TO 3.
3. CHECK CIRCUIT CONTINUITY BETWEEN IPDM E/R AND COMPRESSOR
1. Turn ignition switch OFF.
2. Disconnect IPDM E/R connector and compressor (magnet
clutch) connector.
3. Check continuity between IPDM E/R harness connector E8 ter-
minal 33 (L) and compressor harness connector F2 terminal 1
(L).
OK or NG
OK >> GO TO 4.
NG >> Repair harness or connector.
4. CHECK MAGNET CLUTCH CIRCUIT
Check for operation sound when applying battery voltage direct cur-
rent to terminal.
OK or NG
OK >> Replace IPDM E/R.
NG >> Replace magnet clutch. Refer to ATC-143, "
Removal
and Installation of Compressor Clutch" .
33 – 1 : Continuity should exist.
RJIA2004E
RJIA2005E
Page 527 of 4449

ATC-98
TROUBLE DIAGNOSIS
Revision: 2004 November 2004 FX35/FX45
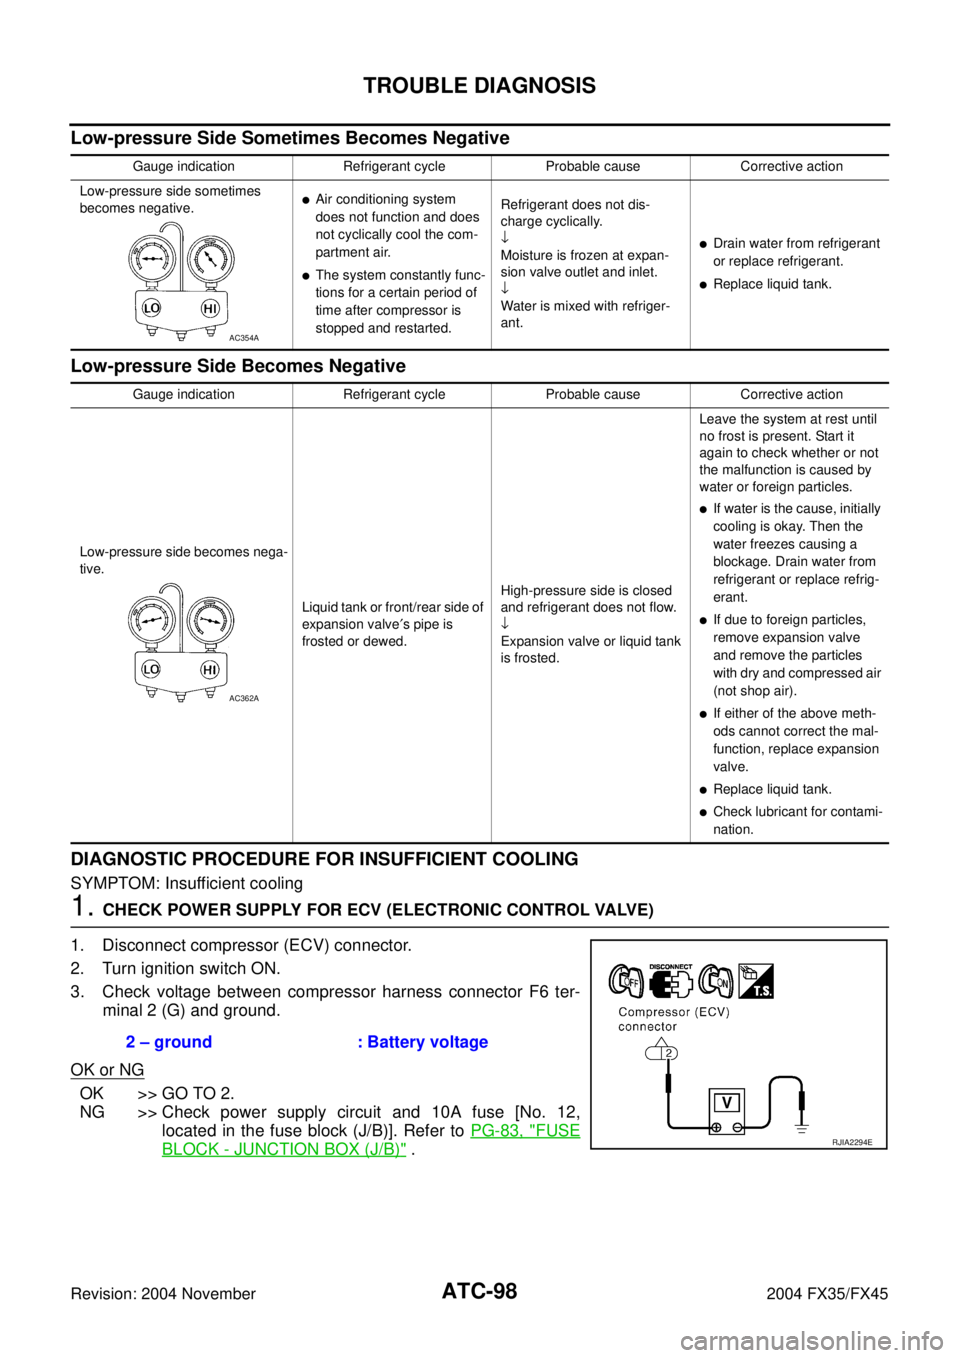
Low-pressure Side Sometimes Becomes Negative
Low-pressure Side Becomes Negative
DIAGNOSTIC PROCEDURE FOR INSUFFICIENT COOLING
SYMPTOM: Insufficient cooling
1. CHECK POWER SUPPLY FOR ECV (ELECTRONIC CONTROL VALVE)
1. Disconnect compressor (ECV) connector.
2. Turn ignition switch ON.
3. Check voltage between compressor harness connector F6 ter-
minal 2 (G) and ground.
OK or NG
OK >> GO TO 2.
NG >> Check power supply circuit and 10A fuse [No. 12,
located in the fuse block (J/B)]. Refer to PG-83, "
FUSE
BLOCK - JUNCTION BOX (J/B)" .
Gauge indication Refrigerant cycle Probable cause Corrective action
Low-pressure side sometimes
becomes negative.
�Air conditioning system
does not function and does
not cyclically cool the com-
partment air.
�The system constantly func-
tions for a certain period of
time after compressor is
stopped and restarted.Refrigerant does not dis-
charge cyclically.
↓
Moisture is frozen at expan-
sion valve outlet and inlet.
↓
Water is mixed with refriger-
ant.
�Drain water from refrigerant
or replace refrigerant.
�Replace liquid tank.
AC354A
Gauge indication Refrigerant cycle Probable cause Corrective action
Low-pressure side becomes nega-
tive.
Liquid tank or front/rear side of
expansion valve′s pipe is
frosted or dewed.High-pressure side is closed
and refrigerant does not flow.
↓
Expansion valve or liquid tank
is frosted.Leave the system at rest until
no frost is present. Start it
again to check whether or not
the malfunction is caused by
water or foreign particles.
�If water is the cause, initially
cooling is okay. Then the
water freezes causing a
blockage. Drain water from
refrigerant or replace refrig-
erant.
�If due to foreign particles,
remove expansion valve
and remove the particles
with dry and compressed air
(not shop air).
�If either of the above meth-
ods cannot correct the mal-
function, replace expansion
valve.
�Replace liquid tank.
�Check lubricant for contami-
nation.
AC362A
2 – ground : Battery voltage
RJIA2294E
Page 549 of 4449

ATC-120
INTAKE SENSOR
Revision: 2004 November 2004 FX35/FX45
INTAKE SENSORPFP:27723
Removal and InstallationAJS0015D
REMOVAL
1. Set the temperature at 18°C (60°F), and then disconnect the battery negative cable.
2. Use a refrigerant collecting equipment (for HFC-134a) to discharge refrigerant.
3. Remove the mounting bolt, and then remove the low-pressure pipe 2 and high-pressure pipe 3. Refer to
ATC-151, "
Removal and Installation of Low-pressure Pipe 2 and High-pressure Pipe 3" .
CAUTION:
Seal connection opening of piping with a cap or vinyl tape to avoid exposure to atmosphere.
4. Slide the evaporator to passenger side, and then remove the
intake sensor.
INSTALLATION
Installation is basically the reverse order of removal.
CAUTION:
�Replace O-rings for A/C piping with new ones. Before installing, apply compressor oil to them.
�Connection point for female-side piping is thin. So, when inserting male-side piping, take care not
to deform female-side piping. Slowly insert in axial direction.
�Insert one-touch joint connection point securely until it clicks.
�After piping has been connected, pull male-side piping by hand to make sure piping does not
come off.
�When recharging refrigerant, check for leaks.
RJIA0928E