Page 655 of 3066
TROUBLE DIAGNOSIS
ATC-77
C
D
E
F
G
H
I
K
L
MA
B
AT C
4.CHECK A/C RELAY AFTER DISCONNECTING IT
Refer toAT C - 8 0 , "
A/C Relay".
OK or NG
OK >>ReconnectA/Crelay.AndGOTO5.
NG >> 1. replace A/C relay.
2. Go to self-diagnosis step-by-step procedure:ATC-43, "
PROCEDURE"and perform self-diag-
nosis STEP-4.Confirm that magnet clutch operation is normal.
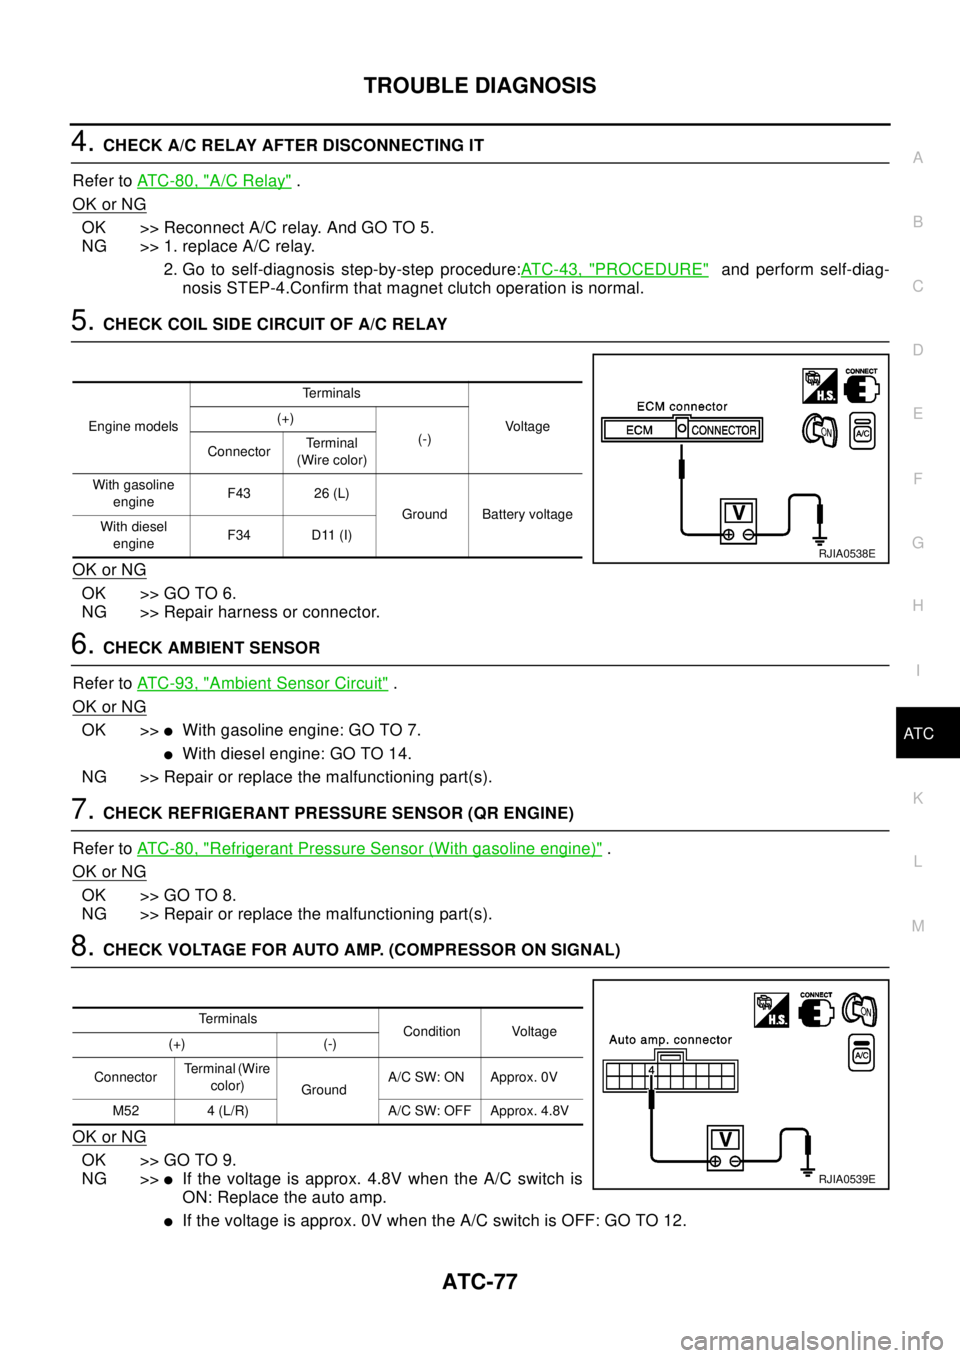
5.CHECK COIL SIDE CIRCUIT OF A/C RELAY
OK or NG
OK >> GO TO 6.
NG >> Repair harness or connector.
6.CHECK AMBIENT SENSOR
Refer toAT C - 9 3 , "
Ambient Sensor Circuit".
OK or NG
OK >>lWith gasoline engine: GO TO 7.
lWith diesel engine: GO TO 14.
NG >> Repair or replace the malfunctioning part(s).
7.CHECK REFRIGERANT PRESSURE SENSOR (QR ENGINE)
Refer toAT C - 8 0 , "
Refrigerant Pressure Sensor (With gasoline engine)".
OK or NG
OK >> GO TO 8.
NG >> Repair or replace the malfunctioning part(s).
8.CHECK VOLTAGE FOR AUTO AMP. (COMPRESSOR ON SIGNAL)
OK or NG
OK >> GO TO 9.
NG >>
lIf the voltage is approx. 4.8V when the A/C switch is
ON: Replace the auto amp.
lIf the voltage is approx. 0V when the A/C switch is OFF: GO TO 12.
Engine modelsTe r m i n a l s
Vo l ta g e (+)
(-)
ConnectorTe r m i n a l
(Wire color)
With gasoline
engineF43 26 (L)
Ground Battery voltage
With diesel
engineF34 D11 (I)
RJIA0538E
Te r m i n a l s
Condition Voltage
(+) (-)
ConnectorTerminal (Wire
color)
GroundA/C SW: ON Approx. 0V
M52 4 (L/R) A/C SW: OFF Approx. 4.8V
RJIA0539E
Page 656 of 3066
ATC-78
TROUBLE DIAGNOSIS
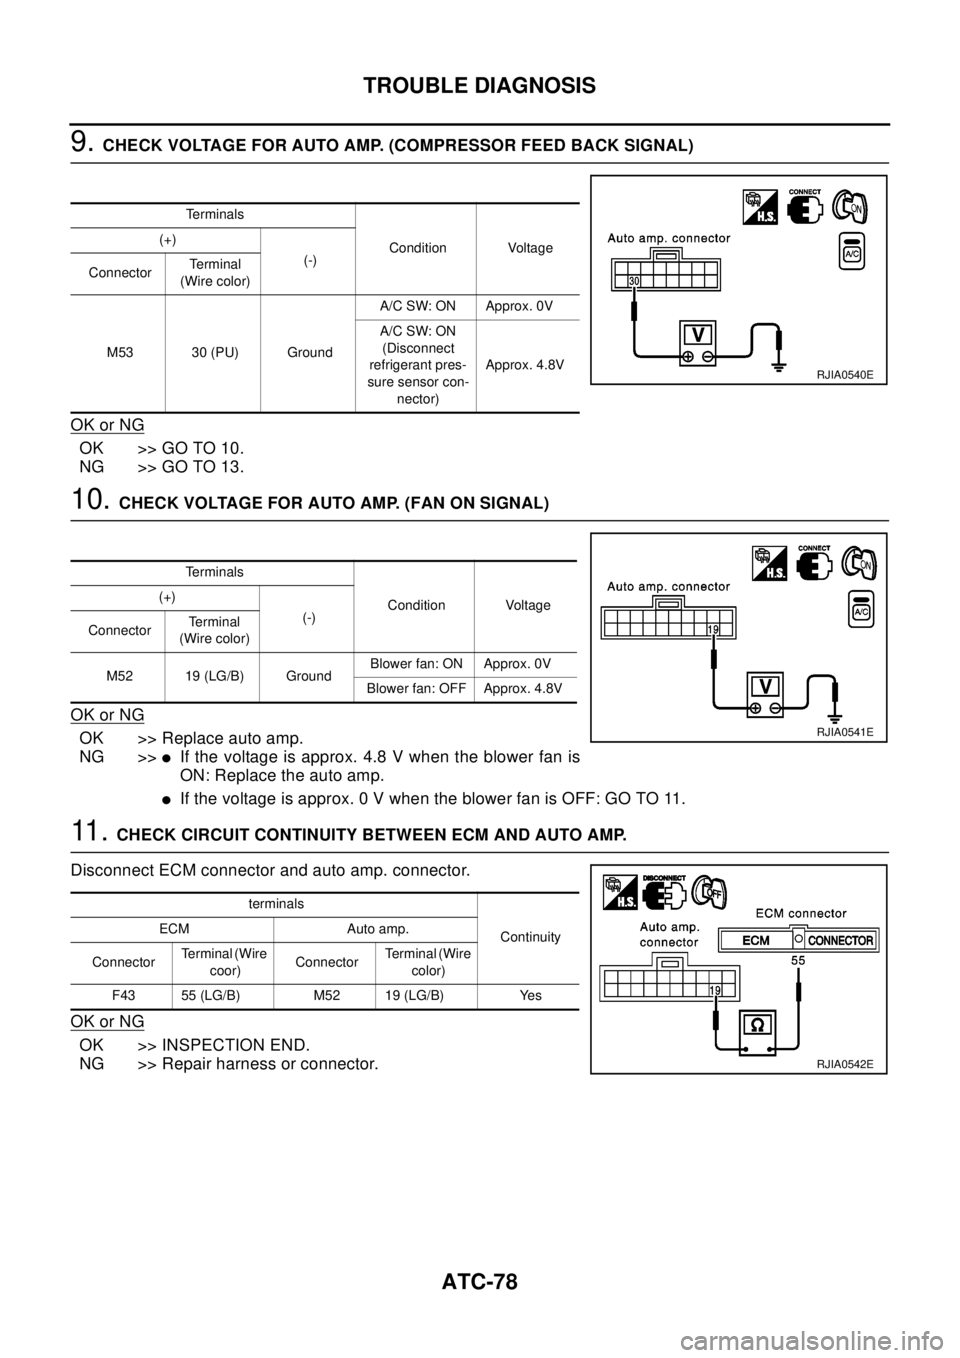
9.CHECK VOLTAGE FOR AUTO AMP. (COMPRESSOR FEED BACK SIGNAL)
OK or NG
OK >> GO TO 10.
NG >> GO TO 13.
10.CHECK VOLTAGE FOR AUTO AMP. (FAN ON SIGNAL)
OK or NG
OK >> Replace auto amp.
NG >>
lIf the voltage is approx. 4.8 V when the blower fan is
ON: Replace the auto amp.
lIf the voltage is approx. 0 V when the blower fan is OFF: GO TO 11.
11 .CHECK CIRCUIT CONTINUITY BETWEEN ECM AND AUTO AMP.
Disconnect ECM connector and auto amp. connector.
OK or NG
OK >> INSPECTION END.
NG >> Repair harness or connector.
Te r m i n a l s
Condition Voltage (+)
(-)
ConnectorTe r m i n a l
(Wire color)
M53 30 (PU) GroundA/C SW: ON Approx. 0V
A/C SW: ON
(Disconnect
refrigerant pres-
sure sensor con-
nector)Approx. 4.8V
RJIA0540E
Te r m i n a l s
Condition Voltage (+)
(-)
ConnectorTe r m i n a l
(Wire color)
M52 19 (LG/B) GroundBlower fan: ON Approx. 0V
Blower fan: OFF Approx. 4.8V
RJIA0541E
terminals
Continuity ECM Auto amp.
ConnectorTerminal (Wire
coor)ConnectorTerminal (Wire
color)
F43 55 (LG/B) M52 19 (LG/B) Yes
RJIA0542E
Page 658 of 3066
ATC-80
TROUBLE DIAGNOSIS
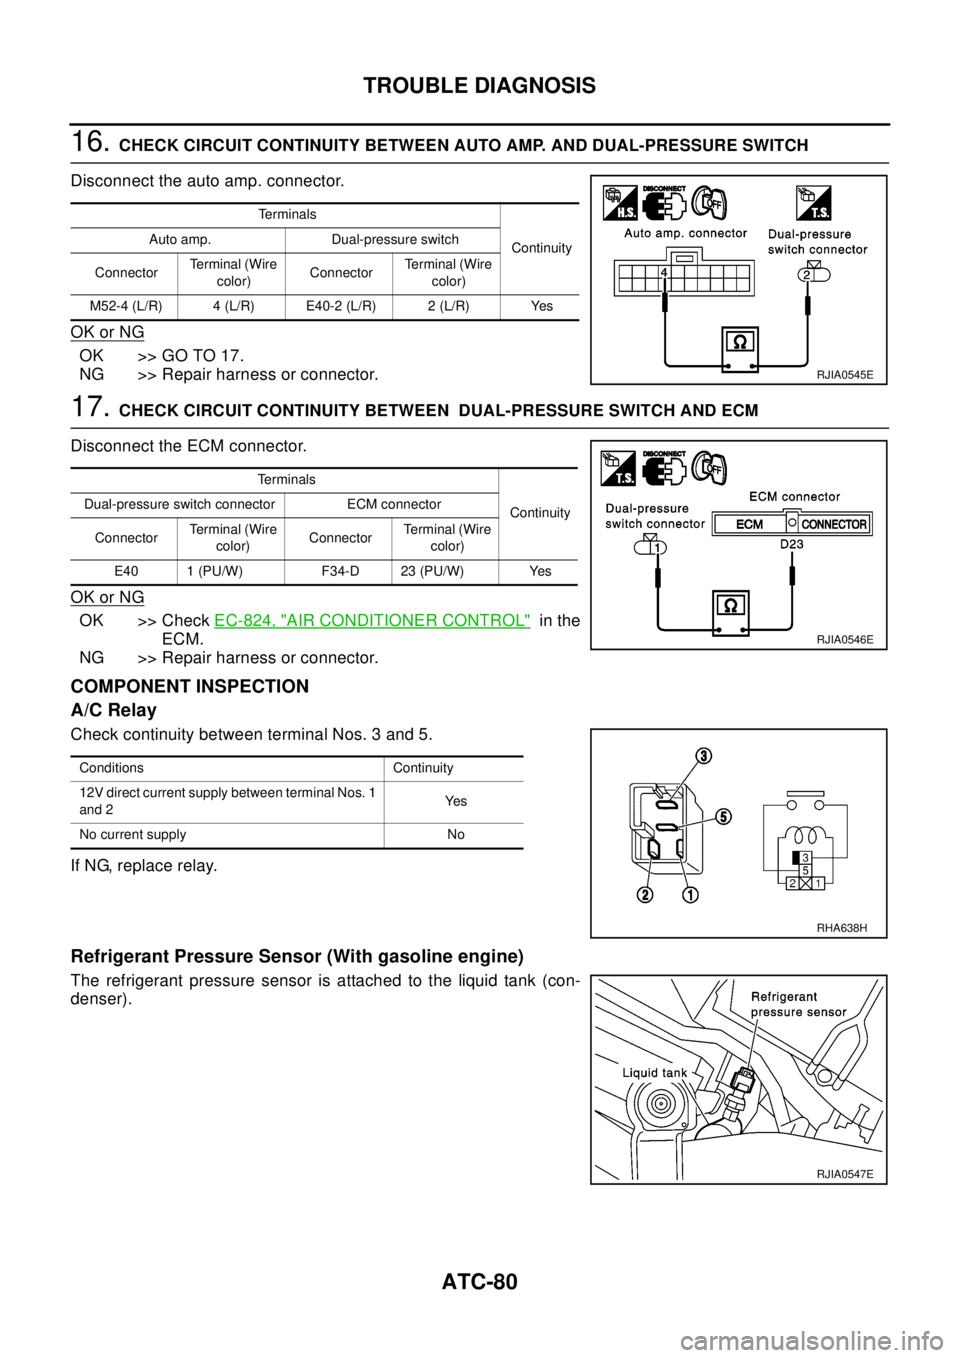
16.CHECK CIRCUIT CONTINUITY BETWEEN AUTO AMP. AND DUAL-PRESSURE SWITCH
Disconnect the auto amp. connector.
OK or NG
OK >> GO TO 17.
NG >> Repair harness or connector.
17.CHECK CIRCUIT CONTINUITY BETWEEN DUAL-PRESSURE SWITCH AND ECM
Disconnect the ECM connector.
OK or NG
OK >> CheckEC-824, "AIR CONDITIONER CONTROL"in the
ECM.
NG >> Repair harness or connector.
COMPONENT INSPECTION
A/C Relay
Check continuity between terminal Nos. 3 and 5.
If NG, replace relay.
Refrigerant Pressure Sensor (With gasoline engine)
The refrigerant pressure sensor is attached to the liquid tank (con-
denser).
Te r m i n a l s
Continuity Auto amp. Dual-pressure switch
ConnectorTerminal (Wire
color)ConnectorTerminal (Wire
color)
M52-4 (L/R) 4 (L/R) E40-2 (L/R) 2 (L/R) Yes
RJIA0545E
Te r m i n a l s
Continuity Dual-pressure switch connector ECM connector
ConnectorTerminal (Wire
color)ConnectorTerminal (Wire
color)
E40 1 (PU/W) F34-D 23 (PU/W) Yes
RJIA0546E
Conditions Continuity
12V direct current supply between terminal Nos. 1
and 2Ye s
No current supply No
RHA638H
RJIA0547E
Page 666 of 3066
ATC-88
TROUBLE DIAGNOSIS
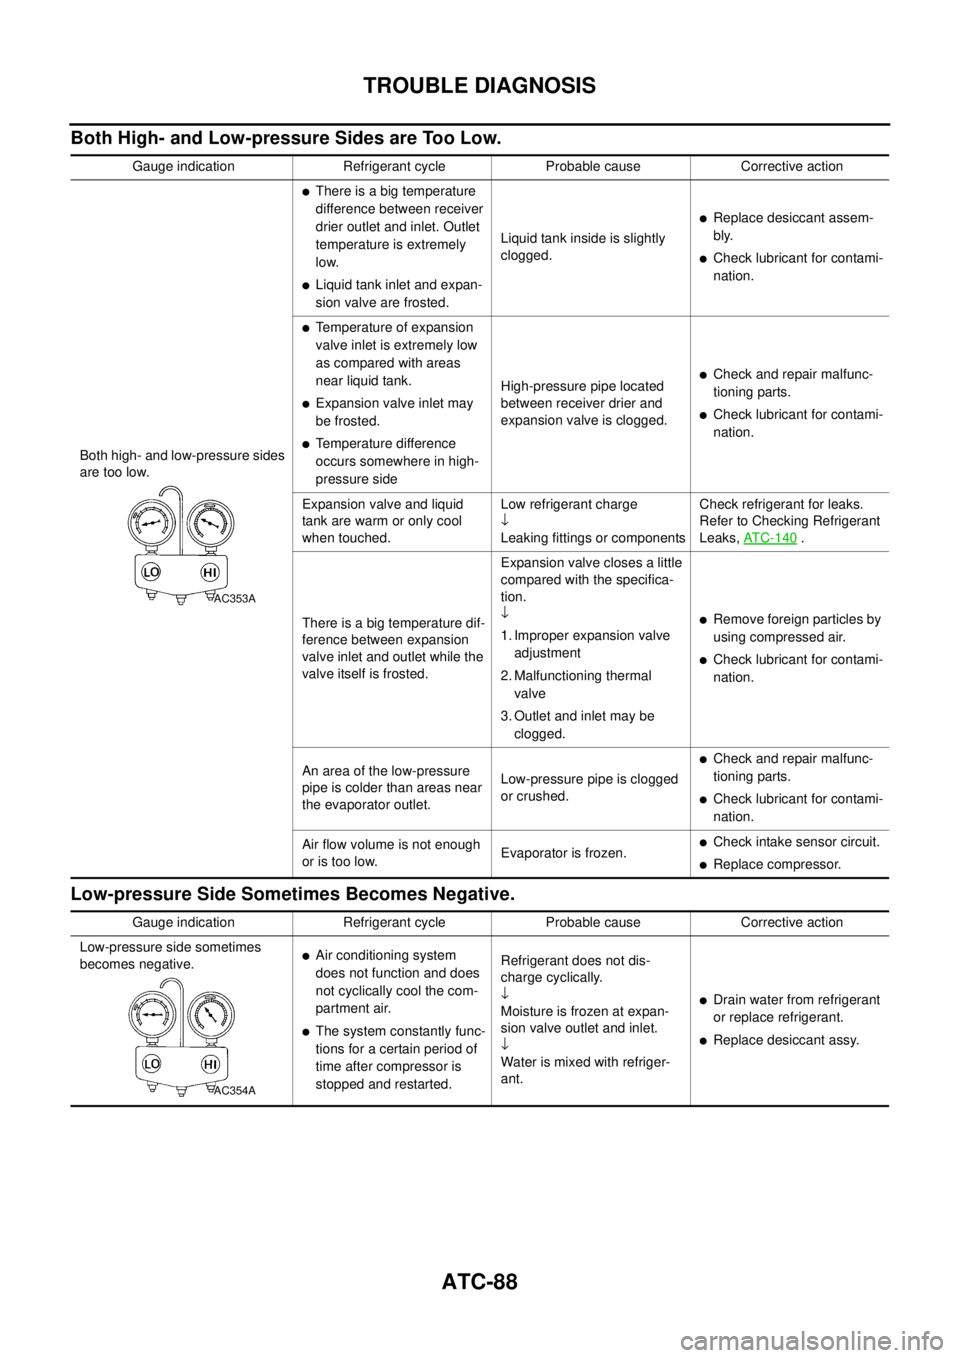
Both High- and Low-pressure Sides are Too Low.
Low-pressure Side Sometimes Becomes Negative.
Gauge indication Refrigerant cycle Probable cause Corrective action
Both high- and low-pressure sides
are too low.
lThere is a big temperature
difference between receiver
drier outlet and inlet. Outlet
temperature is extremely
low.
lLiquid tank inlet and expan-
sion valve are frosted.Liquid tank inside is slightly
clogged.
lReplace desiccant assem-
bly.
lCheck lubricant for contami-
nation.
lTemperature of expansion
valve inlet is extremely low
as compared with areas
near liquid tank.
lExpansion valve inlet may
be frosted.
lTemperature difference
occurs somewhere in high-
pressure sideHigh-pressure pipe located
between receiver drier and
expansion valve is clogged.
lCheck and repair malfunc-
tioning parts.
lCheck lubricant for contami-
nation.
Expansion valve and liquid
tank are warm or only cool
when touched.Low refrigerant charge
¯
Leaking fittings or componentsCheck refrigerant for leaks.
Refer to Checking Refrigerant
Leaks,AT C - 1 4 0
.
There is a big temperature dif-
ference between expansion
valve inlet and outlet while the
valve itself is frosted.Expansion valve closes a little
compared with the specifica-
tion.
¯
1. Improper expansion valve
adjustment
2. Malfunctioning thermal
valve
3. Outlet and inlet may be
clogged.
lRemove foreign particles by
using compressed air.
lCheck lubricant for contami-
nation.
An area of the low-pressure
pipe is colder than areas near
the evaporator outlet.Low-pressure pipe is clogged
or crushed.
lCheck and repair malfunc-
tioning parts.
lCheck lubricant for contami-
nation.
Air flow volume is not enough
or is too low.Evaporator is frozen.
lCheck intake sensor circuit.
lReplace compressor.
AC353A
Gauge indication Refrigerant cycle Probable cause Corrective action
Low-pressure side sometimes
becomes negative.
lAir conditioning system
does not function and does
not cyclically cool the com-
partment air.
lThe system constantly func-
tions for a certain period of
time after compressor is
stopped and restarted.Refrigerant does not dis-
charge cyclically.
¯
Moisture is frozen at expan-
sion valve outlet and inlet.
¯
Water is mixed with refriger-
ant.
lDrain water from refrigerant
or replace refrigerant.
lReplace desiccant assy.
AC354A
Page 670 of 3066
ATC-92
TROUBLE DIAGNOSIS
Self-diagnosis
EJS001H9
Symptom: Self-diagnosis can not be performed.
INSPECTION FLOW
Memory FunctionEJS001HA
Symptom: Memory function does not operate.
*1ATC-129, "Removal and Installation
for Compressor Clutch"
*3AT C - 2 1 , "Maintenance of Lubricant
Quantity in Compressor"
*5EM-13, "Checking Drive Belts"QR
engine;EM-110, "
Checking Drive
Belts"YD engine
*2ATC-132, "
Inspection"*4 Operational checkAT C - 5 1
*1 Main power supply and body ground
circuit.PG-3*2 Ambient sensor circuit.AT C - 9 3*3 In-vehicle sensor circuit .AT C - 9 5
*4 sunload sensor circuit.AT C - 9 8*5 Intake sensor circuit.AT C - 1 0 1*6 Air mix door motor.AT C - 6 1
*7 Operational check.AT C - 5 1*8 Symptom table.AT C -3 0*9 Operational checkAT C - 5 1
RJIA0551E
Page 671 of 3066
TROUBLE DIAGNOSIS
ATC-93
C
D
E
F
G
H
I
K
L
MA
B
AT C
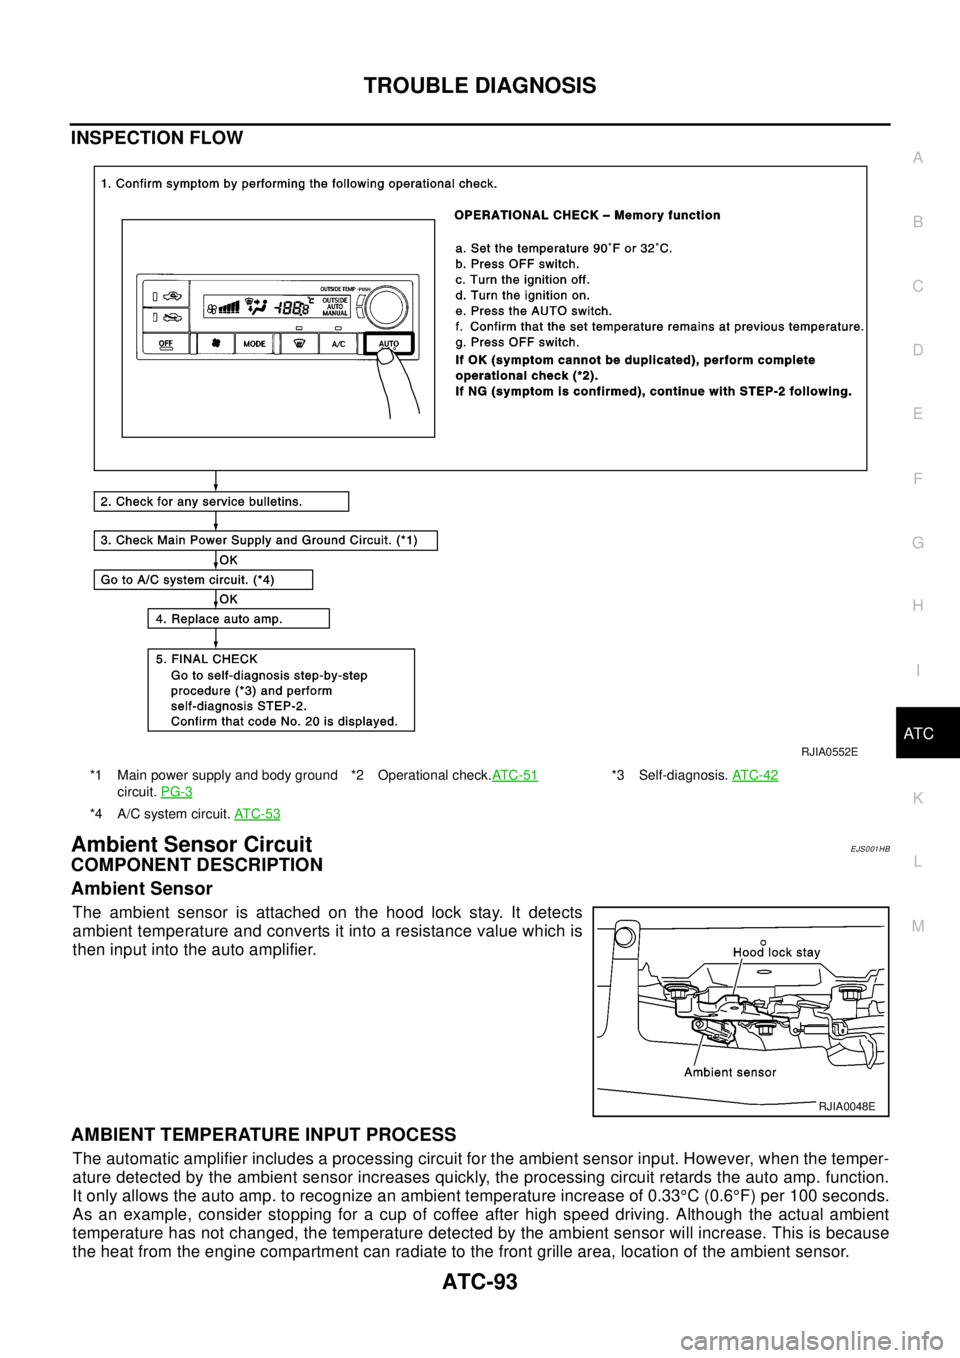
INSPECTION FLOW
Ambient Sensor CircuitEJS001HB
COMPONENT DESCRIPTION
Ambient Sensor
The ambient sensor is attached on the hood lock stay. It detects
ambient temperature and converts it into a resistance value which is
then input into the auto amplifier.
AMBIENT TEMPERATURE INPUT PROCESS
The automatic amplifier includes a processing circuit for the ambient sensor input. However, when the temper-
ature detected by the ambient sensor increases quickly, the processing circuit retards the auto amp. function.
It only allows the auto amp. to recognize an ambient temperature increase of 0.33°C(0.6°F) per 100 seconds.
As an example, consider stopping for a cup of coffee after high speed driving. Although the actual ambient
temperature has not changed, the temperature detected by the ambient sensor will increase. This is because
the heat from the engine compartment can radiate to the front grille area, location of the ambient sensor.
*1 Main power supply and body ground
circuit.PG-3*2 Operational check.AT C - 5 1*3 Self-diagnosis.AT C - 4 2
*4 A/C system circuit.AT C - 5 3
RJIA0552E
RJIA0048E
Page 672 of 3066
ATC-94
TROUBLE DIAGNOSIS
DIAGNOSTIC PROCEDURE
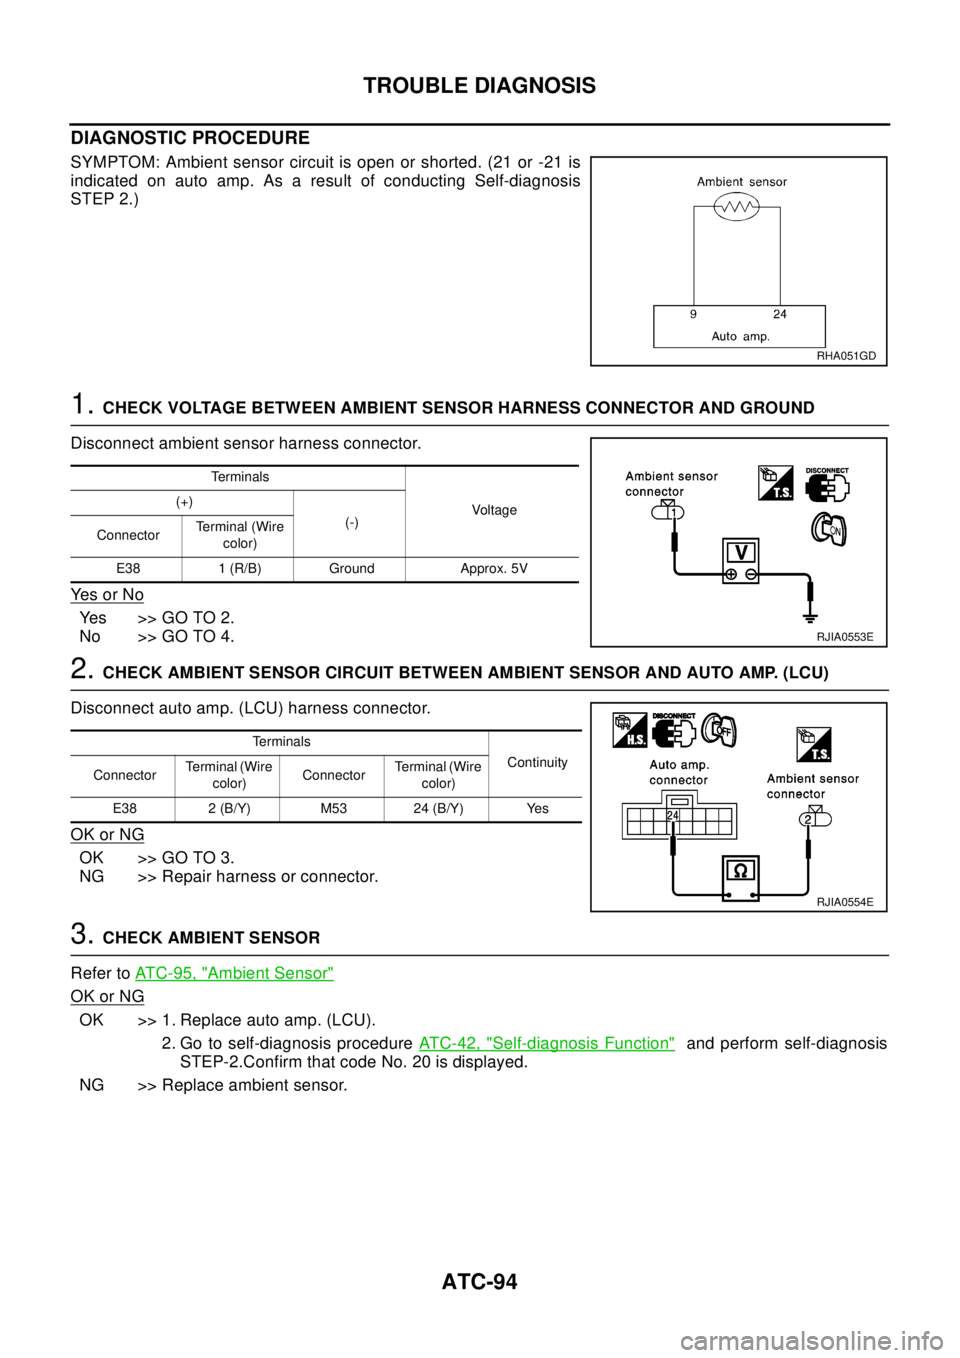
SYMPTOM: Ambient sensor circuit is open or shorted. (21 or -21 is
indicated on auto amp. As a result of conducting Self-diagnosis
STEP 2.)
1.CHECK VOLTAGE BETWEEN AMBIENT SENSOR HARNESS CONNECTOR AND GROUND
Disconnect ambient sensor harness connector.
Ye s o r N o
Yes >>GOTO2.
No >> GO TO 4.
2.CHECK AMBIENT SENSOR CIRCUIT BETWEEN AMBIENT SENSOR AND AUTO AMP. (LCU)
Disconnect auto amp. (LCU) harness connector.
OK or NG
OK >> GO TO 3.
NG >> Repair harness or connector.
3.CHECK AMBIENT SENSOR
Refer toATC-95, "
Ambient Sensor"
OK or NG
OK >> 1. Replace auto amp. (LCU).
2. Go to self-diagnosis procedureATC-42, "
Self-diagnosis Function"and perform self-diagnosis
STEP-2.Confirm that code No. 20 is displayed.
NG >> Replace ambient sensor.
RHA051GD
Te r m i n a l s
Voltag e (+)
(-)
ConnectorTerminal (Wire
color)
E38 1 (R/B) Ground Approx. 5V
RJIA0553E
Te r m i n a l s
Continuity
ConnectorTerminal (Wire
color)ConnectorTerminal (Wire
color)
E38 2 (B/Y) M53 24 (B/Y) Yes
RJIA0554E
Page 673 of 3066
TROUBLE DIAGNOSIS
ATC-95
C
D
E
F
G
H
I
K
L
MA
B
AT C
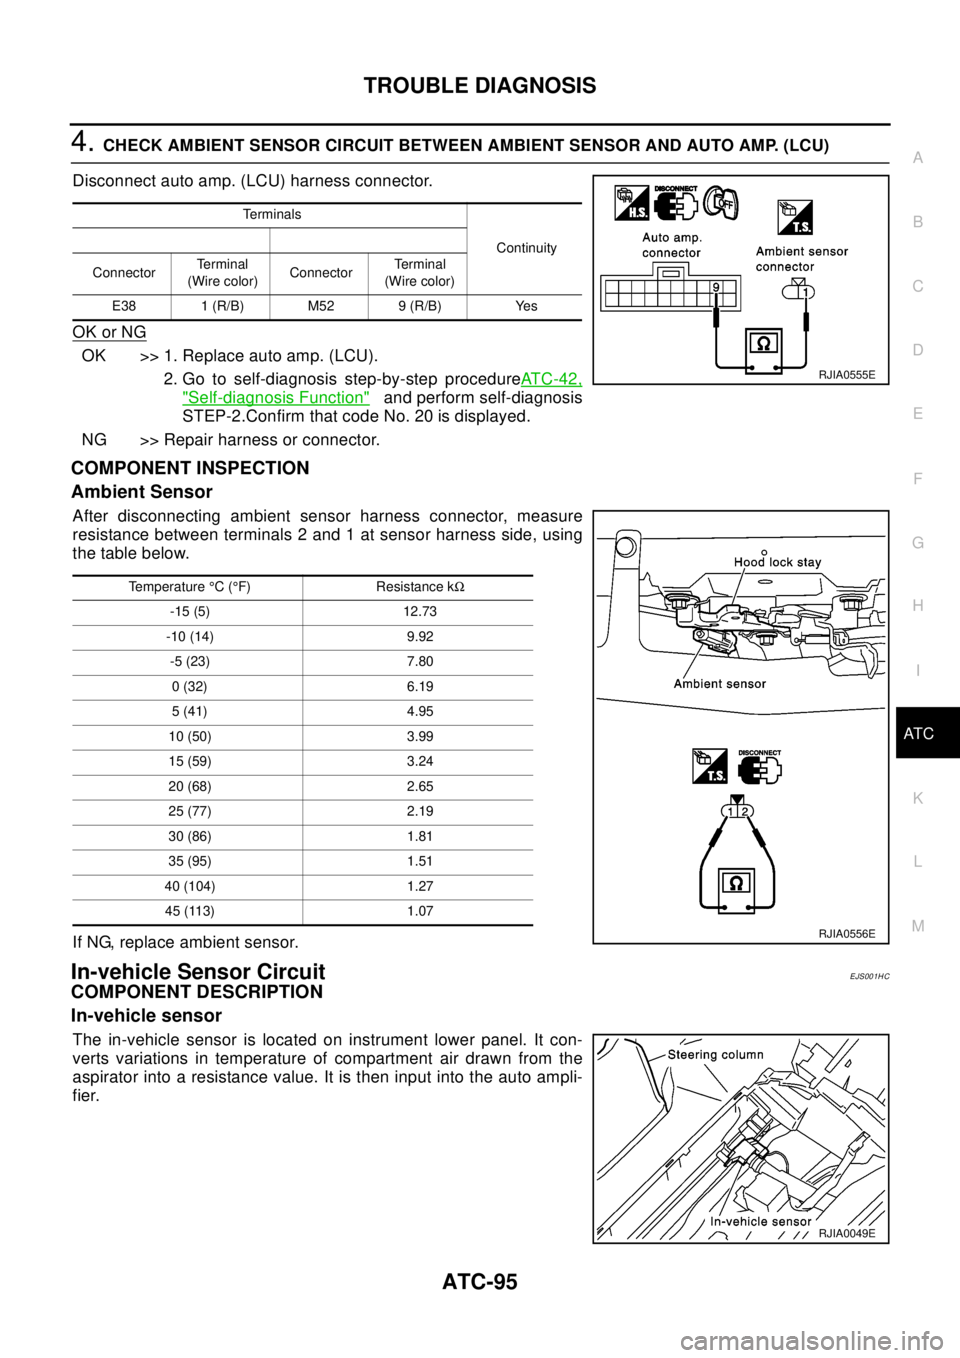
4.CHECK AMBIENT SENSOR CIRCUIT BETWEEN AMBIENT SENSOR AND AUTO AMP. (LCU)
Disconnect auto amp. (LCU) harness connector.
OK or NG
OK >> 1. Replace auto amp. (LCU).
2. Go to self-diagnosis step-by-step procedureAT C - 4 2 ,
"Self-diagnosis Function"and perform self-diagnosis
STEP-2.Confirm that code No. 20 is displayed.
NG >> Repair harness or connector.
COMPONENT INSPECTION
Ambient Sensor
After disconnecting ambient sensor harness connector, measure
resistance between terminals 2 and 1 at sensor harness side, using
the table below.
If NG, replace ambient sensor.
In-vehicle Sensor CircuitEJS001HC
COMPONENT DESCRIPTION
In-vehicle sensor
The in-vehicle sensor is located on instrument lower panel. It con-
verts variations in temperature of compartment air drawn from the
aspirator into a resistance value. It is then input into the auto ampli-
fier.
Te r m i n a l s
Continuity
ConnectorTe r m i n a l
(Wire color)ConnectorTerminal
(Wire color)
E38 1 (R/B) M52 9 (R/B) Yes
RJIA0555E
Temperature°C(°F) Resistance kW
-15 (5) 12.73
-10 (14) 9.92
-5 (23) 7.80
0(32) 6.19
5(41) 4.95
10 (50) 3.99
15 (59) 3.24
20 (68) 2.65
25 (77) 2.19
30 (86) 1.81
35 (95) 1.51
40 (104) 1.27
45 (113) 1.07
RJIA0556E
RJIA0049E