Page 2961 of 3502
![NISSAN TEANA 2003 Service Manual OIL PUMP
LU-11
[QR]
C
D
E
F
G
H
I
J
K
L
MA
LU
OIL PUMPPFP:15010
Removal and InstallationBBS0059S
REMOVAL
Remove front cover. Refer to EM-53, "TIMING CHAIN" .
NOTE:
Oil pump is built into front cove](/manual-img/5/57392/w960_57392-2960.png "NISSAN TEANA 2003 Service Manual OIL PUMP
LU-11
[QR]
C
D
E
F
G
H
I
J
K
L
MA
LU
OIL PUMPPFP:15010
Removal and InstallationBBS0059S
REMOVAL
Remove front cover. Refer to EM-53, \"TIMING CHAIN\" .
NOTE:
Oil pump is built into front cove")
OIL PUMP
LU-11
[QR]
C
D
E
F
G
H
I
J
K
L
MA
LU
OIL PUMPPFP:15010
Removal and InstallationBBS0059S
REMOVAL
Remove front cover. Refer to EM-53, "TIMING CHAIN" .
NOTE:
Oil pump is built into front cover.
INSTALLATION
Note the following, and install in the reverse order of removal.
�When installing, align oil pump drive spacer flat faces with inner rotor flat faces.
INSPECTION AFTER INSTALLATION
1. Check the engine oil level. Refer to LU-7, "ENGINE OIL" .
2. Start engine, and make sure there is no leaks of engine oil.
3. Stop engine and wait for 10 minutes.
4. Check the engine oil level and adjust engine oil. Refer to LU-7, "
ENGINE OIL" .
Disassembly and AssemblyBBS0059T
DISASSEMBLY
1. Remove oil pump cover.
2. Remove inner rotor and outer rotor from front cover.
3. After removing regulator valve plug, remove regulator valve spring and regulator valve.
PBIC2430E
1. Front cover (Oil pump body is united) 2. Outer rotor 3. Inner rotor
4. Oil pump cover 5. Regulator valve 6. Regulator valve spring
7. Regulator valve plug
Page 2963 of 3502
OIL PUMP
LU-13
[QR]
C
D
E
F
G
H
I
J
K
L
MA
LU
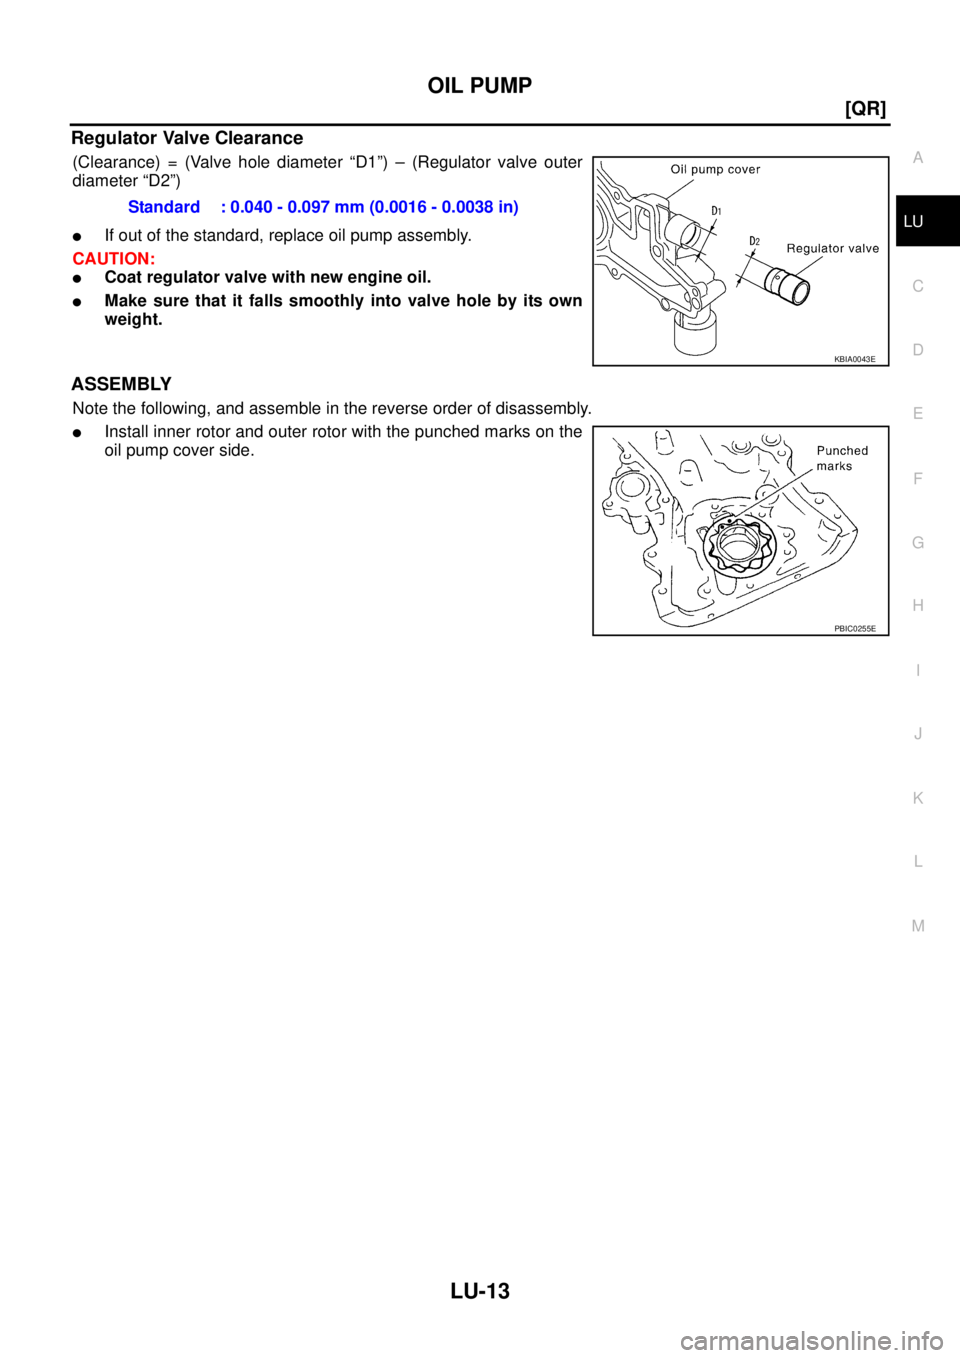
Regulator Valve Clearance
(Clearance) = (Valve hole diameter “D1”) – (Regulator valve outer
diameter “D2”)
�If out of the standard, replace oil pump assembly.
CAUTION:
�Coat regulator valve with new engine oil.
�Make sure that it falls smoothly into valve hole by its own
weight.
ASSEMBLY
Note the following, and assemble in the reverse order of disassembly.
�Install inner rotor and outer rotor with the punched marks on the
oil pump cover side.Standard : 0.040 - 0.097 mm (0.0016 - 0.0038 in)
KBIA0043E
PBIC0255E
Page 2964 of 3502
LU-14
[QR]
SERVICE DATA AND SPECIFICATIONS (SDS)
SERVICE DATA AND SPECIFICATIONS (SDS)PFP:00030
Standard and LimitBBS0059U
OIL PRESSURE
*: Engine oil temperature at 80° (176°F)
ENGINE OIL CAPACITY (APPROXIMATE)
Unit: (Imp qt)
OIL PUMP
Unit: mm (in)
REGULATOR VALVE
Unit: mm (in) Engine speed
rpm Approximate discharge pressure*
kPa (bar, kg/cm
2 , psi)
Idle speed More than 98 (0.98, 1.0, 14)
2,000 More than 294 (2.94, 3.0, 43)
Drain and refillWith oil filter change 3.9 (3-3/8)
Without oil filter change 3.7 (3-1/4)
Dry engine (Overhaul)4.5 (4)
Oil pump body to outer rotor radial clearance 0.114 - 0.179 (0.0045 - 0.0070)
Inner rotor to outer rotor tip clearance Below 0.220 (0.0087)
Oil pump body to inner rotor side clearance 0.030 - 0.070 (0.0012 - 0.0028)
Oil pump body to outer rotor side clearance 0.060 - 0.110 (0.0024 - 0.0043)
Inner rotor to oil pump body clearance 0.035 - 0.070 (0.0014 - 0.0028)
Regulator valve to valve hole clearance 0.040 - 0.097 (0.0016 - 0.0038)
Page 2965 of 3502
PRECAUTIONS
LU-15
[VQ]
C
D
E
F
G
H
I
J
K
L
MA
LU
[VQ]PRECAUTIONSPFP:00001
Precautions for Liquid GasketBBS004WF
LIQUID GASKET APPLICATION PROCEDURE
1. Remove old liquid gasket adhering to the liquid gasket application surface and the mating surface.
�Remove liquid gasket completely from the liquid gasket application surface, mounting bolts, and bolt
holes.
2. Wipe the liquid gasket application surface and the mating surface with white gasoline (lighting and heating
use) to remove adhering moisture, grease and foreign materials.
3. Attach liquid gasket tube to tube presser (SST).
Use Genuine Liquid Gasket or equivalent.
�Within 5 minutes of liquid gasket application, install the mating
component.
�If liquid gasket protrudes, wipe it off immediately.
�Do not retighten mounting bolts or nuts after the installation.
�After 30 minutes or more have passed from the installation, fill
engine oil and engine coolant.
PBIC2160E
Page 2969 of 3502
![NISSAN TEANA 2003 Service Manual ENGINE OIL
LU-19
[VQ]
C
D
E
F
G
H
I
J
K
L
MA
LU
ENGINE OILPFP:KLA92
InspectionBBS004WK
ENGINE OIL LEVEL
NOTE:
Before starting engine, put vehicle horizontally and check the engine oil level. If engi](/manual-img/5/57392/w960_57392-2968.png "NISSAN TEANA 2003 Service Manual ENGINE OIL
LU-19
[VQ]
C
D
E
F
G
H
I
J
K
L
MA
LU
ENGINE OILPFP:KLA92
InspectionBBS004WK
ENGINE OIL LEVEL
NOTE:
Before starting engine, put vehicle horizontally and check the engine oil level. If engi")
ENGINE OIL
LU-19
[VQ]
C
D
E
F
G
H
I
J
K
L
MA
LU
ENGINE OILPFP:KLA92
InspectionBBS004WK
ENGINE OIL LEVEL
NOTE:
Before starting engine, put vehicle horizontally and check the engine oil level. If engine is already started, stop
it and allow 10 minutes before checking.
1. Pull out oil level gauge and wipe it clean.
2. Insert oil level gauge and make sure the engine oil level is within
the range shown in the figure.
3. If it is out of range, adjust it.
ENGINE OIL APPEARANCE
�Check engine oil for white turbidity or heavy contamination.
�If engine oil becomes turbid and white, it is highly probable that it is contaminated with engine coolant.
Repair or replace damaged parts.
ENGINE OIL LEAKAGE
Check for engine oil leakage around the following areas:
�Oil pan
�Oil pan drain plug
�Oil pressure switch
�Oil filter
�Oil cooler (VQ35DE)
�Water pump cover
�Chain tensioner cover
�Intake valve timing control cover and intake valve timing control solenoid valve
�Mating surface between cylinder block and cylinder head
�Mating surface between cylinder head and rocker cover
�Mating surface between front timing chain case and rear timing chain case
�Mating surface between rear timing chain case and cylinder block
�Crankshaft oil seals (front and rear)
PBIC0249E
Page 2970 of 3502
![NISSAN TEANA 2003 Service Manual LU-20
[VQ]
ENGINE OIL
OIL PRESSURE CHECK
WARNING:
�Be careful not to burn yourself, as engine oil may be hot.
�Oil pressure check should be done in “Parking position”.
1. Check engine oil level.](/manual-img/5/57392/w960_57392-2969.png "NISSAN TEANA 2003 Service Manual LU-20
[VQ]
ENGINE OIL
OIL PRESSURE CHECK
WARNING:
�Be careful not to burn yourself, as engine oil may be hot.
�Oil pressure check should be done in “Parking position”.
1. Check engine oil level.")
LU-20
[VQ]
ENGINE OIL
OIL PRESSURE CHECK
WARNING:
�Be careful not to burn yourself, as engine oil may be hot.
�Oil pressure check should be done in “Parking position”.
1. Check engine oil level. Refer to LU-19, "
ENGINE OIL LEVEL" .
2. Remove splash guard (RH).
3. Disconnect harness connector at oil pressure switch, and
remove oil pressure switch using deep socket (commercial ser-
vice tool).
NOTE:
Figure is shown as an example of VQ35DE.
4. Install oil pressure gauge and hose (SST).
5. Start engine and warm it up to normal operating temperature.
6. Check oil pressure with engine running under no-load.
NOTE:
When engine oil temperature is low, engine oil pressure becomes high.
Engine oil pressure [Engine oil temperature at 80°C (176°F)]
If difference is extreme, check oil passage and oil pump for oil leaks.
7. After the inspections, install oil pressure switch as follows:
a. Remove old liquid gasket adhering to oil pressure switch and engine.
b. Apply liquid gasket and tighten oil pressure switch to specification.
Use Genuine Liquid Gasket or equivalent.
c. After warming up engine, make sure there is no leakage of engine oil with running engine.
PBIC2506E
SLC926-A
Engine speed
rpm Approximate discharge pressure
kPa (bar, kg/cm2 , psi)
Idle speed More than 98 (0.98, 1.0, 14)
2,000 More than 294 (2.94, 3.0, 43)
: 14.8 N·m (1.5 kg-m, 11 ft-lb)
Page 2971 of 3502
![NISSAN TEANA 2003 Service Manual ENGINE OIL
LU-21
[VQ]
C
D
E
F
G
H
I
J
K
L
MA
LU
Changing Engine OilBBS004WL
WARNING:
�Be careful not to burn yourself, as engine oil may be hot.
�Prolonged and repeated contact with used engine oil](/manual-img/5/57392/w960_57392-2970.png "NISSAN TEANA 2003 Service Manual ENGINE OIL
LU-21
[VQ]
C
D
E
F
G
H
I
J
K
L
MA
LU
Changing Engine OilBBS004WL
WARNING:
�Be careful not to burn yourself, as engine oil may be hot.
�Prolonged and repeated contact with used engine oil")
ENGINE OIL
LU-21
[VQ]
C
D
E
F
G
H
I
J
K
L
MA
LU
Changing Engine OilBBS004WL
WARNING:
�Be careful not to burn yourself, as engine oil may be hot.
�Prolonged and repeated contact with used engine oil may cause skin cancer; try to avoid direct
skin contact with used engine oil. If skin contact is made, wash thoroughly with soap or hand
cleaner as soon as possible.
1. Warm up engine, put vehicle horizontally and check for engine oil leakage from engine components. Refer
to LU-19, "
ENGINE OIL LEAKAGE" .
2. Stop engine and wait for 10 minutes.
3. Loosen oil filler cap and then remove drain plug.
4. Drain engine oil.
5. Install drain plug with new washer. Refer to EM-145, "
OIL PAN AND OIL STRAINER" .
CAUTION:
Be sure to clean drain plug and install with new washer.
6. Refill with new engine oil.
Engine oil specification and viscosity:
Refer to MA-14, "
RECOMMENDED FLUIDS AND LUBRICANTS" .
Engine oil capacity (Approximate):
Unit: (lmp qt)
CAUTION:
�When filling engine oil, do not pull out oil level gauge.
�The refill capacity depends on the engine oil temperature and drain time. Use these specifica-
tions for reference only.
�Always use oil level gauge to the determine when the proper amount of engine oil is in the
engine.
NOTE:
The same quantity both VQ23DE and VQ35DE.
7. Warm up engine and check area around drain plug and oil filter for engine oil leakage.
8. Stop engine and wait for 10 minutes.
9. Check the engine oil level. Refer to LU-19, "
ENGINE OIL LEVEL" . Oil pan drain plug:
: 34.3 N·m (3.5 kg-m, 25 ft-lb)
Drain and refill With oil filter change 4.0 (3-1/2)
Without oil filter change 3.7 (3-1/4)
Dry engine (Overhaul)5.0 (4-3/8)
Page 2972 of 3502
![NISSAN TEANA 2003 Service Manual LU-22
[VQ]
OIL FILTER
OIL FILTERPFP:15208
Removal and InstallationBBS004WM
REMOVAL
1. Remove splash guard (RH).
2. Using oil filter wrench (SST), remove oil filter.
CAUTION:
�Oil filter is provided](/manual-img/5/57392/w960_57392-2971.png "NISSAN TEANA 2003 Service Manual LU-22
[VQ]
OIL FILTER
OIL FILTERPFP:15208
Removal and InstallationBBS004WM
REMOVAL
1. Remove splash guard (RH).
2. Using oil filter wrench (SST), remove oil filter.
CAUTION:
�Oil filter is provided")
LU-22
[VQ]
OIL FILTER
OIL FILTERPFP:15208
Removal and InstallationBBS004WM
REMOVAL
1. Remove splash guard (RH).
2. Using oil filter wrench (SST), remove oil filter.
CAUTION:
�Oil filter is provided with relief valve. Use Genuine Nissan
Oil Filter or equivalent.
�Be careful not to get burned when engine and engine oil
may be hot.
�When removing, prepare a shop cloth to absorb any
engine oil leakage or spillage.
�Do not allow engine oil to adhere to drive belts.
�Completely wipe off any engine oil that adheres to engine
and vehicle.
NOTE:
Figure is shown as an example VQ35DE.
INSTALLATION
1. Remove foreign materials adhering to oil filter installation surface.
2. Apply new engine oil to the oil seal contact surface of new oil fil-
ter.
3. Screw oil filter manually until it touches the installation surface,
then tighten it by 2/3 turn. Or tighten to specification.
INSPECTION AFTER INSTALLATION
1. Check the engine oil level. Refer to LU-19, "ENGINE OIL" .
2. Start engine, and make sure there is no leaks of engine oil.
3. Stop engine and wait for 10 minutes.
4. Check the engine oil level and adjust engine oil. Refer to LU-19, "
ENGINE OIL" .
PBIC1804E
SMA010
Oil filter:
: 17.6 N·m (1.8 kg-m, 13 ft-lb)
SMA229B
![NISSAN TEANA 2003 Service Manual LU-14
[QR]
SERVICE DATA AND SPECIFICATIONS (SDS)
SERVICE DATA AND SPECIFICATIONS (SDS)PFP:00030
Standard and LimitBBS0059U
OIL PRESSURE
*: Engine oil temperature at 80° (176°F)
ENGINE OIL CAPACIT](/manual-img/5/57392/w960_57392-2963.png "NISSAN TEANA 2003 Service Manual LU-14
[QR]
SERVICE DATA AND SPECIFICATIONS (SDS)
SERVICE DATA AND SPECIFICATIONS (SDS)PFP:00030
Standard and LimitBBS0059U
OIL PRESSURE
*: Engine oil temperature at 80° (176°F)
ENGINE OIL CAPACIT")
![NISSAN TEANA 2003 Service Manual PRECAUTIONS
LU-15
[VQ]
C
D
E
F
G
H
I
J
K
L
MA
LU
[VQ]PRECAUTIONSPFP:00001
Precautions for Liquid GasketBBS004WF
LIQUID GASKET APPLICATION PROCEDURE
1. Remove old liquid gasket adhering to the liquid](/manual-img/5/57392/w960_57392-2964.png "NISSAN TEANA 2003 Service Manual PRECAUTIONS
LU-15
[VQ]
C
D
E
F
G
H
I
J
K
L
MA
LU
[VQ]PRECAUTIONSPFP:00001
Precautions for Liquid GasketBBS004WF
LIQUID GASKET APPLICATION PROCEDURE
1. Remove old liquid gasket adhering to the liquid")