Page 323 of 4500

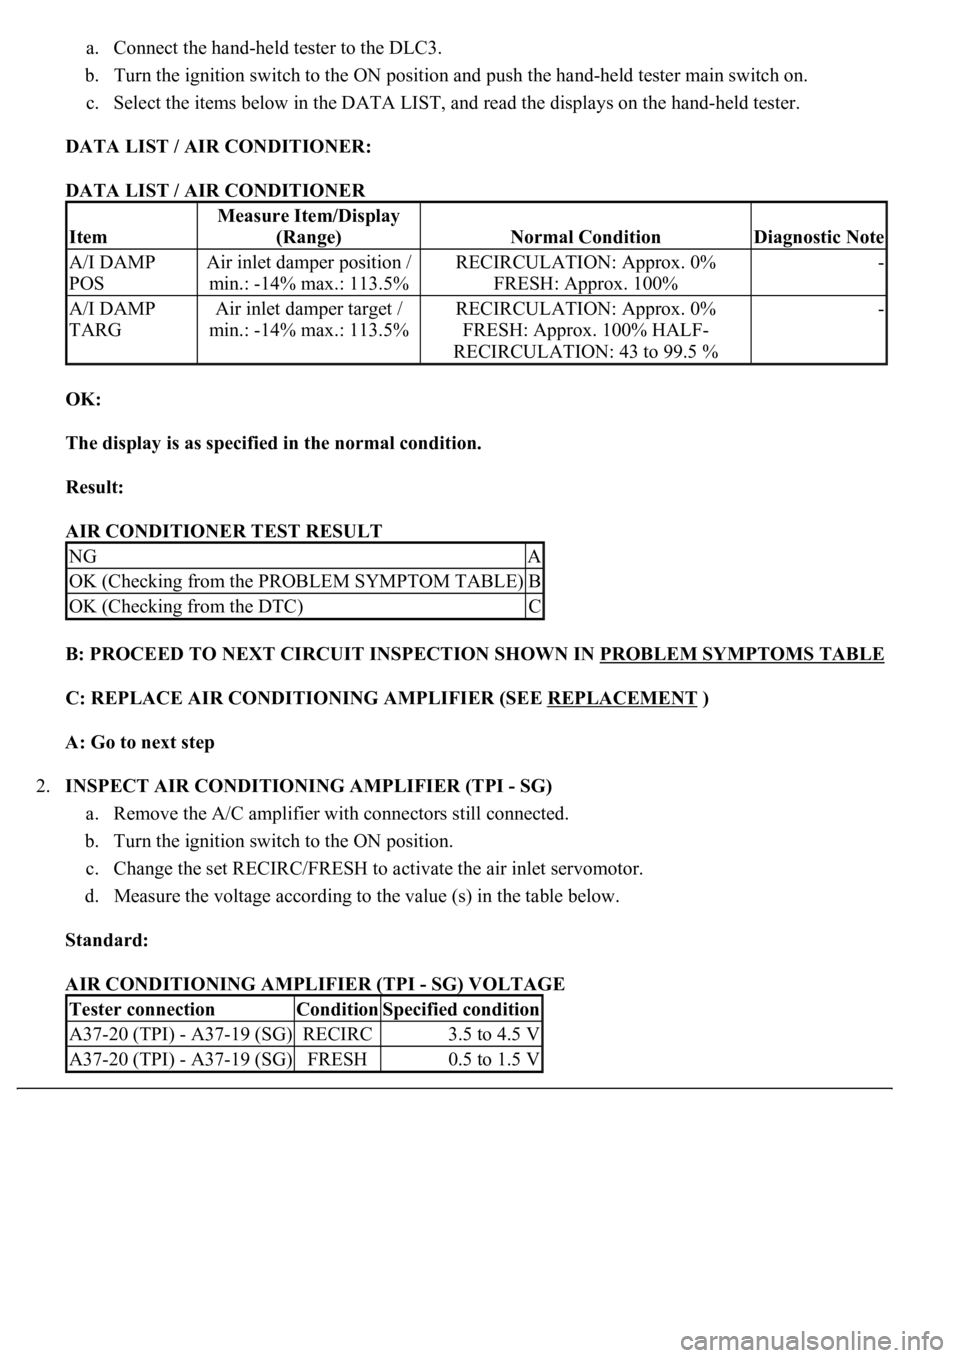
a. Connect the hand-held tester to the DLC3.
b. Turn the ignition switch to the ON position and push the hand-held tester main switch on.
c. Select the items below in the DATA LIST, and read the displays on the hand-held tester.
DATA LIST / AIR CONDITIONER:
DATA LIST / AIR CONDITIONER
OK:
The display is as specified in the normal condition.
Result:
AIR CONDITIONER TEST RESULT
B: PROCEED TO NEXT CIRCUIT INSPECTION SHOWN IN PROBLEM SYMPTOMS TABLE
C: REPLACE AIR CONDITIONING AMPLIFIER (SEE REPLACEMENT )
A: Go to next step
2.INSPECT AIR CONDITIONING AMPLIFIER (TPI - SG)
a. Remove the A/C amplifier with connectors still connected.
b. Turn the ignition switch to the ON position.
c. Change the set RECIRC/FRESH to activate the air inlet servomotor.
d. Measure the voltage according to the value (s) in the table below.
Standard:
AIR CONDITIONING AMPLIFIER (TPI - SG) VOLTAGE
Item
Measure Item/Display
(Range)
Normal ConditionDiagnostic Note
A/I DAMP
POSAir inlet damper position /
min.: -14% max.: 113.5%RECIRCULATION: Approx. 0%
FRESH: Approx. 100%-
A/I DAMP
TARGAir inlet damper target /
min.: -14% max.: 113.5%RECIRCULATION: Approx. 0%
FRESH: Approx. 100% HALF-
RECIRCULATION: 43 to 99.5 %-
NGA
OK (Checking from the PROBLEM SYMPTOM TABLE)B
OK (Checking from the DTC)C
Tester connectionConditionSpecified condition
A37-20 (TPI) - A37-19 (SG)RECIRC3.5 to 4.5 V
A37-20 (TPI) - A37-19 (SG)FRESH0.5 to 1.5 V
Page 331 of 4500

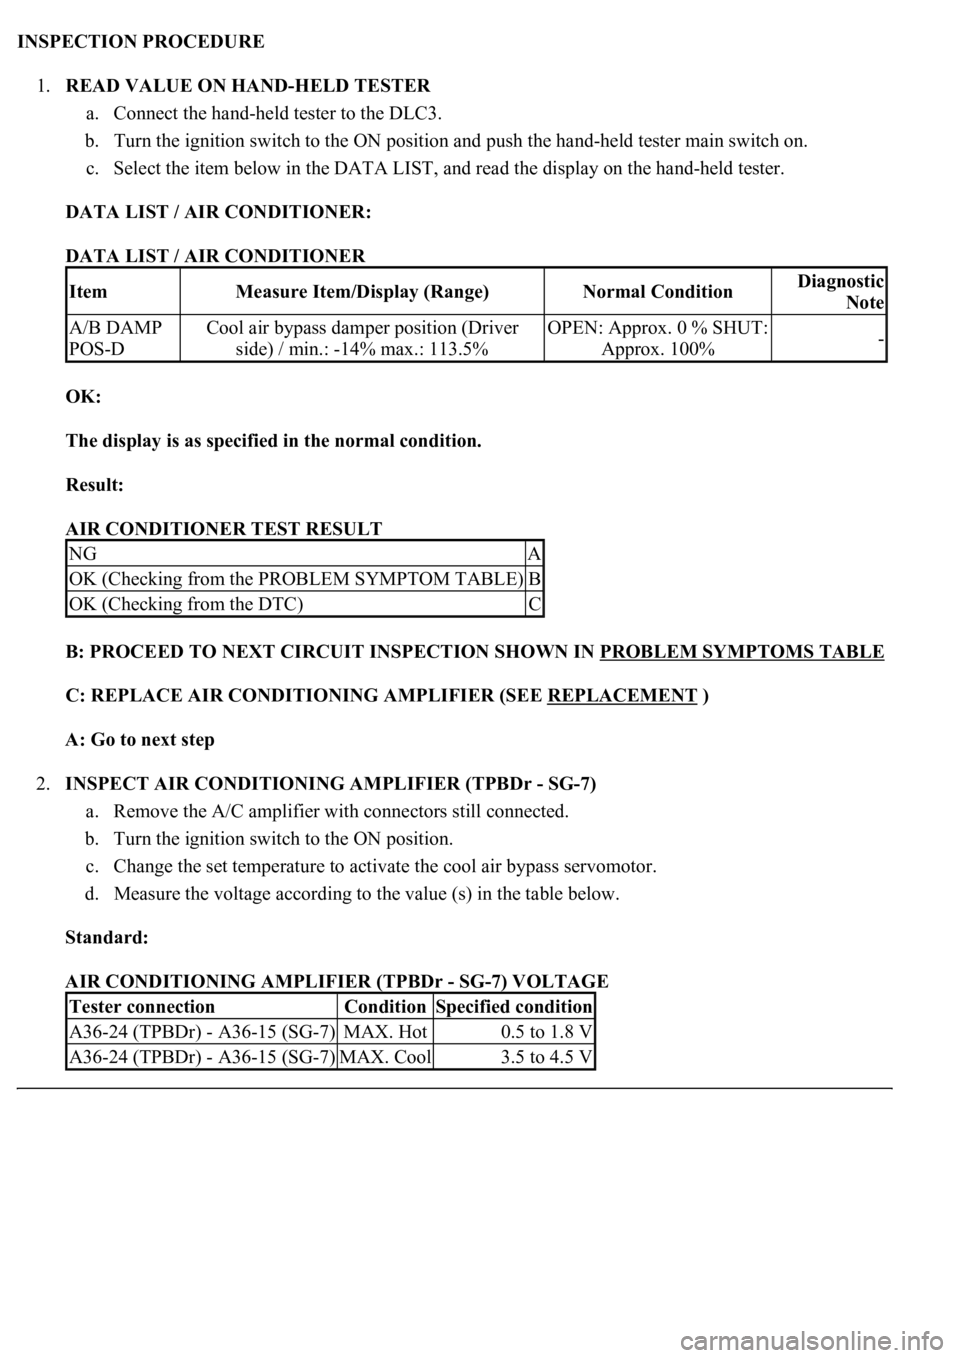
INSPECTION PROCEDURE
1.READ VALUE ON HAND-HELD TESTER
a. Connect the hand-held tester to the DLC3.
b. Turn the ignition switch to the ON position and push the hand-held tester main switch on.
c. Select the item below in the DATA LIST, and read the display on the hand-held tester.
DATA LIST / AIR CONDITIONER:
DATA LIST / AIR CONDITIONER
OK:
The display is as specified in the normal condition.
Result:
AIR CONDITIONER TEST RESULT
B: PROCEED TO NEXT CIRCUIT INSPECTION SHOWN IN PROBLEM SYMPTOMS TABLE
C: REPLACE AIR CONDITIONING AMPLIFIER (SEE REPLACEMENT )
A: Go to next step
2.INSPECT AIR CONDITIONING AMPLIFIER (TPBDr - SG-7)
a. Remove the A/C amplifier with connectors still connected.
b. Turn the ignition switch to the ON position.
c. Change the set temperature to activate the cool air bypass servomotor.
d. Measure the voltage according to the value (s) in the table below.
Standard:
AIR CONDITIONING AMPLIFIER (TPBDr - SG-7) VOLTAGE
ItemMeasure Item/Display (Range)Normal ConditionDiagnostic
Note
A/B DAMP
POS-DCool air bypass damper position (Driver
side) / min.: -14% max.: 113.5%OPEN: Approx. 0 % SHUT:
Approx. 100%-
NGA
OK (Checking from the PROBLEM SYMPTOM TABLE)B
OK (Checking from the DTC)C
Tester connectionConditionSpecified condition
A36-24 (TPBDr) - A36-15 (SG-7)MAX. Hot0.5 to 1.8 V
A36-24 (TPBDr) - A36-15 (SG-7)MAX. Cool3.5 to 4.5 V
Page 339 of 4500
Fig. 107: Max Cool Damper Position Sensor Circuit (Passenger Side)
Courtesy of TOYOTA MOTOR SALES, U.S.A., INC.
INSPECTION PROCEDURE
1.READ VALUE ON HAND-HELD TESTER
a. Connect the hand-held tester to the DLC3.
b. Turn the ignition switch to the ON position and push the hand-held tester main switch on.
c. Select the item below in the DATA LIST, and read the display on the hand-held tester.
DATA LIST / AIR CONDITIONER:
DATA LIST / AIR CONDITIONER
ItemMeasure Item/Display (Range)Normal ConditionDiagnostic
Note
A/B DAMP
POS-PCool air bypass damper position (Passenger
side) / min.: -14% max.: 113.5%OPEN: Approx. 0 %
SHUT: Approx. 100%-
Page 340 of 4500

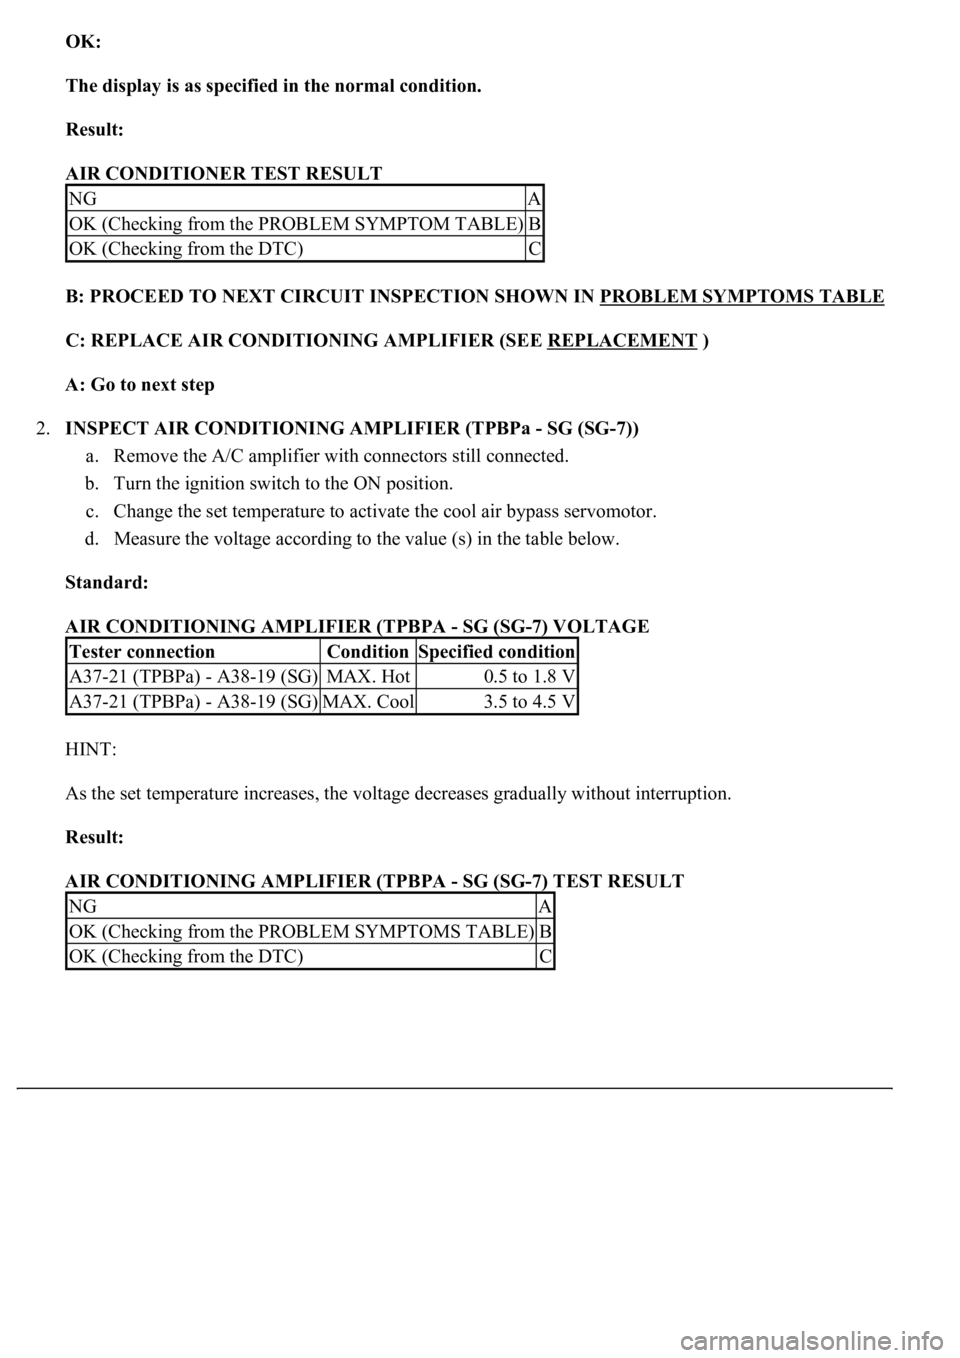
OK:
The display is as specified in the normal condition.
Result:
AIR CONDITIONER TEST RESULT
B: PROCEED TO NEXT CIRCUIT INSPECTION SHOWN IN PROBLEM SYMPTOMS TABLE
C: REPLACE AIR CONDITIONING AMPLIFIER (SEE REPLACEMENT )
A: Go to next step
2.INSPECT AIR CONDITIONING AMPLIFIER (TPBPa - SG (SG-7))
a. Remove the A/C amplifier with connectors still connected.
b. Turn the ignition switch to the ON position.
c. Change the set temperature to activate the cool air bypass servomotor.
d. Measure the voltage according to the value (s) in the table below.
Standard:
AIR CONDITIONING AMPLIFIER (TPBPA - SG (SG-7) VOLTAGE
HINT:
As the set temperature increases, the voltage decreases gradually without interruption.
Result:
AIR CONDITIONING AMPLIFIER (TPBPA - SG (SG-7) TEST RESULT
NGA
OK (Checking from the PROBLEM SYMPTOM TABLE)B
OK (Checking from the DTC)C
Tester connectionConditionSpecified condition
A37-21 (TPBPa) - A38-19 (SG)MAX. Hot0.5 to 1.8 V
A37-21 (TPBPa) - A38-19 (SG)MAX. Cool3.5 to 4.5 V
NGA
OK (Checking from the PROBLEM SYMPTOMS TABLE)B
OK (Checking from the DTC)C
Page 353 of 4500
Fig. 118: Inspecting Air Conditioning Amplifier (SOL+ - SOL-)
Courtesy of TOYOTA MOTOR SALES, U.S.A., INC.
B: PROCEED TO NEXT CIRCUIT INSPECTION SHOWN IN PROBLEM SYMPTOMS TABLE
C: REPLACE AIR CONDITIONING AMPLIFIER (SEE REPLACEMENT )
A: Go to next step
2.INSPECT COOLER COMPRESSOR ASSY (AIR CONDITIONER SOLENOID)
a. Disconnect the cooler compressor assy connector.
b. Measure the resistance according to the value (s) in the table below.
Standard:
COOLER COMPRESSOR ASSY (AIR CONDITIONER SOLENOID) RESISTANCE
Tester connectionConditionSpecified condition
1 - 2at 20°C (68°F)10 to 11 ohms
Page 354 of 4500
Fig. 119: Inspecting Cooler Compressor Assy (Air Conditioner Solenoid)
Courtesy of TOYOTA MOTOR SALES, U.S.A., INC.
NG: REPLACE COOLER COMPRESSOR ASSY
OK: Go to next step
3.CHECK HARNESS AND CONNECTOR (AIR CONDITIONING AMPLIFIER - COOLER
COMPRESSOR ASSY) (SEE ELECTRONIC CIRCUIT INSPECTION PROCEDURE
)
a. Measure the resistance according to the value (s) in the table below.
Standard:
AIR CONDITIONING AMPLIFIER - COOLER COMPRESSOR ASSY RESISTANCE
Tester connectionConditionSpecified condition
A11-6 (SOL+) - C23-2AlwaysBelow 1 ohms
A11-7 (SOL-) - C23-1AlwaysBelow 1 ohms
A11-6 (SOL+) - Body groundAlways10 kohms or higher
A11-6 (SOL-) - Body groundAlways10 kohms or higher
Page 357 of 4500
Fig. 122: Emission Gas Nox Sensor Circuit
Courtesy of TOYOTA MOTOR SALES, U.S.A., INC.
INSPECTION PROCEDURE
1.READ VALUE ON HAND-HELD TESTER
a. Connect the hand-held tester to the DLC3.
b. Turn the ignition switch to the ON position and push the hand-held tester main switch on.
c. Select the item below in the DATA LIST, and read the display on the hand-held tester.
DATA LIST / AIR CONDITIONER:
DATA LIST / AIR CONDITIONER
OK:
ItemMeasure Item/Display (Range)Normal ConditionDiagnostic
Note
NOX GAS
SENSEmission gas Nox sensor / min.: 0
max.:255Increases as the gas amount
increases-
Page 358 of 4500
The display is as specified in the normal condition.
Result:
AIR CONDITIONER TEST RESULT
B: PROCEED TO NEXT CIRCUIT INSPECTION SHOWN IN PROBLEM SYMPTOMS TABLE
C: REPLACE AIR CONDITIONING AMPLIFIER (SEE REPLACEMENT )
A: Go to next step
2.INSPECT AIR CONDITIONING AMPLIFIER (NOX - SG-1)
a. Remove the A/C amplifier with connectors still connected.
b. Turn the ignition switch to the ON position.
c. Measure the voltage according to the value (s) in the table below.
Standard:
AIR CONDITIONING AMPLIFIER (NOX - SG-1) VOLTAGE
HINT:
As the temperature increases, the voltage decreases.
Result:
AIR CONDITIONING AMPLIFIER (NOX - SG-1) TEST RESULT
NGA
OK (Checking from the PROBLEM SYMPTOM TABLE)B
OK (Checking from the DTC)C
Tester connectionConditionSpecified condition
A13-17 (NOX) - A13-8 (SG-1)Ignition switch ON at 10 to 35C° (50 to 95°F)1.0 to 4.5 V
NGA
OK (Checking from the PROBLEM SYMPTOMS TABLE)B
OK (Checking from the DTC)C