2002 NISSAN TERRANO air condition
[x] Cancel search: air conditionPage 692 of 1767
![NISSAN TERRANO 2002 Service Repair Manual Monitored item
[Unit]ECM
input
signalsMain
signalsDescription Remarks
FUEL CUT S/V
[ON/OFF]IThe control condition of the fuel cut sole-
noid valve (determined by ECM accord-
ing to the input signal) i](/manual-img/5/57393/w960_57393-691.png "NISSAN TERRANO 2002 Service Repair Manual Monitored item
[Unit]ECM
input
signalsMain
signalsDescription Remarks
FUEL CUT S/V
[ON/OFF]IThe control condition of the fuel cut sole-
noid valve (determined by ECM accord-
ing to the input signal) i")
Monitored item
[Unit]ECM
input
signalsMain
signalsDescription Remarks
FUEL CUT S/V
[ON/OFF]IThe control condition of the fuel cut sole-
noid valve (determined by ECM accord-
ing to the input signal) is indicated.
IOFF ... Fuel cut solenoid valve is not
operating.
ON ... Fuel cut solenoid valve is operat-
ing.IWhen the fuel cut solenoid valve is not
operating, fuel supply is shut off.
AIR COND RLY
[ON/OFF]
q
IThe air conditioner relay control condition
(determined by ECM according to the
input signal) is indicated.
GLOW RLY
[ON/OFF]
q
IThe glow relay control condition (deter-
mined by ECM according to the input
signal) is displayed.
EGRC SOL/V A
[ON/OFF]IThe control condition of the EGRC-sole-
noid valve A (determined by ECM
according to the input signal) is indicated.
IOFF ... EGRC-solenoid valve A is not
operating.
ON ... EGRC-solenoid valve A is operat-
ing.
EGRC SOL/V B
[ON/OFF]IThe control condition of the EGRC-sole-
noid valve B (determined by ECM
according to the input signal) is indicated.
IOFF ... EGRC solenoid valve B is not
operating.
ON ... EGRC-solenoid valve B is operat-
ing.
THROT RLY
[ON/OFF]IThe control condition of the throttle con-
trol solenoid valve (determined by ECM
according to the input signal) is indicated.
IOFF ... Throttle control solenoid valve is
not operating.
ON ... Throttle control solenoid valve is
operating.
ON BOARD DIAGNOSTIC SYSTEM DESCRIPTIONTD27Ti
CONSULT-II (Cont'd)
EC-330
Page 698 of 1767
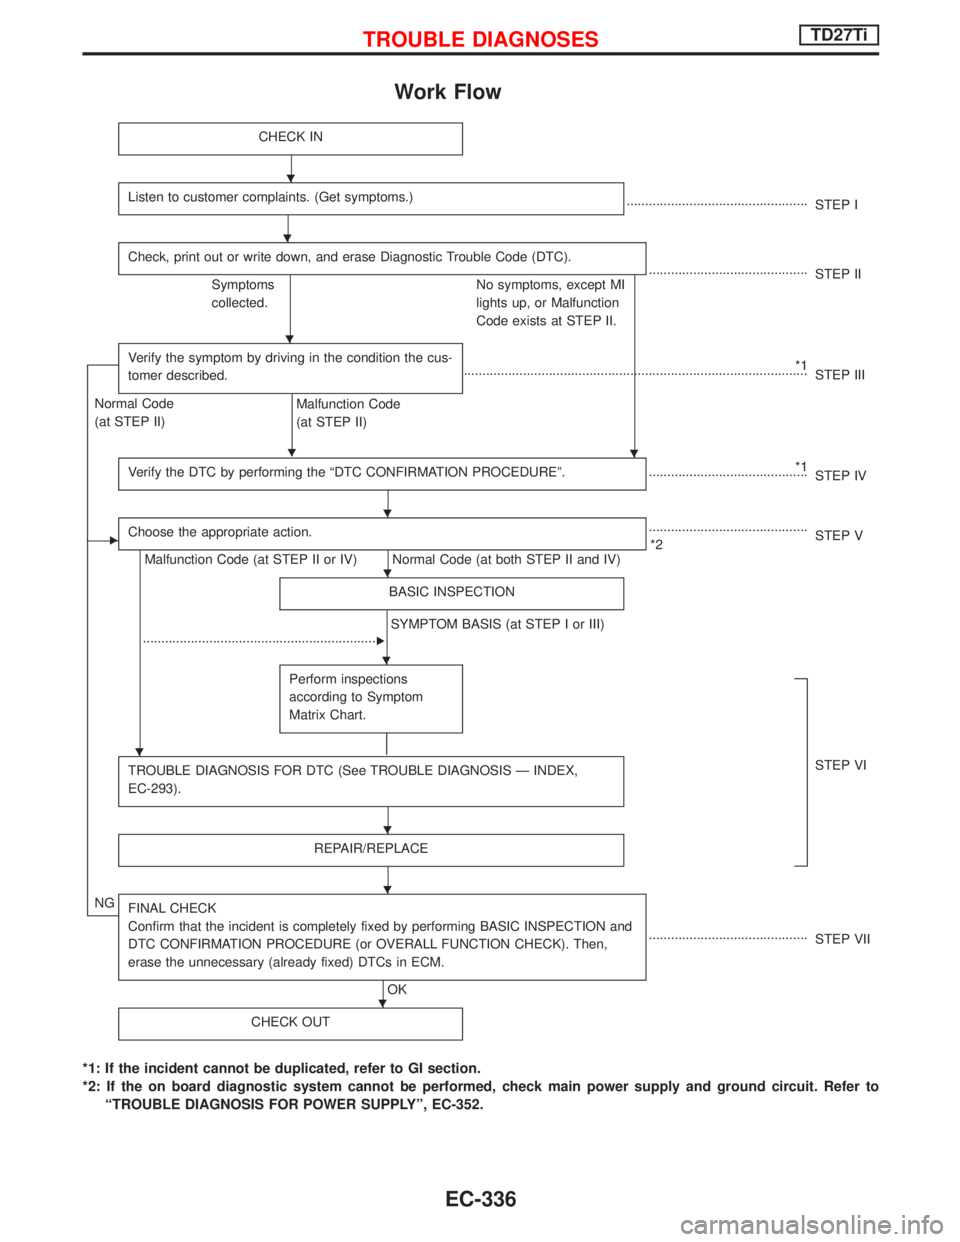
Work Flow
CHECK IN
Listen to customer complaints. (Get symptoms.).................................................
STEP I
Check, print out or write down, and erase Diagnostic Trouble Code (DTC).
...........................................
STEP II
Symptoms
collected.No symptoms, except MI
lights up, or Malfunction
Code exists at STEP II.
Verify the symptom by driving in the condition the cus-
tomer described.
H
*1
.............................................................................................
STEP III
Normal Code
(at STEP II)
Malfunction Code
(at STEP II)
Verify the DTC by performing the ªDTC CONFIRMATION PROCEDUREº.
*1
...........................................
STEP IV
EChoose the appropriate action.
Malfunction Code (at STEP II or IV) Normal Code (at both STEP II and IV)...........................................
*2STEP V
BASIC INSPECTION
SYMPTOM BASIS (at STEP I or III)
................................................................
E
Perform inspections
according to Symptom
Matrix Chart.
TROUBLE DIAGNOSIS FOR DTC (See TROUBLE DIAGNOSIS Ð INDEX,
EC-293).STEP VI
REPAIR/REPLACE
NGFINAL CHECK
Confirm that the incident is completely fixed by performing BASIC INSPECTION and
DTC CONFIRMATION PROCEDURE (or OVERALL FUNCTION CHECK). Then,
erase the unnecessary (already fixed) DTCs in ECM.
OK...........................................
STEP VII
CHECK OUT
*1: If the incident cannot be duplicated, refer to GI section.
*2: If the on board diagnostic system cannot be performed, check main power supply and ground circuit. Refer to
ªTROUBLE DIAGNOSIS FOR POWER SUPPLYº, EC-352.
H
H
H
H
H
H
H
H
H
H
H
TROUBLE DIAGNOSESTD27Ti
EC-336
Page 699 of 1767
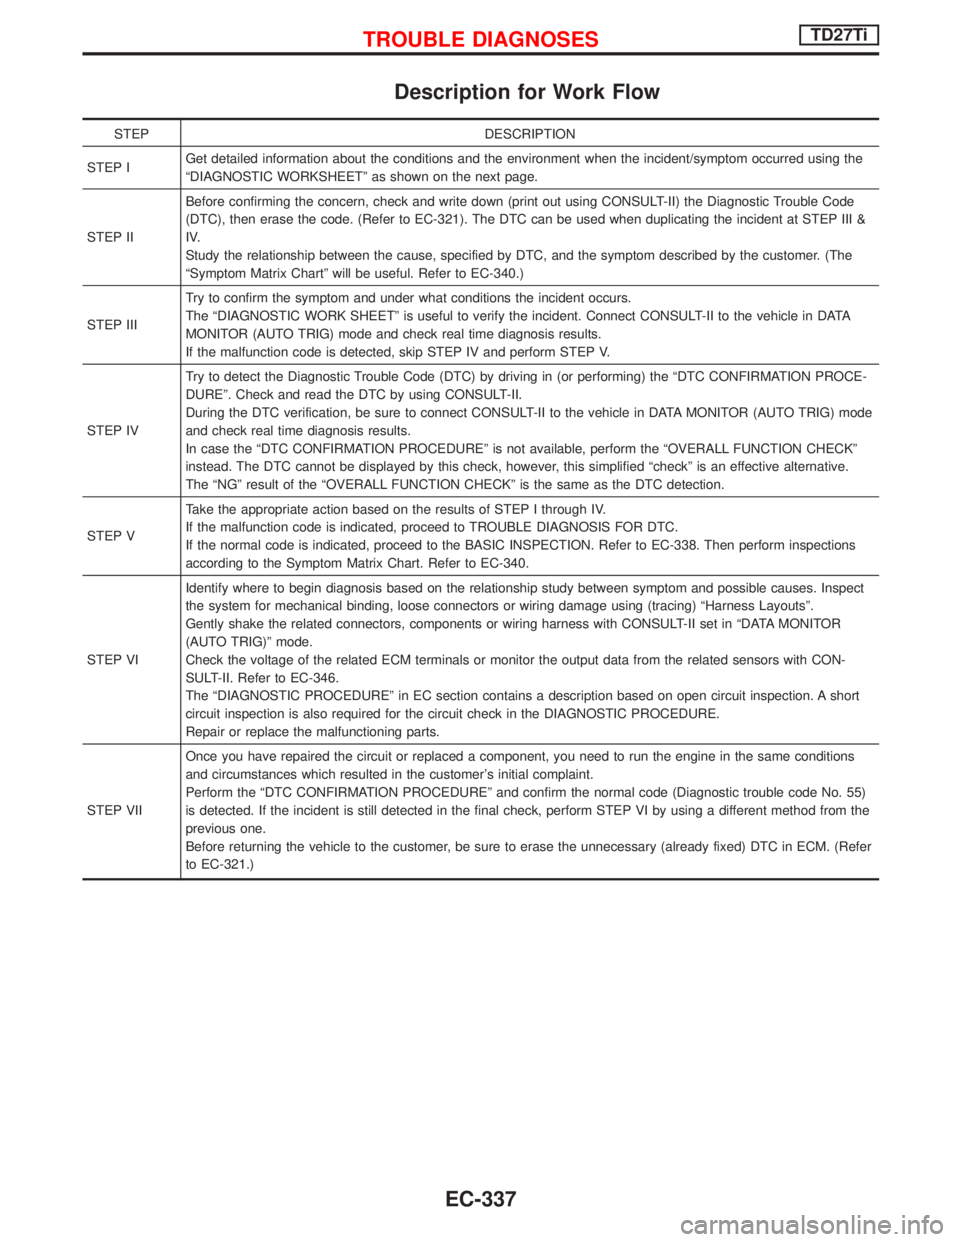
Description for Work Flow
STEP DESCRIPTION
STEP IGet detailed information about the conditions and the environment when the incident/symptom occurred using the
ªDIAGNOSTIC WORKSHEETº as shown on the next page.
STEP IIBefore confirming the concern, check and write down (print out using CONSULT-II) the Diagnostic Trouble Code
(DTC), then erase the code. (Refer to EC-321). The DTC can be used when duplicating the incident at STEP III &
IV.
Study the relationship between the cause, specified by DTC, and the symptom described by the customer. (The
ªSymptom Matrix Chartº will be useful. Refer to EC-340.)
STEP IIITry to confirm the symptom and under what conditions the incident occurs.
The ªDIAGNOSTIC WORK SHEETº is useful to verify the incident. Connect CONSULT-II to the vehicle in DATA
MONITOR (AUTO TRIG) mode and check real time diagnosis results.
If the malfunction code is detected, skip STEP IV and perform STEP V.
STEP IVTry to detect the Diagnostic Trouble Code (DTC) by driving in (or performing) the ªDTC CONFIRMATION PROCE-
DUREº. Check and read the DTC by using CONSULT-II.
During the DTC verification, be sure to connect CONSULT-II to the vehicle in DATA MONITOR (AUTO TRIG) mode
and check real time diagnosis results.
In case the ªDTC CONFIRMATION PROCEDUREº is not available, perform the ªOVERALL FUNCTION CHECKº
instead. The DTC cannot be displayed by this check, however, this simplified ªcheckº is an effective alternative.
The ªNGº result of the ªOVERALL FUNCTION CHECKº is the same as the DTC detection.
STEP VTake the appropriate action based on the results of STEP I through IV.
If the malfunction code is indicated, proceed to TROUBLE DIAGNOSIS FOR DTC.
If the normal code is indicated, proceed to the BASIC INSPECTION. Refer to EC-338. Then perform inspections
according to the Symptom Matrix Chart. Refer to EC-340.
STEP VIIdentify where to begin diagnosis based on the relationship study between symptom and possible causes. Inspect
the system for mechanical binding, loose connectors or wiring damage using (tracing) ªHarness Layoutsº.
Gently shake the related connectors, components or wiring harness with CONSULT-II set in ªDATA MONITOR
(AUTO TRIG)º mode.
Check the voltage of the related ECM terminals or monitor the output data from the related sensors with CON-
SULT-II. Refer to EC-346.
The ªDIAGNOSTIC PROCEDUREº in EC section contains a description based on open circuit inspection. A short
circuit inspection is also required for the circuit check in the DIAGNOSTIC PROCEDURE.
Repair or replace the malfunctioning parts.
STEP VIIOnce you have repaired the circuit or replaced a component, you need to run the engine in the same conditions
and circumstances which resulted in the customer's initial complaint.
Perform the ªDTC CONFIRMATION PROCEDUREº and confirm the normal code (Diagnostic trouble code No. 55)
is detected. If the incident is still detected in the final check, perform STEP VI by using a different method from the
previous one.
Before returning the vehicle to the customer, be sure to erase the unnecessary (already fixed) DTC in ECM. (Refer
to EC-321.)
TROUBLE DIAGNOSESTD27Ti
EC-337
Page 700 of 1767

Basic Inspection
Precaution:
Perform Basic Inspection without electrical or mechanical
loads applied;
IHeadlamp switch is OFF,
IAir conditioner switch is OFF,
IRear defogger switch is OFF,
ISteering wheel is in the straight-ahead position, etc.
BEFORE STARTING
1. Check service records for any recent
repairs that may indicate a related
problem, or the current need for
scheduled maintenance.
2. Open engine hood and check the fol-
lowing:
IHarness connectors for improper con-
nections
IVacuum hoses for splits, kinks, or
improper connections
IWiring for improper connections,
pinches, or cuts
3.Using priming pump, bleed air from fuel
system. Refer to ªFuel Filter Checkº in
MA section.
CONNECT CONSULT-II TO THE
VEHICLE.
Connect ªCONSULT-IIº to the data link
connector for CONSULT-II and select
ªENGINEº from the menu.
DOES ENGINE START?
Ye s
ENo
Turn ignition switch to
ªLOCKº position, wait 5
seconds and then start
engine. If engine fails to
start, check diagnostic
trouble code (DTC).
Run engine for 10 minutes.
CHECK IDLE SPEED.
Read engine idle speed in ªDATA
MONITORº mode with CONSULT-II.
725 rpm 50 (in N position)
------------------------------------------------------------------------------------------------------------------------------------OR------------------------------------------------------------------------------------------------------------------------------------
Check idle speed using tachometer
tester.
725 rpm 50 (in N position)
(Go toqAon next page.)
SEF142I
NEF463
YEC237A
NEF464
SEF817Y
H
H
H
H
H
TROUBLE DIAGNOSESTD27Ti
EC-338
Page 704 of 1767
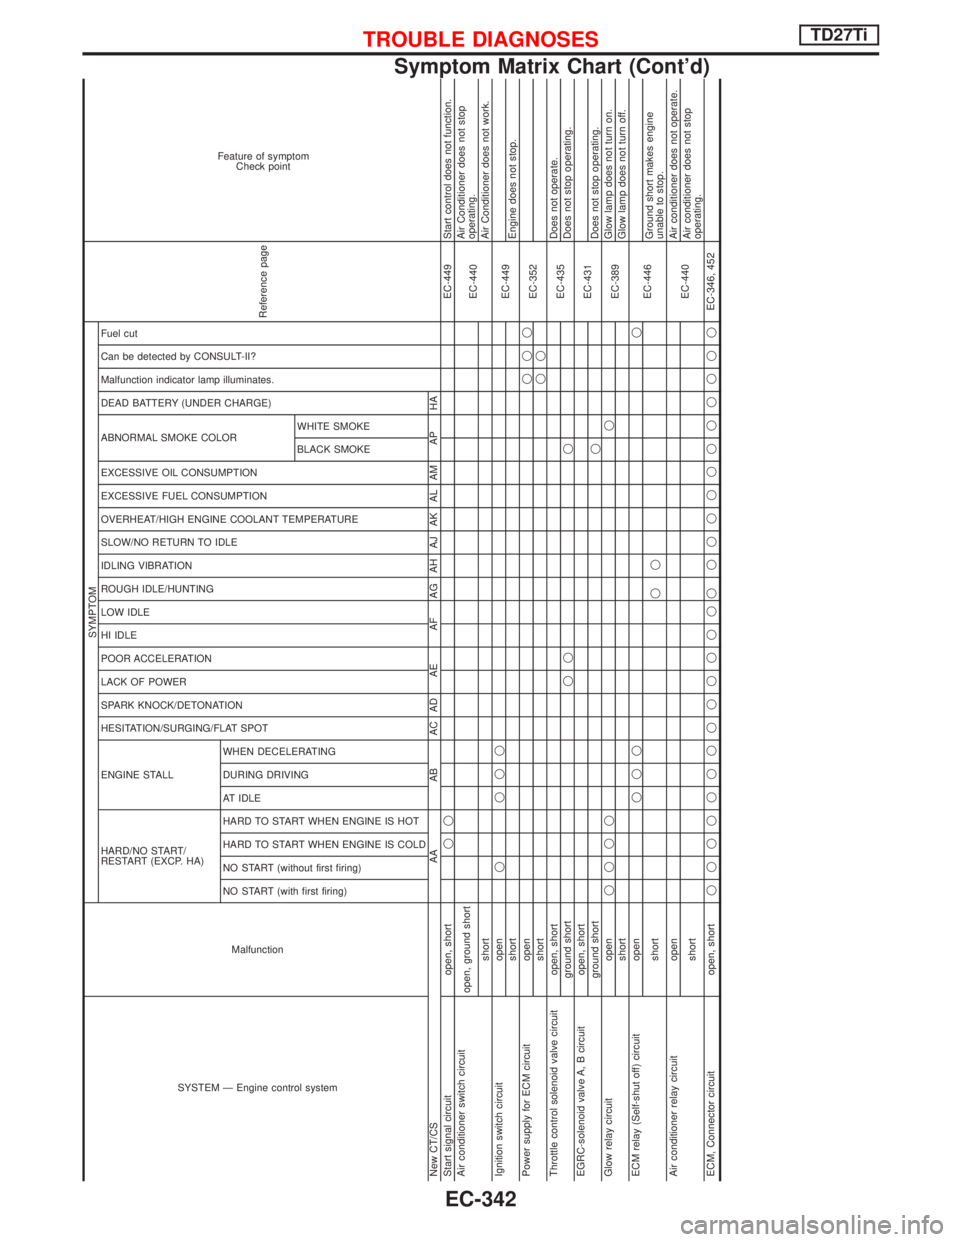
SYSTEM Ð Engine control systemMalfunction
SYMPTOM
Reference page
Feature of symptom
Check point
HARD/NO START/
RESTART (EXCP. HA) ENGINE STALL HESITATION/SURGING/FLAT SPOT SPARK KNOCK/DETONATION
LACK OF POWER
POOR ACCELERATION
HI IDLE
LOW IDLE
ROUGH IDLE/HUNTING
IDLING VIBRATION
SLOW/NO RETURN TO IDLE
OVERHEAT/HIGH ENGINE COOLANT TEMPERATURE
EXCESSIVE FUEL CONSUMPTION
EXCESSIVE OIL CONSUMPTION ABNORMAL SMOKE COLOR
DEAD BATTERY (UNDER CHARGE) Malfunction indicator lamp illuminates.
Can be detected by CONSULT-II?
Fuel cut
NO START (with first firing) NO START (without first firing)
HARD TO START WHEN ENGINE IS COLD
HARD TO START WHEN ENGINE IS HOT
AT IDLE
DURING DRIVING
WHEN DECELERATINGBLACK SMOKE WHITE SMOKE
New CT/CS AA AB AC AD AE AF AG AH AJ AK AL AM AP HA
Start signal circuit open, shortqqEC-449 Start control does not function.
Air conditioner switch circuit
open, ground short
EC-440Air Conditioner does not stop
operating.
shortAir Conditioner does not work.
Ignition switch circuit openq qqq
EC-449
shortEngine does not stop.
Power supply for ECM circuit openqqq
EC-352
shortqq
Throttle control solenoid valve circuit open, short
EC-435Does not operate.
ground shortqq qDoes not stop operating.
EGRC-solenoid valve A, B circuit open, short
EC-431
ground shortqDoes not stop operating.
Glow relay circuit openqqqqq
EC-389Glow lamp does not turn on.
shortGlow lamp does not turn off.
ECM relay (Self-shut off) circuit openqqqq
EC-446
shortqqGround short makes engine
unable to stop.
Air conditioner relay circuit open
EC-440Air conditioner does not operate.
shortAir conditioner does not stop
operating.
ECM, Connector circuit open, shortqqqqqqqqqqqqqq qqqqqqqqqqqEC-346, 452
TROUBLE DIAGNOSESTD27Ti
Symptom Matrix Chart (Cont'd)
EC-342
Page 705 of 1767
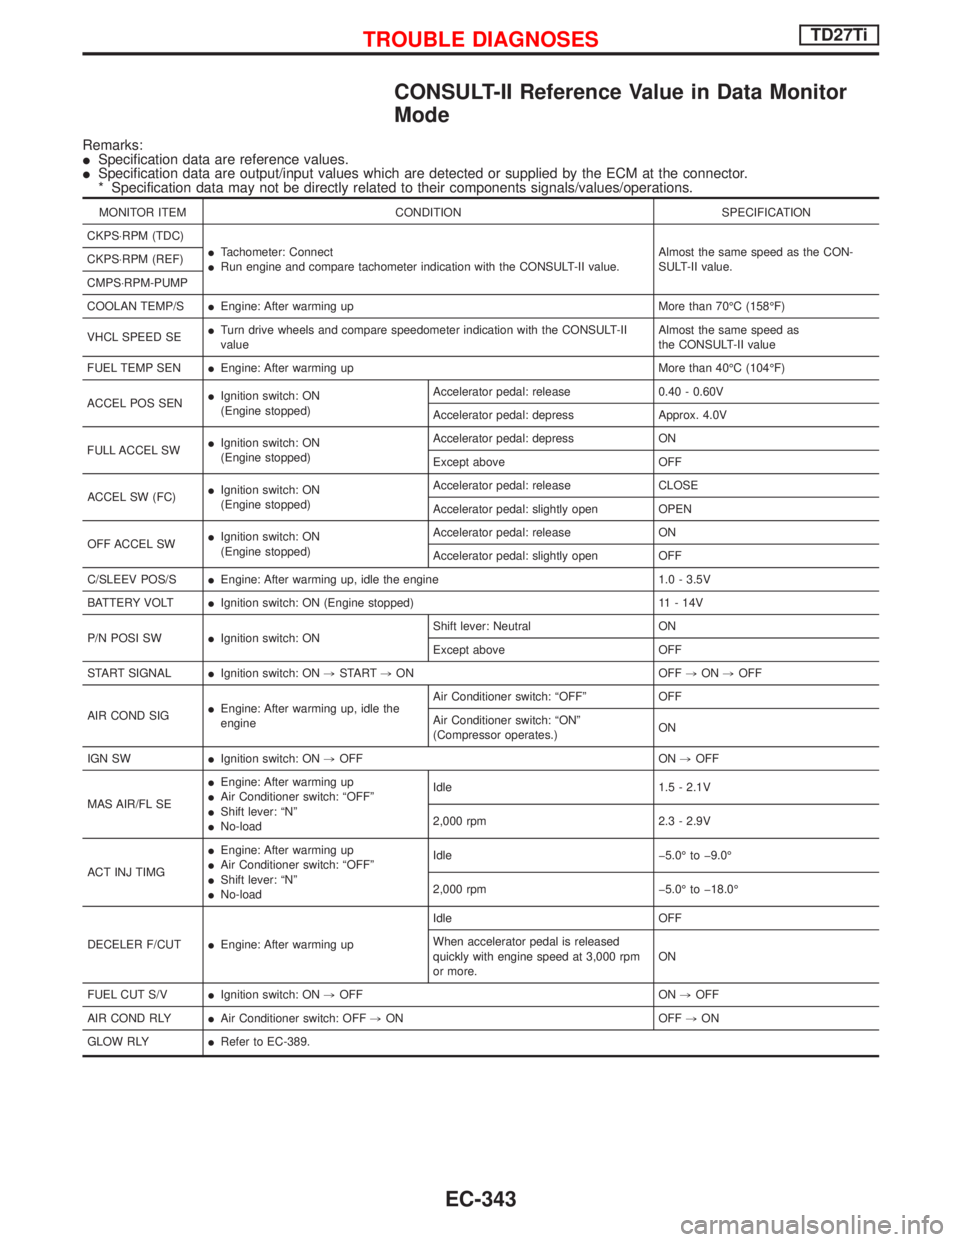
CONSULT-II Reference Value in Data Monitor
Mode
Remarks:
ISpecification data are reference values.
ISpecification data are output/input values which are detected or supplied by the ECM at the connector.
* Specification data may not be directly related to their components signals/values/operations.
MONITOR ITEM CONDITION SPECIFICATION
CKPS×RPM (TDC)
ITachometer: Connect
IRun engine and compare tachometer indication with the CONSULT-II value.Almost the same speed as the CON-
SULT-II value. CKPS×RPM (REF)
CMPS×RPM-PUMP
COOLAN TEMP/SIEngine: After warming up More than 70ÉC (158ÉF)
VHCL SPEED SEITurn drive wheels and compare speedometer indication with the CONSULT-II
valueAlmost the same speed as
the CONSULT-II value
FUEL TEMP SENIEngine: After warming up More than 40ÉC (104ÉF)
ACCEL POS SENIIgnition switch: ON
(Engine stopped)Accelerator pedal: release 0.40 - 0.60V
Accelerator pedal: depress Approx. 4.0V
FULL ACCEL SWIIgnition switch: ON
(Engine stopped)Accelerator pedal: depress ON
Except above OFF
ACCEL SW (FC)IIgnition switch: ON
(Engine stopped)Accelerator pedal: release CLOSE
Accelerator pedal: slightly open OPEN
OFF ACCEL SWIIgnition switch: ON
(Engine stopped)Accelerator pedal: release ON
Accelerator pedal: slightly open OFF
C/SLEEV POS/SIEngine: After warming up, idle the engine 1.0 - 3.5V
BATTERY VOLTIIgnition switch: ON (Engine stopped) 11 - 14V
P/N POSI SWIIgnition switch: ONShift lever: Neutral ON
Except above OFF
START SIGNALIIgnition switch: ON,START,ON OFF,ON,OFF
AIR COND SIGIEngine: After warming up, idle the
engineAir Conditioner switch: ªOFFº OFF
Air Conditioner switch: ªONº
(Compressor operates.)ON
IGN SWIIgnition switch: ON,OFF ON,OFF
MAS AIR/FL SEIEngine: After warming up
IAir Conditioner switch: ªOFFº
IShift lever: ªNº
INo-loadIdle 1.5 - 2.1V
2,000 rpm 2.3 - 2.9V
ACT INJ TIMGIEngine: After warming up
IAir Conditioner switch: ªOFFº
IShift lever: ªNº
INo-loadIdle þ5.0É to þ9.0É
2,000 rpm þ5.0É to þ18.0É
DECELER F/CUTIEngine: After warming upIdle OFF
When accelerator pedal is released
quickly with engine speed at 3,000 rpm
or more.ON
FUEL CUT S/VIIgnition switch: ON,OFF ON,OFF
AIR COND RLYIAir Conditioner switch: OFF,ON OFF,ON
GLOW RLYIRefer to EC-389.
TROUBLE DIAGNOSESTD27Ti
EC-343
Page 706 of 1767
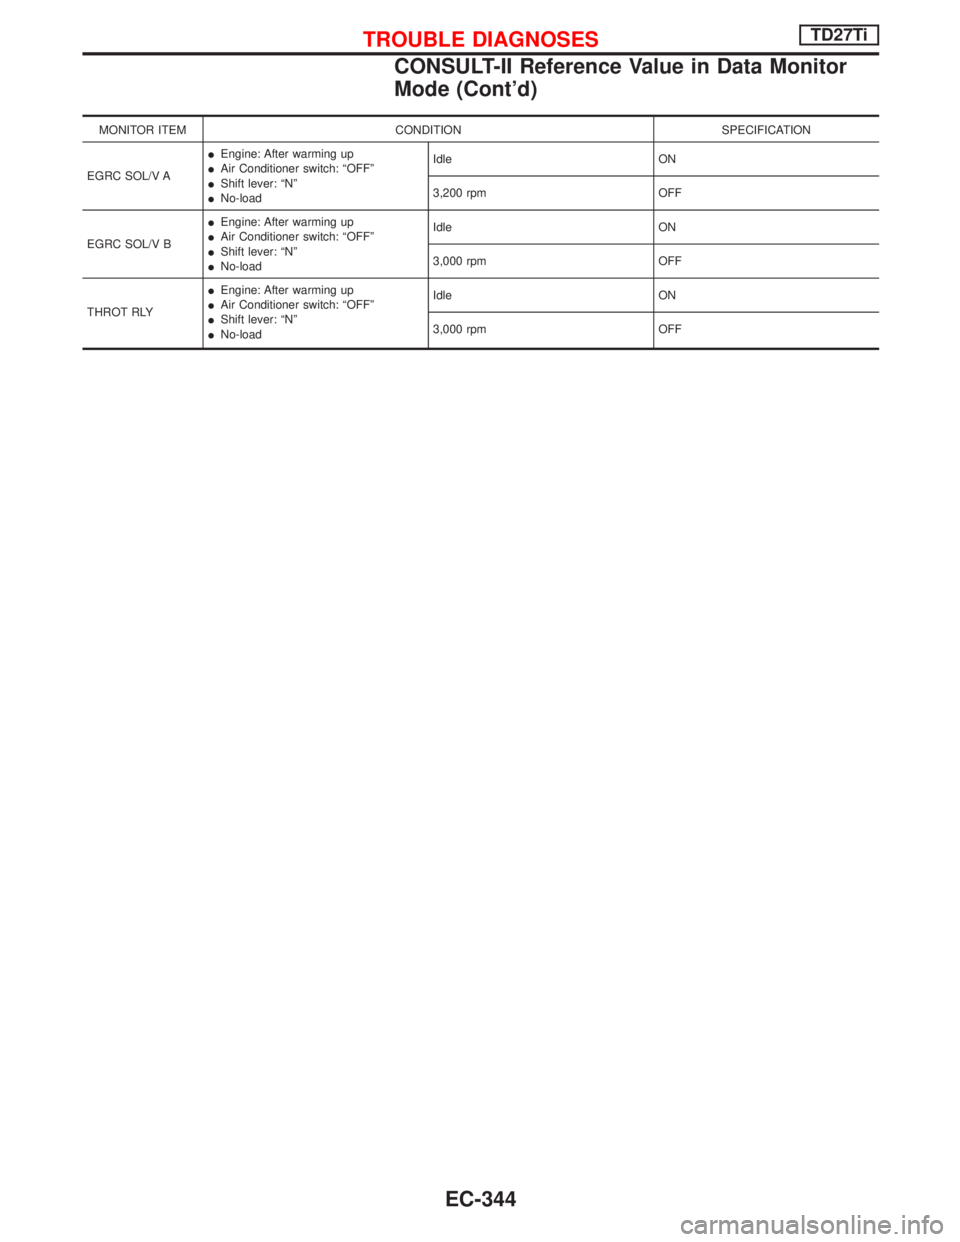
MONITOR ITEM CONDITION SPECIFICATION
EGRC SOL/V AIEngine: After warming up
IAir Conditioner switch: ªOFFº
IShift lever: ªNº
INo-loadIdle ON
3,200 rpm OFF
EGRC SOL/V BIEngine: After warming up
IAir Conditioner switch: ªOFFº
IShift lever: ªNº
INo-loadIdle ON
3,000 rpm OFF
THROT RLYIEngine: After warming up
IAir Conditioner switch: ªOFFº
IShift lever: ªNº
INo-loadIdle ON
3,000 rpm OFF
TROUBLE DIAGNOSESTD27Ti
CONSULT-II Reference Value in Data Monitor
Mode (Cont'd)
EC-344
Page 709 of 1767
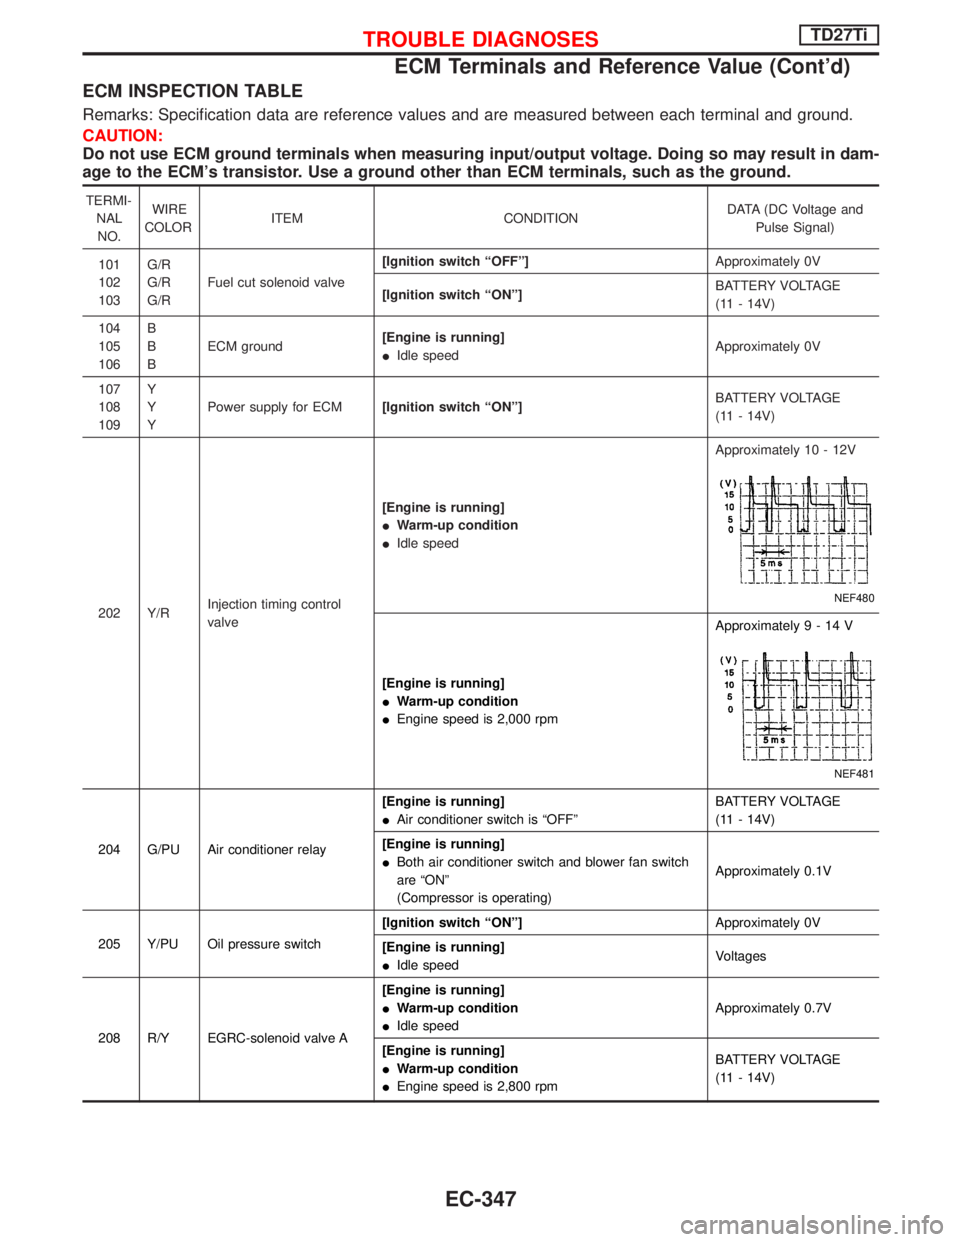
ECM INSPECTION TABLE
Remarks: Specification data are reference values and are measured between each terminal and ground.
CAUTION:
Do not use ECM ground terminals when measuring input/output voltage. Doing so may result in dam-
age to the ECM's transistor. Use a ground other than ECM terminals, such as the ground.
TERMI-
NAL
NO.WIRE
COLORITEM CONDITIONDATA (DC Voltage and
Pulse Signal)
101
102
103G/R
G/R
G/RFuel cut solenoid valve[Ignition switch ªOFFº]Approximately 0V
[Ignition switch ªONº]BATTERY VOLTAGE
(11 - 14V)
104
105
106B
B
BECM ground[Engine is running]
IIdle speedApproximately 0V
107
108
109Y
Y
YPower supply for ECM[Ignition switch ªONº]BATTERY VOLTAGE
(11 - 14V)
202 Y/RInjection timing control
valve[Engine is running]
IWarm-up condition
IIdle speedApproximately 10 - 12V
NEF480
[Engine is running]
IWarm-up condition
IEngine speed is 2,000 rpmApproximately9-14V
NEF481
204 G/PU Air conditioner relay[Engine is running]
IAir conditioner switch is ªOFFºBATTERY VOLTAGE
(11 - 14V)
[Engine is running]
IBoth air conditioner switch and blower fan switch
are ªONº
(Compressor is operating)Approximately 0.1V
205 Y/PU Oil pressure switch[Ignition switch ªONº]Approximately 0V
[Engine is running]
IIdle speedVoltages
208 R/Y EGRC-solenoid valve A[Engine is running]
IWarm-up condition
IIdle speedApproximately 0.7V
[Engine is running]
IWarm-up condition
IEngine speed is 2,800 rpmBATTERY VOLTAGE
(11 - 14V)
TROUBLE DIAGNOSESTD27Ti
ECM Terminals and Reference Value (Cont'd)
EC-347