Page 1085 of 1672

BRAKES
70-40 REPAIRS
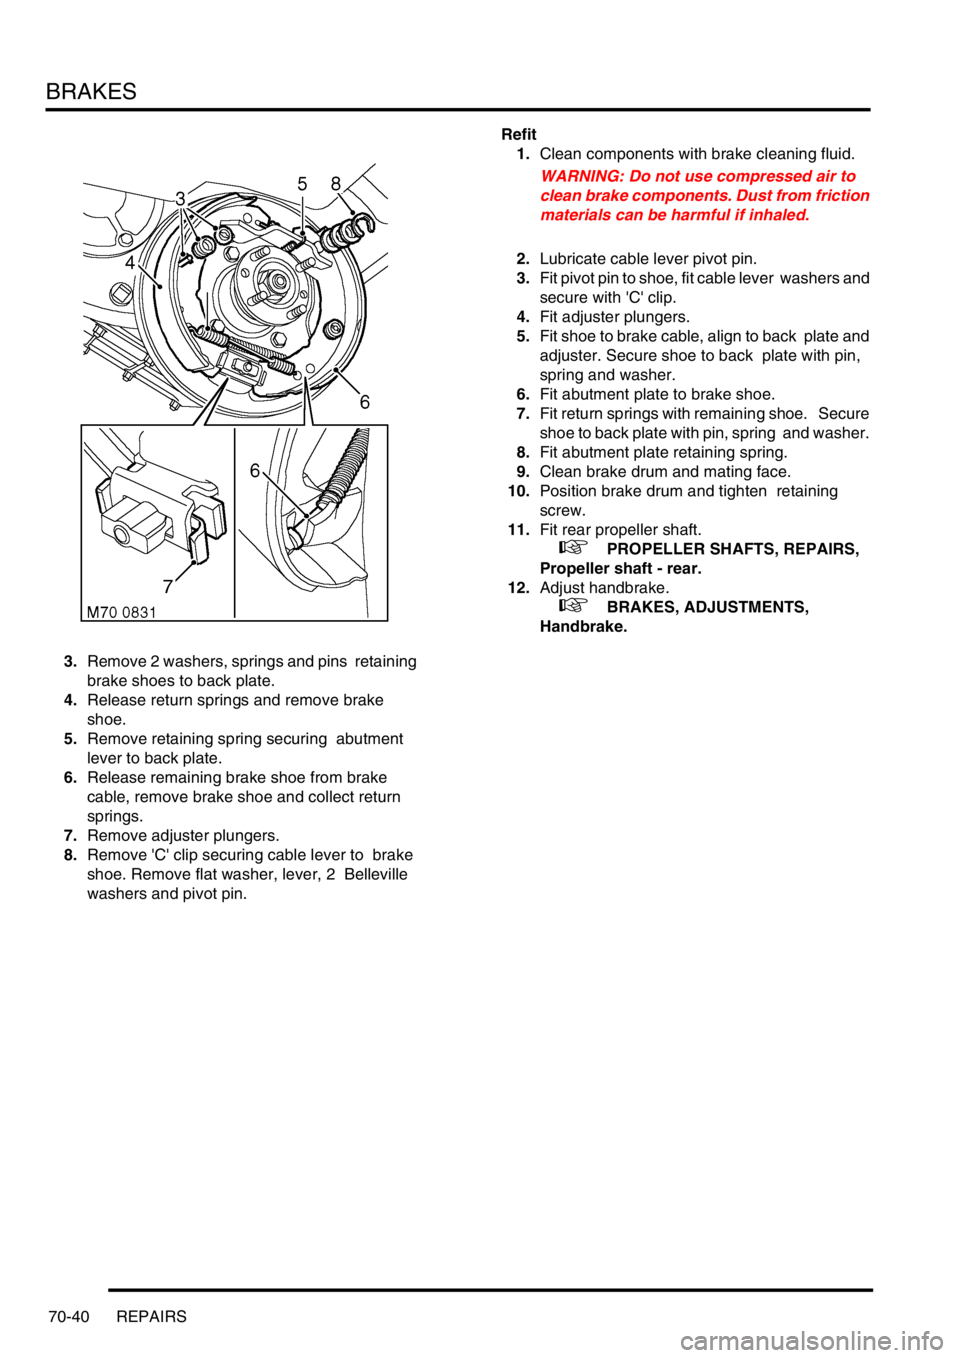
3.Remove 2 washers, springs and pins retaining
brake shoes to back plate.
4.Release return springs and remove brake
shoe.
5.Remove retaining spring securing abutment
lever to back plate.
6.Release remaining brake shoe from brake
cable, remove brake shoe and collect return
springs.
7.Remove adjuster plungers.
8.Remove 'C' clip securing cable lever to brake
shoe. Remove flat washer, lever, 2 Belleville
washers and pivot pin. Refit
1.Clean components with brake cleaning fluid.
WARNING: Do not use compressed air to
clean brake components. Dust from friction
materials can be harmful if inhaled.
2.Lubricate cable lever pivot pin.
3.Fit pivot pin to shoe, fit cable lever washers and
secure with 'C' clip.
4.Fit adjuster plungers.
5.Fit shoe to brake cable, align to back plate and
adjuster. Secure shoe to back plate with pin,
spring and washer.
6.Fit abutment plate to brake shoe.
7.Fit return springs with remaining shoe. Secure
shoe to back plate with pin, spring and washer.
8.Fit abutment plate retaining spring.
9.Clean brake drum and mating face.
10.Position brake drum and tighten retaining
screw.
11.Fit rear propeller shaft.
+ PROPELLER SHAFTS, REPAIRS,
Propeller shaft - rear.
12.Adjust handbrake.
+ BRAKES, ADJUSTMENTS,
Handbrake.
Page 1088 of 1672

BRAKES
REPAIRS 70-43
Refit
1.Clean mating faces of alternator and vacuum
pump.
2.Fit vacuum pump to alternator and tighten
bolts to 8 Nm (6 lbf.ft).
3.Position alternator to engine and connect
multiplug.
4.Connect vacuum hose and oil drain hose to
vacuum pump and secure clips.
5.With assistance align alternator to mounting
bracket and fit but do not tighten bolt.
6.Fit bolt securing support stay to alternator and
tighten to 25 Nm (18 lbf.ft) .
7.Tighten bolt securing alternator to mounting
bracket to 45 Nm (33 lbf.ft).
8.Using new 'O' ring, connect oil supply pipe to
cylinder head and tighten to 10 Nm (7 lbf.ft).
9.Connect lead to alternator and tighten nut to 6
Nm (4.4 lbf.ft).
10.Fit auxiliary drive belt tensioner and tighten bolt
to 50 Nm (37 lbf.ft).
11.Fit auxiliary drive belt.
+ CHARGING AND STARTING,
REPAIRS, Belt - auxiliary drive.
Housing - caliper - front
$% 70.55.24
Remove
1.Raise front of vehicle, one side.
WARNING: Do not work on or under a
vehicle supported only by a jack. Always
support the vehicle on safety stands.
2.Remove road wheel(s).
3.Clamp brake hose to prevent fluid loss.
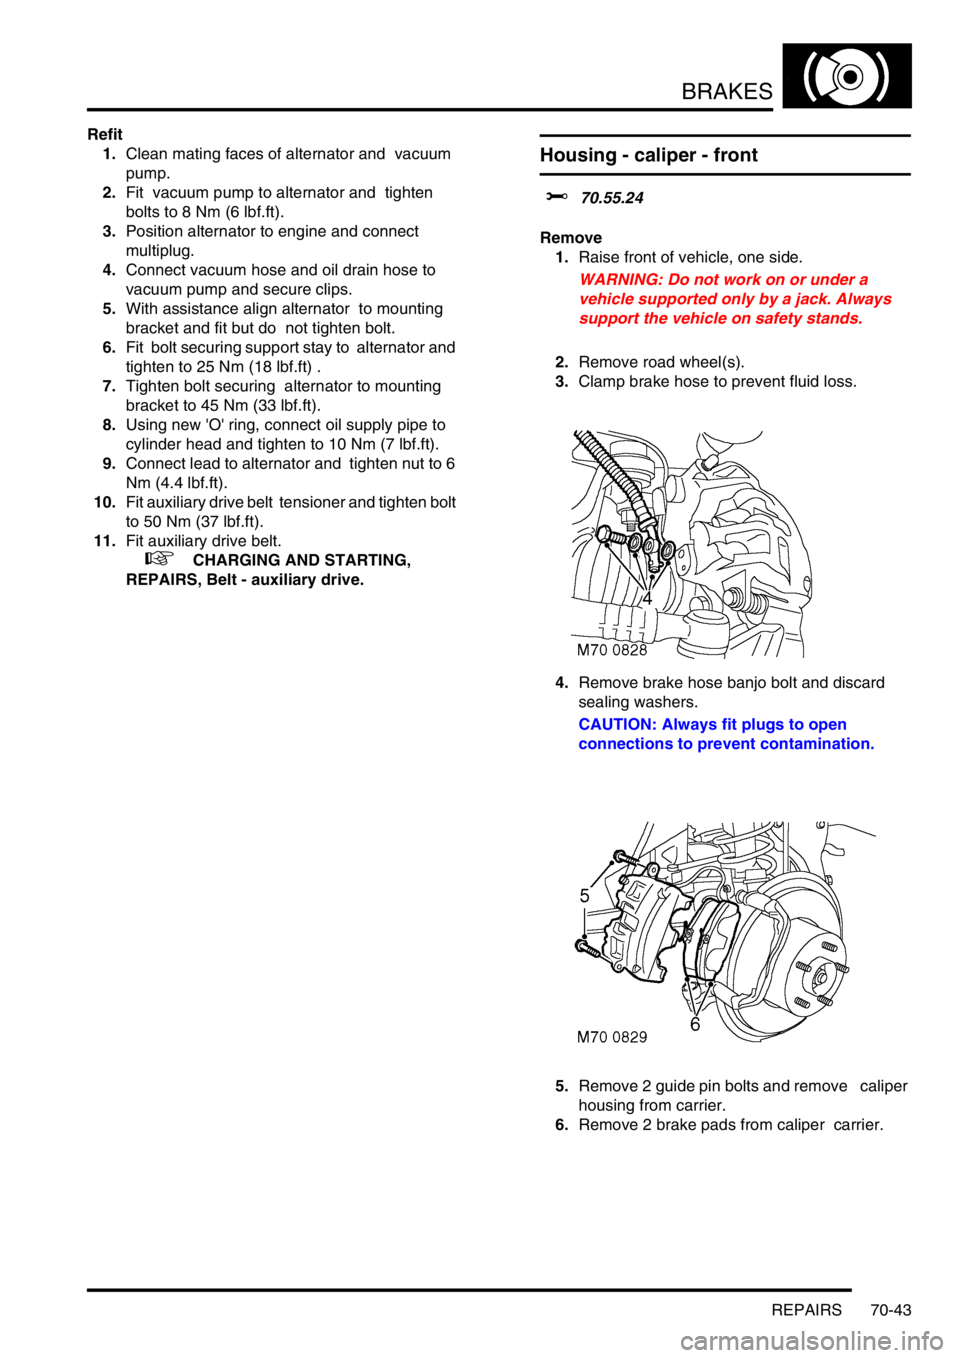
4.Remove brake hose banjo bolt and discard
sealing washers.
CAUTION: Always fit plugs to open
connections to prevent contamination.
5.Remove 2 guide pin bolts and remove caliper
housing from carrier.
6.Remove 2 brake pads from caliper carrier.
Page 1089 of 1672

BRAKES
70-44 REPAIRS
Refit
1.Rotate disc by hand and scrape all scale and
rust from around edge of disc. Clean location
surfaces on caliper bracket.
2.Clean dust from brake parts using brake
cleaning fluid.
WARNING: Do not use compressed air to
clean brake components. Dust from friction
materials can be harmful if inhaled.
3.Fit brake pads to caliper carrier.
4.Position caliper housing to carrier, align flats on
guide pins with caliper housing.
5.Fit guide pin bolts and tighten to 30 Nm (22
lbf.ft).
6.Clean banjo bolt and fit new sealing washers.
7.Position hose to caliper and tighten banjo bolt
to 32 Nm (24 lbf.ft).
8.Remove clamp from brake hose.
9.Bleed brake system.
+ BRAKES, ADJUSTMENTS, Brake
system bleeding.
10.Fit road wheel(s) and tighten nuts to 140 Nm
(103 lbf.ft).
11.Remove stand(s) and lower vehicle.
Housing - caliper - rear
$% 70.55.25
Remove
1.Raise rear of vehicle, one side.
WARNING: Do not work on or under a
vehicle supported only by a jack. Always
support the vehicle on safety stands.
2.Remove road wheel(s).
3.Clamp brake hose to prevent fluid loss.
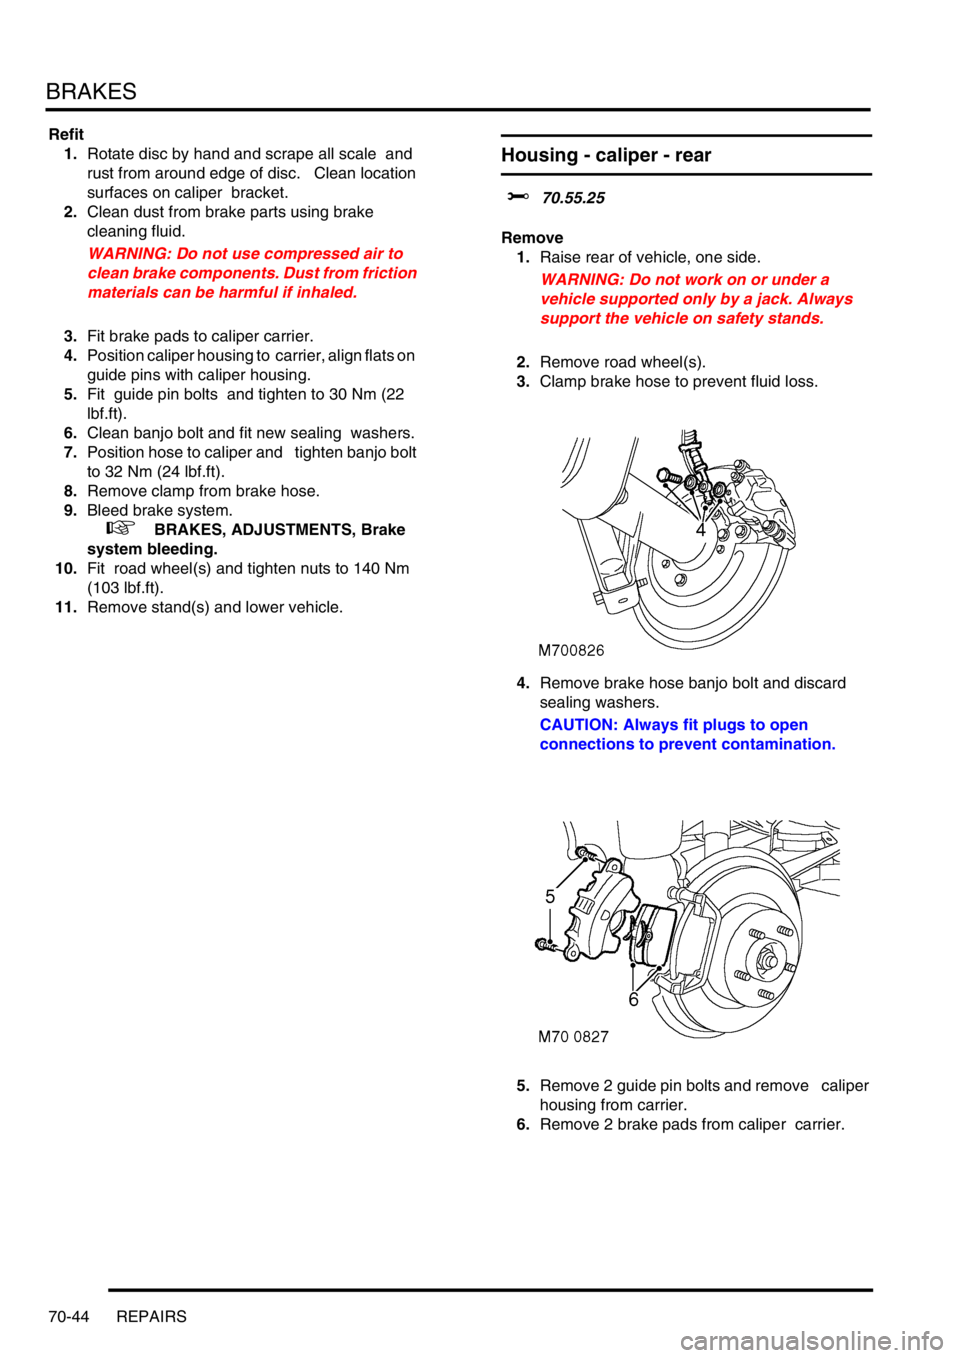
4.Remove brake hose banjo bolt and discard
sealing washers.
CAUTION: Always fit plugs to open
connections to prevent contamination.
5.Remove 2 guide pin bolts and remove caliper
housing from carrier.
6.Remove 2 brake pads from caliper carrier.
Page 1090 of 1672

BRAKES
REPAIRS 70-45
Refit
1.Rotate disc by hand and scrape all scale and
rust from around edge of disc. Clean location
surfaces on caliper bracket.
2.Clean dust from brake parts using brake
cleaning fluid.
WARNING: Do not use compressed air to
clean brake components. Dust from friction
materials can be harmful if inhaled.
3.Fit brake pads to caliper carrier.
4.Position caliper housing to carrier, align flats on
guide pins with caliper housing.
5.Fit guide pin bolts and tighten to 30 Nm (22
lbf.ft).
6.Clean banjo bolt and fit new sealing washers.
7.Position hose to caliper and tighten banjo bolt
to 32 Nm (24 lbf.ft).
8.Remove clamp from brake hose.
9.Bleed brakes.
+ BRAKES, ADJUSTMENTS, Brake
system bleeding.
10.Fit road wheel(s) and tighten nuts to 140 Nm
(103 lbf.ft).
11.Remove stand(s) and lower vehicle.
ECU - Self levelling and anti locking
brakes (SLABS)
$% 70.65.01
Remove
1.Remove BCU.
+ BODY CONTROL UNIT, REPAIRS,
Body control unit (BCU).
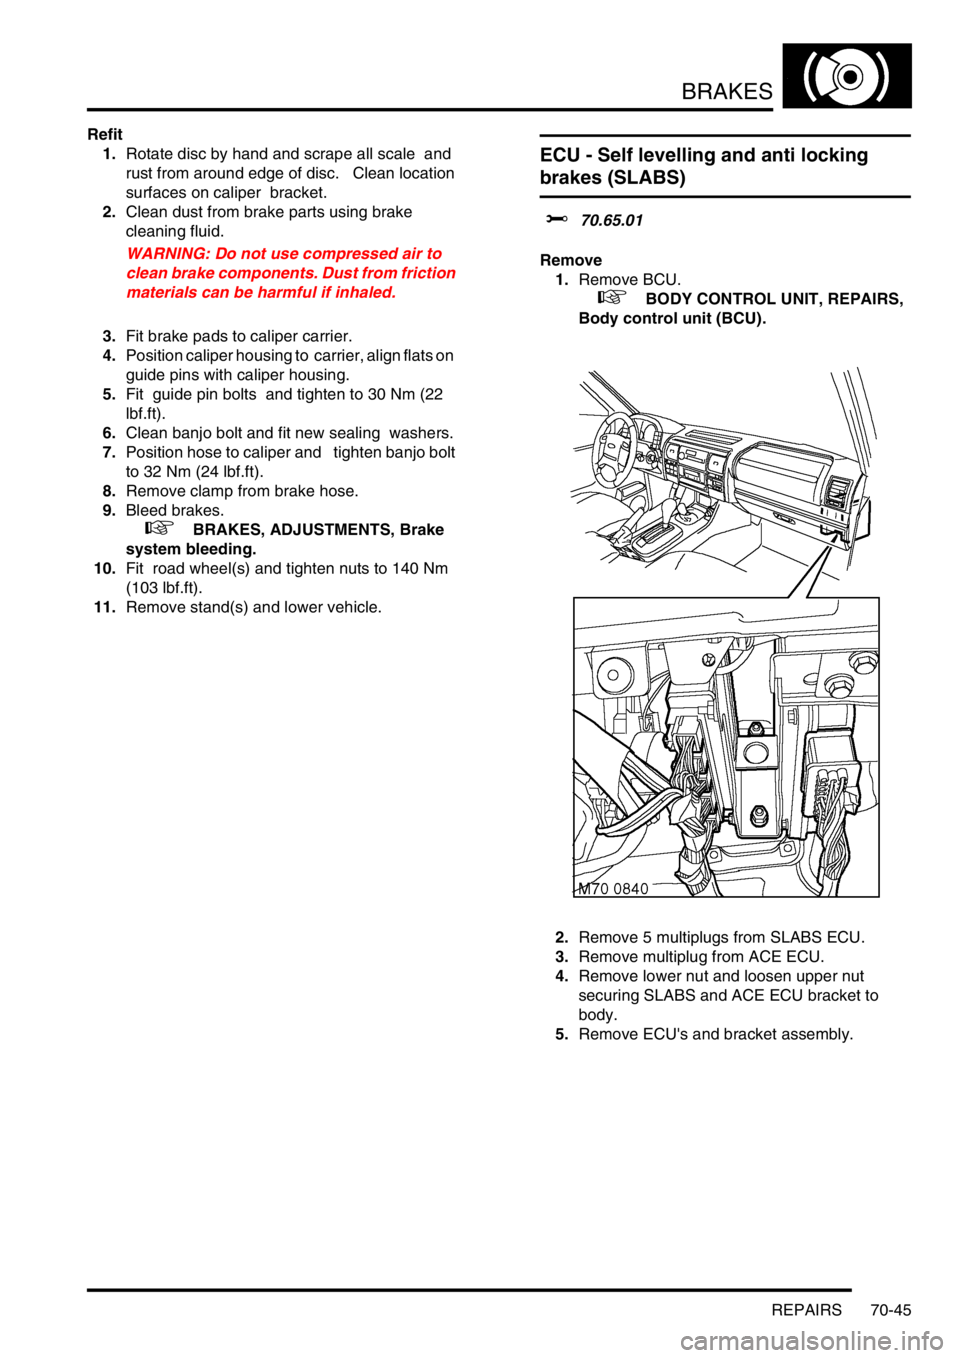
2.Remove 5 multiplugs from SLABS ECU.
3.Remove multiplug from ACE ECU.
4.Remove lower nut and loosen upper nut
securing SLABS and ACE ECU bracket to
body.
5.Remove ECU's and bracket assembly.
Page 1094 of 1672
BRAKES
REPAIRS 70-49
Switch - handbrake
$% 86.65.45
Remove
1.Remove centre console.
+ INTERIOR TRIM COMPONENTS,
REPAIRS, Console - centre - automatic
models.
+ INTERIOR TRIM COMPONENTS,
REPAIRS, Console - centre - manual
models.
2.Disconnect Lucar from handbrake warning
switch.
3.Remove clip and clevis pin securing cable to
handbrake lever.
4.Remove 2 bolts and remove handbrake lever.
5.Remove 2 screws securing switch to
handbrake lever and remove switch.
Refit
1.Fit switch to handbrake lever and tighten
screws.
2.Position handbrake lever to floor and tighten
bolts to 22 Nm (16 lbf.ft).
3.Align cable to handbrake lever and fit clevis pin
and clip.
4.Connect Lucar to handbrake switch.
5.Fit centre console.
+ INTERIOR TRIM COMPONENTS,
REPAIRS, Console - centre - automatic
models.
+ INTERIOR TRIM COMPONENTS,
REPAIRS, Console - centre - manual
models.
Page 1096 of 1672
RESTRAINT SYSTEMS
DESCRIPTION AND OPERATION 75-1
RESTRAINT SYSTEMS DESCRIPTION AND OPERAT ION
SRS component layout
RHD shown, LHD similar
1DCU
2SRS warning lamp
3Driver airbag module
4Driver seat belt pretensioner
5Passenger airbag module
6Passenger seat belt pretensioner
Page 1097 of 1672
RESTRAINT SYSTEMS
75-2 DESCRIPTION AND OPERATION
SRS block diagram
1DCU
2SRS warning lamp
3Driver airbag module
4Driver seat belt pretensioner
5Passenger airbag module
6Passenger seat belt pretensioner
Page 1098 of 1672
RESTRAINT SYSTEMS
DESCRIPTION AND OPERATION 75-3
Description - SRS
General
The purpose of the Supplementary Restraint System (SRS) is to reduce the impact of the driver and passenger
against the vehicle's interior in the event of a serious accident.
The SRS system is a stand-alone system. There are no remotely mounted crash sensors. The only external input to
the DCU is power. The system only becomes live when the ignition is switched on.
The SRS consists of the following components:
lDiagnostic and control unit (DCU).
lSRS warning lamp.
lRotary coupler.
lDriver airbag module.
lDriver seat belt pretensioner.
lPassenger airbag module.
lPassenger seat belt pretensioner.
The passenger airbag is optional in some markets. All other components are standard fit in all markets. The SRS
functions the same in all markets.