Page 1118 of 1672
RESTRAINT SYSTEMS
REPAIRS 75-23
Airbag module - drivers - deployment
$% 76.74.99
These guidelines are written to aid authorised
personnel to carry out the safe disposal of airbag
modules when removed from the vehicle.
If a vehicle is to be scrapped and contains an
undeployed airbag module, the module must be
manually deployed. This operation should only
be carried out using the following recommended
manual deployment procedure. Before
deployment is started the deployment tool self
test procedure should be carried out.
WARNING: Only use approved deployment
equipment, and only deploy SRS components in
a well ventilated designated area. Ensure SRS
components are not damaged or ruptured before
deployment. Notify the relevant authorities.
CAUTION: Deployment in the vehicle will damage
the steering wheel. If the vehicle is not being
scrapped, deploy the module away from the
vehicle in accordance with the correct
procedure.
Deploy
1.Carry out deployment tool self test.
+ RESTRAINT SYSTEMS, REPAIRS,
Airbag deployment tool - self test.
2.Remove airbag module from steering wheel.
+ RESTRAINT SYSTEMS, REPAIRS,
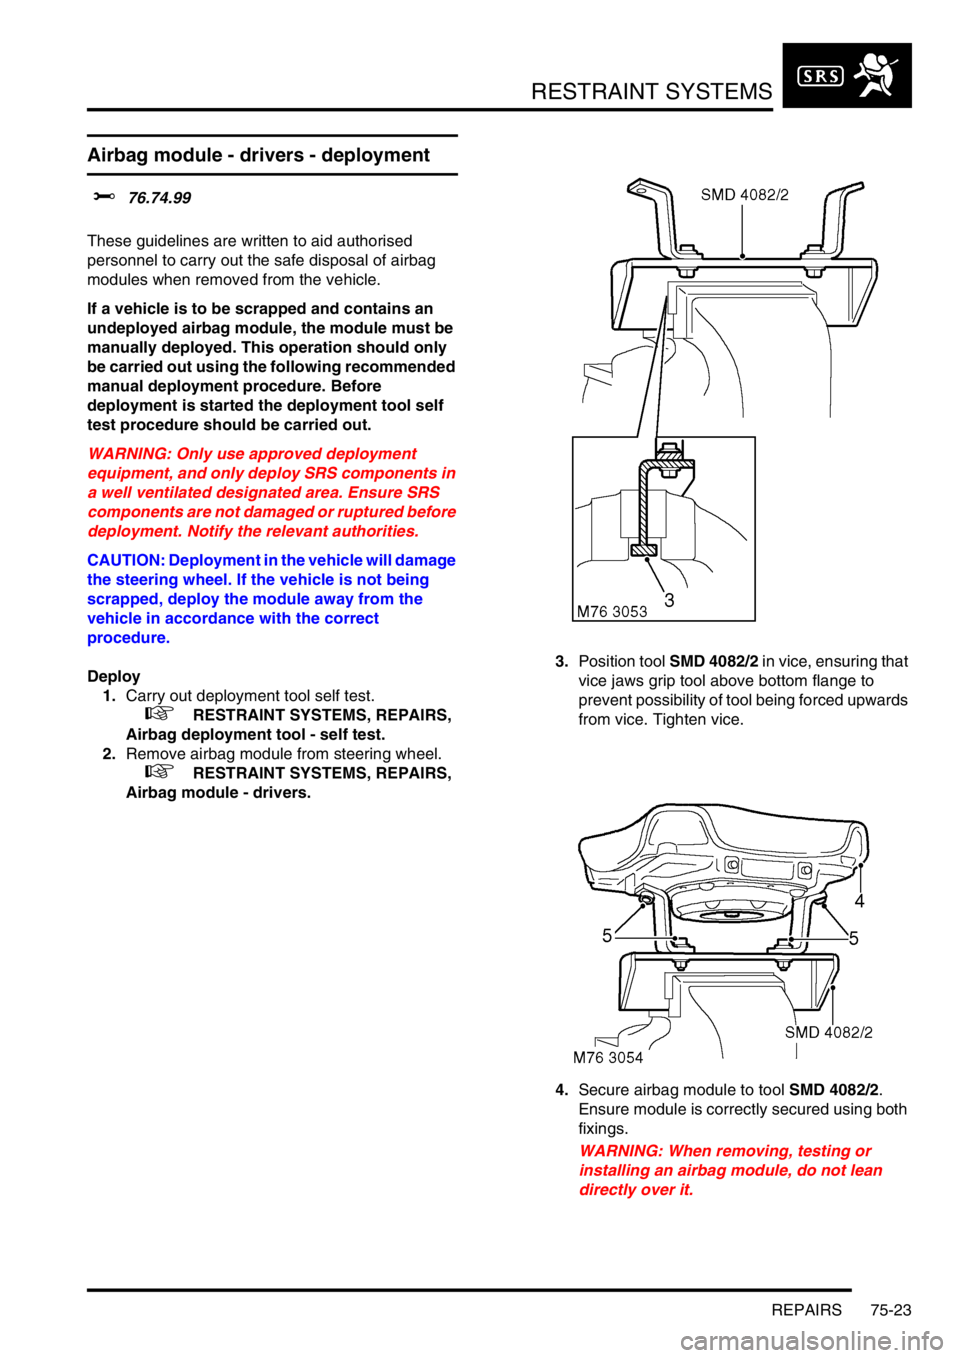
Airbag module - drivers.3.Position tool SMD 4082/2 in vice, ensuring that
vice jaws grip tool above bottom flange to
prevent possibility of tool being forced upwards
from vice. Tighten vice.
4.Secure airbag module to tool SMD 4082/2.
Ensure module is correctly secured using both
fixings.
WARNING: When removing, testing or
installing an airbag module, do not lean
directly over it.
Page 1119 of 1672
RESTRAINT SYSTEMS
75-24 REPAIRS
5.Ensure airbag module mounting brackets are
secure.
6.Connect flylead SMD 4082/4 to airbag module.
WARNING: Ensure the deployment tool is
not connected to the battery.
7.Connect flylead SMD 4082/4 to tool SMD 4082/
1.
WARNING: Do not lean over module whilst
connecting.
8.Connect tool SMD 4082/1 to battery.
WARNING: Ensure all personnel are at least
15 metres (50 ft) away from the airbag
module.9.Press both operating buttons to deploy airbag
module.
10.DO NOT return to airbag module for 30
minutes.
11.Using gloves and face mask, remove airbag
module from tool, place airbag module in
plastic bag and seal bag.
12.Wipe down tool with damp cloth.
13.Transport deployed airbag module to
designated area for incineration.
NOTE: DO NOT re-use or salvage any parts of
the airbag system including steering wheel or
steering column. Do not transport deployed
SRS components in the vehicle passenger
compartment.
Page 1120 of 1672
RESTRAINT SYSTEMS
REPAIRS 75-25
Airbag module - passenger - deployment
$% 76.74.99
These guidelines are written to aid authorised
personnel to carry out the safe disposal of airbag
modules when removed from the vehicle.
If a vehicle is to be scrapped and contains an
undeployed airbag module, the module must be
manually deployed. This operation should only
be carried out using the following recommended
manual deployment procedure. Before
deployment is started the deployment tool self
test procedure should be carried out.
WARNING: Only use approved deployment
equipment, and only deploy SRS components in
a well ventilated designated area. Ensure SRS
components are not damaged or ruptured before
deployment. Notify the relevant authorities.
Deploy
1.Carry out deployment tool self test.
+ RESTRAINT SYSTEMS, REPAIRS,
Airbag deployment tool - self test.
2.Remove airbag module from fascia.
+ RESTRAINT SYSTEMS, REPAIRS,
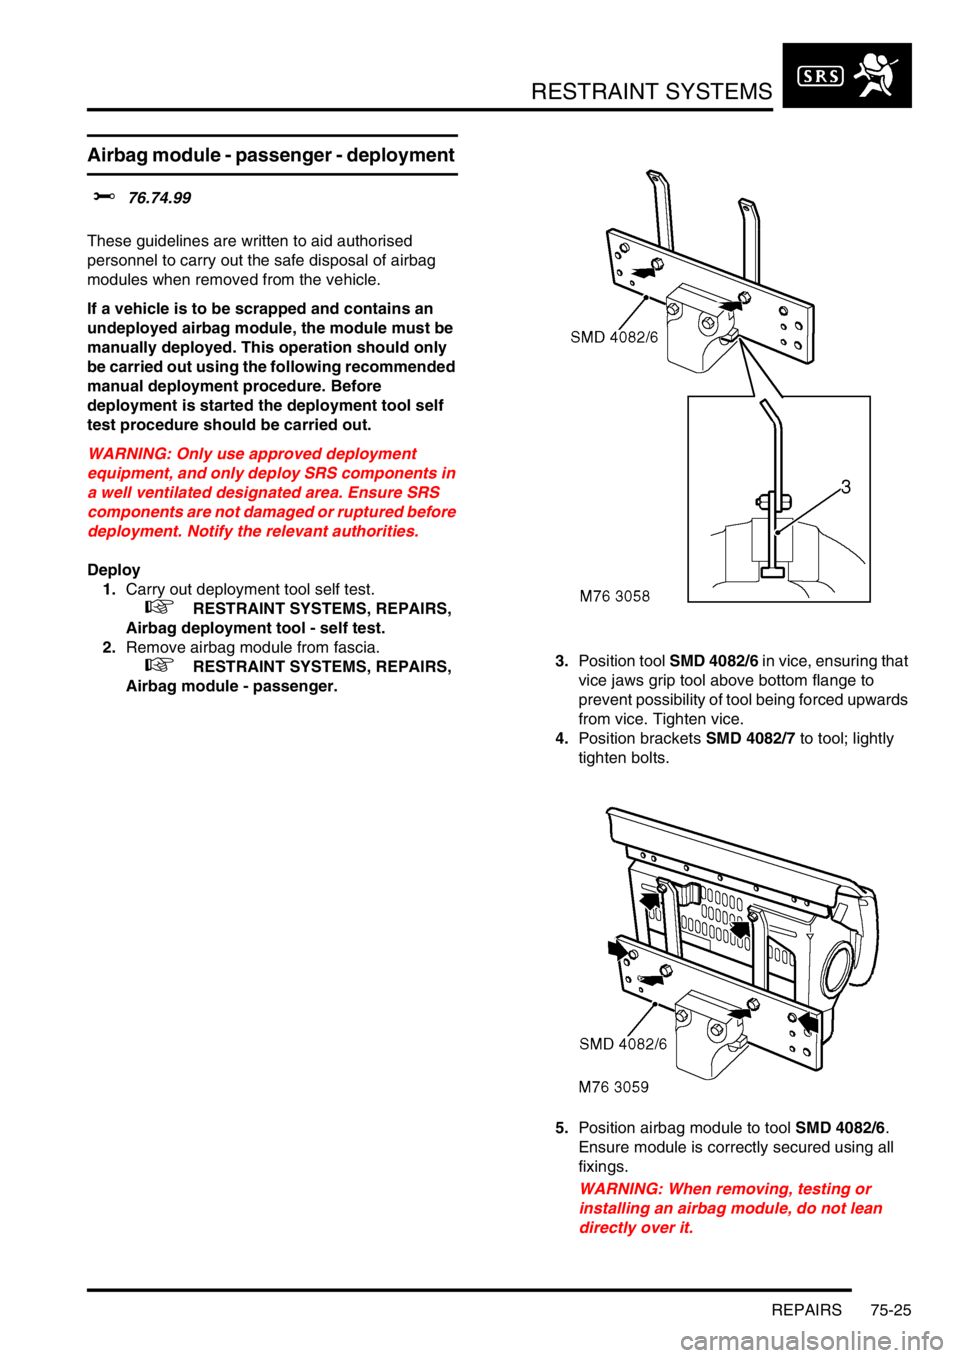
Airbag module - passenger.3.Position tool SMD 4082/6 in vice, ensuring that
vice jaws grip tool above bottom flange to
prevent possibility of tool being forced upwards
from vice. Tighten vice.
4.Position brackets SMD 4082/7 to tool; lightly
tighten bolts.
5.Position airbag module to tool SMD 4082/6.
Ensure module is correctly secured using all
fixings.
WARNING: When removing, testing or
installing an airbag module, do not lean
directly over it.
Page 1121 of 1672
RESTRAINT SYSTEMS
75-26 REPAIRS
6.Ensure airbag module mounting brackets are
secure.
7.Connect flylead SMD 4082/5 to airbag module.
WARNING: Ensure the deployment tool is
not connected to the battery.
8.Connect flylead SMD 4082/5 to tool SMD 4082/
1.
9.Connect tool SMD 4082/1 to battery.
WARNING: Ensure all personnel are at least
15 metres (50 ft) away from the airbag
module.10.Press both operating buttons to deploy airbag
module.
11.DO NOT return to airbag module for 30
minutes.
12.Using gloves and face mask, remove airbag
module from tool, place airbag module in
plastic bag and seal bag.
13.Wipe down tool with damp cloth.
14.Transport deployed airbag module to
designated area for incineration.
NOTE: DO NOT re-use or salvage any parts of
the airbag system.Do not transport deployed
SRS components in the vehicle passenger
compartment.
Page 1122 of 1672
RESTRAINT SYSTEMS
REPAIRS 75-27
Pre-tensioner - deployment
$% 76.74.99
These guidelines are written to aid authorised
personnel to carry out the safe disposal of pre-
tensioners.
If a vehicle is to be scrapped and contains an
undeployed pre-tensioner, the pre-tensioner
must be manually deployed. This operation
should only be carried out using the following
recommended manual deployment procedure.
Before deployment is started the deployment
tool self test procedure should be carried out.
WARNING: Only use approved deployment
equipment, and only deploy SRS components in
a well ventilated designated area. Ensure SRS
components are not damaged or ruptured before
deployment. Notify the relevant authorities.
Deploy
1.Carry out deployment tool self test.
+ RESTRAINT SYSTEMS, REPAIRS,
Airbag deployment tool - self test.
2.Slide seat fully rearwards to access pre-
tensioner harness connector.
3.Disconnect pre-tensioner harness connector.
Ensure deployment tool SMD 4082/1 is not
connected to battery.
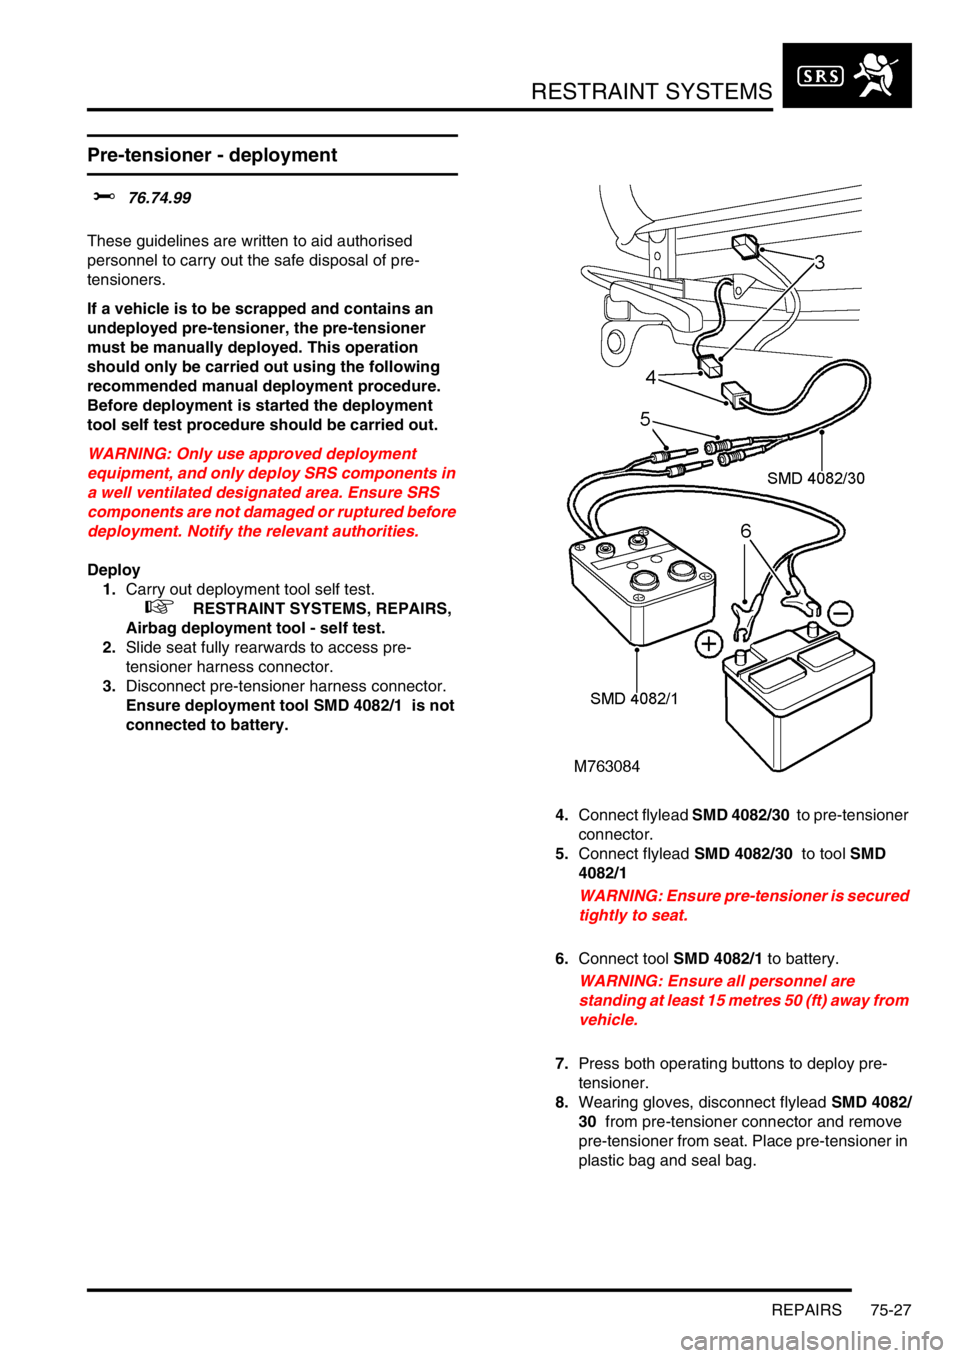
4.Connect flylead SMD 4082/30 to pre-tensioner
connector.
5.Connect flylead SMD 4082/30 to tool SMD
4082/1
WARNING: Ensure pre-tensioner is secured
tightly to seat.
6.Connect tool SMD 4082/1 to battery.
WARNING: Ensure all personnel are
standing at least 15 metres 50 (ft) away from
vehicle.
7.Press both operating buttons to deploy pre-
tensioner.
8.Wearing gloves, disconnect flylead SMD 4082/
30 from pre-tensioner connector and remove
pre-tensioner from seat. Place pre-tensioner in
plastic bag and seal bag.
Page 1143 of 1672
EXTERIOR FITTINGS
76-2-6 REPAIRS
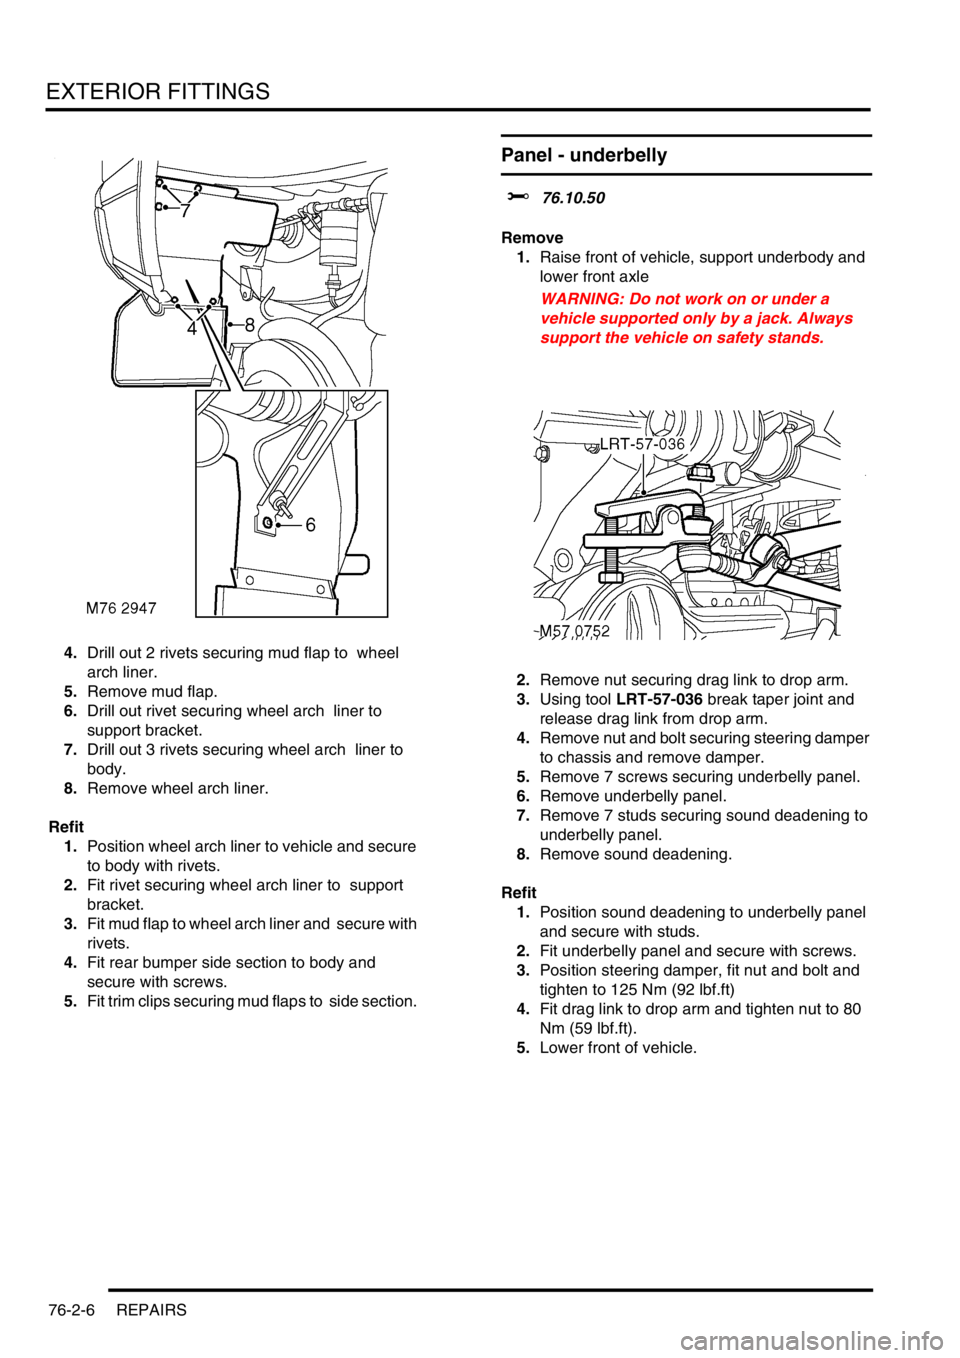
4.Drill out 2 rivets securing mud flap to wheel
arch liner.
5.Remove mud flap.
6.Drill out rivet securing wheel arch liner to
support bracket.
7.Drill out 3 rivets securing wheel arch liner to
body.
8.Remove wheel arch liner.
Refit
1.Position wheel arch liner to vehicle and secure
to body with rivets.
2.Fit rivet securing wheel arch liner to support
bracket.
3.Fit mud flap to wheel arch liner and secure with
rivets.
4.Fit rear bumper side section to body and
secure with screws.
5.Fit trim clips securing mud flaps to side section.
Panel - underbelly
$% 76.10.50
Remove
1.Raise front of vehicle, support underbody and
lower front axle
WARNING: Do not work on or under a
vehicle supported only by a jack. Always
support the vehicle on safety stands.
2.Remove nut securing drag link to drop arm.
3.Using tool LRT-57-036 break taper joint and
release drag link from drop arm.
4.Remove nut and bolt securing steering damper
to chassis and remove damper.
5.Remove 7 screws securing underbelly panel.
6.Remove underbelly panel.
7.Remove 7 studs securing sound deadening to
underbelly panel.
8.Remove sound deadening.
Refit
1.Position sound deadening to underbelly panel
and secure with studs.
2.Fit underbelly panel and secure with screws.
3.Position steering damper, fit nut and bolt and
tighten to 125 Nm (92 lbf.ft)
4.Fit drag link to drop arm and tighten nut to 80
Nm (59 lbf.ft).
5.Lower front of vehicle.
Page 1179 of 1672
SCREENS
76-4-2 REPAIRS
Windscreen
$% 76.81.01
Introduction
The following equipment is required:
lCutting wire and handles.
lKent cutting knife.
lGlazing knife.
lWindscreen repair kit.
lSealant applicator gun.
lSuction cups.
lA felt covered table or stand to support glass.
WARNING: Wear protective gloves when
handling glass, solvents and primers.
WARNING: Wear suitable eye protection when
removing and refitting glass.
WARNING: If glass has splintered, protect eyes
and operate demister blower to remove glass
from heater ducts. Use a vacuum cleaner to
remove glass from fascia, carpet and seats.
Remove
1.Remove air intake plenum.
+ HEATING AND VENTILATION,
REPAIRS, Plenum Air Intake.
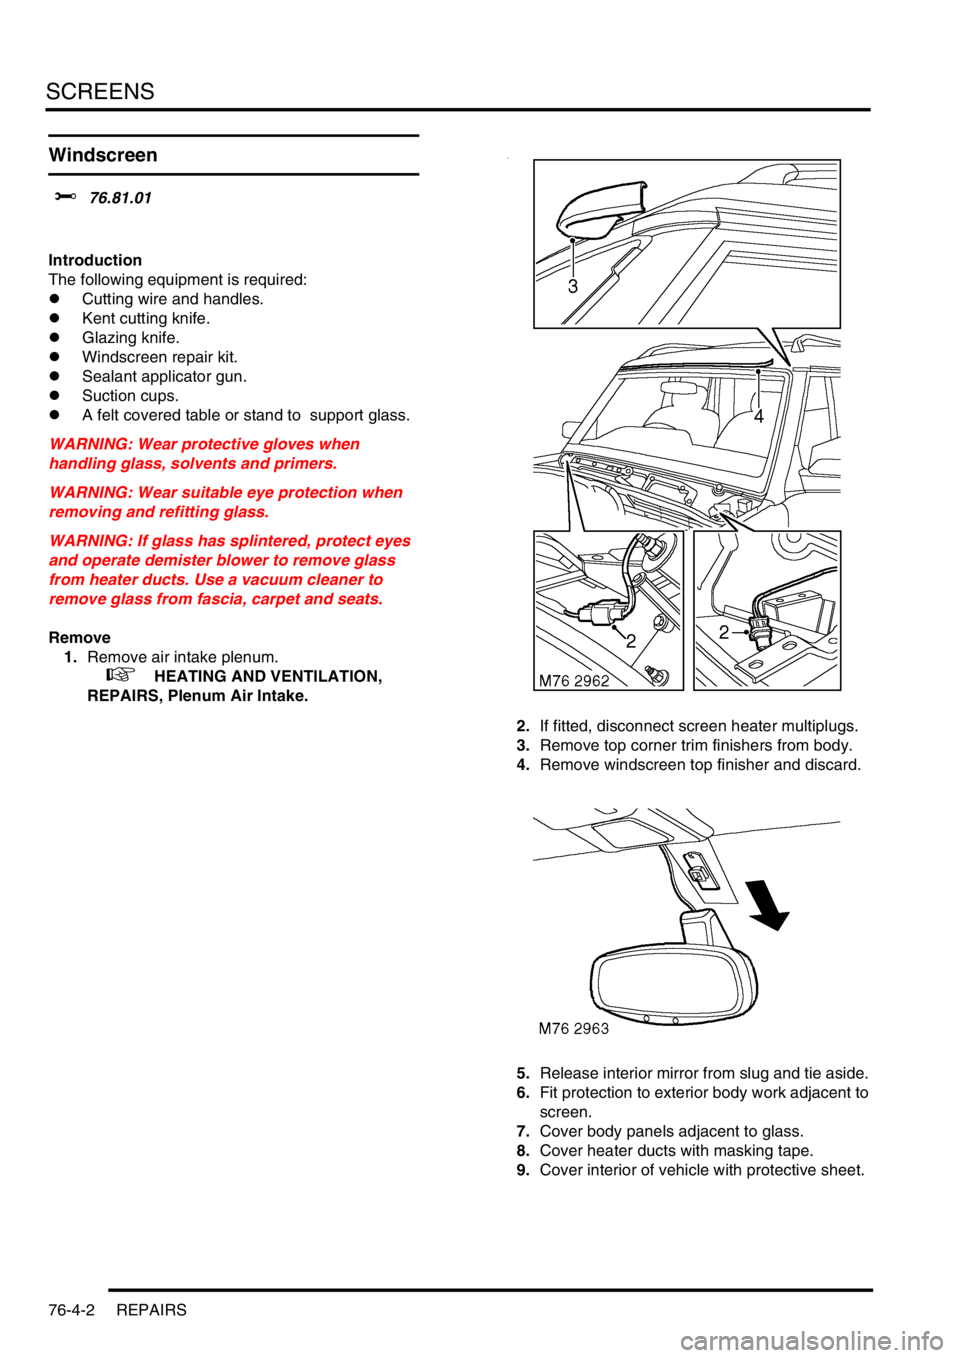
2.If fitted, disconnect screen heater multiplugs.
3.Remove top corner trim finishers from body.
4.Remove windscreen top finisher and discard.
5.Release interior mirror from slug and tie aside.
6.Fit protection to exterior body work adjacent to
screen.
7.Cover body panels adjacent to glass.
8.Cover heater ducts with masking tape.
9.Cover interior of vehicle with protective sheet.
Page 1181 of 1672
SCREENS
76-4-4 REPAIRS
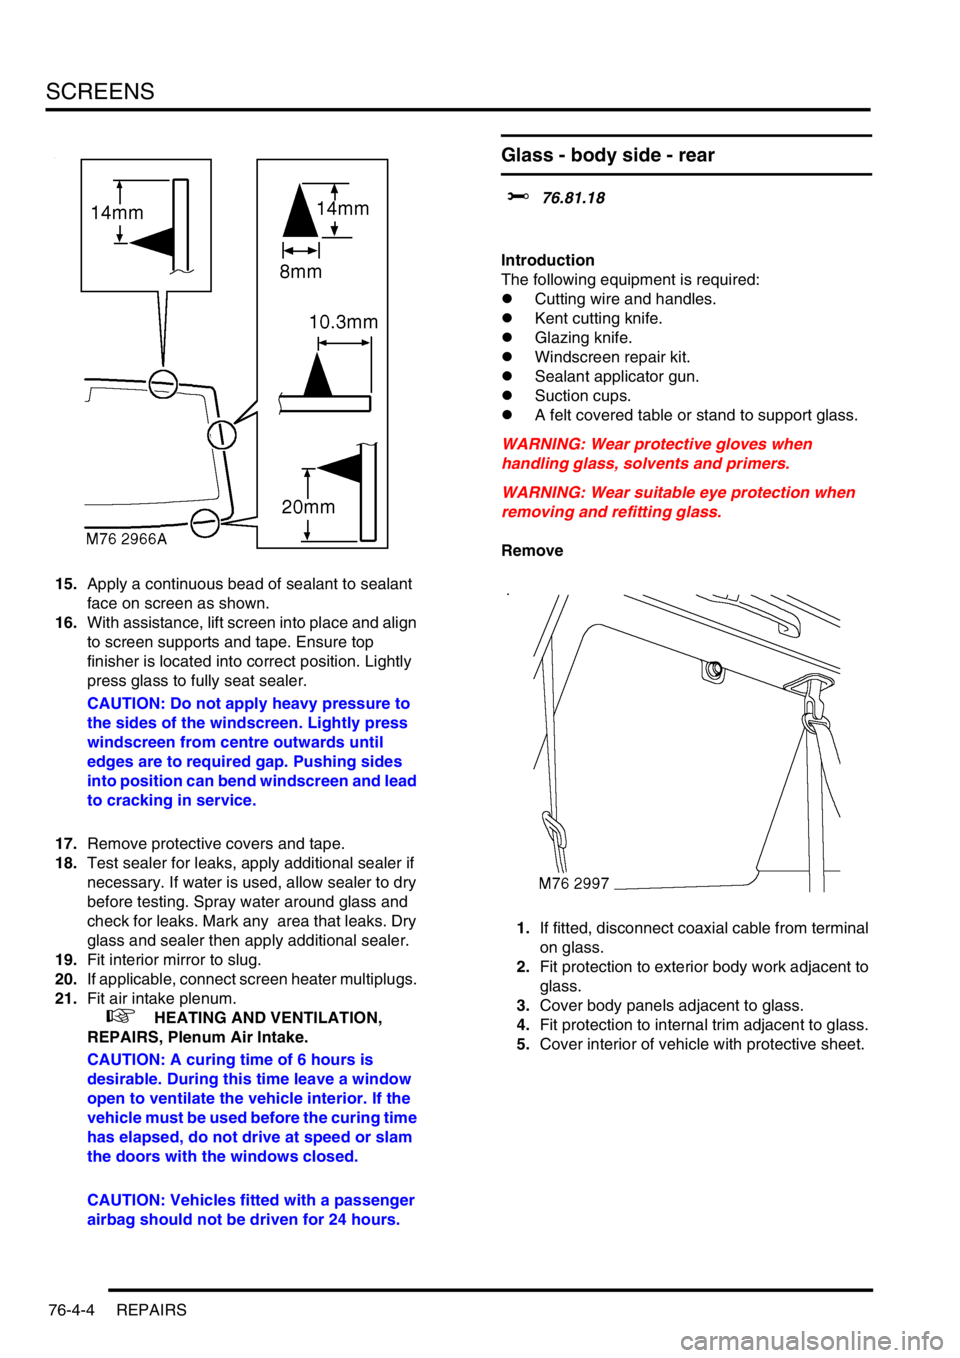
15.Apply a continuous bead of sealant to sealant
face on screen as shown.
16.With assistance, lift screen into place and align
to screen supports and tape. Ensure top
finisher is located into correct position. Lightly
press glass to fully seat sealer.
CAUTION: Do not apply heavy pressure to
the sides of the windscreen. Lightly press
windscreen from centre outwards until
edges are to required gap. Pushing sides
into position can bend windscreen and lead
to cracking in service.
17.Remove protective covers and tape.
18.Test sealer for leaks, apply additional sealer if
necessary. If water is used, allow sealer to dry
before testing. Spray water around glass and
check for leaks. Mark any area that leaks. Dry
glass and sealer then apply additional sealer.
19.Fit interior mirror to slug.
20.If applicable, connect screen heater multiplugs.
21.Fit air intake plenum.
+ HEATING AND VENTILATION,
REPAIRS, Plenum Air Intake.
CAUTION: A curing time of 6 hours is
desirable. During this time leave a window
open to ventilate the vehicle interior. If the
vehicle must be used before the curing time
has elapsed, do not drive at speed or slam
the doors with the windows closed.
CAUTION: Vehicles fitted with a passenger
airbag should not be driven for 24 hours.
Glass - body side - rear
$% 76.81.18
Introduction
The following equipment is required:
lCutting wire and handles.
lKent cutting knife.
lGlazing knife.
lWindscreen repair kit.
lSealant applicator gun.
lSuction cups.
lA felt covered table or stand to support glass.
WARNING: Wear protective gloves when
handling glass, solvents and primers.
WARNING: Wear suitable eye protection when
removing and refitting glass.
Remove
1.If fitted, disconnect coaxial cable from terminal
on glass.
2.Fit protection to exterior body work adjacent to
glass.
3.Cover body panels adjacent to glass.
4.Fit protection to internal trim adjacent to glass.
5.Cover interior of vehicle with protective sheet.