2002 DODGE RAM torque
[x] Cancel search: torquePage 2037 of 2255
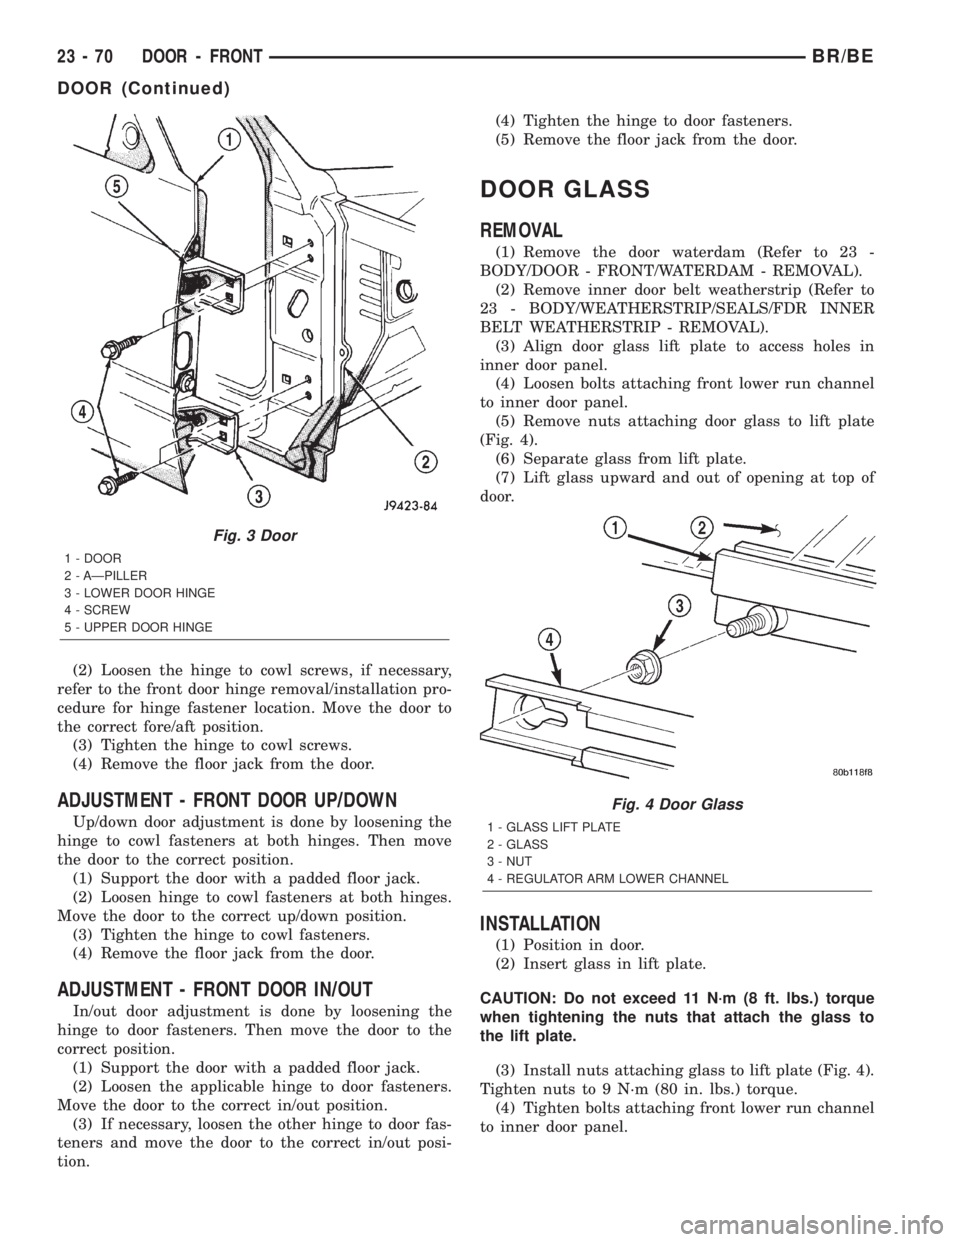
(2) Loosen the hinge to cowl screws, if necessary,
refer to the front door hinge removal/installation pro-
cedure for hinge fastener location. Move the door to
the correct fore/aft position.
(3) Tighten the hinge to cowl screws.
(4) Remove the floor jack from the door.
ADJUSTMENT - FRONT DOOR UP/DOWN
Up/down door adjustment is done by loosening the
hinge to cowl fasteners at both hinges. Then move
the door to the correct position.
(1) Support the door with a padded floor jack.
(2) Loosen hinge to cowl fasteners at both hinges.
Move the door to the correct up/down position.
(3) Tighten the hinge to cowl fasteners.
(4) Remove the floor jack from the door.
ADJUSTMENT - FRONT DOOR IN/OUT
In/out door adjustment is done by loosening the
hinge to door fasteners. Then move the door to the
correct position.
(1) Support the door with a padded floor jack.
(2) Loosen the applicable hinge to door fasteners.
Move the door to the correct in/out position.
(3) If necessary, loosen the other hinge to door fas-
teners and move the door to the correct in/out posi-
tion.(4) Tighten the hinge to door fasteners.
(5) Remove the floor jack from the door.
DOOR GLASS
REMOVAL
(1) Remove the door waterdam (Refer to 23 -
BODY/DOOR - FRONT/WATERDAM - REMOVAL).
(2) Remove inner door belt weatherstrip (Refer to
23 - BODY/WEATHERSTRIP/SEALS/FDR INNER
BELT WEATHERSTRIP - REMOVAL).
(3) Align door glass lift plate to access holes in
inner door panel.
(4) Loosen bolts attaching front lower run channel
to inner door panel.
(5) Remove nuts attaching door glass to lift plate
(Fig. 4).
(6) Separate glass from lift plate.
(7) Lift glass upward and out of opening at top of
door.
INSTALLATION
(1) Position in door.
(2) Insert glass in lift plate.
CAUTION: Do not exceed 11 N´m (8 ft. lbs.) torque
when tightening the nuts that attach the glass to
the lift plate.
(3) Install nuts attaching glass to lift plate (Fig. 4).
Tighten nuts to 9 N´m (80 in. lbs.) torque.
(4) Tighten bolts attaching front lower run channel
to inner door panel.
Fig. 3 Door
1 - DOOR
2 - AÐPILLER
3 - LOWER DOOR HINGE
4 - SCREW
5 - UPPER DOOR HINGE
Fig. 4 Door Glass
1 - GLASS LIFT PLATE
2 - GLASS
3 - NUT
4 - REGULATOR ARM LOWER CHANNEL
23 - 70 DOOR - FRONTBR/BE
DOOR (Continued)
Page 2039 of 2255
HINGE
REMOVAL
(1) Remove cowl trim panel (Refer to 23 - BODY/
INTERIOR/COWL TRIM COVER - REMOVAL).
(2) Remove hidden bolt attaching door hinge to
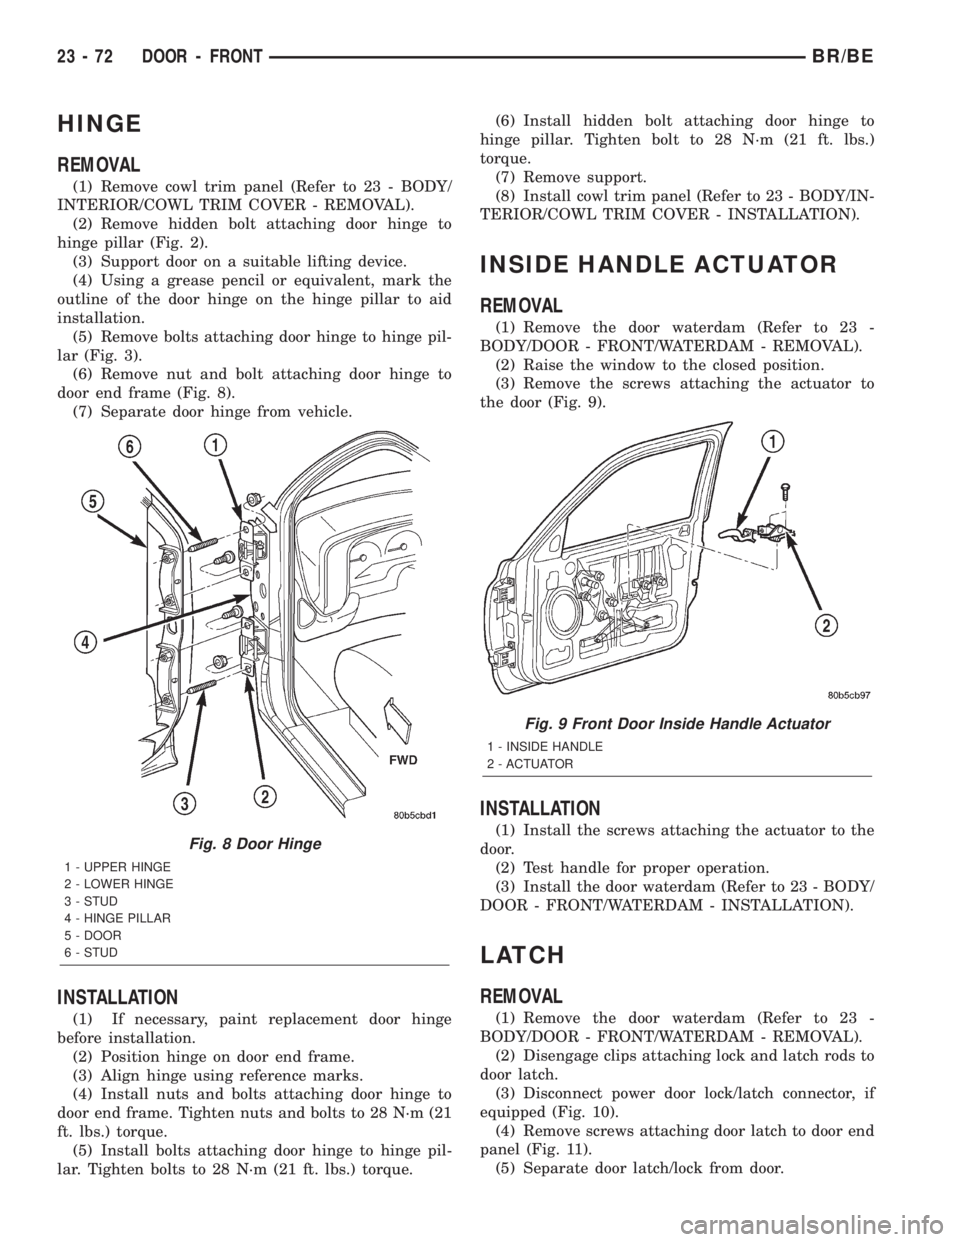
hinge pillar (Fig. 2).
(3) Support door on a suitable lifting device.
(4) Using a grease pencil or equivalent, mark the
outline of the door hinge on the hinge pillar to aid
installation.
(5) Remove bolts attaching door hinge to hinge pil-
lar (Fig. 3).
(6) Remove nut and bolt attaching door hinge to
door end frame (Fig. 8).
(7) Separate door hinge from vehicle.
INSTALLATION
(1) If necessary, paint replacement door hinge
before installation.
(2) Position hinge on door end frame.
(3) Align hinge using reference marks.
(4) Install nuts and bolts attaching door hinge to
door end frame. Tighten nuts and bolts to 28 N´m (21
ft. lbs.) torque.
(5) Install bolts attaching door hinge to hinge pil-
lar. Tighten bolts to 28 N´m (21 ft. lbs.) torque.(6) Install hidden bolt attaching door hinge to
hinge pillar. Tighten bolt to 28 N´m (21 ft. lbs.)
torque.
(7) Remove support.
(8) Install cowl trim panel (Refer to 23 - BODY/IN-
TERIOR/COWL TRIM COVER - INSTALLATION).
INSIDE HANDLE ACTUATOR
REMOVAL
(1) Remove the door waterdam (Refer to 23 -
BODY/DOOR - FRONT/WATERDAM - REMOVAL).
(2) Raise the window to the closed position.
(3) Remove the screws attaching the actuator to
the door (Fig. 9).
INSTALLATION
(1) Install the screws attaching the actuator to the
door.
(2) Test handle for proper operation.
(3) Install the door waterdam (Refer to 23 - BODY/
DOOR - FRONT/WATERDAM - INSTALLATION).
LATCH
REMOVAL
(1) Remove the door waterdam (Refer to 23 -
BODY/DOOR - FRONT/WATERDAM - REMOVAL).
(2) Disengage clips attaching lock and latch rods to
door latch.
(3) Disconnect power door lock/latch connector, if
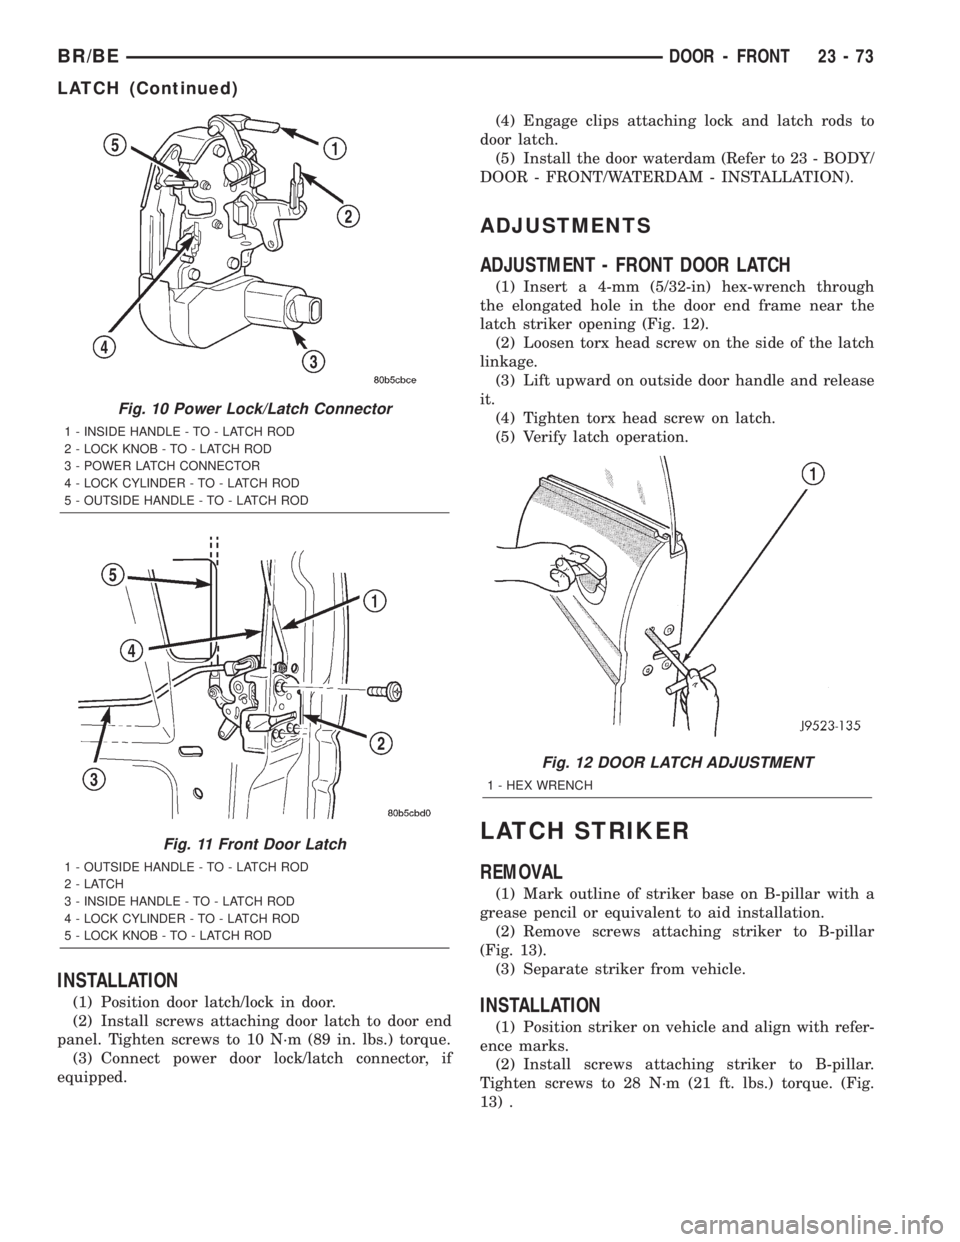
equipped (Fig. 10).
(4) Remove screws attaching door latch to door end
panel (Fig. 11).
(5) Separate door latch/lock from door.
Fig. 8 Door Hinge
1 - UPPER HINGE
2 - LOWER HINGE
3 - STUD
4 - HINGE PILLAR
5 - DOOR
6 - STUD
Fig. 9 Front Door Inside Handle Actuator
1 - INSIDE HANDLE
2 - ACTUATOR
23 - 72 DOOR - FRONTBR/BE
Page 2040 of 2255
INSTALLATION
(1) Position door latch/lock in door.
(2) Install screws attaching door latch to door end
panel. Tighten screws to 10 N´m (89 in. lbs.) torque.
(3) Connect power door lock/latch connector, if
equipped.(4) Engage clips attaching lock and latch rods to
door latch.
(5) Install the door waterdam (Refer to 23 - BODY/
DOOR - FRONT/WATERDAM - INSTALLATION).
ADJUSTMENTS
ADJUSTMENT - FRONT DOOR LATCH
(1) Insert a 4-mm (5/32-in) hex-wrench through
the elongated hole in the door end frame near the
latch striker opening (Fig. 12).
(2) Loosen torx head screw on the side of the latch
linkage.
(3) Lift upward on outside door handle and release
it.
(4) Tighten torx head screw on latch.
(5) Verify latch operation.
LATCH STRIKER
REMOVAL
(1) Mark outline of striker base on B-pillar with a
grease pencil or equivalent to aid installation.
(2) Remove screws attaching striker to B-pillar
(Fig. 13).
(3) Separate striker from vehicle.
INSTALLATION
(1) Position striker on vehicle and align with refer-
ence marks.
(2) Install screws attaching striker to B-pillar.
Tighten screws to 28 N´m (21 ft. lbs.) torque. (Fig.
13) .
Fig. 10 Power Lock/Latch Connector
1 - INSIDE HANDLE - TO - LATCH ROD
2 - LOCK KNOB - TO - LATCH ROD
3 - POWER LATCH CONNECTOR
4 - LOCK CYLINDER - TO - LATCH ROD
5 - OUTSIDE HANDLE - TO - LATCH ROD
Fig. 11 Front Door Latch
1 - OUTSIDE HANDLE - TO - LATCH ROD
2-LATCH
3 - INSIDE HANDLE - TO - LATCH ROD
4 - LOCK CYLINDER - TO - LATCH ROD
5 - LOCK KNOB - TO - LATCH ROD
Fig. 12 DOOR LATCH ADJUSTMENT
1 - HEX WRENCH
BR/BEDOOR - FRONT 23 - 73
LATCH (Continued)
Page 2045 of 2255
CHECK
REMOVAL
(1) Remove cargo door trim panel (Refer to 23 -
BODY/DOOR - CARGO/TRIM PANEL - REMOVAL).
(2) Remove the bolts attaching the door check to
the cab C-pillar.
(3) Remove the nuts attaching the door check to
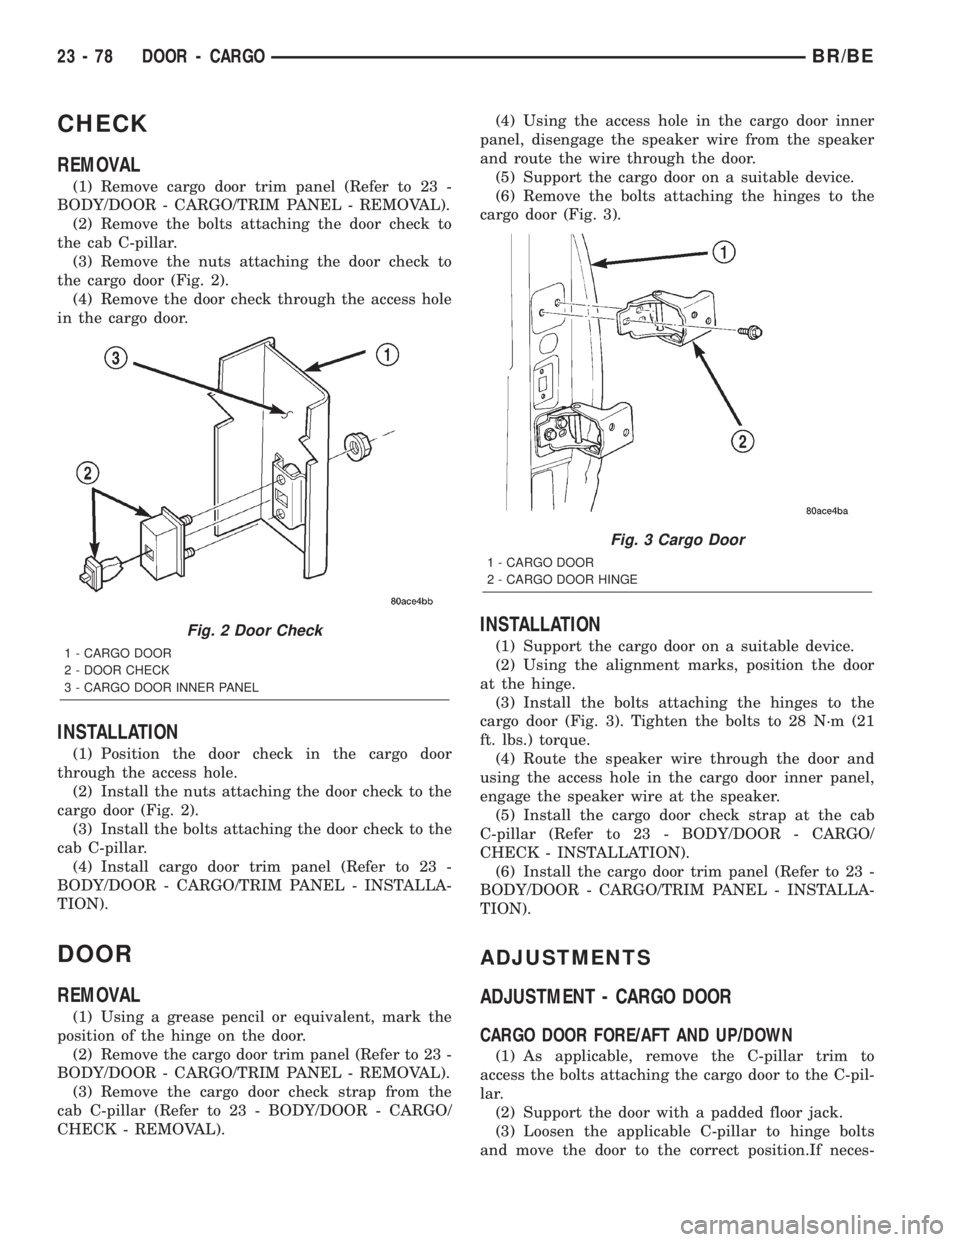
the cargo door (Fig. 2).
(4) Remove the door check through the access hole
in the cargo door.
INSTALLATION
(1) Position the door check in the cargo door
through the access hole.
(2) Install the nuts attaching the door check to the
cargo door (Fig. 2).
(3) Install the bolts attaching the door check to the
cab C-pillar.
(4) Install cargo door trim panel (Refer to 23 -
BODY/DOOR - CARGO/TRIM PANEL - INSTALLA-
TION).
DOOR
REMOVAL
(1) Using a grease pencil or equivalent, mark the
position of the hinge on the door.
(2) Remove the cargo door trim panel (Refer to 23 -
BODY/DOOR - CARGO/TRIM PANEL - REMOVAL).
(3) Remove the cargo door check strap from the
cab C-pillar (Refer to 23 - BODY/DOOR - CARGO/
CHECK - REMOVAL).(4) Using the access hole in the cargo door inner
panel, disengage the speaker wire from the speaker
and route the wire through the door.
(5) Support the cargo door on a suitable device.
(6) Remove the bolts attaching the hinges to the
cargo door (Fig. 3).
INSTALLATION
(1) Support the cargo door on a suitable device.
(2) Using the alignment marks, position the door
at the hinge.
(3) Install the bolts attaching the hinges to the
cargo door (Fig. 3). Tighten the bolts to 28 N´m (21
ft. lbs.) torque.
(4) Route the speaker wire through the door and
using the access hole in the cargo door inner panel,
engage the speaker wire at the speaker.
(5) Install the cargo door check strap at the cab
C-pillar (Refer to 23 - BODY/DOOR - CARGO/
CHECK - INSTALLATION).
(6) Install the cargo door trim panel (Refer to 23 -
BODY/DOOR - CARGO/TRIM PANEL - INSTALLA-
TION).
ADJUSTMENTS
ADJUSTMENT - CARGO DOOR
CARGO DOOR FORE/AFT AND UP/DOWN
(1) As applicable, remove the C-pillar trim to
access the bolts attaching the cargo door to the C-pil-
lar.
(2) Support the door with a padded floor jack.
(3) Loosen the applicable C-pillar to hinge bolts
and move the door to the correct position.If neces-
Fig. 2 Door Check
1 - CARGO DOOR
2 - DOOR CHECK
3 - CARGO DOOR INNER PANEL
Fig. 3 Cargo Door
1 - CARGO DOOR
2 - CARGO DOOR HINGE
23 - 78 DOOR - CARGOBR/BE
Page 2046 of 2255
sary, loosen the other C-pillar to hinge bolts and
move the door to the correct position.
(4) Tighten the bolts to 28 N´m (21 ft. lbs.) torque.
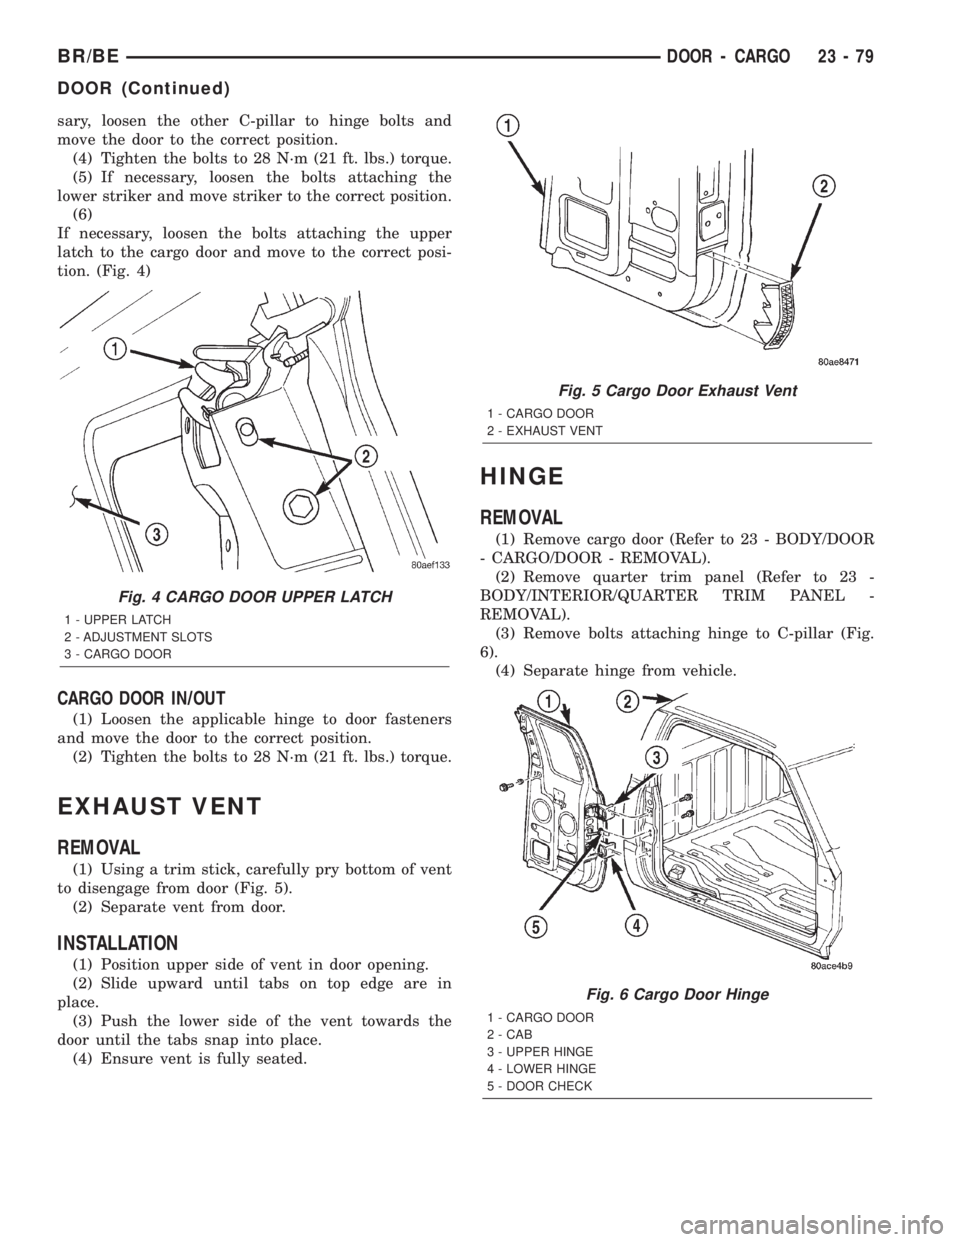
(5) If necessary, loosen the bolts attaching the
lower striker and move striker to the correct position.
(6)
If necessary, loosen the bolts attaching the upper
latch to the cargo door and move to the correct posi-
tion. (Fig. 4)
CARGO DOOR IN/OUT
(1) Loosen the applicable hinge to door fasteners
and move the door to the correct position.
(2) Tighten the bolts to 28 N´m (21 ft. lbs.) torque.
EXHAUST VENT
REMOVAL
(1) Using a trim stick, carefully pry bottom of vent
to disengage from door (Fig. 5).
(2) Separate vent from door.
INSTALLATION
(1) Position upper side of vent in door opening.
(2) Slide upward until tabs on top edge are in
place.
(3) Push the lower side of the vent towards the
door until the tabs snap into place.
(4) Ensure vent is fully seated.
HINGE
REMOVAL
(1) Remove cargo door (Refer to 23 - BODY/DOOR
- CARGO/DOOR - REMOVAL).
(2) Remove quarter trim panel (Refer to 23 -
BODY/INTERIOR/QUARTER TRIM PANEL -
REMOVAL).
(3) Remove bolts attaching hinge to C-pillar (Fig.
6).
(4) Separate hinge from vehicle.
Fig. 4 CARGO DOOR UPPER LATCH
1 - UPPER LATCH
2 - ADJUSTMENT SLOTS
3 - CARGO DOOR
Fig. 5 Cargo Door Exhaust Vent
1 - CARGO DOOR
2 - EXHAUST VENT
Fig. 6 Cargo Door Hinge
1 - CARGO DOOR
2 - CAB
3 - UPPER HINGE
4 - LOWER HINGE
5 - DOOR CHECK
BR/BEDOOR - CARGO 23 - 79
DOOR (Continued)
Page 2047 of 2255
INSTALLATION
(1) Position hinge on vehicle.
(2) Install bolts attaching hinge to C-pillar (Fig. 6).
Tighten bolts to 28 N´m (21 ft. lbs.) torque.
(3) Install quarter trim panel (Refer to 23 - BODY/
INTERIOR/QUARTER TRIM PANEL - INSTALLA-
TION).
(4) Install cargo door (Refer to 23 - BODY/DOOR -
CARGO/DOOR - INSTALLATION).
INSIDE HANDLE ACTUATOR
REMOVAL
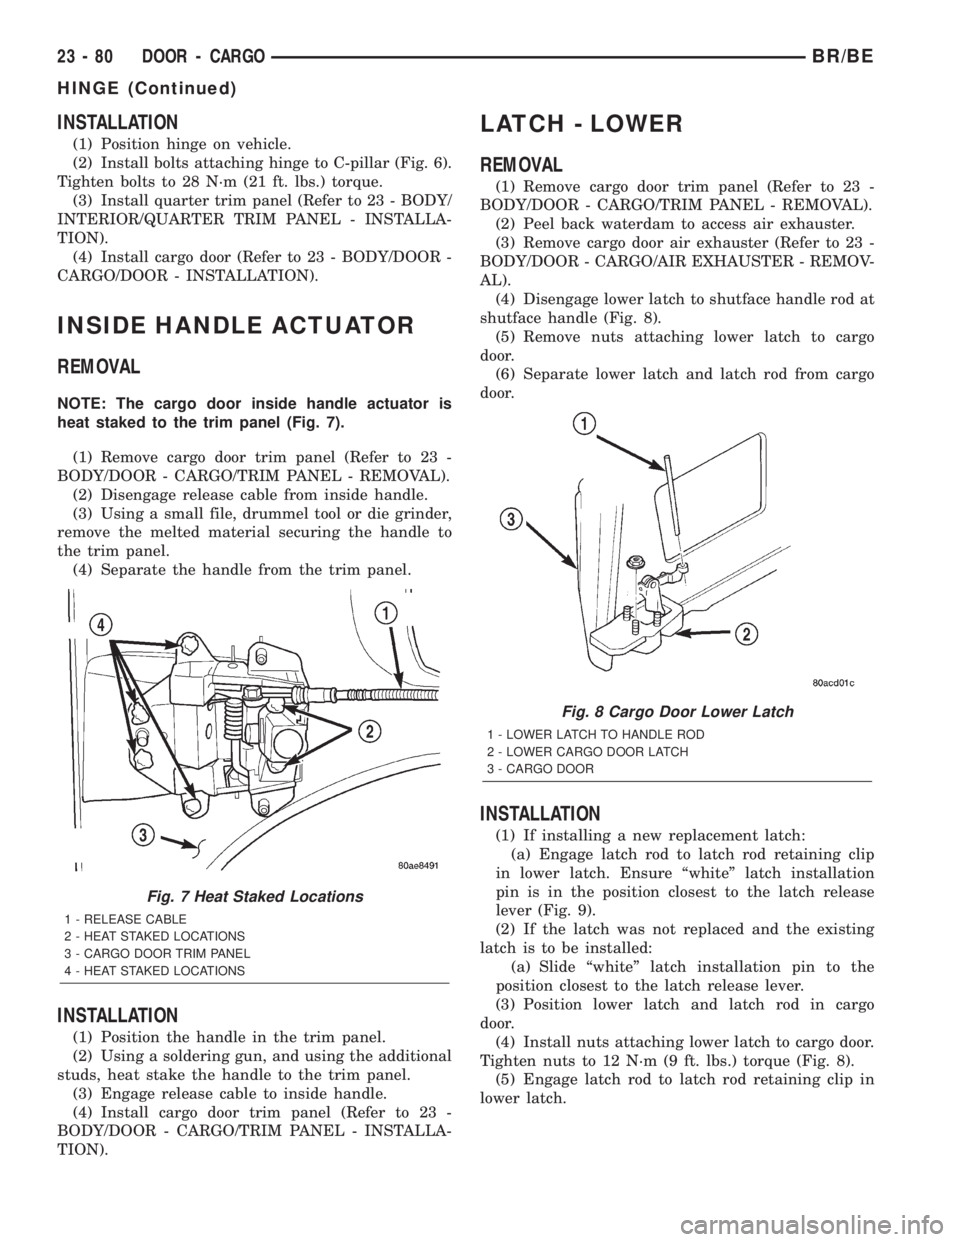
NOTE: The cargo door inside handle actuator is
heat staked to the trim panel (Fig. 7).
(1) Remove cargo door trim panel (Refer to 23 -
BODY/DOOR - CARGO/TRIM PANEL - REMOVAL).
(2) Disengage release cable from inside handle.
(3) Using a small file, drummel tool or die grinder,
remove the melted material securing the handle to
the trim panel.
(4) Separate the handle from the trim panel.
INSTALLATION
(1) Position the handle in the trim panel.
(2) Using a soldering gun, and using the additional
studs, heat stake the handle to the trim panel.
(3) Engage release cable to inside handle.
(4) Install cargo door trim panel (Refer to 23 -
BODY/DOOR - CARGO/TRIM PANEL - INSTALLA-
TION).
LATCH - LOWER
REMOVAL
(1) Remove cargo door trim panel (Refer to 23 -
BODY/DOOR - CARGO/TRIM PANEL - REMOVAL).
(2) Peel back waterdam to access air exhauster.
(3) Remove cargo door air exhauster (Refer to 23 -
BODY/DOOR - CARGO/AIR EXHAUSTER - REMOV-
AL).
(4) Disengage lower latch to shutface handle rod at
shutface handle (Fig. 8).
(5) Remove nuts attaching lower latch to cargo
door.
(6) Separate lower latch and latch rod from cargo
door.
INSTALLATION
(1) If installing a new replacement latch:
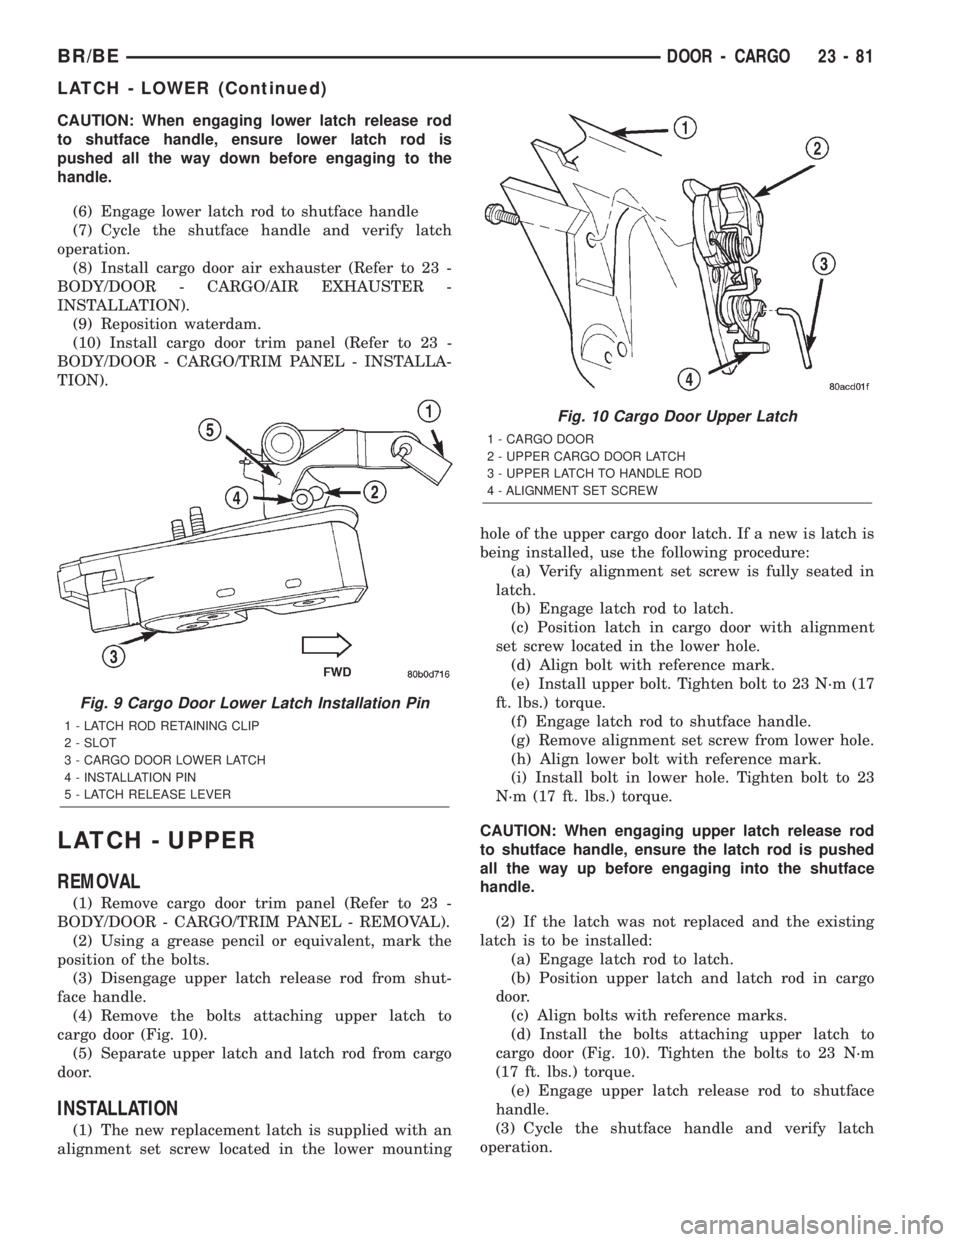
(a) Engage latch rod to latch rod retaining clip
in lower latch. Ensure ªwhiteº latch installation
pin is in the position closest to the latch release
lever (Fig. 9).
(2) If the latch was not replaced and the existing
latch is to be installed:
(a) Slide ªwhiteº latch installation pin to the
position closest to the latch release lever.
(3) Position lower latch and latch rod in cargo
door.
(4) Install nuts attaching lower latch to cargo door.
Tighten nuts to 12 N´m (9 ft. lbs.) torque (Fig. 8).
(5) Engage latch rod to latch rod retaining clip in
lower latch.
Fig. 7 Heat Staked Locations
1 - RELEASE CABLE
2 - HEAT STAKED LOCATIONS
3 - CARGO DOOR TRIM PANEL
4 - HEAT STAKED LOCATIONS
Fig. 8 Cargo Door Lower Latch
1 - LOWER LATCH TO HANDLE ROD
2 - LOWER CARGO DOOR LATCH
3 - CARGO DOOR
23 - 80 DOOR - CARGOBR/BE
HINGE (Continued)
Page 2048 of 2255
CAUTION: When engaging lower latch release rod
to shutface handle, ensure lower latch rod is
pushed all the way down before engaging to the
handle.
(6) Engage lower latch rod to shutface handle
(7) Cycle the shutface handle and verify latch
operation.
(8) Install cargo door air exhauster (Refer to 23 -
BODY/DOOR - CARGO/AIR EXHAUSTER -
INSTALLATION).
(9) Reposition waterdam.
(10) Install cargo door trim panel (Refer to 23 -
BODY/DOOR - CARGO/TRIM PANEL - INSTALLA-
TION).
LATCH - UPPER
REMOVAL
(1) Remove cargo door trim panel (Refer to 23 -
BODY/DOOR - CARGO/TRIM PANEL - REMOVAL).
(2) Using a grease pencil or equivalent, mark the
position of the bolts.
(3) Disengage upper latch release rod from shut-
face handle.
(4) Remove the bolts attaching upper latch to
cargo door (Fig. 10).
(5) Separate upper latch and latch rod from cargo
door.
INSTALLATION
(1) The new replacement latch is supplied with an
alignment set screw located in the lower mountinghole of the upper cargo door latch. If a new is latch is
being installed, use the following procedure:
(a) Verify alignment set screw is fully seated in
latch.
(b) Engage latch rod to latch.
(c) Position latch in cargo door with alignment
set screw located in the lower hole.
(d) Align bolt with reference mark.
(e) Install upper bolt. Tighten bolt to 23 N´m (17
ft. lbs.) torque.
(f) Engage latch rod to shutface handle.
(g) Remove alignment set screw from lower hole.
(h) Align lower bolt with reference mark.
(i) Install bolt in lower hole. Tighten bolt to 23
N´m (17 ft. lbs.) torque.
CAUTION: When engaging upper latch release rod
to shutface handle, ensure the latch rod is pushed
all the way up before engaging into the shutface
handle.
(2) If the latch was not replaced and the existing
latch is to be installed:
(a) Engage latch rod to latch.
(b) Position upper latch and latch rod in cargo
door.
(c) Align bolts with reference marks.
(d) Install the bolts attaching upper latch to
cargo door (Fig. 10). Tighten the bolts to 23 N´m
(17 ft. lbs.) torque.
(e) Engage upper latch release rod to shutface
handle.
(3) Cycle the shutface handle and verify latch
operation.
Fig. 9 Cargo Door Lower Latch Installation Pin
1 - LATCH ROD RETAINING CLIP
2 - SLOT
3 - CARGO DOOR LOWER LATCH
4 - INSTALLATION PIN
5 - LATCH RELEASE LEVER
Fig. 10 Cargo Door Upper Latch
1 - CARGO DOOR
2 - UPPER CARGO DOOR LATCH
3 - UPPER LATCH TO HANDLE ROD
4 - ALIGNMENT SET SCREW
BR/BEDOOR - CARGO 23 - 81
LATCH - LOWER (Continued)
Page 2049 of 2255
(4) Install cargo door trim panel (Refer to 23 -
BODY/DOOR - CARGO/TRIM PANEL - INSTALLA-
TION).
LATCH STRIKER - LOWER
REMOVAL
(1) Using a grease pencil or equivalent, mark the
position of the lower striker on the sill.
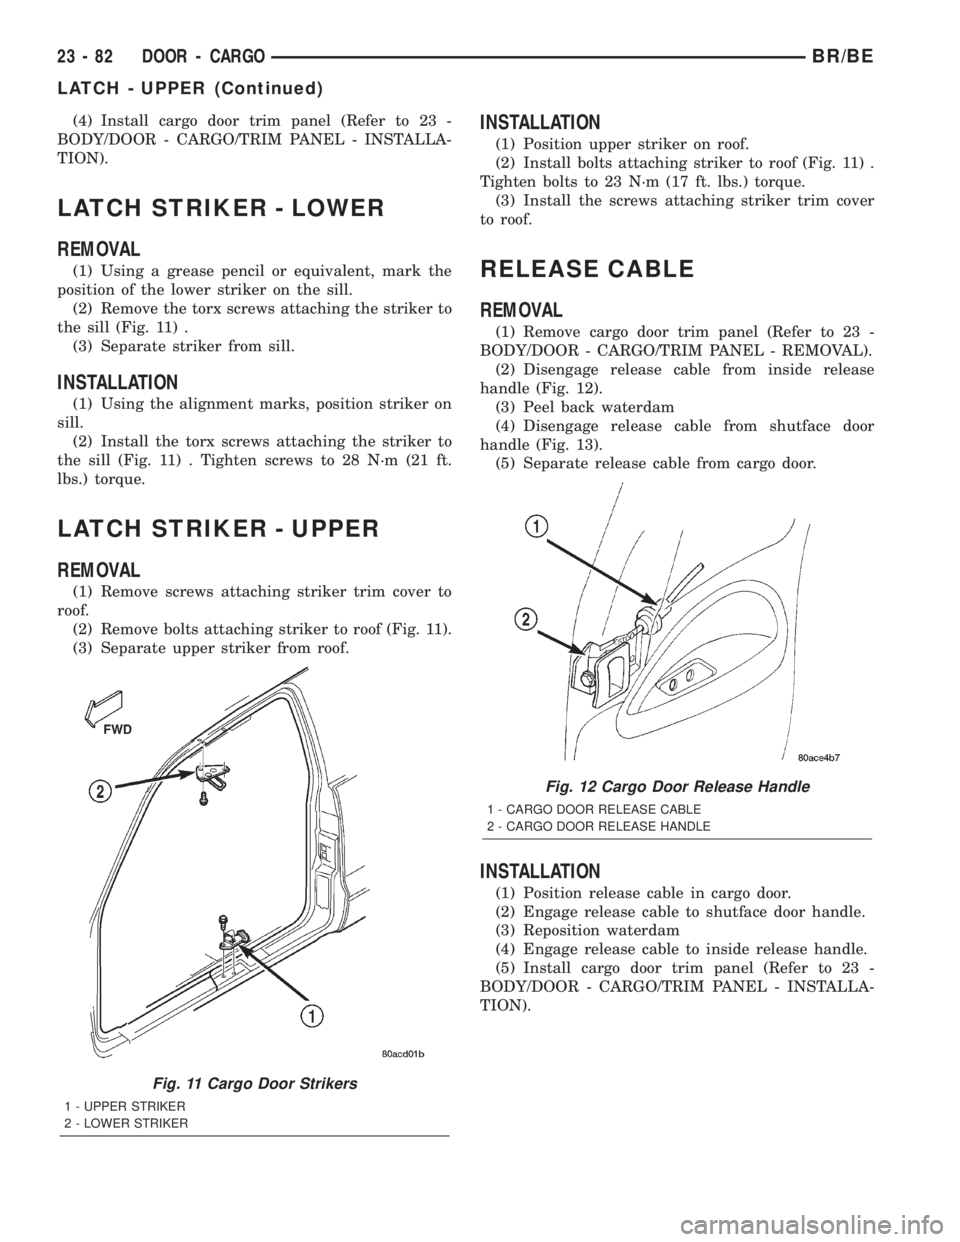
(2) Remove the torx screws attaching the striker to
the sill (Fig. 11) .
(3) Separate striker from sill.
INSTALLATION
(1) Using the alignment marks, position striker on
sill.
(2) Install the torx screws attaching the striker to
the sill (Fig. 11) . Tighten screws to 28 N´m (21 ft.
lbs.) torque.
LATCH STRIKER - UPPER
REMOVAL
(1) Remove screws attaching striker trim cover to
roof.
(2) Remove bolts attaching striker to roof (Fig. 11).
(3) Separate upper striker from roof.
INSTALLATION
(1) Position upper striker on roof.
(2) Install bolts attaching striker to roof (Fig. 11) .
Tighten bolts to 23 N´m (17 ft. lbs.) torque.
(3) Install the screws attaching striker trim cover
to roof.
RELEASE CABLE
REMOVAL
(1) Remove cargo door trim panel (Refer to 23 -
BODY/DOOR - CARGO/TRIM PANEL - REMOVAL).
(2) Disengage release cable from inside release
handle (Fig. 12).
(3) Peel back waterdam
(4) Disengage release cable from shutface door
handle (Fig. 13).
(5) Separate release cable from cargo door.
INSTALLATION
(1) Position release cable in cargo door.
(2) Engage release cable to shutface door handle.
(3) Reposition waterdam
(4) Engage release cable to inside release handle.
(5) Install cargo door trim panel (Refer to 23 -
BODY/DOOR - CARGO/TRIM PANEL - INSTALLA-
TION).
Fig. 11 Cargo Door Strikers
1 - UPPER STRIKER
2 - LOWER STRIKER
Fig. 12 Cargo Door Release Handle
1 - CARGO DOOR RELEASE CABLE
2 - CARGO DOOR RELEASE HANDLE
23 - 82 DOOR - CARGOBR/BE
LATCH - UPPER (Continued)