Page 135 of 486
2-27
Exiting Programming Mode
To exit programming mode, turn the key from
ACCESSORY to OFF and put the BCM PRGRM fuse
back into the instrument panel fuse block.
After programming a feature, you can exit the
programming mode at anytime. Also, if your vehicle is
equipped with the content
-theft deterrent system,
remember to arm the system before exiting.
Dual Sliding Doors
To open either sliding door from outside the vehicle,
pull the handle out and then pull the door toward the
rear. If you slide the door all the way back, the door will
rest in a detent position.
To move the door forward, you must first pull the door
past the open detent position.
The driver's side sliding door is designed to open only a
little if the fuel door is open. If this ever happens, don't
try to force the sliding door. Just close the driver's side
sliding door. Then when the fuel filler door is closed, the
driver's side sliding door can be opened normally.
Page 141 of 486
2-33
CAUTION:
If your vehicle is facing downward on a steep
grade (15 percent or more), the door may not
stay open and could slam shut, possibly injuring
someone. To make sure the door does not slam
shut, turn on the power sliding door feature.
Then if the door closes, it will close under the
control of the power door system.
If you want to close the power sliding door(s) when
the override switch(es) is turned off, pull the inside
or outside handle or the edge of the door. Move the
door about 4 inches (10 cm) toward the closed position
and release. The door will close completely and latch
for you.
To close the power sliding door(s) when the override
switch(es) is turned on, pull the inside or outside
handle and slide the door all the way forward to the
latched position.
Page 151 of 486
2-43
New Vehicle ªBreak-Inº
NOTICE:
Your vehicle doesn't need an elaborate
ªbreak
-in.º But it will perform better in the long
run if you follow these guidelines:
�Don't drive at any one speed -- fast or
slow
-- for the first 500 miles (805 km).
Don't make full
-throttle starts.
�Avoid making hard stops for the first
200 miles (322 km) or so. During this time
your new brake linings aren't yet broken
in. Hard stops with new linings can mean
premature wear and earlier replacement.
Follow this breaking
-in guideline every
time you get new brake linings.
�Don't tow a trailer during break
-in.
See ªTowing a Trailerº in the Index for
more information.
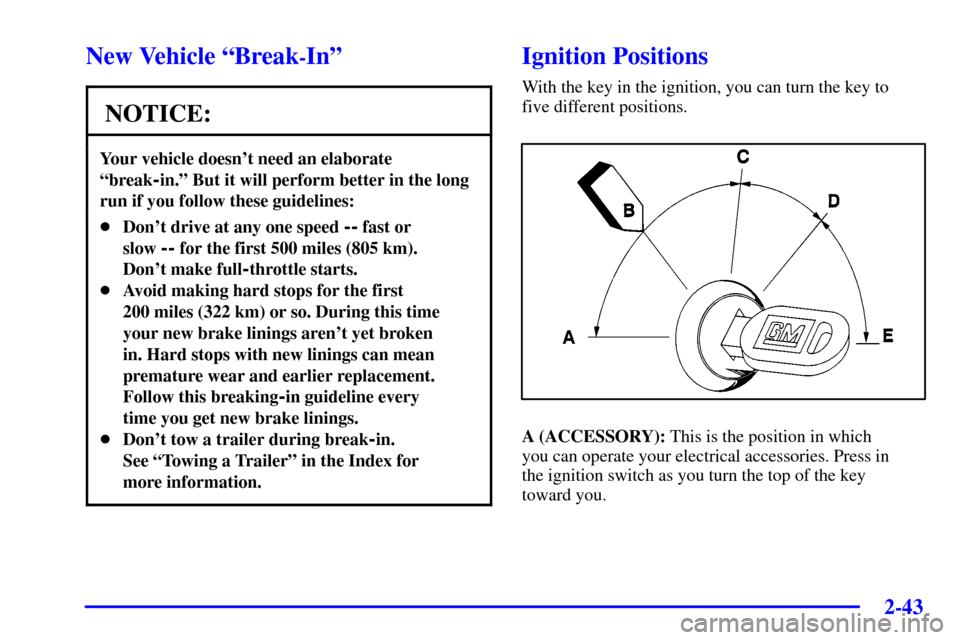
Ignition Positions
With the key in the ignition, you can turn the key to
five different positions.
A (ACCESSORY): This is the position in which
you can operate your electrical accessories. Press in
the ignition switch as you turn the top of the key
toward you.
Page 152 of 486
: This is the only position in which you can
remove the key. This position locks your steering wheel,
ignition and transaxle.
NOTICE:
If your key seems stuck in LOCK and you cant
turn it")
2-44
B (LOCK): This is the only position in which you can
remove the key. This position locks your steering wheel,
ignition and transaxle.
NOTICE:
If your key seems stuck in LOCK and you can't
turn it, be sure you are using the correct key; if
so, is it all the way in? If it is, then turn the
steering wheel left and right while you turn the
key hard. Turn the key only with your hand.
Using a tool to force it could break the key or the
ignition switch. If none of this works, then your
vehicle needs service.
C (OFF): This position unlocks the steering wheel,
ignition and transaxle, but does not send power to any
accessories. Use this position if your vehicle must be
pushed or towed, but never try to push
-start your
vehicle. A warning chime will sound if you open the
driver's door when the ignition is off and the key is in
the ignition.D (RUN): This is the position to which the switch
returns after you start your engine and release the
switch. The switch stays in RUN when the engine is
running. But even when the engine is not running, you
can use RUN to operate your electrical accessories, and
to display some instrument panel warning lights.
E (START): This position starts the engine. When the
engine starts, release the key. The ignition switch will
return to RUN for normal driving.
If the engine is not running, ACCESSORY and RUN
are positions that allow you to operate your electrical
accessories, such as the radio.
Retained Accessory Power (RAP)
With RAP, the power windows (option), the power rear
quarter windows (if equipped), audio system and the
optional electronic level control (ELC) will continue to
work up to 10 minutes after the ignition key is turned to
OFF and none of the doors are opened.
Page 156 of 486
: This gear position locks your front wheels.
Its the best position to use when you start your engine
because your vehicle can")
2-48
There are several different positions for your shift lever.
PARK (P): This gear position locks your front wheels.
It's the best position to use when you start your engine
because your vehicle can't move easily.
Ensure the shift lever is fully in PARK (P) before
starting the engine. Your vehicle has an automatic
transaxle shift lock control system. You have to fully
apply your regular brakes before you can shift from
PARK (P) when the ignition key is in RUN. As you step
on the brake pedal, while in PARK (P), you may hear a
click from the solenoid of the system. This ensures that
the system is operating properly.
If you cannot shift out of PARK (P), ease pressure on
the shift lever
-- push the shift lever all the way into
PARK (P) as you maintain brake application. Then
move the shift lever into the gear you wish. See
ªShifting Out of PARK (P)º in this section.
CAUTION:
It is dangerous to get out of your vehicle if the
shift lever is not fully in PARK (P) with the
parking brake firmly set. Your vehicle can roll.
Don't leave your vehicle when the engine is
running unless you have to. If you have left the
engine running, the vehicle can move suddenly.
You or others could be injured. To be sure your
vehicle won't move, even when you're on fairly
level ground, always set your parking brake and
move the shift lever to PARK (P).
See ªShifting Into PARK (P)º in the Index.
If you're pulling a trailer, see ªTowing a Trailerº
in the Index.
Page 157 of 486
: Use this gear to back up.
NOTICE:
Shifting to REVERSE (R) while your vehicle is
moving forward could damage your transaxle.
Shift to REVERSE (R) only after your vehicle
is stopped.")
2-49
REVERSE (R): Use this gear to back up.
NOTICE:
Shifting to REVERSE (R) while your vehicle is
moving forward could damage your transaxle.
Shift to REVERSE (R) only after your vehicle
is stopped.
To rock your vehicle back and forth to get out of snow,
ice or sand without damaging your transaxle, see
ªStuck: In Sand, Mud, Ice or Snowº in the Index.
NEUTRAL (N): In this position, your engine doesn't
connect with the wheels. To restart when you're already
moving, use NEUTRAL (N) only. Also, use
NEUTRAL (N) when your vehicle is being towed.
CAUTION:
Shifting out of PARK (P) or NEUTRAL (N) while
your engine is ªracingº (running at high speed) is
dangerous. Unless your foot is firmly on the
brake pedal, your vehicle could move very
rapidly. You could lose control and hit people or
objects. Don't shift out of PARK (P) or
NEUTRAL (N) while your engine is racing.
NOTICE:
Damage to your transaxle caused by shifting out
of PARK (P) or NEUTRAL (N) with the engine
racing isn't covered by your warranty.
Page 158 of 486
: This position is
for normal driving. If you need more power for passing,
and youre:
�Going less than 35 mph (55 km/h), push your
accelerator pedal about halfway down.
�")
2-50
AUTOMATIC OVERDRIVE (D): This position is
for normal driving. If you need more power for passing,
and you're:
�Going less than 35 mph (55 km/h), push your
accelerator pedal about halfway down.
�Going about 35 mph (55 km/h) or more, push the
accelerator all the way down.
You'll shift down to the next gear and have more power.
NOTICE:
If your vehicle seems to start up rather slowly, or
if it seems not to shift gears as you go faster,
something may be wrong with a transaxle system
sensor. If you drive very far that way, your
vehicle can be damaged. So, if this happens, have
your vehicle serviced right away. Until then, you
can use SECOND (2) when you are driving less
than 35 mph (55 km/h) and AUTOMATIC
OVERDRIVE (D) for higher speeds.
Warm-Up Shift
Your vehicle has a computer controlled transaxle
designed to warm up the engine faster when the outside
temperature is 35�F (2�C) or colder. You may notice
that the transaxle will shift at a higher vehicle speed
until the engine is warmed up. This is a normal
condition designed to provide heat to the passenger
compartment and defrost the windows more quickly.
See ªComfort Controls, Heatingº in the Index for
more information.
THIRD (3): This position is also used for normal
driving, but it offers more power and lower fuel
economy than AUTOMATIC OVERDRIVE (D).
Here are some times you might choose THIRD (3)
instead of AUTOMATIC OVERDRIVE (D):
�When driving on hilly, winding roads.
�When towing a trailer (so there is less shifting
between gears).
�When going down a steep hill.
Page 161 of 486

2-53
To release the parking brake, hold the regular brake
pedal down with your right foot while you push down
on the parking brake pedal with your left foot. (To
release the tension on the parking brake cable, you will
need to apply about the same amount of pressure to the
parking brake pedal as you did when you set the parking
brake.) When you remove your foot from the parking
brake pedal, it will pop up to the released position.
NOTICE:
Driving with the parking brake on can cause
your rear brakes to overheat. You may have to
replace them, and you could also damage other
parts of your vehicle.
If you are towing a trailer and are parking on any hill,
see ªTowing a Trailerº in the Index. That section shows
what to do first to keep the trailer from moving.
Shifting Into PARK (P)
CAUTION:
It can be dangerous to get out of your vehicle if
the shift lever is not fully in PARK (P) with the
parking brake firmly set. Your vehicle can roll. If
you have left the engine running, the vehicle can
move suddenly. You or others could be injured.
To be sure your vehicle won't move, even when
you're on fairly level ground, use the steps that
follow. If you're pulling a trailer, see ªTowing a
Trailerº in the Index.
1. Hold the brake pedal down with your right foot and
set the parking brake with your left foot.

, the door may not
stay open and could slam shut, possibly injuring
someone. To make sure the door does not slam
s")