Page 3503 of 4323
BE0CE±10
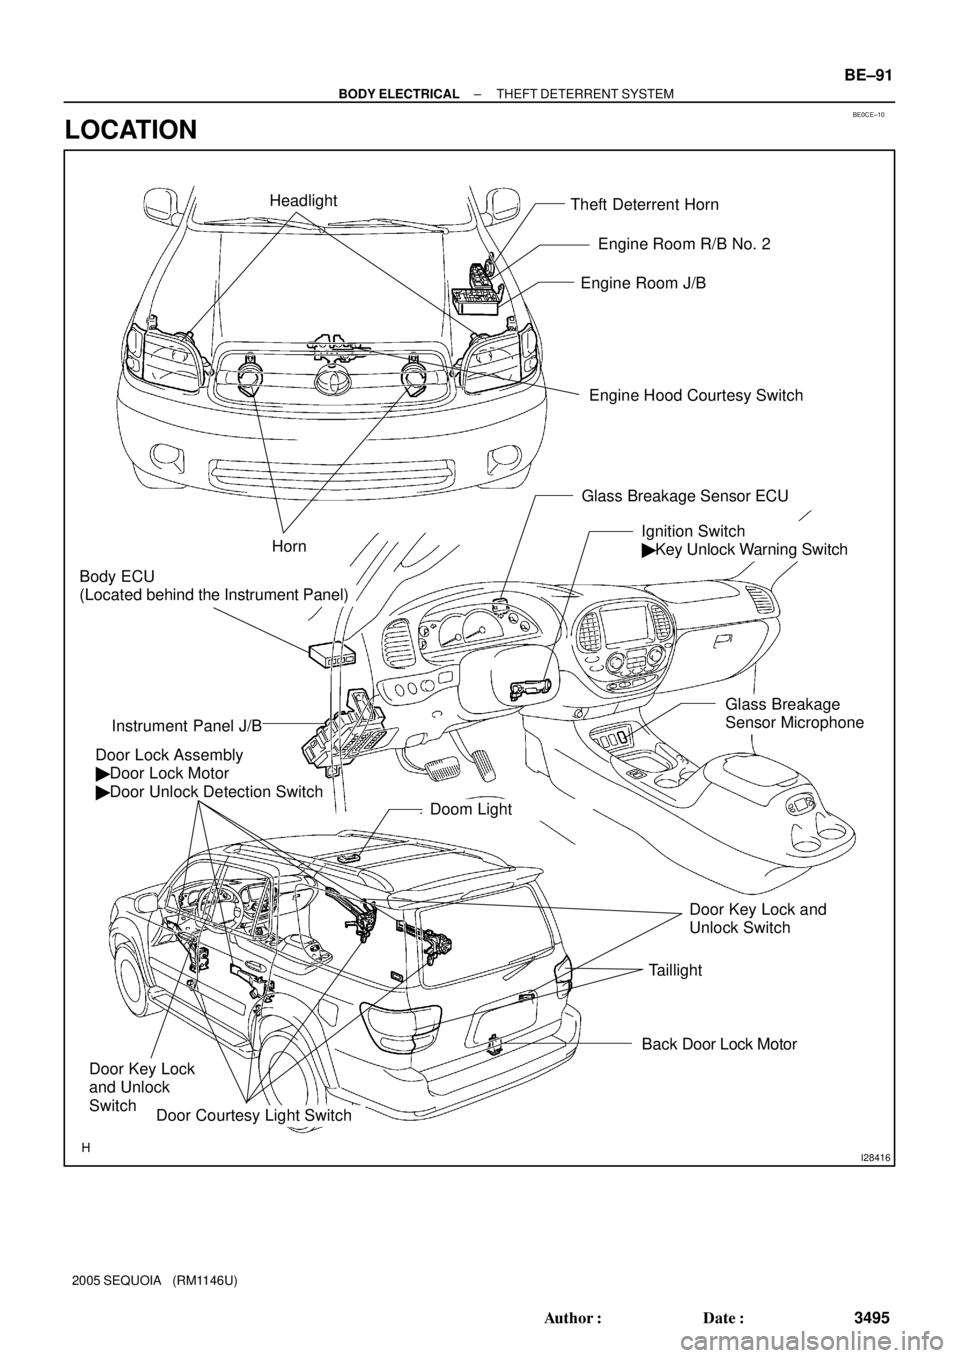
I28416
Theft Deterrent Horn
Engine Hood Courtesy Switch Engine Room J/B
Door Lock Assembly
� Door Lock Motor
� Door Unlock Detection Switch
Ignition Switch
� Key Unlock Warning Switch
Instrument Panel J/B
Door Courtesy Light Switch
Horn
Back Door Lock Motor
Door Key Lock
and Unlock
Switch
Door Key Lock and
Unlock Switch Headlight
Doom Light
Taillight
Body ECU
(Located behind the Instrument Panel)
Engine Room R/B No. 2
Glass Breakage Sensor ECU
Glass Breakage
Sensor Microphone
± BODY ELECTRICALTHEFT DETERRENT SYSTEM
BE±91
3495 Author�: Date�:
2005 SEQUOIA (RM1146U)
LOCATION
Page 3646 of 4323

BO4S5±01
H24375
Instrument Panel ReinforcementFront Passenger Airbag Assembly
Lower No. 2
Finish Panel
No. 2 Brace
Center Heater to
Register Duct
No. 1 Brace
No. 2 Heater to
Register DuctNo. 4 Heater to
Register DuctAssist Grip Plug
Instrument Panel
Radio Tuner
Assembly Assist Grip
Front Pillar Garnish
Combination Meter Switch Base
Lower Finish PanelGlove Compartment
Door
Side Panel
Cowl Side
Trim Board
Cluster
Finish
Panel
Console Box
BezelUpper
Console Panel w/ Seat heater:
Seat Heater Switch
Steering
Wheel Pad Front Console Box
Lower
Steering
Column Cover
Front Door
Scuff Plate
N´m (kgf´cm, ft´lbf): Specified torque
CC
G
G
C
G
G
G
GC
CC
C
DDD
DD
A
A
A
A
AA
AA
F
FF
DD
D
DB
BB
B
5.0 (51, 44 in.´lbf)
20 (204, 15)
A
A
Headphone
Terminal
8.8 (90, 78 in.´lbf)
Lower No. 2
CoverLower No. 3
Cover
AAAA
Headphone
TerminalRear Console
Box w/ Rear seat entertainment :
w/ Rear heater A/C:
Rear Heater Control
Panel
w/ Rear seat
entertainment :
Disc Player
Coverw/ Rear heater A/C:
Disc Player
w/o
Rear heater
A/C:
Rear Heater
Control PanelHeater
Control
Panel
w/ Rear seat audio or rear
seat entertainment:
8.8 (90, 78 in.´lbf)
Steering Wheel
Upper Steering Column Cover
Front Door
Scuff Plate
Side Panel
Cowl Side Trim Board
5.0 (51, 44 in.´lbf)
Integration
Control Panel
Combination Switch
50 (510, 37)
Front Pillar Garnish
Lower Instrument Cover
Shifting Hole
Cover
Door Control
Receiver
Assist Grip Plug
H
B
± BODYINSTRUMENT PANEL
BO±85
3638 Author�: Date�:
2005 SEQUOIA (RM1146U)
INSTRUMENT PANEL
COMPONENTS
Page 3653 of 4323

24. REMOVE REAR CONSOLE BOX
(a) w/ Rear heater A/C:
Using a screwdriver,")
H16749
H18899
H243734 Claws
H16751
2 Clips
H21029
BO±92
± BODYINSTRUMENT PANEL
3645 Author�: Date�:
2005 SEQUOIA (RM1146U)
24. REMOVE REAR CONSOLE BOX
(a) w/ Rear heater A/C:
Using a screwdriver, remove the rear heater control pan-
el, then disconnect the connector.
HINT:
Tape the screwdriver tip before use.
(b) w/ Headphone terminal.
Using a screwdriver, remove the headphone terminal and
the connector.
(c) w/ Rear seat entertainment:
(1) Remove the disc bracket.
(2) Remove the 3 bolts and disc player.
(3) Disconnect the connector.
(d) Remove the 4 bolts and rear console box.
25. REMOVE CONSOLE BOX BEZEL
(a) Using a screwdriver, remove the console box bezel.
HINT:
Tape the screwdriver tip before use.
(b) Disconnect the connectors.
26. REMOVE FRONT CONSOLE BOX
Remove the 2 bolts, 2 clips and front console box.
27. REMOVE LOWER INSTRUMENT COVER
(a) Remove the 4 bolts and 3 screws.
(b) Using a screwdriver, remove the lower instrument cover.
HINT:
Tape the screwdriver tip before use.
28. REMOVE PASSENGER AIRBAG ASSEMBLY
(a) Remove the 2 bolts holding the front passenger airbag
assembly and instrument panel.
Torque: 5.0 N´m (51 kgf´cm, 44 in.´lbf)
Page 3861 of 4323
05_SEQUOIA_U (L/O 0408)
2
2005 SEQUOIA from Aug. '04 Prod. (OM34424U)
1. Side vents
2. Instrument cluster
3. Center vents
4. Multi±information display
5. Personal lights
6. Garage door opener box or auxiliary
box
7. Electric moon roof switches
8. Side defroster outlet
9. Glove box
10. Power door lock switches
11. Power window switches
12. Power outlets
13. Seat heater switches
14. Rear console box
15. Rear air conditioning controls
16. Headphone input jacks and headphone
volume control dials
17. Input terminal adapter
18. Cup holders
19. Power rear view mirror control switches
20. Lower vent
Instrument panel overview
�View A
Page 3958 of 4323

99
2005 SEQUOIA from Aug. 04 Prod. (OM34424U)
�Do not allow anyone to get his/her
head or hands out of windows
since the curtain shield airbags
could inflate with considerabl")
05_SEQUOIA_U (L/O 0408)
99
2005 SEQUOIA from Aug. '04 Prod. (OM34424U)
�Do not allow anyone to get his/her
head or hands out of windows
since the curtain shield airbags
could inflate with considerable
speed and force. Otherwise, he/she
may be killed or seriously injured.
Special care should be taken espe-
cially when you have a small child
in the vehicle.�Do not attach a cup holder or any
other device or object on or around
the door. When the side airbag in-
flates, the cup holder or any other
device or object will be thrown with
great force or the side airbag may
not activate correctly, resulting in
death or serious injury. Likewise,
the driver and front passenger
should not hold objects in their
arms or on their knees.�Do not attach a microphone or any
other device or object around the
area where the curtain shield airbag
activates such as on the windshield
glass, side door glass, front and
rear pillars, roof side rail and assist
grips. When the curtain shield air-
bag inflates, the microphone or oth-
er device or object will be thrown
away with great force or the curtain
shield airbag may not activate cor-
rectly, resulting in death or serious
injury.
Page 4085 of 4323

226
2005 SEQUOIA from Aug. 04 Prod. (OM34424U)
Vehicles with rear seat entertainment sys-
temÐ
While the DVD player is in operation, the
chapter or track can be changed by pu")
05_SEQUOIA_U (L/O 0408)
226
2005 SEQUOIA from Aug. '04 Prod. (OM34424U)
Vehicles with rear seat entertainment sys-
temÐ
While the DVD player is in operation, the
chapter or track can be changed by push-
ing the ª�º or ª�º side of the switch.
3. ªMODEº switch
Push the ªMODEº switch to select an au-
dio mode. Each push changes the mode
sequentially if the desired mode is ready
to use. The DVD player will be selectable
if a rear seat entertainment system is
installed in your vehicle.
To turn the audio system on, push the
ªMODEº switch.
To turn the audio system off, push and
hold the ªMODEº switch until the system
turns off.The rear seat audio system is designed
for the rear seat passengers to enjoy the
audio sound separately between the front
seats and the rear seats.
The rear seat audio system can be turned
on with the rear audio system controller
even if the front audio system is off.
When the front audio is turned off, the
rear audio system will be turned off simul-
taneously.
The rear passengers can enjoy all the
modes (AM and FM radio, cassette tape
player and compact disc player with
changer) with the rear seat audio system
when a cassette tape and a compact disc
are loaded in the front audio system.
When the same mode is selected on the
front and rear audio systems at the same
time, the system can be operated on the
front audio system.
If the radio mode is selected on the front
and rear audio systems at the same time,
AM and FM modes cannot be changed on
the rear seat audio system.You can enjoy the rear seat entertainment
system with commercial headphone. See
ªÐHeadphone input jacksº on page 234 in
this Section for details.
You can also enjoy the rear seat enter-
tainment system with a wireless head-
phone. The wireless headphone can be
used within rear seat. If the signal be-
comes weak, the headphone will mute.
For details, refer to the manufacturer 's
instructions.
With some wireless headphone generally
available in the market, it may be difficult
to catch sound properly. Toyota recom-
mends the use of Toyota genuine wireless
headphone.
You can purchase a wireless headphone
at a Toyota dealer.
CAUTION
Do not drive with using the head-
phone. Otherwise, you may be hard
to hear the sound from the outside
while using the headphone and may
cause an accident.
Rear seat audio systemÐ
Page 4086 of 4323
05_SEQUOIA_U (L/O 0408)
227
2005 SEQUOIA from Aug. '04 Prod. (OM34424U)
The rear seat audio system consists of
following components.
1. Front audio system
2. Rear seat audio system display
3. Rear seat audio system controller
4. Headphone volume control dials
5. Headphone input jacks
6. Controller holderThe rear seat audio system can be oper-
ated with the rear seat audio system con-
troller.
CAUTION
Do not disassemble or modify the
controller. It may cause an accident,
fire or electric shock.
NOTICE
Keep the controller away from direct
sunlight, high heat and high humidity.
These conditions could cause the
case to deform or the battery to ex-
plode or leak.
ÐRear seat audio system
controller
Page 4093 of 4323
05_SEQUOIA_U (L/O 0408)
234
2005 SEQUOIA from Aug. '04 Prod. (OM34424U)
You can enjoy the rear seat audio sys-
tem with commercial headphone.
To use the headphones, connect them to
the jack.
The key must be in the ªACCº or ªONº
position.To adjust the volume of the headphones,
turn the knob. Turn right to increase the
volume. Turn left to decrease the volume.
The maximum volume depends on the
type of headphones.
With some headphone generally available
in the market, it may be difficult to catch
sound properly. Toyota recommends the
use of Toyota genuine headphone.
Please contact your Toyota dealer for fur-
ther details.
CAUTION
Adjust the volume when you connect
the headphones to the jack. Loud
sounds may have a significant impact
on the human body.
ÐHeadphone input jacks

2
2005 SEQUOIA from Aug. 04 Prod. (OM34424U)
1. Side vents
2. Instrument cluster
3. Center vents
4. Multi±information display
5. Personal lights
6. Garage door opener box or")

227
2005 SEQUOIA from Aug. 04 Prod. (OM34424U)
The rear seat audio system consists of
following components.
1. Front audio system
2. Rear seat audio system display
3. Rear sea")

234
2005 SEQUOIA from Aug. 04 Prod. (OM34424U)
You can enjoy the rear seat audio sys-
tem with commercial headphone.
To use the headphones, connect them to
the jack.
The key")