Page 3208 of 4323
BR0JP±15
F13330
Brake Caliper
Anti±squeal Shim
Inner PadPad Support Plate
Pad Support PlateOuter Pad
Anti±squeal Shim
N´m (kgf´cm, ft´lbf) : Specified torque88 (900, 65)
Pad Wear Indicator Plate
Lithium soap base glycol grease
Sliding Pin
± BRAKEREAR BRAKE PAD
BR±33
3200 Author�: Date�:
2005 SEQUOIA (RM1146U)
REAR BRAKE PAD
COMPONENTS
Page 3209 of 4323

REPLACEMENT
1. REMOVE REAR WHEEL
2. INSPECT PAD LINING THICKNESS
Check the pad thickness through the")
BR0TB±07
F13313
F13314
BR±34
± BRAKEREAR BRAKE PAD
3201 Author�: Date�:
2005 SEQUOIA (RM1146U)
REPLACEMENT
1. REMOVE REAR WHEEL
2. INSPECT PAD LINING THICKNESS
Check the pad thickness through the caliper inspection hole
and replace pads if not within the specification.
Minimum thickness: 1.0 mm (0.039 in.)
3. REMOVE BRAKE CALIPER
(a) Remove the 2 sliding pins.
(b) Remove the caliper and suspend it so the hose is not
stretched.
HINT:
Do not disconnect the flexible hose.
4. REMOVE 2 PADS WITH 2 ANTI±SQUEAL SHIMS
5. REMOVE 4 PAD SUPPORT PLATES
NOTICE:
The pad support plates can be used again provided that
they have sufficient rebound, no deformation, cracks or
wear, and have had all rust, dirt and foreign particles
cleaned off.
6. CHECK DISC THICKNESS AND RUNOUT
(See page BR±39)
7. INSTALL PAD SUPPORT PLATES
8. INSTALL NEW PADS
NOTICE:
When replacing worn pads, the anti±squeal shims must be
replaced together with the pads.
(a) Install the pad wear indicator plate on new inner pad.
(b) Install the anti±squeal shim on each pad.
(c) Install the inner pad with the pad wear indicator plate fac-
ing downward.
(d) Install outer pad.
NOTICE:
There should be no oil or grease adhering to the friction
surfaces of the pads or the disc.
9. INSTALL CALIPER
(a) Draw out a small amount of brake fluid from the reservoir.
Page 3210 of 4323
F13315
± BRAKEREAR BRAKE PAD
BR±35
3202 Author�: Date�:
2005 SEQUOIA (RM1146U)
(b) Press in the pistons with a hammer handle or an equiva-
lent.
HINT:
If the piston is difficult to push in, loosen the bleeder plug and
push in the piston while letting some fluid escape.
(c) Install the caliper carefully so the boot is not wedged.
(d) Apply lithium soap base glycol grease to the sliding pins
and install the 2 sliding pins.
Torque: 88 N´m (900 kgf´cm, 65 ft´lbf)
10. INSTALL REAR WHEEL
Torque: 110 N´m (1,122 kgf´cm, 81 ft´lbf)
11. DEPRESS BRAKE PEDAL SEVERAL TIMES
12. CHECK THAT FLUID LEVEL IS AT MAX LINE
Page 3211 of 4323
BR0JR±16
F13303
Brake Caliper
Anti±squeal Shim Inner Pad
Pad Support
PlatePad Support Plate
Outer Pad Anti±squeal Shim
N´m (kgf´cm, ft´lbf): Specified torque
Lithium soap base glycol grease Non±reusable part
�Boot Piston Seal
Piston
Sliding Pin
Torque Plate
� GasketPlug � Boot
Bushing Bleeder Plug
Pad Wear
Indicator
11 (110, 8)
Cap
105 (1,070, 77)
88 (900, 65)
Washer
Washer Union Bolt
31 (320, 23)
105 (1,070, 77)
BR±36
± BRAKEREAR BRAKE CALIPER
3203 Author�: Date�:
2005 SEQUOIA (RM1146U)
REAR BRAKE CALIPER
COMPONENTS
Page 3212 of 4323
BR0JS±14
F13316
± BRAKEREAR BRAKE CALIPER
BR±37
3204 Author�: Date�:
2005 SEQUOIA (RM1146U)
REMOVAL
1. REMOVE REAR WHEEL
Torque: 110 N´m (1,122 kgf´cm, 81 ft´lbf)
2. DISCONNECT FLEXIBLE HOSE
Remove the union bolt and gasket from the caliper, then discon-
nect the flexible hose from the caliper. Use a container to catch
brake fluid as it drains out.
Torque: 31 N´m (320 kgf´cm, 23 ft´lbf)
HINT:
Securely set the flexible hose between the projections of the
caliper.
3. REMOVE CALIPER
(a) Remove the 2 sliding pins.
Torque: 88 N´m (900 kgf´cm, 65 ft´lbf)
(b) Remove the caliper from the torque plate.
4. REMOVE 2 BRAKE PADS WITH ANTI±SQUEAL SHIM
5. REMOVE 4 PAD SUPPORT PLATES
Page 3217 of 4323
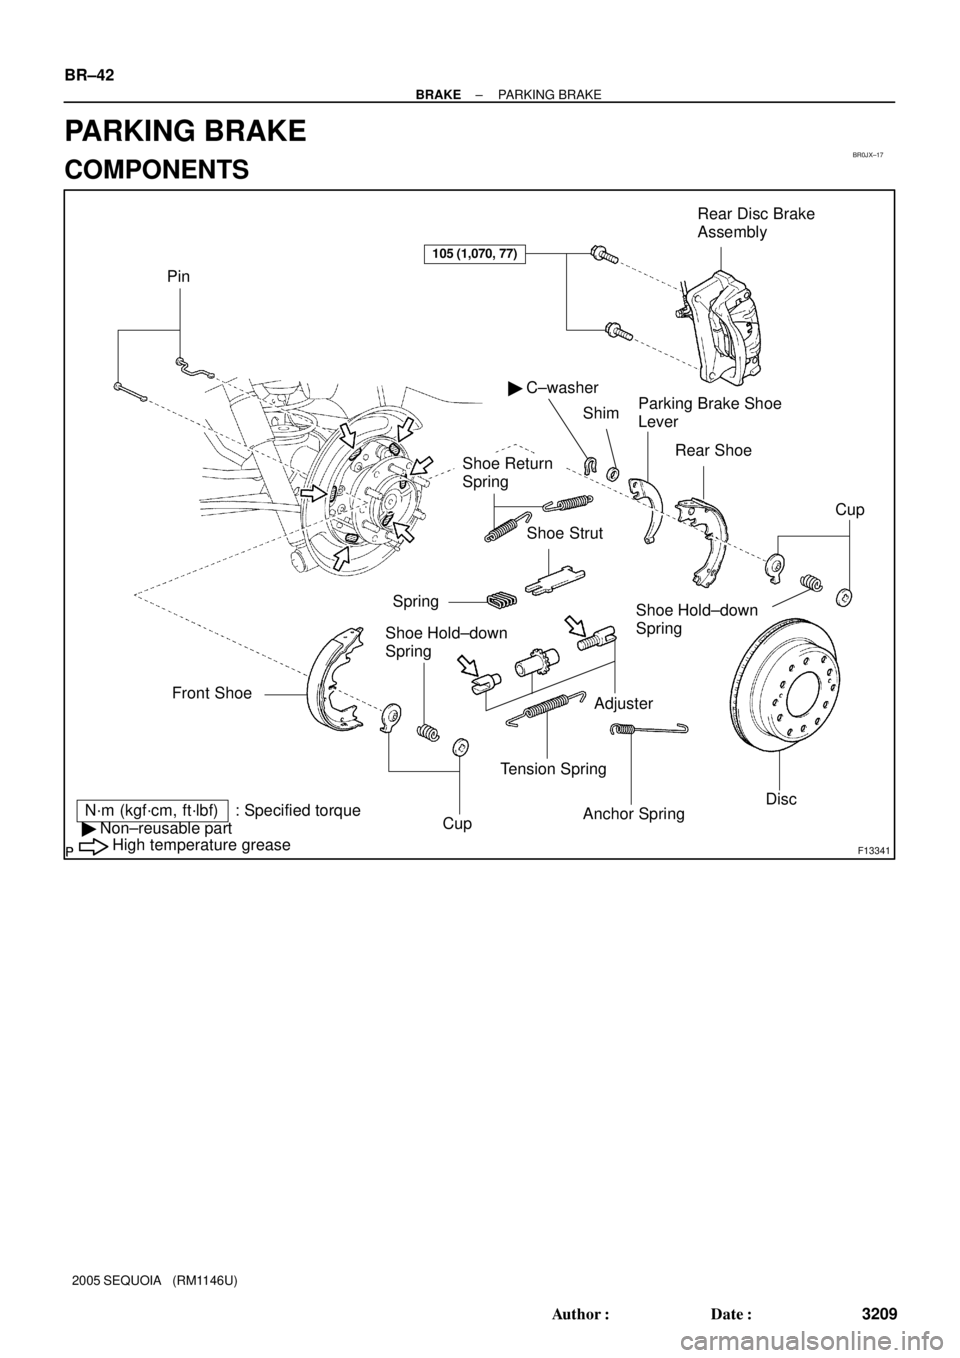
BR0JX±17
F13341
PinRear Disc Brake
Assembly
Front Shoe� C±washer
ShimParking Brake Shoe
Lever
Rear Shoe
Shoe Strut
Spring
Adjuster
CupTension Spring Shoe Hold±down
Spring
Disc
High temperature grease
N´m (kgf´cm, ft´lbf) : Specified torqueAnchor SpringCup
Shoe Hold±down
Spring
Shoe Return
Spring
105 (1,070, 77)
� Non±reusable part BR±42
± BRAKEPARKING BRAKE
3209 Author�: Date�:
2005 SEQUOIA (RM1146U)
PARKING BRAKE
COMPONENTS
Page 3219 of 4323
F13325
F13901
F13326
BR±44
± BRAKEPARKING BRAKE
3211 Author�: Date�:
2005 SEQUOIA (RM1146U)
(c) Using a clip remover, remove the front shoe with holding
the cup.
HINT:
At the time of reassembly, hold the cup with clip remover. In this
condition, install the front shoe.
(d) Remove the 2 cups, shoe hold±down spring and pin.
8. REMOVE REAR SHOE
(a) Using a clip remover, remove the rear shoe with holding
the cup.
HINT:
At the time of reassembly, hold the cup with clip remover. In this
condition, install the rear shoe.
(b) Remove the 2 cups, shoe hold±down spring and pin.
(c) Disconnect the parking brake cable from the parking
brake shoe lever.
Page 3243 of 4323
F06726Vacuum Hose
SR01X±08
SR±8
± STEERINGAIR CONTROL VALVE
3235 Author�: Date�:
2005 SEQUOIA (RM1146U)
AIR CONTROL VALVE
INSPECTION
1. TURN AIR CONDITIONING SWITCH OFF
2. CHECK IDLE±UP
(a) Start the engine and run it at idle.
(b) Fully turn the steering wheel.
(c) Check that the engine speed decrease when the vacuum
hose of the air control valve is pinched.
(d) Check that the engine speed increase when the hose is
released.
 : Specified torque88 (900, 65)
Pad Wear Indicator Plat")

: Specified torque
Lithium soap base glycol grease Non�")