Page 131 of 4323
PP0O2±06
± PREPARATIONBODY ELECTRICAL
PP±73
131 Author�: Date�:
2005 SEQUOIA (RM1146U)
EQUIPMENT
Voltmeter
Ammeter
Ohmmeter
Test lead
ThermometerEngine coolant temperature sender gauge, Engine oil level warn-
ing switch, Seat heater
SyphonBrake fluid level warning switch
Oil bathEngine oil level warning switch
Bulb (1.4 W)Defogger switch
Bulb (3.4 W)Fuel sender gauge, Engine coolant temperature receiver gauge,
Seat belt warning relay
Dry cell batteryFuel sender gauge, Power mirror
Heat lightSeat heater
Hexagon wrench (6 mm)Power seat
Torque wrench
Masking tapeRear window defogger wire
Tin foilRear window defogger wire
Page 716 of 4323
DI±514
± DIAGNOSTICSENGINE
708 Author�: Date�:
2005 SEQUOIA (RM1146U)
3 Check that MIL lights up.
CHECK:
Check that MIL lights up when turning the ignition switch ON.
OK:
Standard: MIL lights up
OK System OK.
NG
4 Inspect combination meter assy (MIL circuit).
See the combination meter troubleshooting on page BE±55.
NG Repair or replace bulb or combination meter as-
sembly.
OK
Check and repair harness and connector be-
tween combination meter and ECM.
Page 809 of 4323
D12795
12
(±)(+)
12
Shift Solenoid Valve SL1:
± DIAGNOSTICSAUTOMATIC TRANSMISSION
DI±607
801 Author�: Date�:
2005 SEQUOIA (RM1146U)
3 Inspect shift solenoid valve SL1.
PREPARATION:
Remove the shift solenoid valve SL1 (See page AT±10).
CHECK:
Measure the resistance according to the value(s) in the table
below.
OK:
Tester ConnectionSpecified Condition
20�C (68�F)
1 ± 25.0 to 5.6 W
CHECK:
Connect the positive (+) lead with a 21 W bulb to terminal 2 and
the negative (±) lead to terminal 1 of the solenoid valve connec-
tor, then check the movement of the valve.
OK:
The solenoid makes an operating sound.
NG Replace the shift solenoid valve SL1
(See page AT±10).
OK
Repair or replace the transmission wire
(See page AT±7).
Page 826 of 4323
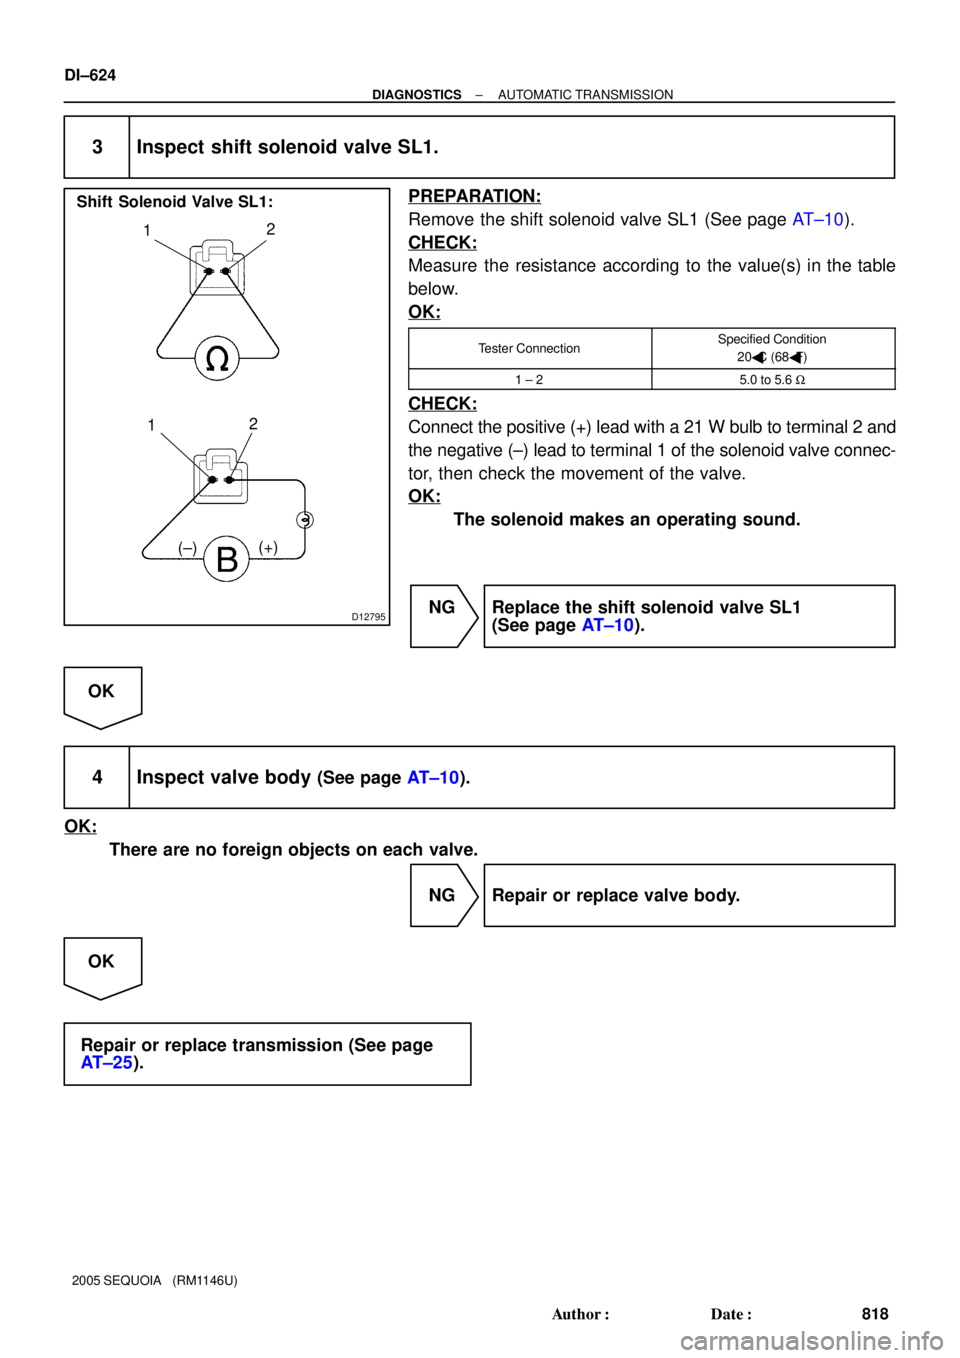
D12795
12
(±)(+)
12
Shift Solenoid Valve SL1:
DI±624
± DIAGNOSTICSAUTOMATIC TRANSMISSION
818 Author�: Date�:
2005 SEQUOIA (RM1146U)
3 Inspect shift solenoid valve SL1.
PREPARATION:
Remove the shift solenoid valve SL1 (See page AT±10).
CHECK:
Measure the resistance according to the value(s) in the table
below.
OK:
Tester ConnectionSpecified Condition
20�C (68�F)
1 ± 25.0 to 5.6 W
CHECK:
Connect the positive (+) lead with a 21 W bulb to terminal 2 and
the negative (±) lead to terminal 1 of the solenoid valve connec-
tor, then check the movement of the valve.
OK:
The solenoid makes an operating sound.
NG Replace the shift solenoid valve SL1
(See page AT±10).
OK
4 Inspect valve body (See page AT±10).
OK:
There are no foreign objects on each valve.
NG Repair or replace valve body.
OK
Repair or replace transmission (See page
AT±25).
Page 832 of 4323
D12795
12
(±)(+)
12
Shift Solenoid Valve SL2:
DI±630
± DIAGNOSTICSAUTOMATIC TRANSMISSION
824 Author�: Date�:
2005 SEQUOIA (RM1146U)
2 Inspect shift solenoid valve SL2.
PREPARATION:
Remove the shift solenoid valve SL2 (See page AT±10).
CHECK:
Measure the resistance according to the value(s) in the table
below.
OK:
Tester ConnectionSpecified Condition
20�C (68�F)
1 ± 25.0 to 5.6 W
CHECK:
Connect the positive (+) lead with a 21 W bulb to terminal 2 and
the negative (±) lead to terminal 1 of the solenoid valve connec-
tor, then check the movement of the valve.
OK:
The solenoid makes an operating sound.
NG Replace the shift solenoid valve SL2
(See page AT±10).
OK
3 Inspect valve body (See page AT±10).
OK:
There are no foreign objects on each valve.
NG Repair or replace valve body.
OK
Repair or replace transmission (See page
AT±25).
Page 837 of 4323
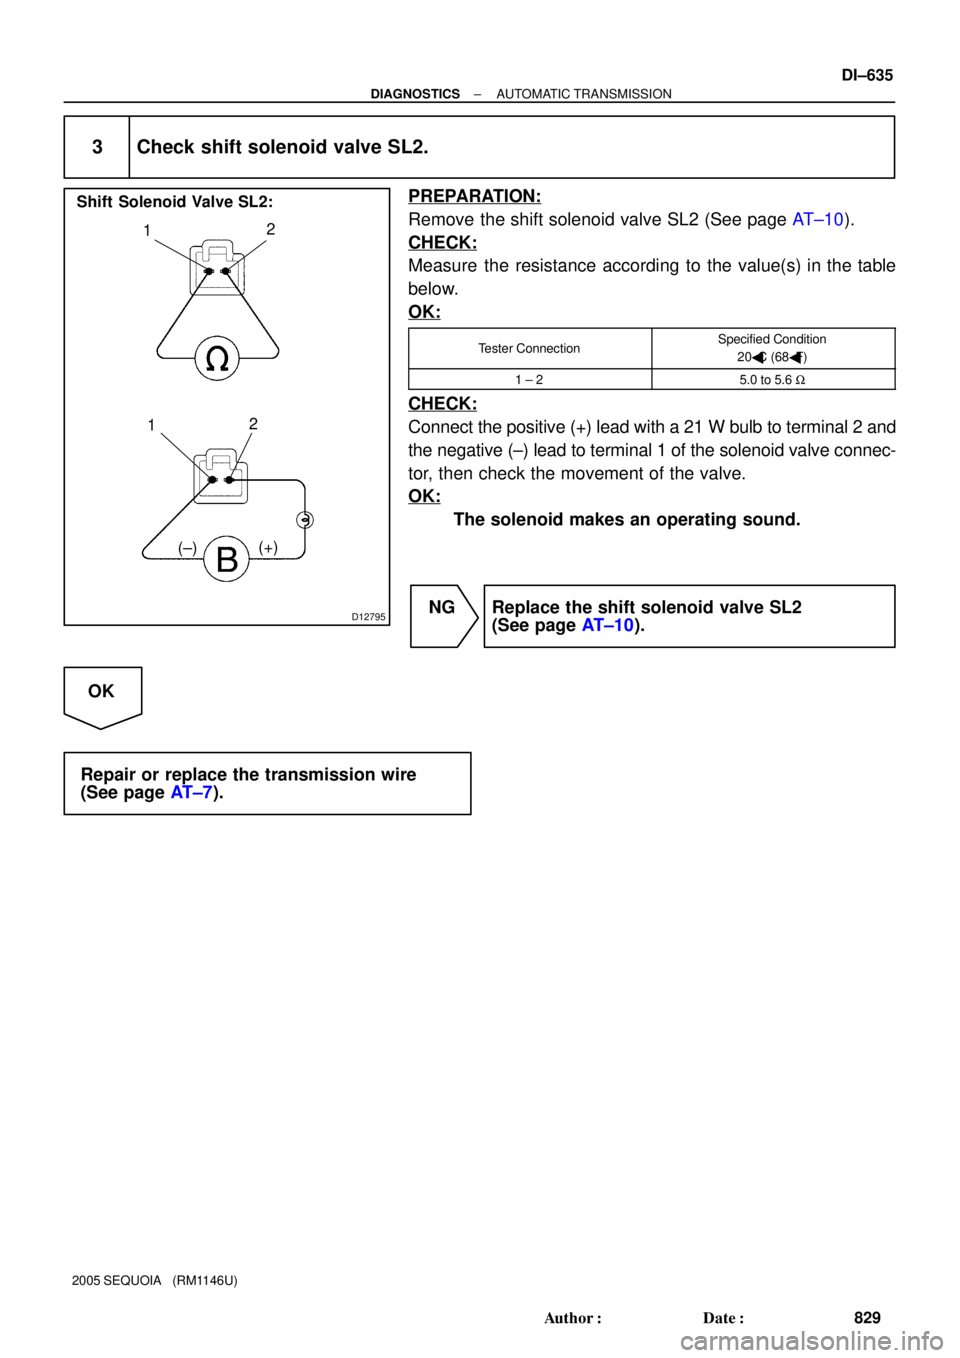
D12795
12
(±)(+)
12
Shift Solenoid Valve SL2:
± DIAGNOSTICSAUTOMATIC TRANSMISSION
DI±635
829 Author�: Date�:
2005 SEQUOIA (RM1146U)
3 Check shift solenoid valve SL2.
PREPARATION:
Remove the shift solenoid valve SL2 (See page AT±10).
CHECK:
Measure the resistance according to the value(s) in the table
below.
OK:
Tester ConnectionSpecified Condition
20�C (68�F)
1 ± 25.0 to 5.6 W
CHECK:
Connect the positive (+) lead with a 21 W bulb to terminal 2 and
the negative (±) lead to terminal 1 of the solenoid valve connec-
tor, then check the movement of the valve.
OK:
The solenoid makes an operating sound.
NG Replace the shift solenoid valve SL2
(See page AT±10).
OK
Repair or replace the transmission wire
(See page AT±7).
Page 863 of 4323
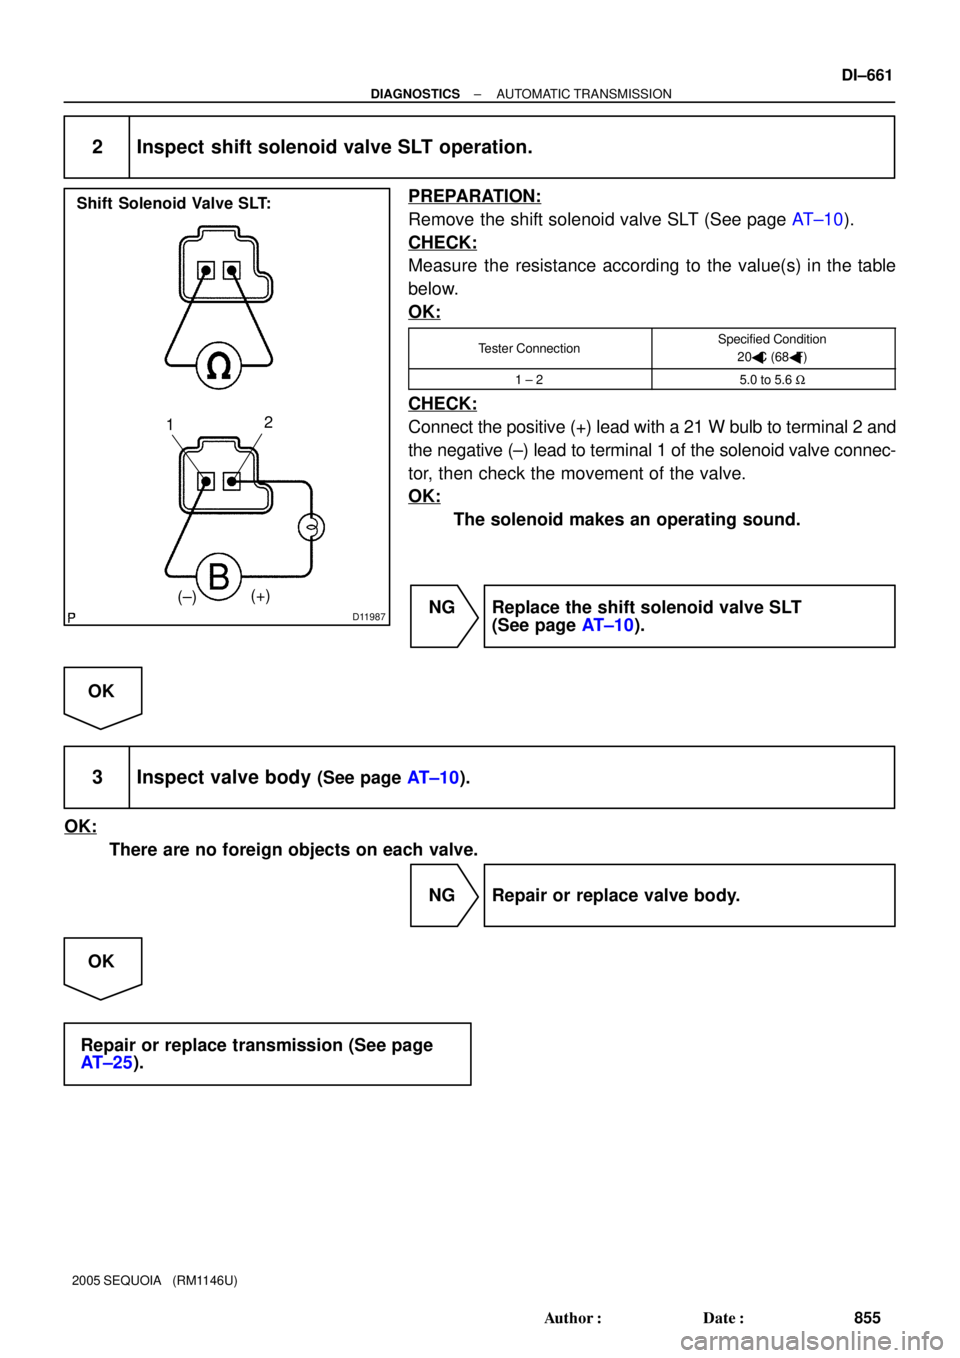
D11987
2
1
(+)
(±) Shift Solenoid Valve SLT:
± DIAGNOSTICSAUTOMATIC TRANSMISSION
DI±661
855 Author�: Date�:
2005 SEQUOIA (RM1146U)
2 Inspect shift solenoid valve SLT operation.
PREPARATION:
Remove the shift solenoid valve SLT (See page AT±10).
CHECK:
Measure the resistance according to the value(s) in the table
below.
OK:
Tester ConnectionSpecified Condition
20�C (68�F)
1 ± 25.0 to 5.6 W
CHECK:
Connect the positive (+) lead with a 21 W bulb to terminal 2 and
the negative (±) lead to terminal 1 of the solenoid valve connec-
tor, then check the movement of the valve.
OK:
The solenoid makes an operating sound.
NG Replace the shift solenoid valve SLT
(See page AT±10).
OK
3 Inspect valve body (See page AT±10).
OK:
There are no foreign objects on each valve.
NG Repair or replace valve body.
OK
Repair or replace transmission (See page
AT±25).
Page 867 of 4323
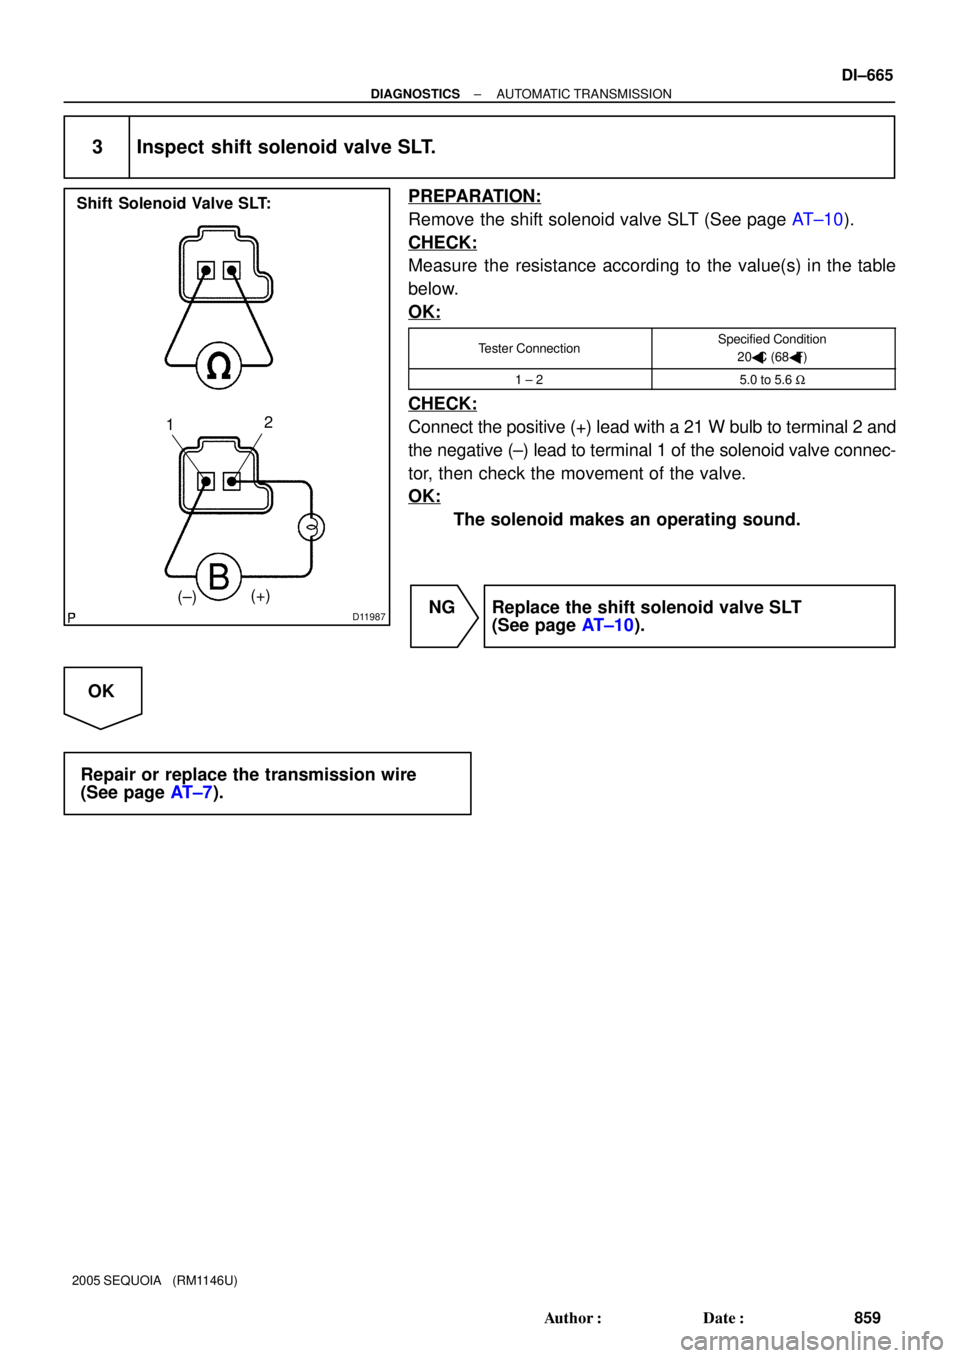
D11987
2
1
(+)
(±) Shift Solenoid Valve SLT:
± DIAGNOSTICSAUTOMATIC TRANSMISSION
DI±665
859 Author�: Date�:
2005 SEQUOIA (RM1146U)
3 Inspect shift solenoid valve SLT.
PREPARATION:
Remove the shift solenoid valve SLT (See page AT±10).
CHECK:
Measure the resistance according to the value(s) in the table
below.
OK:
Tester ConnectionSpecified Condition
20�C (68�F)
1 ± 25.0 to 5.6 W
CHECK:
Connect the positive (+) lead with a 21 W bulb to terminal 2 and
the negative (±) lead to terminal 1 of the solenoid valve connec-
tor, then check the movement of the valve.
OK:
The solenoid makes an operating sound.
NG Replace the shift solenoid valve SLT
(See page AT±10).
OK
Repair or replace the transmission wire
(See page AT±7).