Page 3840 of 4323
I21416
I21403
± AIR CONDITIONINGAIR CONDITIONER CONTROL ASSEMBLY (Center
Cluster Integration)AC±105
3832 Author�: Date�:
2005 SEQUOIA (RM1146U)
(c) Remove the 8 bulbs.
(d) Remove the 7 screws and integration circuit.
Page 3841 of 4323
I07872
AC3HY±02
AC±106± AIR CONDITIONINGAIR CONDITIONER CONTROL ASSEMBLY (Center
Cluster Integration)
3833 Author�: Date�:
2005 SEQUOIA (RM1146U)
INSPECTION
INSPECT BULB
Set the tester as shown in the illustration to check for continuity.
If continuity exists, replace the heater control.
If no continuity exists, replace the bulb.
Page 3844 of 4323
AC3I2±02
I21439
Heater Control Assembly
Heater Control Housing
Bulb
Bulb
A/C Amplifier
and PC Board
Packing
Panel
± AIR CONDITIONINGREAR A/C CONTROL ASSEMBLY (for Rear A/C)
AC±109
3836 Author�: Date�:
2005 SEQUOIA (RM1146U)
REAR A/C CONTROL ASSEMBLY (for Rear A/C)
COMPONENTS
Page 3846 of 4323
I21440
AC3I4±02
I21442
I21443
I22617
± AIR CONDITIONINGREAR A/C CONTROL ASSEMBLY (for Rear A/C)
AC±111
3838 Author�: Date�:
2005 SEQUOIA (RM1146U)
DISASSEMBLY
REMOVE A/C AMPLIFIER
(a) Remove the 2 screws and heater control switch.
(b) Remove the 4 screws, A/C amplifier and PC board.
(c) Remove the 3 bulbs from the PC board.
(d) Remove the bulb from the A/C amplifier.
Page 3847 of 4323
I07872
AC3I5±02
AC±112
± AIR CONDITIONINGREAR A/C CONTROL ASSEMBLY (for Rear A/C)
3839 Author�: Date�:
2005 SEQUOIA (RM1146U)
INSPECTION
INSPECT BULB
Set the tester as shown in the illustration to check for continuity.
If continuity exists, replace the heater control.
If no continuity exists, replace the bulb.
Page 4005 of 4323

05_SEQUOIA_U (L/O 0408)
146
2005 SEQUOIA from Aug. '04 Prod. (OM34424U)
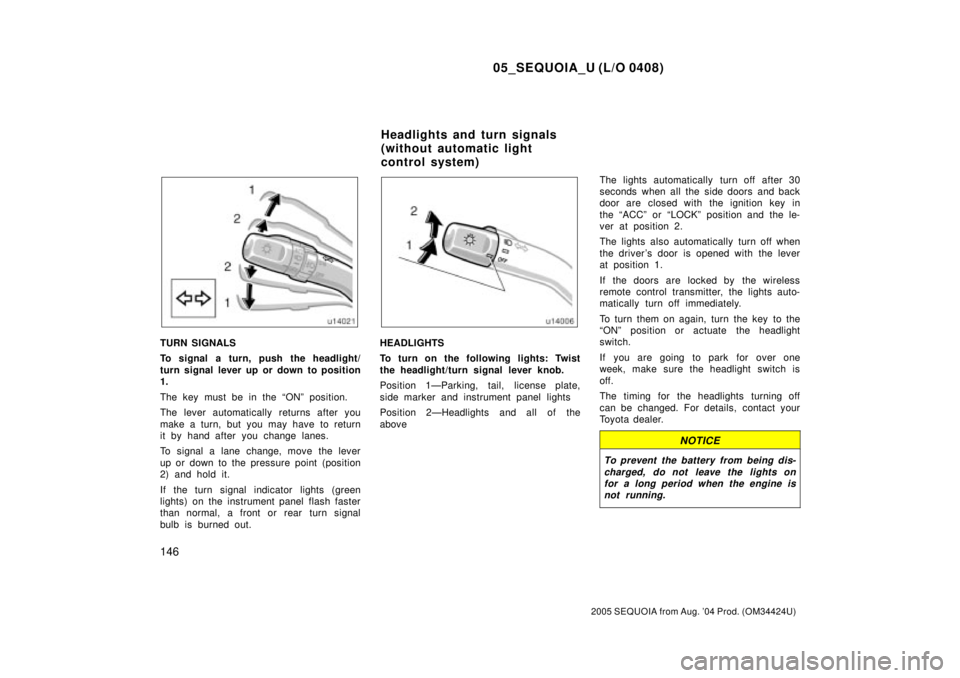
TURN SIGNALS
To signal a turn, push the headlight/
turn signal lever up or down to position
1.
The key must be in the ªONº position.
The lever automatically returns after you
make a turn, but you may have to return
it by hand after you change lanes.
To signal a lane change, move the lever
up or down to the pressure point (position
2) and hold it.
If the turn signal indicator lights (green
lights) on the instrument panel flash faster
than normal, a front or rear turn signal
bulb is burned out.HEADLIGHTS
To turn on the following lights: Twist
the headlight/turn signal lever knob.
Position 1ÐParking, tail, license plate,
side marker and instrument panel lights
Position 2ÐHeadlights and all of the
aboveThe lights automatically turn off after 30
seconds when all the side doors and back
door are closed with the ignition key in
the ªACCº or ªLOCKº position and the le-
ver at position 2.
The lights also automatically turn off when
the driver 's door is opened with the lever
at position 1.
If the doors are locked by the wireless
remote control transmitter, the lights auto-
matically turn off immediately.
To turn them on again, turn the key to the
ªONº position or actuate the headlight
switch.
If you are going to park for over one
week, make sure the headlight switch is
off.
The timing for the headlights turning off
can be changed. For details, contact your
Toyota dealer.
NOTICE
To prevent the battery from being dis-
charged, do not leave the lights on
for a long period when the engine is
not running.
Headlights and turn signals
(without automatic light
control system)
Page 4006 of 4323

05_SEQUOIA_U (L/O 0408)
147
2005 SEQUOIA from Aug. '04 Prod. (OM34424U)
Daytime running light system (all mod-
els sold in Canada and some models
sold in the U.S.A.)
The headlights turn on at reduced intensi-
ty when the parking brake is released with
the engine started, even with the light
switch in the ªOFFº position. They will not
go off until the ignition switch is turned
off.
To turn on the other exterior lights and
instrument panel lights, twist the knob to
position 1.
Twist the knob to position 2 to turn to full
intensity for driving at night.
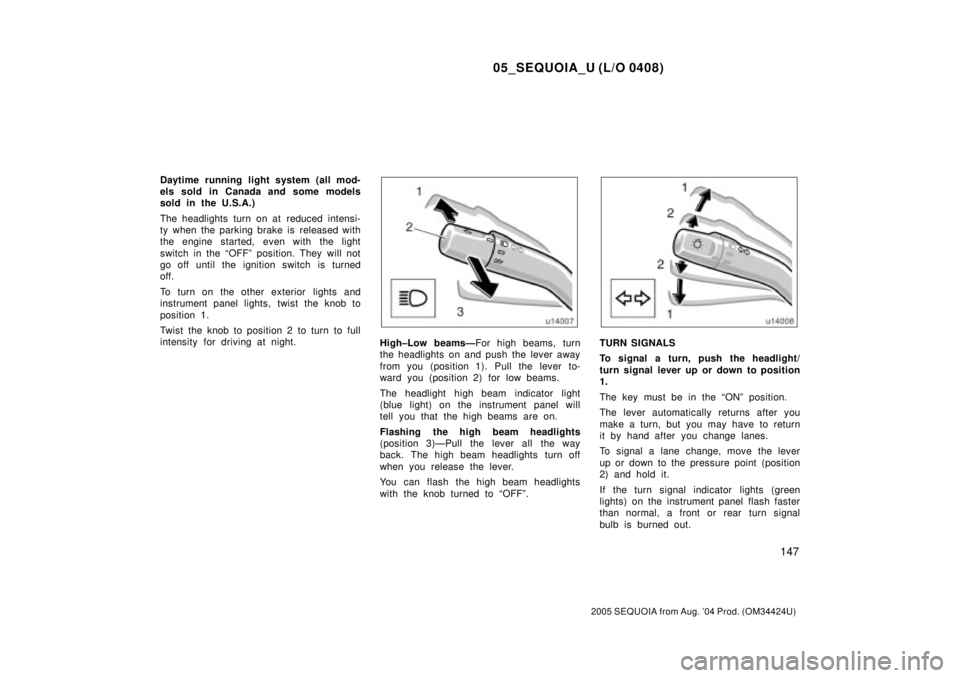
High±Low beamsÐFor high beams, turn
the headlights on and push the lever away
from you (position 1). Pull the lever to-
ward you (position 2) for low beams.
The headlight high beam indicator light
(blue light) on the instrument panel will
tell you that the high beams are on.
Flashing the high beam headlights
(position 3)ÐPull the lever all the way
back. The high beam headlights turn off
when you release the lever.
You can flash the high beam headlights
with the knob turned to ªOFFº.TURN SIGNALS
To signal a turn, push the headlight/
turn signal lever up or down to position
1.
The key must be in the ªONº position.
The lever automatically returns after you
make a turn, but you may have to return
it by hand after you change lanes.
To signal a lane change, move the lever
up or down to the pressure point (position
2) and hold it.
If the turn signal indicator lights (green
lights) on the instrument panel flash faster
than normal, a front or rear turn signal
bulb is burned out.
Page 4233 of 4323

05_SEQUOIA_U (L/O 0408)
374
2005 SEQUOIA from Aug. '04 Prod. (OM34424U)
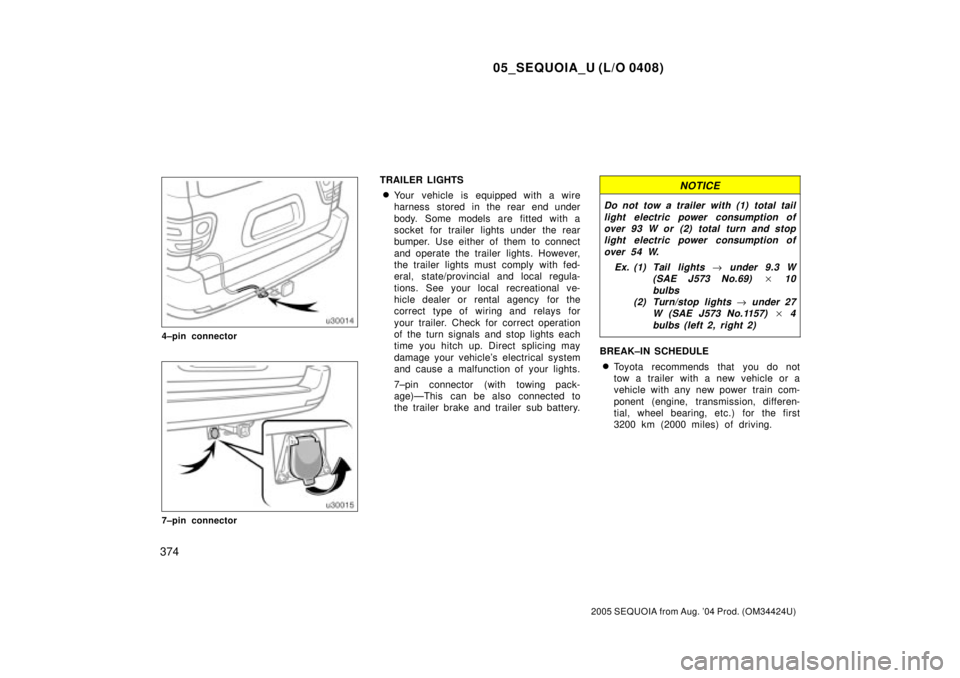
4±pin connector
7±pin connector
TRAILER LIGHTS
�Your vehicle is equipped with a wire
harness stored in the rear end under
body. Some models are fitted with a
socket for trailer lights under the rear
bumper. Use either of them to connect
and operate the trailer lights. However,
the trailer lights must comply with fed-
eral, state/provincial and local regula-
tions. See your local recreational ve-
hicle dealer or rental agency for the
correct type of wiring and relays for
your trailer. Check for correct operation
of the turn signals and stop lights each
time you hitch up. Direct splicing may
damage your vehicle's electrical system
and cause a malfunction of your lights.
7±pin connector (with towing pack-
age)ÐThis can be also connected to
the trailer brake and trailer sub battery.NOTICE
Do not tow a trailer with (1) total tail
light electric power consumption of
over 93 W or (2) total turn and stop
light electric power consumption of
over 54 W.
Ex. (1) Tail lights
" under 9.3 W
(SAE J573 No.69)
� 10
bulbs
(2) Turn/stop lights
" under 27
W (SAE J573 No.1157)
� 4
bulbs (left 2, right 2)
BREAK±IN SCHEDULE
�Toyota recommends that you do not
tow a trailer with a new vehicle or a
vehicle with any new power train com-
ponent (engine, transmission, differen-
tial, wheel bearing, etc.) for the first
3200 km (2000 miles) of driving.