Page 6 of 4323

(k) Care must be taken when jacking up and supporting the
vehicle. Be sure")
IN0253
WRONG CORRECT
IN0252
WRONG CORRECT IN±6
± INTRODUCTIONREPAIR INSTRUCTIONS
6 Author�: Date�:
2005 SEQUOIA (RM1146U)
(k) Care must be taken when jacking up and supporting the
vehicle. Be sure to lift and support the vehicle at the prop-
er locations (See page IN±8).
�Cancel the parking brake on the level place and
shift the transmission in N position.
�When jacking up the front wheels of the vehicle, first
place stoppers behind the rear wheels.
�When jacking up the rear wheels of the vehicle, first
place stoppers before the front wheels.
�When either the front or rear wheels only should be
jacked up, set rigid racks and place stoppers in front
and behind of the other wheels on the ground.
�After the vehicle is jacked up, be sure to support it
on rigid racks. It is extremely dangerous to do any
work on a vehicle raised on a jack, even for a job that
can be finished quickly.
(l) Observe the following precautions to avoid damage to the
following parts:
(1) Do not open the cover or case of the ECU unless
absolutely necessary. (If the IC terminals are
touched, the IC may be destroyed by static electric-
ity.)
(2) To disconnect vacuum hoses, pull off the end, not
the middle of the hose.
(3) To pull apart electrical connectors, pull on the con-
nector itself, not the wires.
(4) Be careful not to drop electrical components, such
as sensors or relays. If they are dropped on a hard
floor, they should be replaced and not reused.
(5) When steam cleaning an engine, protect the elec-
tronic components, air filter and emission±related
components from water.
(6) Never use an impact wrench to remove or install
temperature switches or temperature sensors.
Page 46 of 4323
 IAC
Idle Air ControlIdle Speed Control (ISC)
IATIntake Air TemperatureIntake or Inlet Air Temperature
ICMIgnition Control Module")
IN±46
± INTRODUCTIONTERMS
46 Author�: Date�:
2005 SEQUOIA (RM1146U) IAC
Idle Air ControlIdle Speed Control (ISC)
IATIntake Air TemperatureIntake or Inlet Air Temperature
ICMIgnition Control Module±
IFIIndirect Fuel InjectionIndirect Injection (IDL)
IFSInertia Fuel±Shutoff±
ISCIdle Speed Control±
KSKnock SensorKnock Sensor
MAFMass AirflowAir Flow Meter
MAPManifold Absolute PressureManifold Pressure Intake Vacuum
MCMixture Control
Electric Bleed Air Control Valve (EBCV)
Mixture Control Valve (MCV)
Electric Air Control Valve (EACV)
MDPManifold Differential Pressure±
MFIMultiport Fuel InjectionElectronic Fuel Injection (EFI)
MILMalfunction Indicator LampCheck Engine Lamp
MSTManifold Surface Temperature±
MVZManifold Vacuum Zone±
NVRAMNon±Volatile Random Access Memory±
O2SOxygen SensorOxygen Sensor, O2 Sensor (O2S)
OBDOn±Board DiagnosticOn±Board Diagnostic System (OBD)
OCOxidation Catalytic ConverterOxidation Catalyst Convert (OC), CCo
OLOpen LoopOpen Loop
PAIRPulsed Secondary Air InjectionAir Suction (AS)
PCMPowertrain Control Module±
PNPPark/Neutral Position±
PROMProgrammable Read Only Memory±
PSPPower Steering Pressure±
PTOXPeriodic Trap OxidizerDiesel Particulate Filter (DPF)
Diesel Particulate Trap (DPT)
RAMRandom Access MemoryRandom Access Memory (RAM)
RMRelay Module±
ROMRead Only MemoryRead Only Memory (ROM)
RPMEngine SpeedEngine Speed
SCSuperchargerSupercharger
SCBSupercharger BypassE±ABV
SFISequential Multiport Fuel InjectionElectronic Fuel Injection (EFI), Sequential Injection
SPLSmoke Puff Limiter±
SRIService Reminder Indicator±
SRTSystem Readiness Test±
STScan Tool±
TBThrottle BodyThrottle Body
TBIThrottle Body Fuel InjectionSingle Point Injection
Central Fuel Injection (Ci)
TCTurbochargerTurbocharger
TCCTorque Converter ClutchTorque Converter
TCMTransmission Control ModuleTransmission ECU, ECT ECU
Page 52 of 4323

ENGINE
INSPECTION
HINT:
Perform the following procedures when the engine is cold.
1. REPLACE TIMING B")
MA004±18
P08488
Back Front
± MAINTENANCEENGINE
MA±5
52 Author�: Date�:
2005 SEQUOIA (RM1146U)
ENGINE
INSPECTION
HINT:
Perform the following procedures when the engine is cold.
1. REPLACE TIMING BELT
(See page EM±13)
2. INSPECT DRIVE BELT
(See page CH±1)
3. REPLACE SPARK PLUGS
(See page IG±1)
4. INSPECT AIR FILTER
(a) Visually check that the air cleaner element is not exces-
sively dirty, damaged or oily.
HINT:
Oiliness may indicate a stuck PCV valve.
If necessary, replace the air cleaner element.
(b) Clean the element with compressed air.
First blow from back side thoroughly, then blow off the
front side of the element.
5. REPLACE AIR FILTER
Replace the used air cleaner element with a new one.
6. REPLACE ENGINE OIL AND OIL FILTER
(See page LU±2)
7. REPLACE ENGINE COOLANT
(See page CO±2)
8. INSPECT CHARCOAL CANISTER
(See page EC±9)
9. REPLACE GASKET IN FUEL TANK CAP
(See page SF±33)
10. INSPECT FUEL LINES, CONNECTIONS, FUEL TANK
VAPOR VENT SYSTEM HOSES AND FUEL TANK
BAND
Visually inspect the fuel lines for cracks, leakage loose connec-
tions, deformation or tank band looseness.
11. INSPECT EXHAUST PIPES AND MOUNTINGS
Visually inspect the pipes, hangers and connections for severe
corrosion, leaks or damage.
12. INSPECT VALVE CLEARANCE
(See page EM±4)
Page 207 of 4323
± DIAGNOSTICSENGINE
DI±13
207 Author�: Date�:
2005 SEQUOIA (RM1146U)
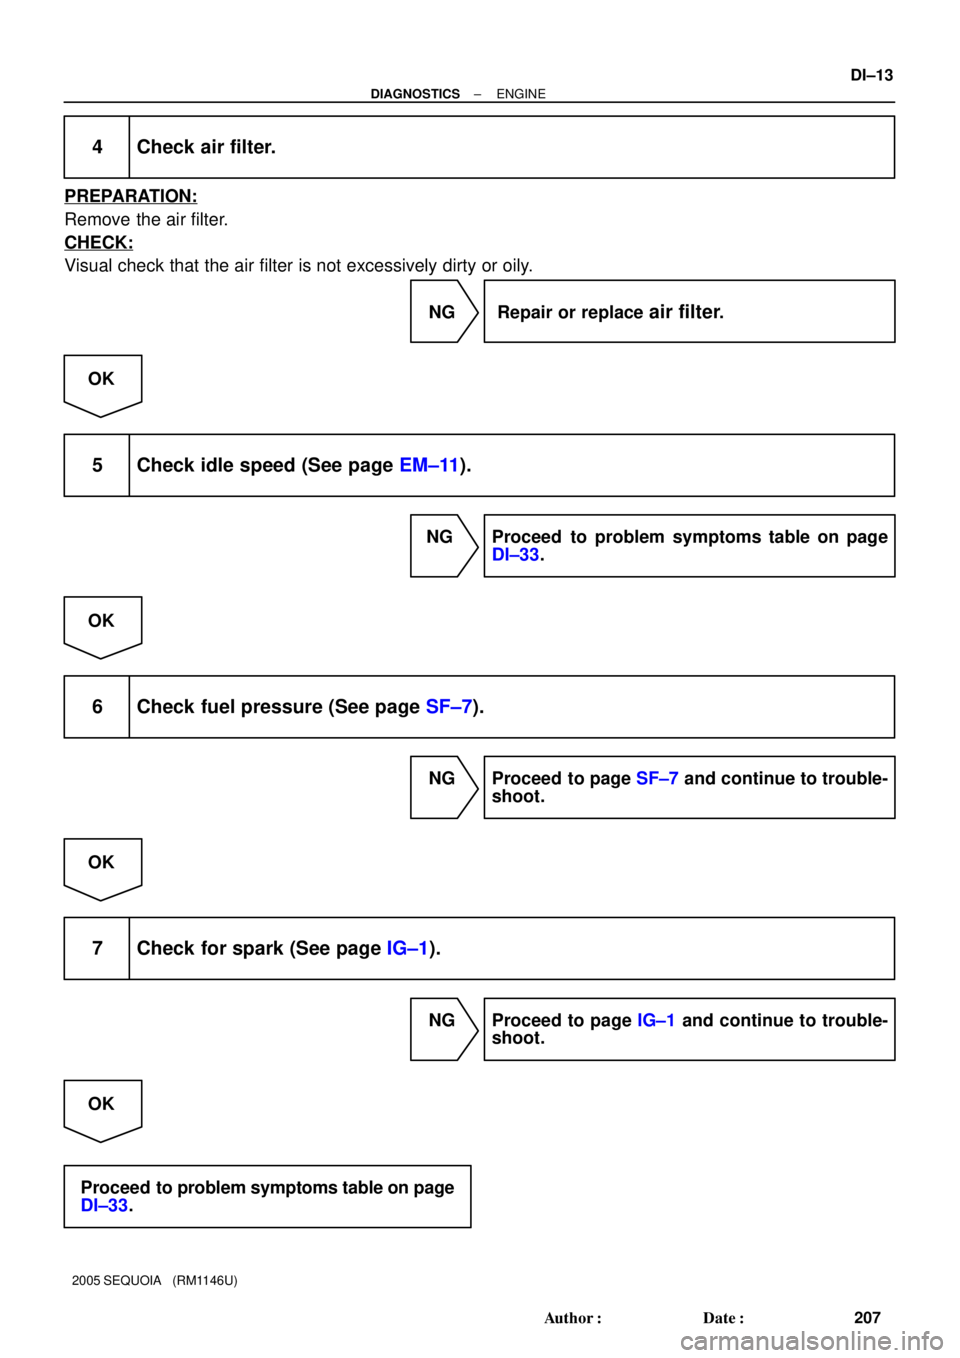
4 Check air filter.
PREPARATION:
Remove the air filter.
CHECK:
Visual check that the air filter is not excessively dirty or oily.
NG Repair or replace
air filter.
OK
5 Check idle speed (See page EM±11).
NG Proceed to problem symptoms table on page
DI±33.
OK
6 Check fuel pressure (See page SF±7).
NG Proceed to page SF±7 and continue to trouble-
shoot.
OK
7 Check for spark (See page IG±1).
NG Proceed to page IG±1 and continue to trouble-
shoot.
OK
Proceed to problem symptoms table on page
DI±33.
Page 277 of 4323
A02852
A23658
± DIAGNOSTICSENGINE
DI±83
277 Author�: Date�:
2005 SEQUOIA (RM1146U)
5 Check VVT controller assembly.
PREPARATION:
(a) Remove the timing belt (See page EM±16).
(b) Remove the cylinder head cover.
(c) Remove the OCV (See page SF±46).
(d) Drain the oil in the VVT controller assembly
(See page EM±36).
CHECK:
Check whether the oil in VVT controller assembly is drained or
not.
OK:
Standard:
The oil in VVT controller assembly is drained.
NG Replace VVT controller assembly, and then go
to step 6.
OK
6 Check oil control valve filter.
PREPARATION:
(a) Remove the cylinder head cover.
(b) Remove the camshaft bearing cap and OCV filter.
CHECK:
Check that the filter is not clogged.
OK:
The filter is not clogged.
NG Repair or replace.
OK
Page 367 of 4323

6 Read value of mass air flow meter.
PREPARATION:
(a) Connect the hand±held tester to the DLC3.
(b) Turn the ignition switch")
± DIAGNOSTICSENGINE
DI±173
367 Author�: Date�:
2005 SEQUOIA (RM1146U)
6 Read value of mass air flow meter.
PREPARATION:
(a) Connect the hand±held tester to the DLC3.
(b) Turn the ignition switch to ON and turn the tester ON.
(c) Select the following menu items: DIAGNOSIS / ENHANCED OBD II / DATA LIST / ALL / MAF and
COOLANT TEMP.
(d) Allow the engine to idle until the COOLANT TEMP reaches 75�C (167�F) or more.
CHECK:
(a) Read the MAF with the engine in an idling condition and at an engine speed of 2,500 rpm.
Standard:
MAF while engine idling: Between 1.4 gm/s and 2.3 gm/s (shift position: N, A/C: OFF).
MAF at engine speed of 2,500 rpm: Between 5.4 gm/s and 7.9 gm/s (shift position: N, A/C: OFF).
NG Replace mass air flow meter.
OK
7 Check fuel pressure (See page SF±7).
CHECK:
Check the fuel pressure (high or low pressure).
NG Check and replace fuel pump, pressure regula-
tor, fuel pipe line and filter (See page SF±1).
OK
8 Check exhaust system for gas leakage.
OK:
No exhaust gas leakage.
NG Repair or replace exhaust gas leakage point.
OK
Page 396 of 4323

16 Check fuel pressure (See page SF±7).
NG Check and repair fuel pump, pressure regulator,
fuel pipe line and filter (See pag")
DI±202
± DIAGNOSTICSENGINE
396 Author�: Date�:
2005 SEQUOIA (RM1146U)
16 Check fuel pressure (See page SF±7).
NG Check and repair fuel pump, pressure regulator,
fuel pipe line and filter (See page SF±1).
OK
17 Check intake air temperature and mass air flow rate.
PREPARATION:
(a) Connect the hand±held tester to the DLC3.
(b) Turn the ignition switch ON.
CHECK:
Check the intake air temperature.
(1) When using hand±held tester, enter the following menu: DIAGNOSIS / ENHANCED OBD II /
DATA LIST / ALL / INTAKE AIR.
(2) Read its value displayed on the hand±held tester.
OK:
Equivalent to ambient temperature
CHECK:
Check the air flow rate.
(1) When using hand±held tester, enter the following menu: DIAGNOSIS/ENHANCED OBD II/DATA
LIST/ALL/MAF.
(2) Read its value displayed on the hand±held tester.
OK:
ConditionAir Flow Rate (gm/s)
Ignition switch ON (do not start engine)0
Idling4 to 6
Running without load (2,500 rpm)13 to 20
Idling to quickly acceleratingAir flow rate fluctuates
NG Replace mass air flow meter.
OK
Page 461 of 4323

Operation D: Purge VSV monitor Operation")
A23480
Fuel Tank Canister
Vacuum Pump: OFF Pressure Sensor 0.02 Inch Orifice
Pump Module
Operation A: Atmospheric Pressure Measurement
Vent Valve: OFF (vent)
Operation D: Purge VSV monitor Operation B, E: 0.02 Inch Leak Pressure Measurement
Negative
Pressure Atmospheric
Pressure Air Filter
Purge VSV: OFFOFF (vent)
ON
OFF
OFF
ON
ON (closed)ON
ON
ON (closed)
Operation C: EVAP System Pressure Measurement
A23483
Purge VSV
Vent Valve
Vacuum Pump
EVAP Pressure
Positive
Leak Pressure
sec NegativeONON
Sequence
TimeA
10
sec60
Within 15 minutes
sec ON
First 0.02 inch
BCD
OK Malfunction
ON: Open
OFF: Closed
OFF: Vent ON: Closed
10
Standard
sec60
E EVAP Pressure when Purge VSV Stuck Open:
Leak PressureSecond 0.02 inch
Standard x 0.2
± DIAGNOSTICSENGINE
DI±259
453 Author�: Date�:
2005 SEQUOIA (RM1146U)
(a) Purge VSV stuck open
In operation C, the vacuum pump creates negative pressure (vacuum) in the EVAP (Evaporative Emission)
system. The EVAP system pressure is then measured by the ECM using the pressure sensor. If the stabilized
system pressure is higher than [second 0.02 inch leak pressure standard x 0.2], the ECM interprets this as
the purge VSV (Vacuum Switching Valve) being stuck open. The ECM illuminates the MIL and sets the DTC
(2 trip detection logic).