2001 NISSAN X-TRAIL oil
[x] Cancel search: oilPage 3034 of 3833
SRS-32
DRIVER AIR BAG MODULE
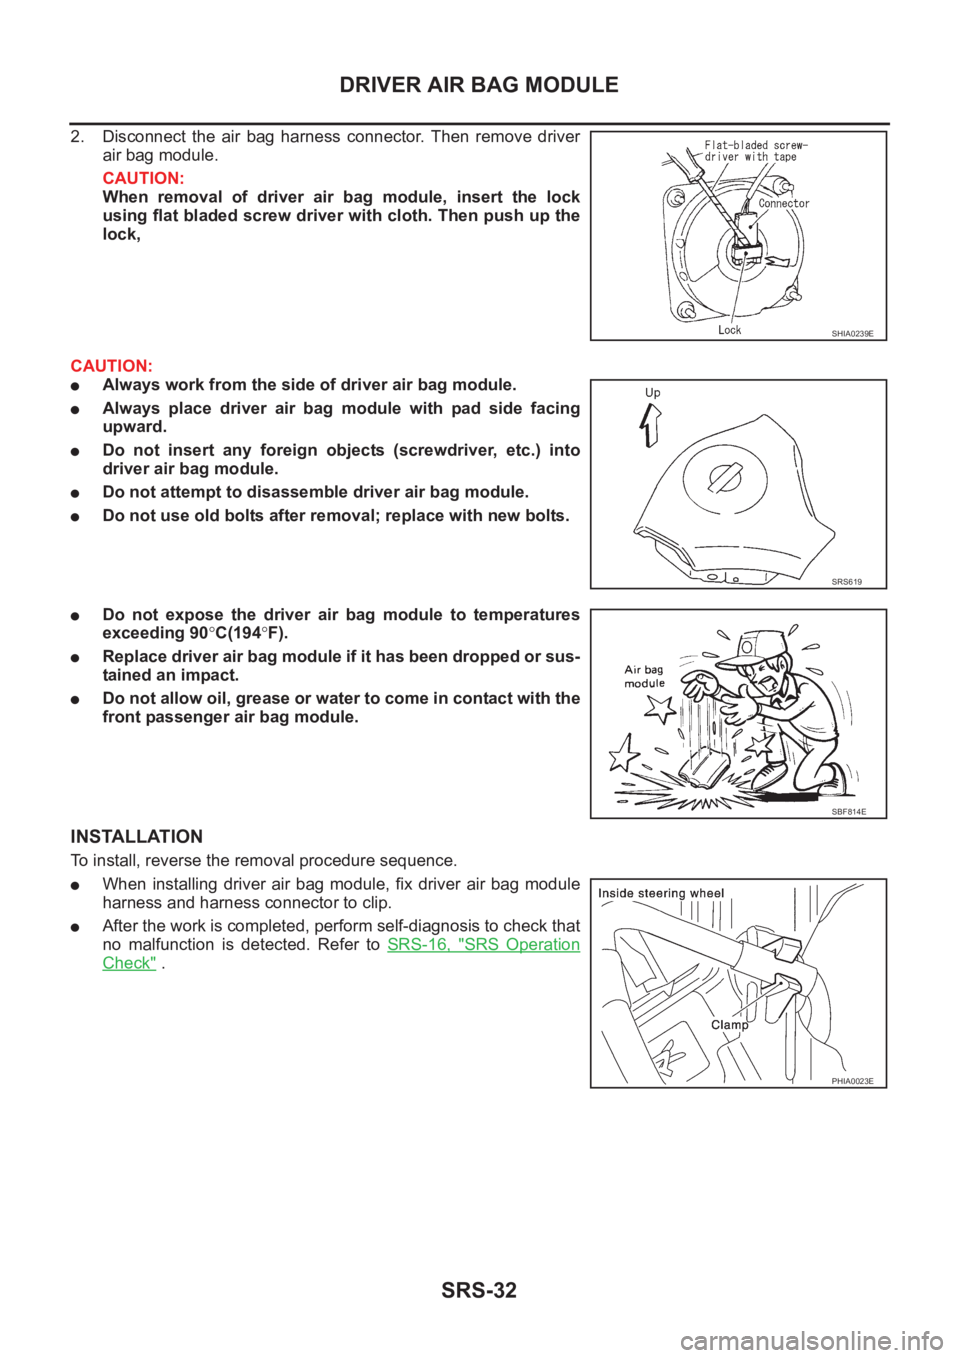
2. Disconnect the air bag harness connector. Then remove driver
air bag module.
CAUTION:
When removal of driver air bag module, insert the lock
using flat bladed screw driver with cloth. Then push up the
lock,
CAUTION:
●Always work from the side of driver air bag module.
●Always place driver air bag module with pad side facing
upward.
●Do not insert any foreign objects (screwdriver, etc.) into
driver air bag module.
●Do not attempt to disassemble driver air bag module.
●Do not use old bolts after removal; replace with new bolts.
●Do not expose the driver air bag module to temperatures
exceeding 90°C(194°F).
●Replace driver air bag module if it has been dropped or sus-
tained an impact.
●Do not allow oil, grease or water to come in contact with the
front passenger air bag module.
INSTALLATION
To install, reverse the removal procedure sequence.
●When installing driver air bag module, fix driver air bag module
harness and harness connector to clip.
●After the work is completed, perform self-diagnosis to check that
no malfunction is detected. Refer to SRS-16, "
SRS Operation
Check" .
SHIA0239E
SRS619
SBF814E
PHIA0023E
Page 3037 of 3833
FRONT PASSENGER AIR BAG MODULE
SRS-35
C
D
E
F
G
I
J
K
L
MA
B
SRS
FRONT PASSENGER AIR BAG MODULEPFP:K8515
Removal and InstallationEHS000D9
REMOVAL
CAUTION:
●Before servicing SRS, turn the ignition switch off, disconnect both battery cables and wait at least
3 minutes.
●Always work from the side of or under front passenger air bag module.
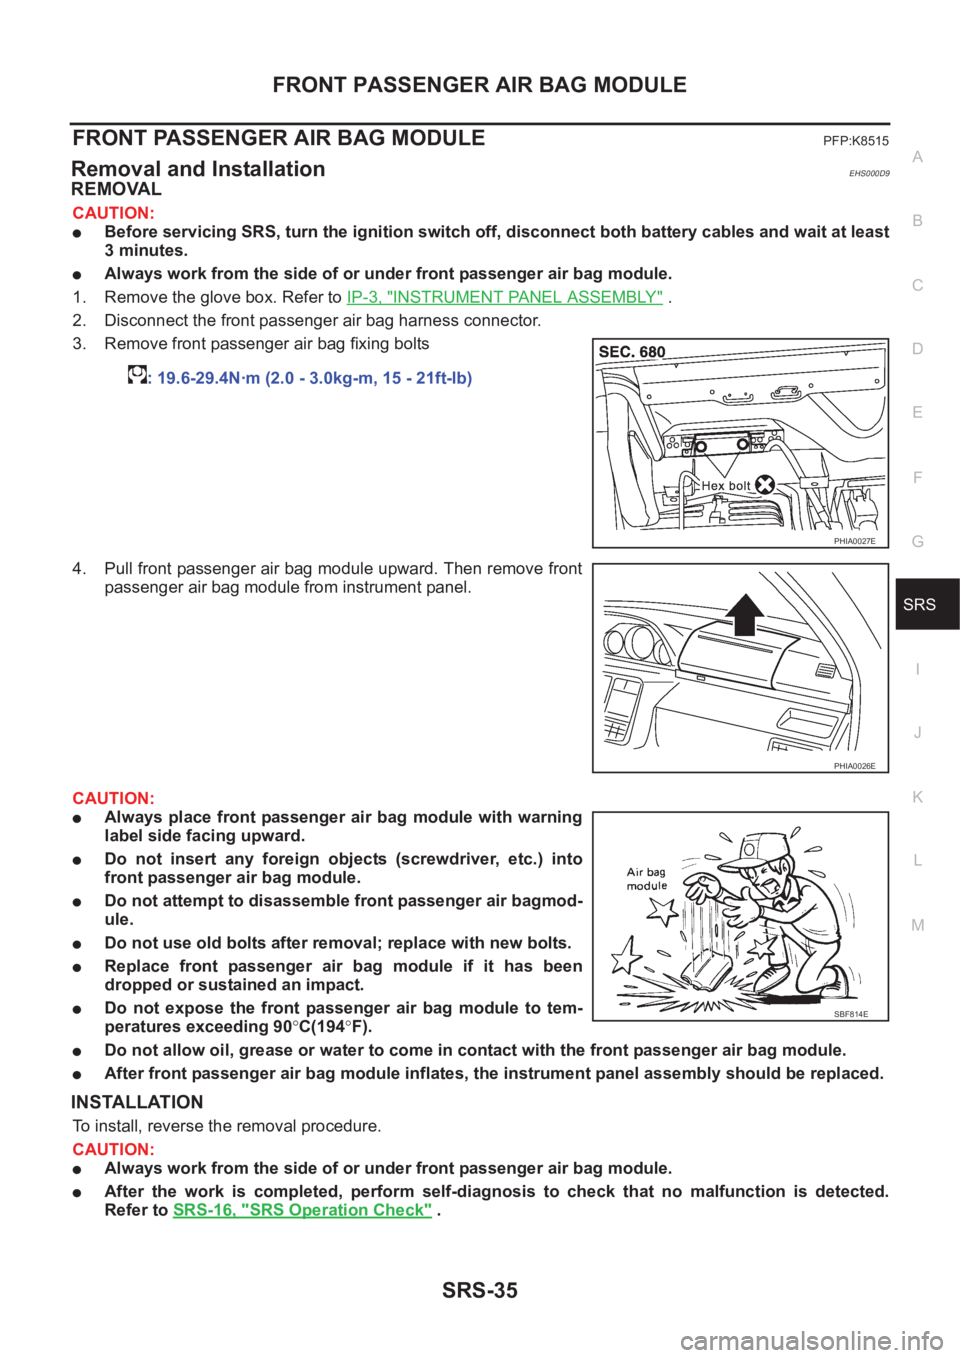
1. Remove the glove box. Refer to IP-3, "
INSTRUMENT PANEL ASSEMBLY" .
2. Disconnect the front passenger air bag harness connector.
3. Remove front passenger air bag fixing bolts
4. Pull front passenger air bag module upward. Then remove front
passenger air bag module from instrument panel.
CAUTION:
●Always place front passenger air bag module with warning
label side facing upward.
●Do not insert any foreign objects (screwdriver, etc.) into
front passenger air bag module.
●Do not attempt to disassemble front passenger air bagmod-
ule.
●Do not use old bolts after removal; replace with new bolts.
●Replace front passenger air bag module if it has been
dropped or sustained an impact.
●Do not expose the front passenger air bag module to tem-
peratures exceeding 90°C(194°F).
●Do not allow oil, grease or water to come in contact with the front passenger air bag module.
●After front passenger air bag module inflates, the instrument panel assembly should be replaced.
INSTALLATION
To install, reverse the removal procedure.
CAUTION:
●Always work from the side of or under front passenger air bag module.
●After the work is completed, perform self-diagnosis to check that no malfunction is detected.
Refer to SRS-16, "
SRS Operation Check" . : 19.6-29.4N·m (2.0 - 3.0kg-m, 15 - 21ft-lb)
PHIA0027E
PHIA0026E
SBF814E
Page 3038 of 3833
SRS-36
FRONT SIDE AIR BAG MODULE
FRONT SIDE AIR BAG MODULE
PFP:K8EH0
Removal and InstallationEHS000DA
REMOVAL
CAUTION:
●Before servicing SRS, turn the ignition switch off, disconnect both battery cables and wait at least
3 minutes.
●Always work from the rear of the front side air bag module.
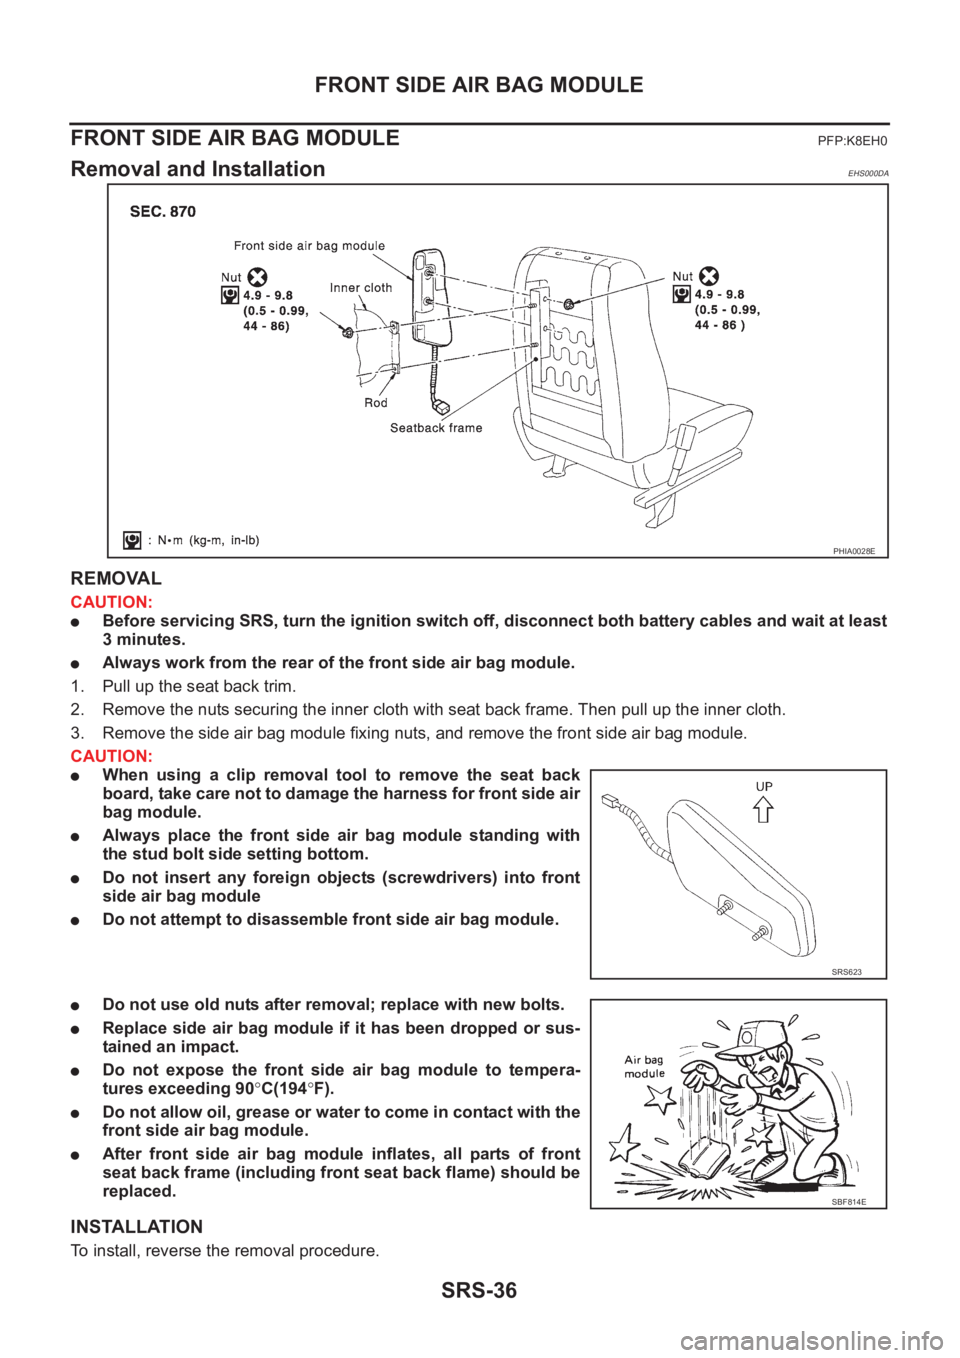
1. Pull up the seat back trim.
2. Remove the nuts securing the inner cloth with seat back frame. Then pull up the inner cloth.
3. Remove the side air bag module fixing nuts, and remove the front side air bag module.
CAUTION:
●When using a clip removal tool to remove the seat back
board, take care not to damage the harness for front side air
bag module.
●Always place the front side air bag module standing with
the stud bolt side setting bottom.
●Do not insert any foreign objects (screwdrivers) into front
side air bag module
●Do not attempt to disassemble front side air bag module.
●Do not use old nuts after removal; replace with new bolts.
●Replace side air bag module if it has been dropped or sus-
tained an impact.
●Do not expose the front side air bag module to tempera-
tures exceeding 90°C(194°F).
●Do not allow oil, grease or water to come in contact with the
front side air bag module.
●After front side air bag module inflates, all parts of front
seat back frame (including front seat back flame) should be
replaced.
INSTALLATION
To install, reverse the removal procedure.
PHIA0028E
SRS623
SBF814E
Page 3055 of 3833
PRECAUTIONS
BL-3
C
D
E
F
G
H
J
K
L
MA
B
BL
PRECAUTIONSPFP:00001
Precautions for Supplemental Restraint System (SRS) “AIR BAG” and “SEAT
BELT PRE-TENSIONER”
EIS00452
The Supplemental Restraint System such as “AIR BAG” and “SEAT BELT PRE-TENSIONER”, used along
with a front seat belt, helps to reduce the risk or severity of injury to the driver and front passenger for certain
types of collision. Information necessary to service the system safely is included in the SRS and SB section of
this Service Manual.
WARNING:
●To avoid rendering the SRS inoperative, which could increase the risk of personal injury or death
in the event of a collision which would result in air bag inflation, all maintenance must be per-
formed by an authorized NISSAN/INFINITI dealer.
●Improper maintenance, including incorrect removal and installation of the SRS, can lead to per-
sonal injury caused by unintentional activation of the system. For removal of Spiral Cable and Air
Bag Module, see the SRS section.
●Do not use electrical test equipment on any circuit related to the SRS unless instructed to in this
Service Manual. SRS wiring harnesses can be identified by yellow and/or orange harness connec-
tors.
Precautions EIS00453
●When removing or disassembling any part, be careful not to damage or deform it. Protect parts, which
may get in the way with cloth.
●When removing parts with a screwdriver or other tool, protect parts by wrapping them with vinyl or tape.
●Keep removed parts protected with cloth.
●If a clip is deformed or damaged, replace it.
●If an unreusable part is removed, replace it with a new one.
●Tighten bolts and nuts firmly to the specified torque.
●After re-assembly has been completed, make sure each part functions correctly.
●Remove stains in the following way.
Water-soluble stains:
Dip a soft cloth in warm water, and then squeeze it tightly. After wiping the stain, wipe with a soft dry cloth.
Oil stain:
Dissolve a synthetic detergent in warm water (density of 2 to 3% or less), dip the cloth, then clean off the stain
with the cloth. Next, dip the cloth in fresh water and squeeze it tightly. Then clean off the detergent completely.
Then wipe the area with a soft dry cloth.
●Do not use any organic solvent, such as thinner or benzine.
Page 3155 of 3833

PRECAUTIONS
GW-3
C
D
E
F
G
H
J
K
L
MA
B
GW
PRECAUTIONSPFP:00001
Precautions for Supplemental Restraint System (SRS) “AIR BAG” and “SEAT
BELT PRE-TENSIONER”
EIS0045G
The Supplemental Restraint System such as “AIR BAG” and “SEAT BELT PRE-TENSIONER”, used along
with a front seat belt, helps to reduce the risk or severity of injury to the driver and front passenger for certain
types of collision. Information necessary to service the system safely is included in the SRS and SB section of
this Service Manual.
WARNING:
●To avoid rendering the SRS inoperative, which could increase the risk of personal injury or death
in the event of a collision which would result in air bag inflation, all maintenance must be per-
formed by an authorized NISSAN/INFINITI dealer.
●Improper maintenance, including incorrect removal and installation of the SRS, can lead to per-
sonal injury caused by unintentional activation of the system. For removal of Spiral Cable and Air
Bag Module, see the SRS section.
●Do not use electrical test equipment on any circuit related to the SRS unless instructed to in this
Service Manual. SRS wiring harnesses can be identified by yellow and/or orange harness connec-
tors.
Precautions EIS0045H
●When removing or disassembling any part, be careful not to damage or deform it. Protect parts, which
may get in the way with cloth.
●When removing parts with a screwdriver or other tool, protect parts by wrapping them with vinyl or tape.
●Keep removed parts protected with cloth.
●If a clip is deformed or damaged, replace it.
●If an unreusable part is removed, replace it with a new one.
●Tighten bolts and nuts firmly to the specified torque.
●After re-assembly has been completed, make sure each part functions correctly.
●Remove stains in the following way.
Water-soluble stains:
Dip a soft cloth in warm water, and then squeeze it tightly. After wiping the stain, wipe with a soft dry cloth.
Oil stain:
Dissolve a synthetic detergent in warm water (density of 2 to 3% or less), dip the cloth, then clean off the stain
with the cloth. Next, dip the cloth in fresh water and squeeze it tightly. Then clean off the detergent completely.
Then wipe the area with a soft dry cloth.
●Do not use any organic solvent, such as thinner or benzine.
Page 3172 of 3833
GW-20
REAR WINDOW DEFOGGER
Electrical Components Inspection
EIS0045U
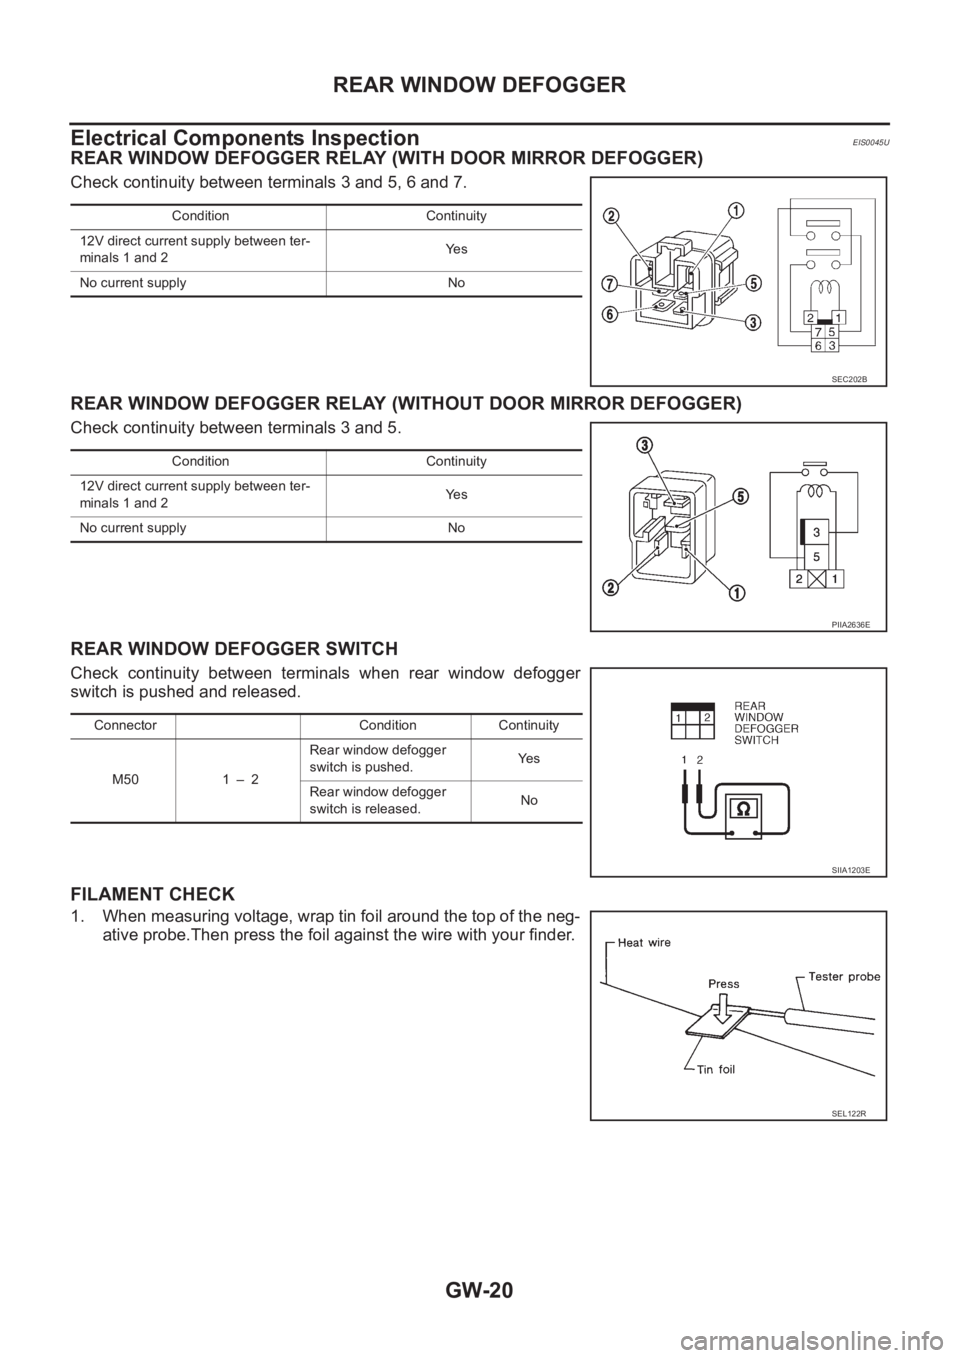
REAR WINDOW DEFOGGER RELAY (WITH DOOR MIRROR DEFOGGER)
Check continuity between terminals 3 and 5, 6 and 7.
REAR WINDOW DEFOGGER RELAY (WITHOUT DOOR MIRROR DEFOGGER)
Check continuity between terminals 3 and 5.
REAR WINDOW DEFOGGER SWITCH
Check continuity between terminals when rear window defogger
switch is pushed and released.
FILAMENT CHECK
1. When measuring voltage, wrap tin foil around the top of the neg-
ative probe.Then press the foil against the wire with your finder.
Condition Continuity
12V direct current supply between ter-
minals 1 and 2Ye s
No current supply No
SEC202B
Condition Continuity
12V direct current supply between ter-
minals 1 and 2Ye s
No current supply No
PIIA2636E
Connector Condition Continuity
M50 1 – 2Rear window defogger
switch is pushed.Ye s
Rear window defogger
switch is released.No
SIIA1203E
SEL122R
Page 3210 of 3833
RF-2
PRECAUTIONS
PRECAUTIONS
PFP:00001
Precautions for Supplemental Restraint System (SRS) “AIR BAG” and “SEAT
BELT PRE-TENSIONER”
EIS0044P
The Supplemental Restraint System such as “AIR BAG” and “SEAT BELT PRE-TENSIONER”, used along
with a front seat belt, helps to reduce the risk or severity of injury to the driver and front passenger for certain
types of collision. Information necessary to service the system safely is included in the SRS and SB section of
this Service Manual.
WARNING:
●To avoid rendering the SRS inoperative, which could increase the risk of personal injury or death
in the event of a collision which would result in air bag inflation, all maintenance must be per-
formed by an authorized NISSAN/INFINITI dealer.
●Improper maintenance, including incorrect removal and installation of the SRS, can lead to per-
sonal injury caused by unintentional activation of the system. For removal of Spiral Cable and Air
Bag Module, see the SRS section.
●Do not use electrical test equipment on any circuit related to the SRS unless instructed to in this
Service Manual. SRS wiring harnesses can be identified by yellow and/or orange harness connec-
tors.
Precautions EIS0044Q
●When removing or disassembling any part, be careful not to damage or deform it. Protect parts, which
may get in the way with cloth.
●When removing parts with a screwdriver or other tool, protect parts by wrapping them with vinyl or tape.
●Keep removed parts protected with cloth.
●If a clip is deformed or damaged, replace it.
●If an unreusable part is removed, replace it with a new one.
●Tighten bolts and nuts firmly to the specified torque.
●After re-assembly has been completed, make sure each part functions correctly.
●Remove stains in the following way.
Water-soluble stains:
Dip a soft cloth in warm water, and then squeeze it tightly. After wiping the stain, wipe with a soft dry cloth.
Oil stain:
Dissolve a synthetic detergent in warm water (density of 2 to 3% or less), dip the cloth, then clean off the stain
with the cloth. Next, dip the cloth in fresh water and squeeze it tightly. Then clean off the detergent completely.
Then wipe the area with a soft dry cloth.
●Do not use any organic solvent, such as thinner or benzine.
●If sunroof motor operation sound is noted but sunroof does not operate, replace motor assembly with
glass lid fully closed.
●If sunroof (glass lid and motor) does not operate when using sunroof switch then remove the front cover of
the luggage compartment, and rotate motor gear box drive shaft with the emergency handle (in the tool
box).
Page 3221 of 3833
EI-1
EXTERIOR & INTERIOR
I BODY
CONTENTS
C
D
E
F
G
H
J
K
L
M
SECTION
A
B
EI
EXTERIOR & INTERIOR
PRECAUTIONS .......................................................... 2
Precautions for Supplemental Restraint System
(SRS) “AIR BAG” and “SEAT BELT PRE-TEN-
SIONER” .................................................................. 2
Precautions .............................................................. 2
CLIP AND FASTENER ............................................... 3
Clip and Fastener ..................................................... 3
FRONT BUMPER ....................................................... 6
Removal and Installation .......................................... 6
REMOVAL ............................................................. 8
INSTALLATION ..................................................... 8
REAR BUMPER .................................................... ..... 9
Removal and Installation .......................................... 9
REMOVAL ............................................................. 9
INSTALLATION ................................................... 10
FRONT GRILLE .........................................................11
Removal and Installation ......................................... 11
REMOVAL ............................................................ 11
INSTALLATION .................................................... 11
COWL TOP ............................................................... 12
Removal and Installation ........................................ 12
REMOVAL ........................................................... 12
INSTALLATION ................................................... 12
FENDER PROTECTOR ............................................ 13
Removal and Installation ........................................ 13
DOOR OUTSIDE MOLDING .................................... 14
Removal and Installation ........................................ 14
REMOVAL ........................................................... 14
INSTALLATION ................................................... 15
SIDE GUARD MOLDING .......................................... 16
Removal and Installation ........................................ 16
DOOR OUTSIDE LOWER MOLDING ...................... 17
Removal and Installation ........................................ 17
SIDE SILL PROTECTOR .......................................... 18
Removal and Installation ........................................ 18ROOF RAIL ............................................................... 19
Removal and Installation ........................................ 19
REMOVAL ........................................................... 19
INSTALLATION ................................................... 20
ROOF SPOILER ....................................................... 21
Removal and Installation ........................................ 21
REMOVAL ........................................................... 21
INSTALLATION ................................................... 21
LICENSE LAMP FINISHER ...................................... 22
Removal and Installation ........................................ 22
REMOVAL ........................................................... 22
INSTALLATION ................................................... 22
DOOR FINISHER ...................................................... 23
Removal and Installation ........................................ 23
FRONT AND REAR ............................................ 23
BACK DOOR TRIM ................................................... 25
Removal and Installation ........................................ 25
BODY SIDE TRIM ..................................................... 26
Removal and Installation ........................................ 26
CENTER PILLAR LOWER GARNISH ................. 26
CENTER PILLAR UPPER GARNISH .................. 27
LUGGAGE SIDE LOWER FINISHER ................. 27
REAR PILLAR FINISHER ................................... 27
DASHBOARD SIDE FINISHER .......................... 27
BODY SIDE WELT .............................................. 27
FLOOR TRIM ............................................................ 28
Removal and Installation ........................................ 28
REMOVAL ........................................................... 28
INSTALLATION ................................................... 28
HEADLINING ............................................................ 29
Removal and Installation ........................................ 29
REMOVAL ........................................................... 29
INSTALLATION ................................................... 30