2001 NISSAN X-TRAIL oil
[x] Cancel search: oilPage 2915 of 3833
POWER STEERING FLUID
PS-5
C
D
E
F
H
I
J
K
L
MA
B
PS
POWER STEERING FLUIDPFP:KLF20
Checking Fluid LevelEGS0004B
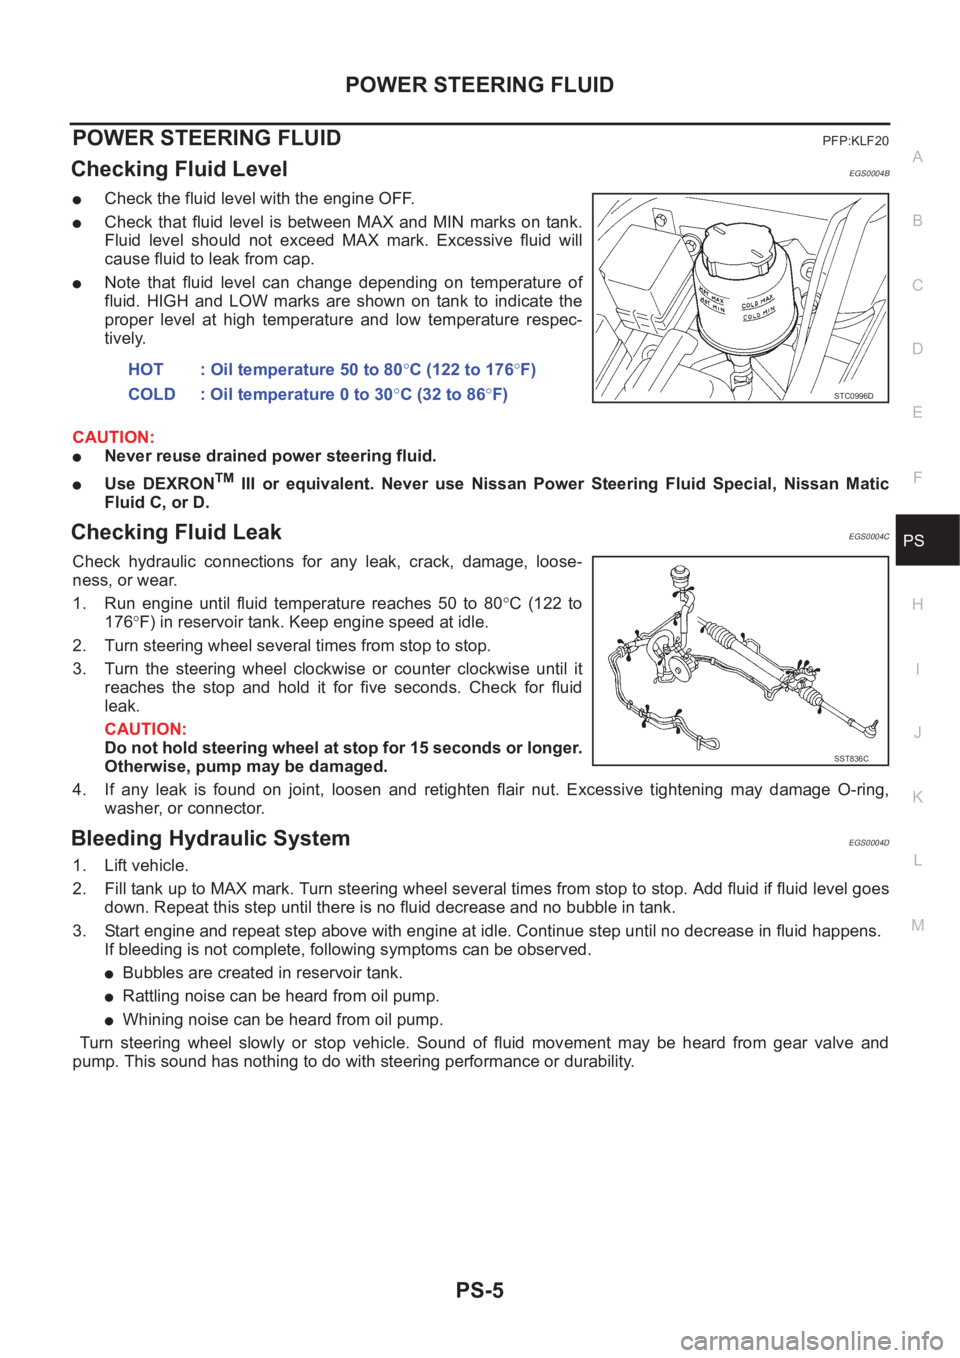
●Check the fluid level with the engine OFF.
●Check that fluid level is between MAX and MIN marks on tank.
Fluid level should not exceed MAX mark. Excessive fluid will
cause fluid to leak from cap.
●Note that fluid level can change depending on temperature of
fluid. HIGH and LOW marks are shown on tank to indicate the
proper level at high temperature and low temperature respec-
tively.
CAUTION:
●Never reuse drained power steering fluid.
●Use DEXRONTM III or equivalent. Never use Nissan Power Steering Fluid Special, Nissan Matic
Fluid C, or D.
Checking Fluid LeakEGS0004C
Check hydraulic connections for any leak, crack, damage, loose-
ness, or wear.
1. Run engine until fluid temperature reaches 50 to 80°C (122 to
176°F) in reservoir tank. Keep engine speed at idle.
2. Turn steering wheel several times from stop to stop.
3. Turn the steering wheel clockwise or counter clockwise until it
reaches the stop and hold it for five seconds. Check for fluid
leak.
CAUTION:
Do not hold steering wheel at stop for 15 seconds or longer.
Otherwise, pump may be damaged.
4. If any leak is found on joint, loosen and retighten flair nut. Excessive tightening may damage O-ring,
washer, or connector.
Bleeding Hydraulic SystemEGS0004D
1. Lift vehicle.
2. Fill tank up to MAX mark. Turn steering wheel several times from stop to stop. Add fluid if fluid level goes
down. Repeat this step until there is no fluid decrease and no bubble in tank.
3. Start engine and repeat step above with engine at idle. Continue step until no decrease in fluid happens.
If bleeding is not complete, following symptoms can be observed.
●Bubbles are created in reservoir tank.
●Rattling noise can be heard from oil pump.
●Whining noise can be heard from oil pump.
Turn steering wheel slowly or stop vehicle. Sound of fluid movement may be heard from gear valve and
pump. This sound has nothing to do with steering performance or durability. HOT : Oil temperature 50 to 80°C (122 to 176°F)
COLD : Oil temperature 0 to 30°C (32 to 86°F)
STC0996D
SST836C
Page 2916 of 3833
PS-6
STEERING WHEEL
STEERING WHEEL
PFP:48430
On-Vehicle Inspection and ServiceEGS0004E
PLAY INSPECTION
1. Turn steering wheel to straight-ahead position. Start engine and lightly turn steering wheel clockwise and
counter clockwise until front wheels start moving. Measure travel to starting point on circumference of
steering wheel.
2. If play is outside specifications, check following parts for proper installation: steering gear assembly, front
suspension, axles, and steering column
●Check steering wheel for vertical, horizontal, or axial play.
●Lift vehicle and check steering gear mounting bolts and nuts for looseness.
NEUTRAL POSITION INSPECTION
●After the wheel alignment inspection, carry out the neutral position inspection. Refer to FSU-6, "Wheel
Alignment" .
●Before removing steering wheel, check steering gear neutral position.
1. Set vehicle to straight-ahead position, and check that steering wheel is in neutral position.
2. If it is not in neutral position, remove steering wheel, and install again in properly.
3. If it is not adjusted within two teeth from center of gear, loosen tie rod lock nut. Then turn it to opposite
direction to adjust until amount of left and right becomes equal.
STEERING TORQUE CHECK
1. Stop vehicle on a dry flat paved road and apply parking brake.
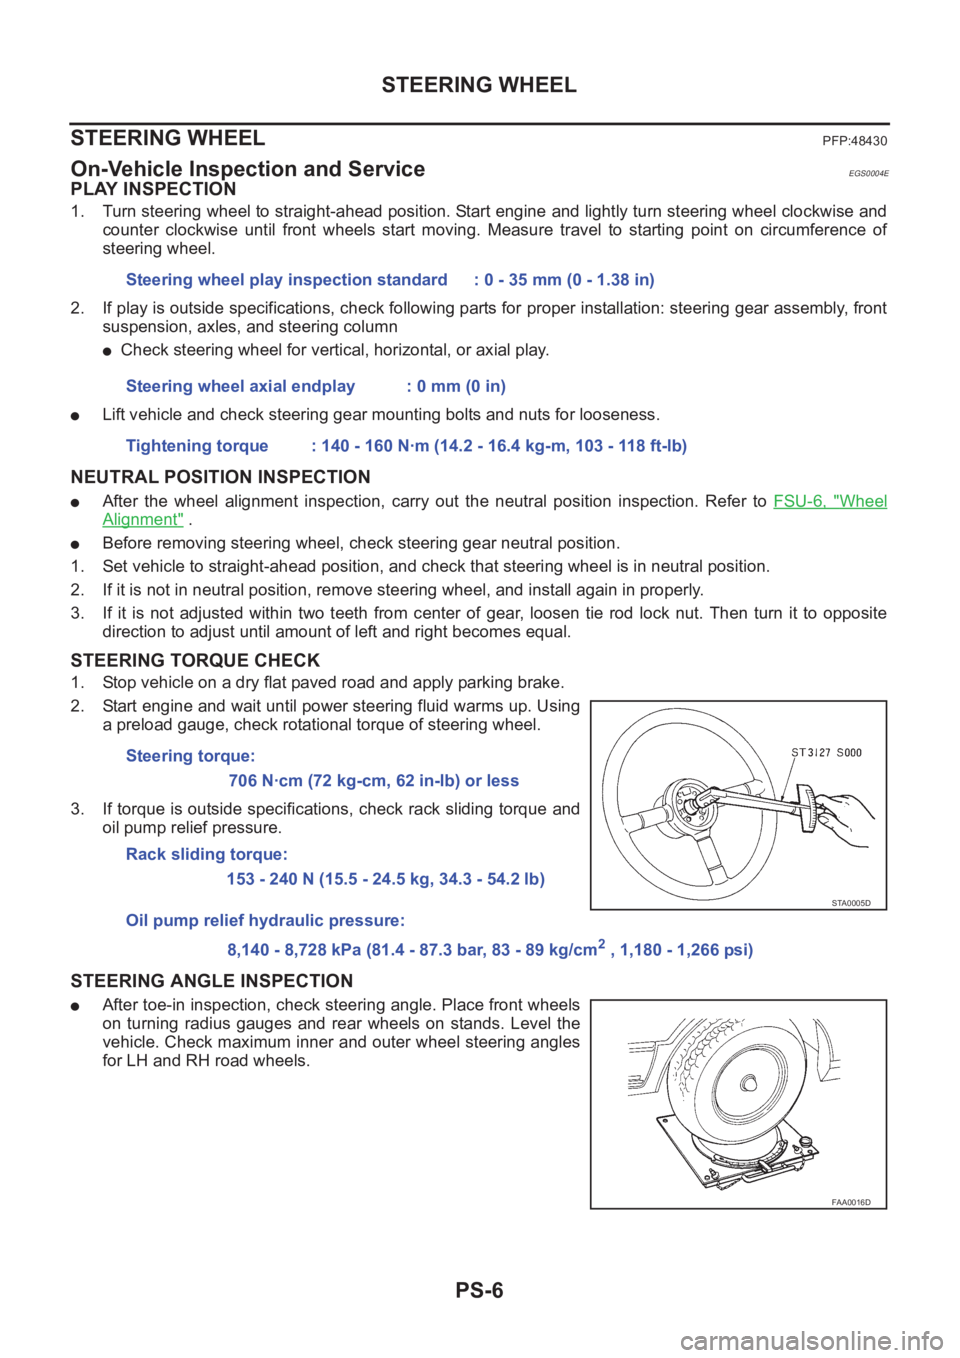
2. Start engine and wait until power steering fluid warms up. Using
a preload gauge, check rotational torque of steering wheel.
3. If torque is outside specifications, check rack sliding torque and
oil pump relief pressure.
STEERING ANGLE INSPECTION
●After toe-in inspection, check steering angle. Place front wheels
on turning radius gauges and rear wheels on stands. Level the
vehicle. Check maximum inner and outer wheel steering angles
for LH and RH road wheels.Steering wheel play inspection standard : 0 - 35 mm (0 - 1.38 in)
Steering wheel axial endplay : 0 mm (0 in)
Tightening torque : 140 - 160 N·m (14.2 - 16.4 kg-m, 103 - 118 ft-lb)
Steering torque:
706 N·cm (72 kg-cm, 62 in-lb) or less
Rack sliding torque:
153 - 240 N (15.5 - 24.5 kg, 34.3 - 54.2 lb)
Oil pump relief hydraulic pressure:
8,140 - 8,728 kPa (81.4 - 87.3 bar, 83 - 89 kg/cm
2 , 1,180 - 1,266 psi)
STA0005D
FAA0016D
Page 2925 of 3833
POWER STEERING GEAR AND LINKAGE
PS-15
C
D
E
F
H
I
J
K
L
MA
B
PS
Disassembly and AssemblyEGS0004K
DISASSEMBLY
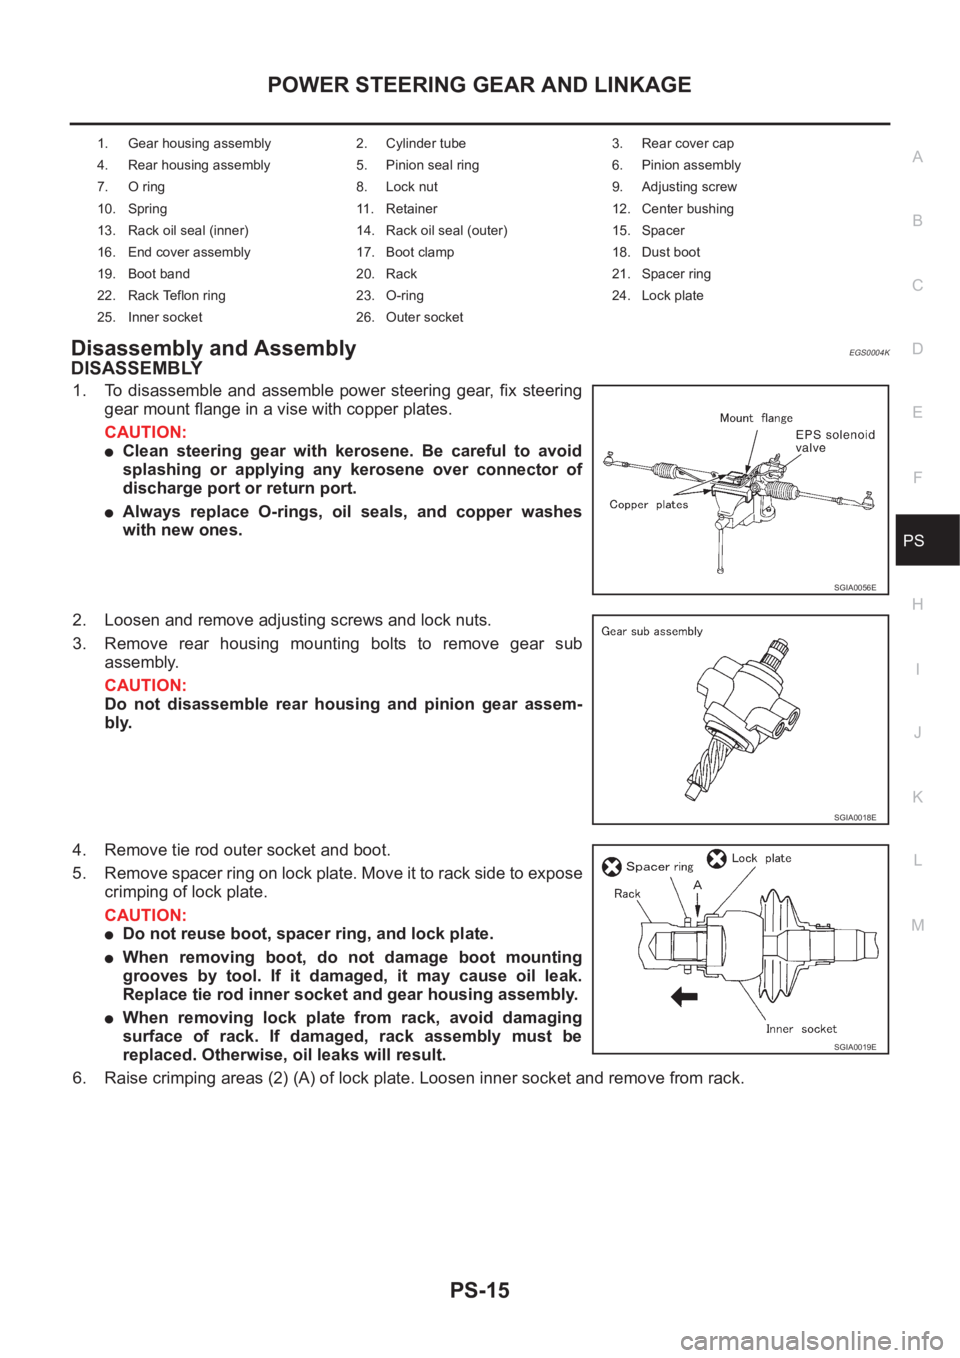
1. To disassemble and assemble power steering gear, fix steering
gear mount flange in a vise with copper plates.
CAUTION:
●Clean steering gear with kerosene. Be careful to avoid
splashing or applying any kerosene over connector of
discharge port or return port.
●Always replace O-rings, oil seals, and copper washes
with new ones.
2. Loosen and remove adjusting screws and lock nuts.
3. Remove rear housing mounting bolts to remove gear sub
assembly.
CAUTION:
Do not disassemble rear housing and pinion gear assem-
bly.
4. Remove tie rod outer socket and boot.
5. Remove spacer ring on lock plate. Move it to rack side to expose
crimping of lock plate.
CAUTION:
●Do not reuse boot, spacer ring, and lock plate.
●When removing boot, do not damage boot mounting
grooves by tool. If it damaged, it may cause oil leak.
Replace tie rod inner socket and gear housing assembly.
●When removing lock plate from rack, avoid damaging
surface of rack. If damaged, rack assembly must be
replaced. Otherwise, oil leaks will result.
6. Raise crimping areas (2) (A) of lock plate. Loosen inner socket and remove from rack.
1. Gear housing assembly 2. Cylinder tube 3. Rear cover cap
4. Rear housing assembly 5. Pinion seal ring 6. Pinion assembly
7. O ring 8. Lock nut 9. Adjusting screw
10. Spring 11. Retainer 12. Center bushing
13. Rack oil seal (inner) 14. Rack oil seal (outer) 15. Spacer
16. End cover assembly 17. Boot clamp 18. Dust boot
19. Boot band 20. Rack 21. Spacer ring
22. Rack Teflon ring 23. O-ring 24. Lock plate
25. Inner socket 26. Outer socket
SGIA0056E
SGIA0018E
SGIA0019E
Page 2926 of 3833
![NISSAN X-TRAIL 2001 Service Repair Manual PS-16
POWER STEERING GEAR AND LINKAGE
7. Drill out punch crimping area on cylinder outer rim with a 3 mm
(0.12 in) drill bit [Drill for approx. 1.5 mm (0.059 in) in depth.]
8. Remove end cover with a NISSAN X-TRAIL 2001 Service Repair Manual PS-16
POWER STEERING GEAR AND LINKAGE
7. Drill out punch crimping area on cylinder outer rim with a 3 mm
(0.12 in) drill bit [Drill for approx. 1.5 mm (0.059 in) in depth.]
8. Remove end cover with a](/manual-img/5/57405/w960_57405-2925.png)
PS-16
POWER STEERING GEAR AND LINKAGE
7. Drill out punch crimping area on cylinder outer rim with a 3 mm
(0.12 in) drill bit [Drill for approx. 1.5 mm (0.059 in) in depth.]
8. Remove end cover with a 36 mm (1.42 in) open head.
CAUTION:
When removing, avoid damaging surface of rack. If dam-
aged, rack assembly must be replaced. Otherwise, oil leaks
will result.
9. Pull rack assembly with rack Teflon ring out of gear housing
assembly.
CAUTION:
When pulling out rack assembly, do not damage cylinder
inner wall. If it damaged, it may cause oil leak. Replace gear
housing assembly.
10. Heat Teflon ring to approx. 40°C (104°F) with a hot air blower Remove it and O-ring from rack. Be careful
not to damage rack.
11. Use a taped 29 mm (1.14 in) socket and an extension bar. Push
out and remove center bushing and rack oil seal together from
gear housing assembly.
CAUTION:
●Be careful not to damage gear housing assembly and cyl-
inder inner wall.
●If damaged, gear housing assembly must be replaced.
Otherwise, oil leaks will result.
INSPECTION AFTER DISASSEMBLY
Boot
Check boot for tear, wrinkle, and deformation. Replace it, if necessary.
Rack
Check rack gear for damage and wear. Replace it, if necessary.
Gear subassembly
●Check pinion gear for damage and wear, and replace if necessary.
●Check bearing while rotating it. Replace bearing if bearing ball race was dent, worn, or damaged.
Gear housing cylinder
Check gear housing cylinder for damage and scratch (inner wall). Replace it, if necessary.
Tie rod ball joint
1. Swing torque.
STC0013D
SGIA0461E
SGIA0467E
Page 2927 of 3833
POWER STEERING GEAR AND LINKAGE
PS-17
C
D
E
F
H
I
J
K
L
MA
B
PS
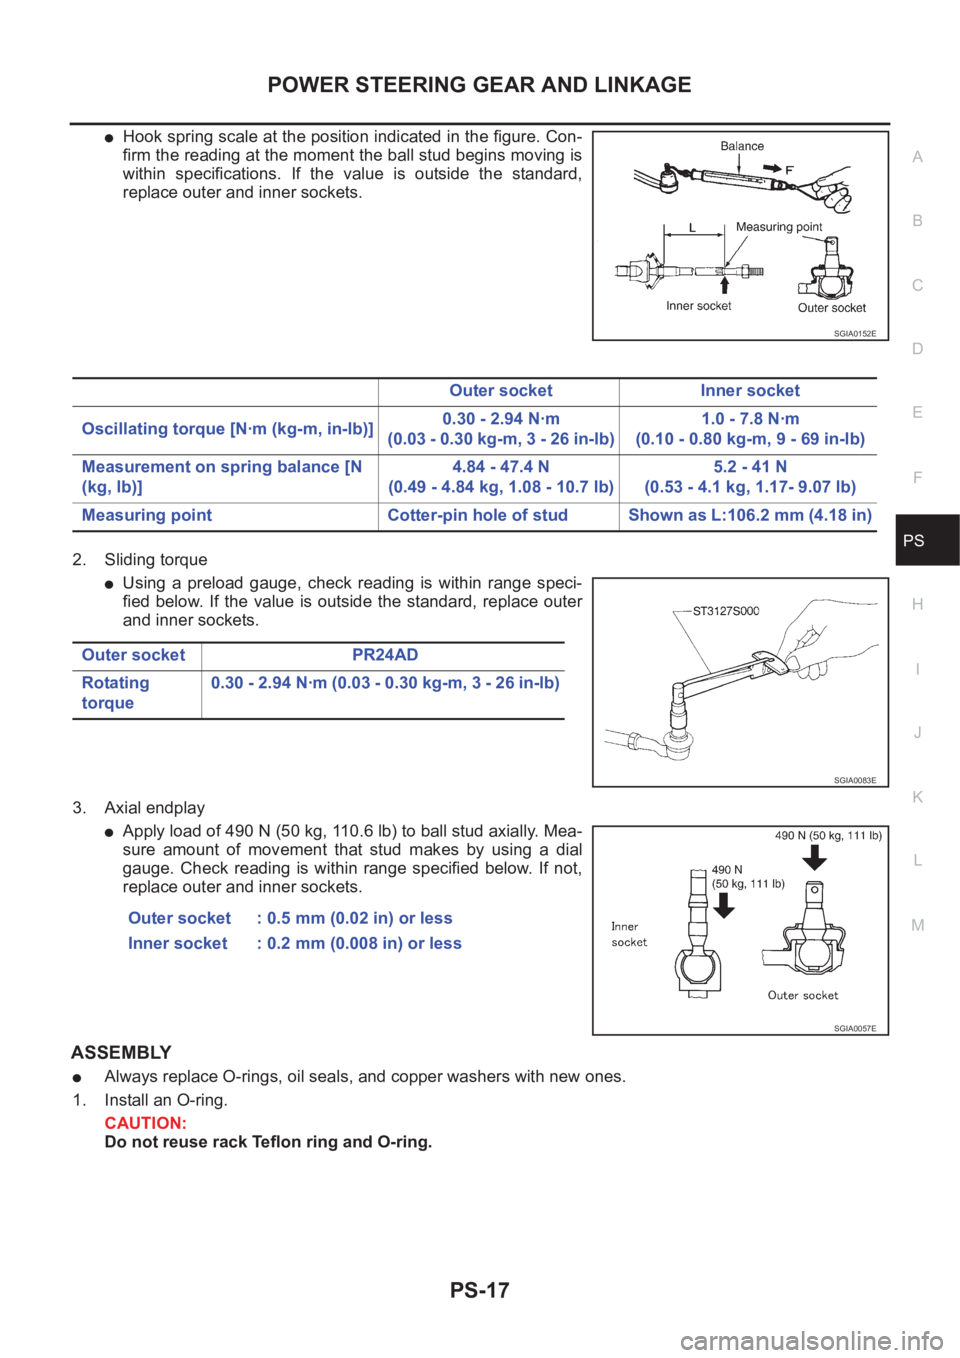
●Hook spring scale at the position indicated in the figure. Con-
firm the reading at the moment the ball stud begins moving is
within specifications. If the value is outside the standard,
replace outer and inner sockets.
2. Sliding torque
●Using a preload gauge, check reading is within range speci-
fied below. If the value is outside the standard, replace outer
and inner sockets.
3. Axial endplay
●Apply load of 490 N (50 kg, 110.6 lb) to ball stud axially. Mea-
sure amount of movement that stud makes by using a dial
gauge. Check reading is within range specified below. If not,
replace outer and inner sockets.
ASSEMBLY
●Always replace O-rings, oil seals, and copper washers with new ones.
1. Install an O-ring.
CAUTION:
Do not reuse rack Teflon ring and O-ring.
SGIA0152E
Outer socket Inner socket
Oscillating torque [N·m (kg-m, in-lb)]0.30 - 2.94 N·m
(0.03 - 0.30 kg-m, 3 - 26 in-lb)1.0 - 7.8 N·m
(0.10 - 0.80 kg-m, 9 - 69 in-lb)
Measurement on spring balance [N
(kg, lb)]4.84 - 47.4 N
(0.49 - 4.84 kg, 1.08 - 10.7 lb)5.2 - 41 N
(0.53 - 4.1 kg, 1.17- 9.07 lb)
Measuring point Cotter-pin hole of stud Shown as L:106.2 mm (4.18 in)
Outer socket PR24AD
Rotating
torque0.30 - 2.94 N·m (0.03 - 0.30 kg-m, 3 - 26 in-lb)
SGIA0083E
Outer socket : 0.5 mm (0.02 in) or less
Inner socket : 0.2 mm (0.008 in) or less
SGIA0057E
Page 2928 of 3833
PS-18
POWER STEERING GEAR AND LINKAGE
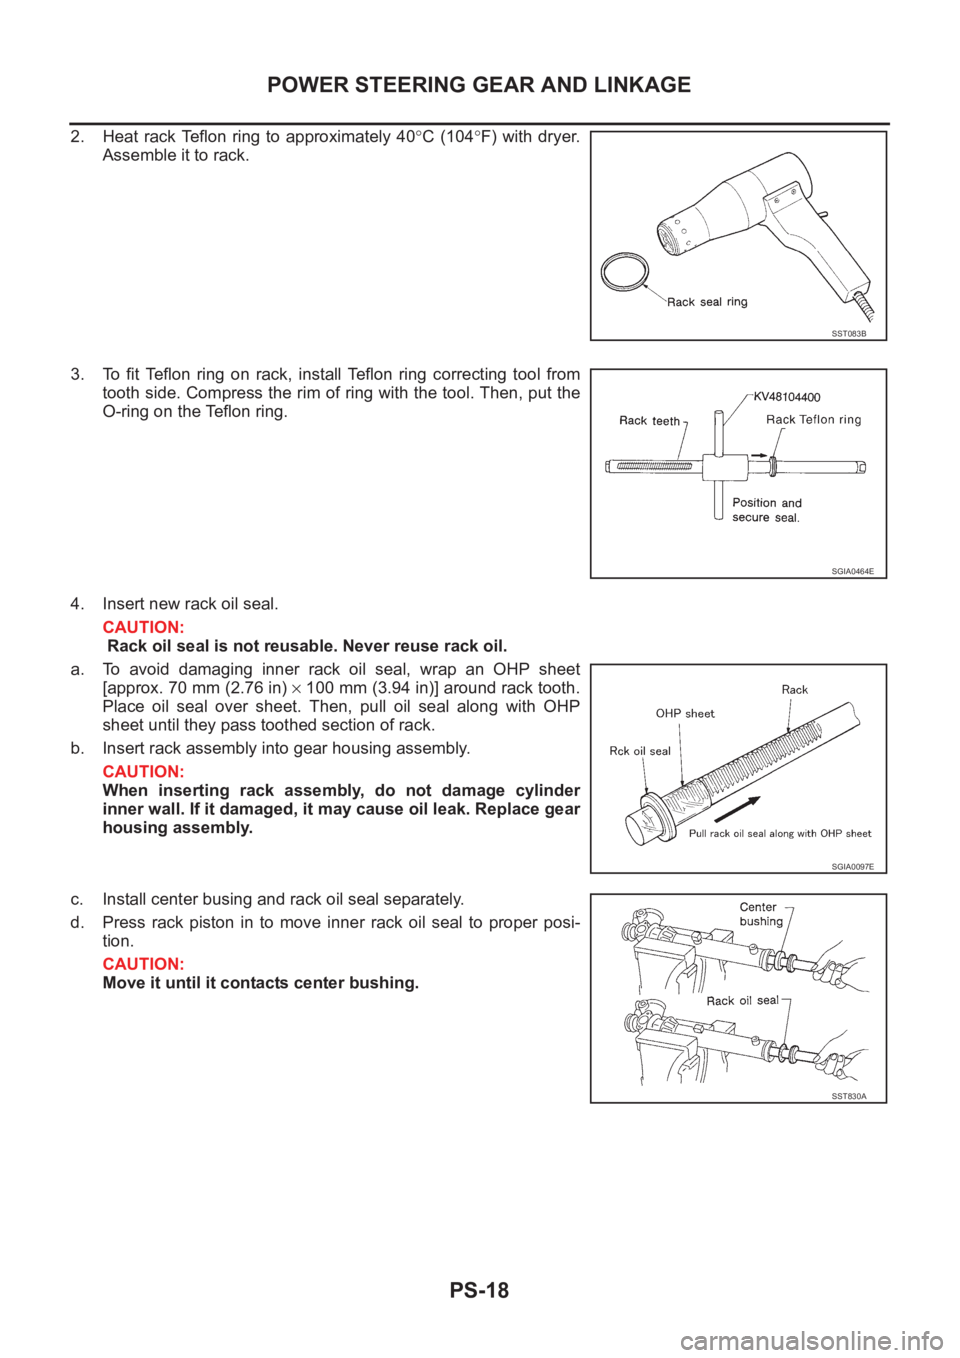
2. Heat rack Teflon ring to approximately 40°C (104°F) with dryer.
Assemble it to rack.
3. To fit Teflon ring on rack, install Teflon ring correcting tool from
tooth side. Compress the rim of ring with the tool. Then, put the
O-ring on the Teflon ring.
4. Insert new rack oil seal.
CAUTION:
Rack oil seal is not reusable. Never reuse rack oil.
a. To avoid damaging inner rack oil seal, wrap an OHP sheet
[approx. 70 mm (2.76 in) × 100 mm (3.94 in)] around rack tooth.
Place oil seal over sheet. Then, pull oil seal along with OHP
sheet until they pass toothed section of rack.
b. Insert rack assembly into gear housing assembly.
CAUTION:
When inserting rack assembly, do not damage cylinder
inner wall. If it damaged, it may cause oil leak. Replace gear
housing assembly.
c. Install center busing and rack oil seal separately.
d. Press rack piston in to move inner rack oil seal to proper posi-
tion.
CAUTION:
Move it until it contacts center bushing.
SST083B
SGIA0464E
SGIA0097E
SST830A
Page 2929 of 3833
![NISSAN X-TRAIL 2001 Service Repair Manual POWER STEERING GEAR AND LINKAGE
PS-19
C
D
E
F
H
I
J
K
L
MA
B
PS
e. When installing outer rack oil seal, cover end of rack with an
OHP sheet [70 mm (2.76 in) × 100 mm (3.94 in)]. NISSAN X-TRAIL 2001 Service Repair Manual POWER STEERING GEAR AND LINKAGE
PS-19
C
D
E
F
H
I
J
K
L
MA
B
PS
e. When installing outer rack oil seal, cover end of rack with an
OHP sheet [70 mm (2.76 in) × 100 mm (3.94 in)].](/manual-img/5/57405/w960_57405-2928.png)
POWER STEERING GEAR AND LINKAGE
PS-19
C
D
E
F
H
I
J
K
L
MA
B
PS
e. When installing outer rack oil seal, cover end of rack with an
OHP sheet [70 mm (2.76 in) × 100 mm (3.94 in)]. It will avoid
damaging rack oil seal. Then place oil seal over sheet. Pull rack
oil seal along with OHP sheet until they pass rack end. Install
rack oil seal in place using end cover assembly.
f. Attach rack oil seal. Both inner lip and outer lip should face each
other.
5. Using a 36-mm open head, tighten end cover assembly to spec-
ified torque.
CAUTION:
Do not damage rack surface. If it damaged, it may cause oil
leak. Replace rack assembly.
6. After tightening end cover, crimp cylinder at one point as shown
in figure using a punch. This will prevent end cover from getting
loose.
7. Assemble an O-ring to the gear housing.
8. Install gear sub assembly to gear housing.
SGIA0097E
SGIA0058E
: 59 - 74 N·m (6.0 - 7.5 kg-m, 43 - 54 ft-lb)
SST081B
SST073B
SGIA0203E
Page 2934 of 3833
PS-24
POWER STEERING OIL PUMP
POWER STEERING OIL PUMP
PFP:49110
On-Vehicle Inspection and ServiceEGS000AF
OIL PUMP PULLEY HYDRAULIC PRESSURE INSPECTION
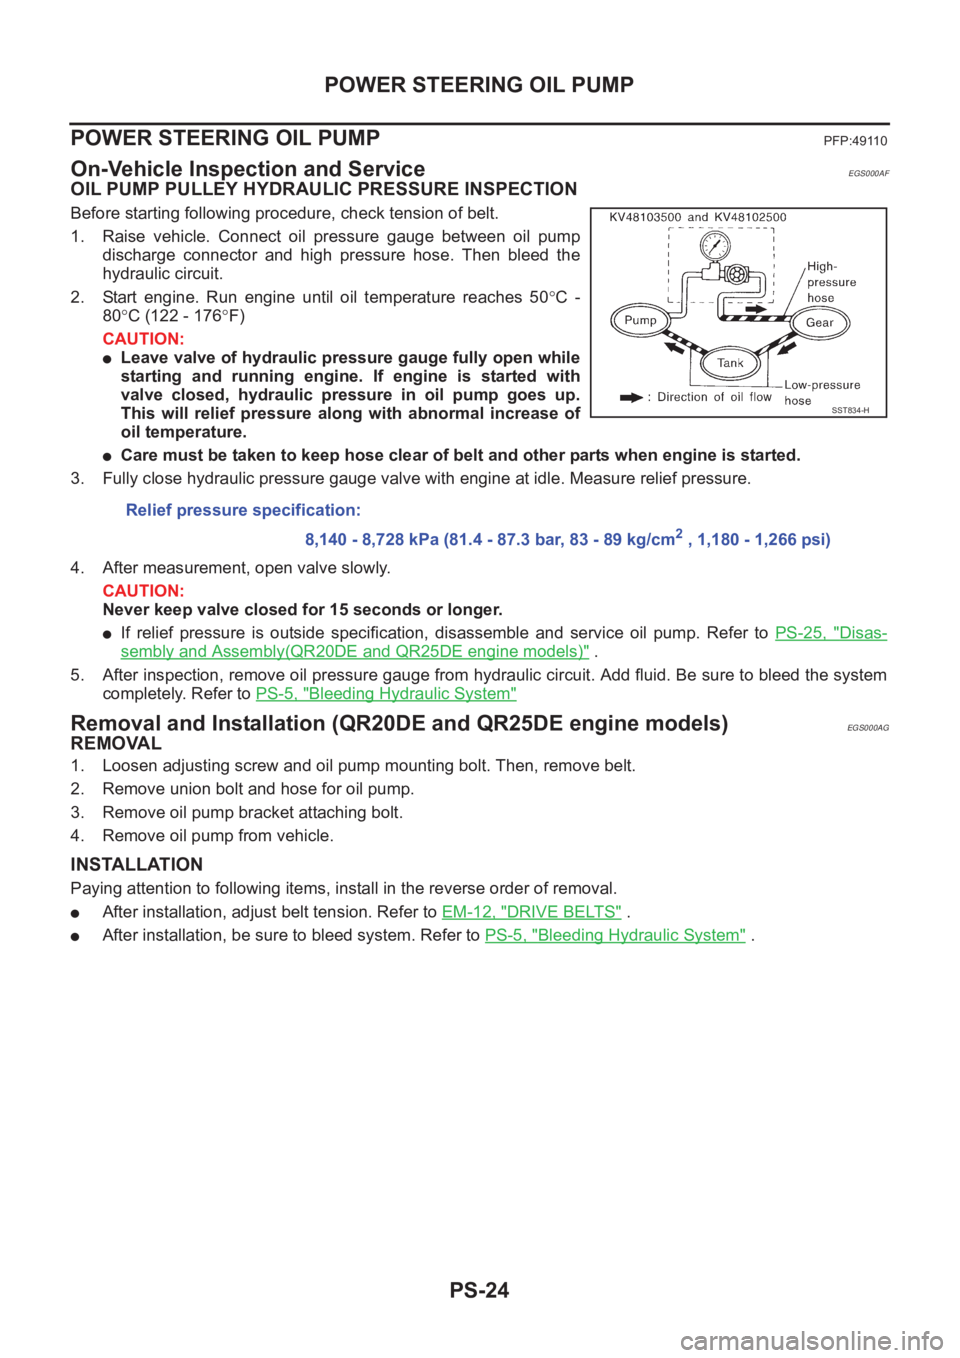
Before starting following procedure, check tension of belt.
1. Raise vehicle. Connect oil pressure gauge between oil pump
discharge connector and high pressure hose. Then bleed the
hydraulic circuit.
2. Start engine. Run engine until oil temperature reaches 50°C -
80°C (122 - 176°F)
CAUTION:
●Leave valve of hydraulic pressure gauge fully open while
starting and running engine. If engine is started with
valve closed, hydraulic pressure in oil pump goes up.
This will relief pressure along with abnormal increase of
oil temperature.
●Care must be taken to keep hose clear of belt and other parts when engine is started.
3. Fully close hydraulic pressure gauge valve with engine at idle. Measure relief pressure.
4. After measurement, open valve slowly.
CAUTION:
Never keep valve closed for 15 seconds or longer.
●If relief pressure is outside specification, disassemble and service oil pump. Refer to PS-25, "Disas-
sembly and Assembly(QR20DE and QR25DE engine models)" .
5. After inspection, remove oil pressure gauge from hydraulic circuit. Add fluid. Be sure to bleed the system
completely. Refer to PS-5, "
Bleeding Hydraulic System"
Removal and Installation (QR20DE and QR25DE engine models)EGS000AG
REMOVAL
1. Loosen adjusting screw and oil pump mounting bolt. Then, remove belt.
2. Remove union bolt and hose for oil pump.
3. Remove oil pump bracket attaching bolt.
4. Remove oil pump from vehicle.
INSTALLATION
Paying attention to following items, install in the reverse order of removal.
●After installation, adjust belt tension. Refer to EM-12, "DRIVE BELTS" .
●After installation, be sure to bleed system. Refer to PS-5, "Bleeding Hydraulic System" . Relief pressure specification:
8,140 - 8,728 kPa (81.4 - 87.3 bar, 83 - 89 kg/cm
2 , 1,180 - 1,266 psi)
SST834-H