2001 NISSAN X-TRAIL fuse box
[x] Cancel search: fuse boxPage 3494 of 3833
LT-4
HEADLAMP
HEADLAMP
PFP:26010
System Description EKS003CD
DESCRIPTION
The headlamps are controlled by the lighting switch which is built into the combination switch.
Power is supplied at all times
●to lighting switch terminal 8
●through 15A fuse (No. 40, located in the fuse and fusible link box), and
●to lighting switch terminal 5
●through 15A fuse (No. 41, located in the fuse and fusible link box).
LOW BEAM OPERATION
When the lighting switch is turned to the 2ND position and placed in LOW (“B”) position, power is supplied
●from lighting switch terminal 10
●to terminal 3 of the headlamp LH, and
●from lighting switch terminal 7
●to terminal 3 of the headlamp RH.
Terminal 2 of each headlamp supplies ground through body grounds E24 and E50.
With power and ground supplied, the low beams will illuminate.
HIGH BEAM OPERATION/FLASH-TO-PASS OPERATION
When the lighting switch is turned to the 2ND position and placed in HIGH (“A”) position or PASS (“C”) posi-
tion, power is supplied
●from lighting switch terminal 6
●to terminal 1 of headlamp RH, and
●from lighting switch terminal 9
●to terminal 1 of headlamp LH, and
●to combination meter terminal 61 (LHD models) or 50 (RHD models) for the HIGH BEAM indicator.
Ground is supplied to terminal 60 (LHD models) or 49 (RHD models) of the combination meter through body
grounds M27 and M70.
Ground is supplied to terminal 2 of each headlamp through body grounds E24 and E50.
With power and ground supplied, the high beams and the HIGH BEAM indicator illuminate.
SMA for models with roof mounted driving lamp
Page 3496 of 3833
LT-6
HEADLAMP
Trouble Diagnoses
EKS003CF
Aiming Adjustment EKS003CG
When performing headlamp aiming adjustment, use an aiming machine, aiming wall screen or headlamp
tester. Aimers should be in good repair, calibrated and operated in accordance with respective operation man-
uals.
If any aimer is not available, aiming adjustment can be done as follows:
For details, refer to the regulations in your own country.
●Keep all tires inflated to correct pressures.
●Place vehicle and tester on one and same flat surface.
●See that there is no-load in vehicle (coolant, engine oil filled up to correct level and full fuel tank) other
than the driver (or equivalent weight placed in driver's position).
Symptom Possible cause Repair order
Headlamp LH do not operate.1. Bulb
2. Grounds E24 and E50
3. 15A fuse
4. Lighting switch1. Check bulb.
2. Check grounds E24 and E50.
3. Check 15A fuse (No. 40, located in fuse
and fusible link box). Verify battery posi-
tive voltage is present at terminal 8 of
lighting switch.
4. Check lighting switch.
Headlamp RH do not operate.1. Bulb
2. Grounds E24 and E50
3. 15A fuse
4. Lighting switch1. Check bulb.
2. Check grounds E24 and E50.
3. Check 15A fuse (No. 41, located in fuse
and fusible link box). Verify battery posi-
tive voltage is present at terminal 5 of
lighting switch.
4. Check lighting switch.
High beam LH do not operate, but low
beam LH operates.1. Bulb
2. Open in high beam LH circuit
3. Lighting switch1. Check bulbs.
2. Check the wire between lighting switch
terminal 9 and headlamp LH terminal 1
for an open circuit.
3. Check lighting switch.
Low beam LH does not operate, but high
beam LH operates.1. Bulb
2. Open in low beam LH circuit
3. Lighting switch1. Check bulb.
2. Check the wire between lighting switch
terminal 10 and headlamp LH terminal 3
for an open circuit.
3. Check lighting switch.
High beam RH do not operate, but low
beam RH operates.1. Bulb
2. Open in high beam RH circuit
3. Lighting switch1. Check bulbs.
2. Check the wire between lighting switch
terminal 6 and headlamp RH terminal 1
for an open circuit.
3. Check lighting switch.
Low beam RH does not operate, but high
beam RH operates.1. Bulb
2. Open in low beam RH circuit
3. Lighting switch1. Check bulb.
2. Check the wire between lighting switch
terminal 7 and headlamp RH terminal 3
for an open circuit.
3. Check lighting switch.
High beam indicator does not work.1. Bulb
2. Grounds M27 and M70
3. Open in high beam circuit1. Check bulb in combination meter.
2. Check grounds M27 and M70.
3. Check the wire between lighting switch
terminal 9 and combination meter termi-
nal 61(LHD models) or 50(RHD models)
for an open circuit.
Page 3499 of 3833
HEADLAMP - DAYTIME LIGHT SYSTEM -
LT-9
C
D
E
F
G
H
I
J
L
MA
B
LT
HEADLAMP - DAYTIME LIGHT SYSTEM -PFP:26010
System DescriptionEKS003BB
DESCRIPTION
The headlamp system on vehicles for North Europe contains a daytime light control unit. The unit activates the
following whenever the engine is running with the lighting switch in the OFF position:
●Low beam headlamps
●Parking, license, tail and illumination lamps
Power is supplied at all times
●through 10A fuse (No. 31, located in the fuse and fusible link box)
●to daytime light control unit terminal 1 and
●to lighting switch terminal 11.
Power is also supplied at all times
●through 15A fuse (No. 41, located in the fuse and fusible link box)
●to daytime light control unit terminal 3 and
●to lighting switch terminal 5.
Power is also supplied at all times
●through 15A fuse (No. 40, located in the fuse and fusible link box)
●to daytime light control unit terminal 2 and
●to lighting switch terminal 8.
With the ignition switch in the ON or START position, power is supplied
●through 10A fuse [No. 13, located in the fuse block (J/B)]
●to daytime light control unit terminal 7.
With the ignition switch in the START position, power is supplied
●through 10A fuse [No. 7, located in the fuse block (J/B)]
●to daytime light control unit terminal 6.
HEADLAMP OPERATION (DAYTIME LIGHT CANCEL OPERATION)
When the lighting switch is turned to the 1st or 2nd position, power is supplied
●through lighting switch terminal 12,
●to daytime light control unit terminal 11.
Then daytime light will be canceled. And the lighting system operation will be the same as no daytime light
system.
DAYTIME LIGHT OPERATION
With the engine running and the lighting switch in the OFF position, power is supplied
●from alternator terminal 3
●to daytime light control unit terminal 8,
●through daytime light control unit terminal 5
●to terminal 3 of headlamp LH,
●through daytime light control unit terminal 4
●to terminal 3 of headlamp RH and
●through daytime light control unit terminal 10
●to tail lamp and illumination.
Ground is supplied to terminal 2 of each headlamp through body grounds E24 and E50.
SMA for models with roof mounted driving lamp
Page 3507 of 3833
TURN SIGNAL AND HAZARD WARNING LAMPS
LT-17
C
D
E
F
G
H
I
J
L
MA
B
LT
TURN SIGNAL AND HAZARD WARNING LAMPSPFP:26120
System Description EKS003BX
TURN SIGNAL OPERATION
With the hazard switch in the OFF position and the ignition switch in the ON or START position, power is sup-
plied
●through 10A fuse [No. 2, located in the fuse block (J/B)]
●to hazard switch terminal 2
●through terminal 1 of the hazard switch
●to combination flasher unit terminal 1
●through terminal 3 of the combination flasher unit
●to turn signal switch terminal 1.
Ground is supplied to combination flasher unit terminal 2 through body grounds M27 and M70.
LH Turn
When the turn signal switch is moved to the LH position, power is supplied from turn signal switch terminal 3 to
●front turn signal lamp LH terminal 1
●side turn signal lamp LH terminal 1
●combination meter terminal 57 (LHD models) or 12 (RHD models)
●rear combination lamp LH terminal 2.
Ground is supplied to the front turn signal lamp LH terminal 2 through body grounds E24 and E50.
Ground is supplied to the side turn signal lamp LH terminal 2 through body grounds E24 and E50.
Ground is supplied to the rear combination lamp LH terminal 4 through body grounds B8 and B18.
Ground is supplied to combination meter terminal 48 (LHD models) or 61 (RHD models) through body
grounds M27 and M70.
With power and ground supplied, the combination flasher unit controls the flashing of the LH turn signal lamps.
RH Turn
When the turn signal switch is moved to the RH position, power is supplied from turn signal switch terminal 2
to
●front turn signal lamp RH terminal 1
●side turn signal lamp RH terminal 1
●combination meter terminal 12 (LHD models) or 46 (RHD models)
●rear combination lamp RH terminal 2.
Ground is supplied to the front turn signal lamp RH terminal 2 through body grounds E24 and E50.
Ground is supplied to the side turn signal lamp RH terminal 2 through body grounds E24 and E50.
Ground is supplied to the rear combination lamp RH terminal 4 through body grounds B8 and B18.
Ground is supplied to combination meter terminal 48 (LHD models) or 61 (RHD models) through body grounds
M27 and M70.
With power and ground supplied, the combination flasher unit controls the flashing of the RH turn signal
lamps.
HAZARD LAMP OPERATION
Power is supplied at all times to hazard switch terminal 3 through:
●through 10A fuse (No. 35, located in the fuse and fusible link box).
With the hazard switch in the ON position, power is supplied
●through terminal 1 of the hazard switch
●to combination flasher unit terminal 1
●through terminal 3 of the combination flasher unit
●to hazard switch terminal 4.
Ground is supplied to combination flasher unit terminal 2 through body grounds M27 and M70.
Power is supplied through terminal 5 of the hazard switch to
●front turn signal lamp LH terminal 1
●combination meter terminal 57 (LHD models) or 12 (RHD models)
●rear combination lamp LH terminal 2.
Page 3511 of 3833
TURN SIGNAL AND HAZARD WARNING LAMPS
LT-21
C
D
E
F
G
H
I
J
L
MA
B
LT
Trouble Diagnoses EKS003BG
Electrical Components InspectionEKS0034C
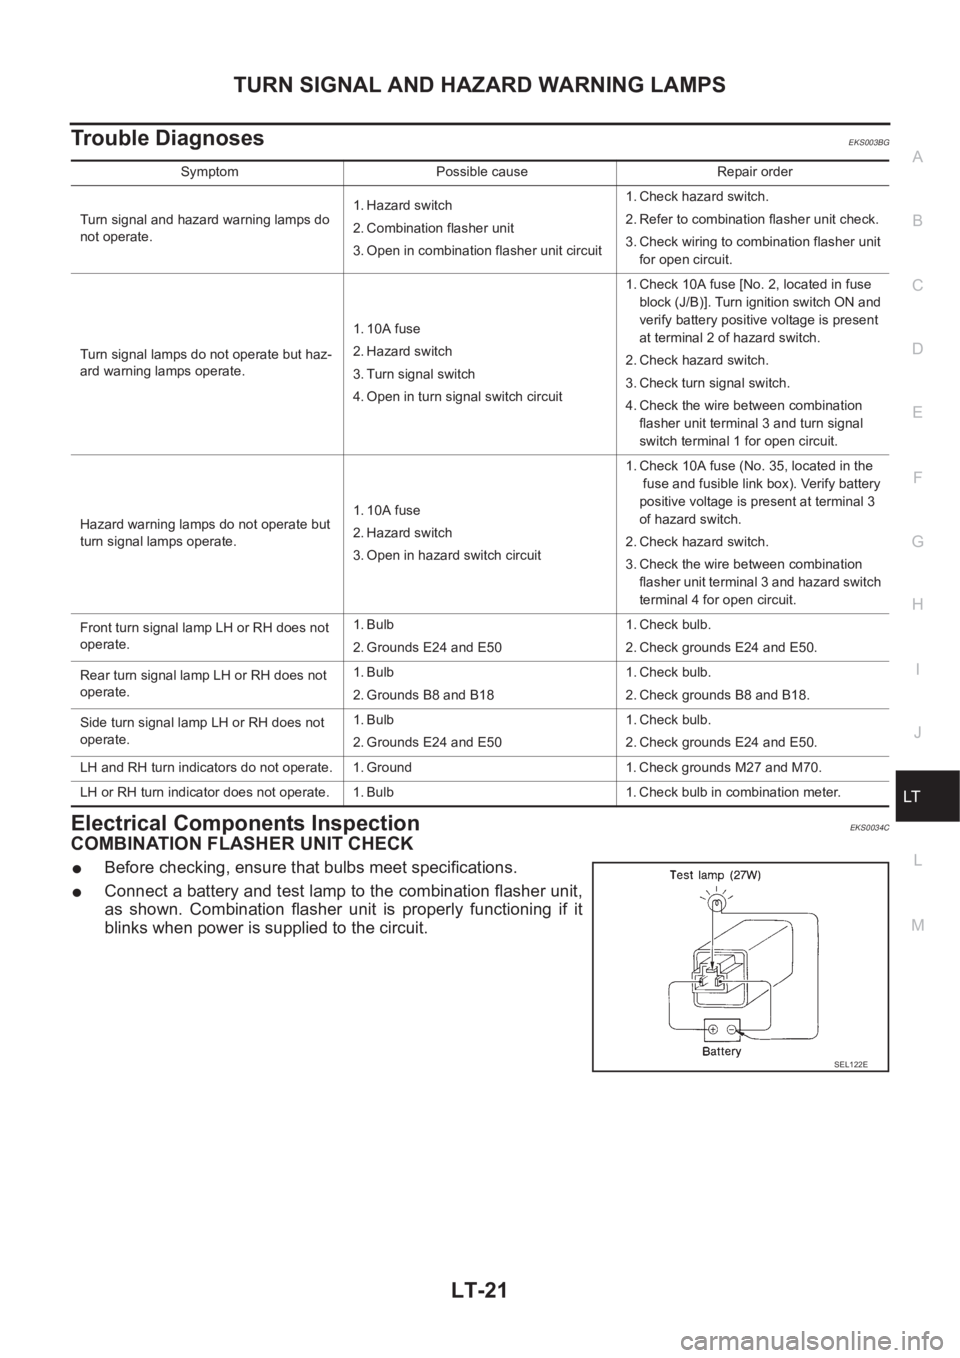
COMBINATION FLASHER UNIT CHECK
●Before checking, ensure that bulbs meet specifications.
●Connect a battery and test lamp to the combination flasher unit,
as shown. Combination flasher unit is properly functioning if it
blinks when power is supplied to the circuit.
Symptom Possible cause Repair order
Turn signal and hazard warning lamps do
not operate.1. Hazard switch
2. Combination flasher unit
3. Open in combination flasher unit circuit1. Check hazard switch.
2. Refer to combination flasher unit check.
3. Check wiring to combination flasher unit
for open circuit.
Turn signal lamps do not operate but haz-
ard warning lamps operate.1. 10A fuse
2. Hazard switch
3. Turn signal switch
4. Open in turn signal switch circuit1. Check 10A fuse [No. 2, located in fuse
block (J/B)]. Turn ignition switch ON and
verify battery positive voltage is present
at terminal 2 of hazard switch.
2. Check hazard switch.
3. Check turn signal switch.
4. Check the wire between combination
flasher unit terminal 3 and turn signal
switch terminal 1 for open circuit.
Hazard warning lamps do not operate but
turn signal lamps operate.1. 10A fuse
2. Hazard switch
3. Open in hazard switch circuit1. Check 10A fuse (No. 35, located in the
fuse and fusible link box). Verify battery
positive voltage is present at terminal 3
of hazard switch.
2. Check hazard switch.
3. Check the wire between combination
flasher unit terminal 3 and hazard switch
terminal 4 for open circuit.
Front turn signal lamp LH or RH does not
operate.1. Bulb
2. Grounds E24 and E501. Check bulb.
2. Check grounds E24 and E50.
Rear turn signal lamp LH or RH does not
operate.1. Bulb
2. Grounds B8 and B181. Check bulb.
2. Check grounds B8 and B18.
Side turn signal lamp LH or RH does not
operate.1. Bulb
2. Grounds E24 and E501. Check bulb.
2. Check grounds E24 and E50.
LH and RH turn indicators do not operate. 1. Ground 1. Check grounds M27 and M70.
LH or RH turn indicator does not operate. 1. Bulb 1. Check bulb in combination meter.
SEL122E
Page 3523 of 3833
FRONT FOG LAMP
LT-33
C
D
E
F
G
H
I
J
L
MA
B
LT
FRONT FOG LAMP PFP:00011
System Description EKS003DF
DESCRIPTION
Power is supplied at all times to fog lamp relay terminal 3
●through 15A fuse (No. 42, located in the fuse and fusible link box).
With the lighting switch in the 2ND position and LOW (“B”) position, power is supplied
●through 10A fuse (No. 31, located in the fuse and fusible link box).
●to lighting switch terminal 11
●through terminal 12 of the lighting switch
●to fog lamp switch terminal 32
●through terminal 31 of the fog lamp switch
●to fog lamp relay terminal 2.
FOG LAMP OPERATION
The fog lamp switch is built into the combination switch. The lighting switch must be in the 1st or 2nd position
for fog lamp operation.
With the fog lamp switch in the ON position, ground is supplied
●to fog lamp relay terminal 1
●through the fog lamp switch and body grounds E24 and E50.
The fog lamp relay is energized and power is supplied
●from fog lamp relay terminal 5
●to terminal 1 of each fog lamp.
Ground is supplied to terminal 2 of each fog lamp through body grounds E24 and E50.
With power and ground supplied, the fog lamps illuminate.
Page 3535 of 3833
![NISSAN X-TRAIL 2001 Service Repair Manual ILLUMINATION
LT-45
C
D
E
F
G
H
I
J
L
MA
B
LT
ILLUMINATIONPFP:27545
System Description EKS003C7
Power is supplied at all times
●through 10A fuse [No. 31, located in the fuse and fusible link box]
● NISSAN X-TRAIL 2001 Service Repair Manual ILLUMINATION
LT-45
C
D
E
F
G
H
I
J
L
MA
B
LT
ILLUMINATIONPFP:27545
System Description EKS003C7
Power is supplied at all times
●through 10A fuse [No. 31, located in the fuse and fusible link box]
●](/manual-img/5/57405/w960_57405-3534.png)
ILLUMINATION
LT-45
C
D
E
F
G
H
I
J
L
MA
B
LT
ILLUMINATIONPFP:27545
System Description EKS003C7
Power is supplied at all times
●through 10A fuse [No. 31, located in the fuse and fusible link box]
●to lighting switch terminal 11.
The lighting switch must be in the 1ST or 2ND position for illumination.
The following chart shows the power and ground connector terminals for the components included in the illu-
mination system.
Component Connector No. Power terminal Ground terminal
Headlamp washier switch M23 3 4
Headlamp aiming switch M24 3 4
Door mirror remote control
switchM26 10 1
ESP off switch M25 3 4
Hazard switch M51 7 8
4WD mode switch M39 4 3
Rear window defogger switch M50 5 6
A/C auto amp. M52 12 11
Combination meter
(LHD models)M46 56 66
Combination meter
(RHD models)M46 45 56
Audio M42 2 1
CD auto changer M82 34 35
Heater control panel M55 2 6
A/T device M58 3 4
Cigarette lighter M56 3 2
Heated seat switch LH
(LHD models)B131 5 6
Heated seat switch RH
(LHD models)B132 5 6
Heated seat switch LH
(RHD models)B35 5 6
Heated seat switch RH
(RHD models)B34 5 6
Page 3616 of 3833
DI-58
WARNING CHIME
WARNING CHIME
PFP:24814
System DescriptionEKS002XF
POWER SUPPLY AND GROUND CIRCUIT
Power is supplied at all times
●to combination switch terminal 11 and
●to daytime light control unit terminal 1 (with daytime light system)
●through 10A fuse (No.31, located in fuse and fusible link box), and
●to key switch terminal 1 and
●to time control unit terminal 1
●through 10A fuse [No.28, located in the fuse block (J/B)].
With ignition switch in ON or START position, power is supplied
●to time control unit terminal 17
●through 10A fuse [No.5, located in the fuse block (J/B)].
Ground is supplied
●to time control unit terminal 16
●through body grounds M27 and M70.
IGNITION KEY WARNING CHIME
With ignition switch in OFF or ACC position, and the driver's door open and driver’s door locked, the warning
chime will sound. Power is supplied
●to time control unit terminal 18
●through key switch terminal 2 and
Ground is supplied
●to time control unit terminal 28
●through front door lock actuator (driver side) terminal 5
Front door lock actuator (driver side) terminal 2 is grounded through body grounds M27 and M70, and
Ground is supplied
●to time control unit terminal 30
●through front door switch (driver side) terminal 2.
Front door switch (driver side) terminal 3 is grounded through body grounds B8 and B18.
LIGHT WARNING CHIME
With ignition switch OFF position, driver's door open, and lighting switch in 1ST or 2ND position, warning
chime will sound. Power is supplied
●from the lighting switch terminal 12 or daytime light control unit terminal 11 (with daytime light system)
●to time control unit terminal 19.
Ground is supplied
●to time control unit terminal 30
●through front door switch (driver side) terminal 2.
Front door switch (driver side) terminal 3 is grounded through body grounds B8 and B18.
SEAT BELT WARNING CHIME
When the vehicle speed exceeds 25 km/h (16MPH) with driver side or passenger side seat belt unfastened
(seat belt switch ON), warning chime will sound. Refer to SB-6, "
SEAT BELT WARNING SYSTEM" .