2001 NISSAN X-TRAIL cooling
[x] Cancel search: coolingPage 3796 of 3833
MA-16
RECOMMENDED FLUIDS AND LUBRICANTS
RECOMMENDED FLUIDS AND LUBRICANTS
PFP:00000
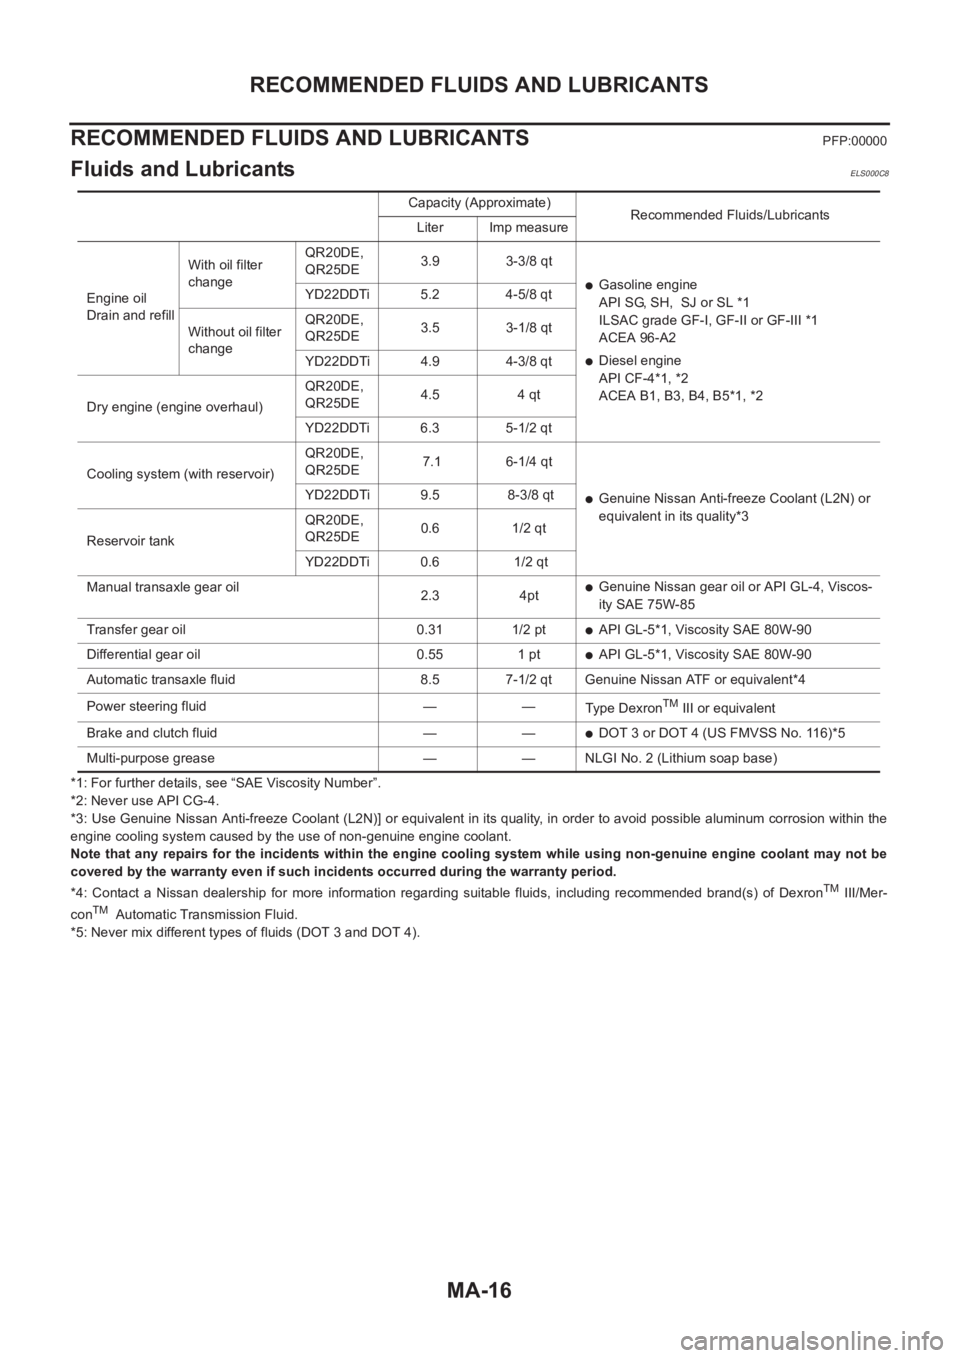
Fluids and LubricantsELS000C8
*1: For further details, see “SAE Viscosity Number”.
*2: Never use API CG-4.
*3: Use Genuine Nissan Anti-freeze Coolant (L2N)] or equivalent in its quality, in order to avoid possible aluminum corrosion within the
engine cooling system caused by the use of non-genuine engine coolant.
Note that any repairs for the incidents within the engine cooling system while using non-genuine engine coolant may not be
covered by the warranty even if such incidents occurred during the warranty period.
*4: Contact a Nissan dealership for more information regarding suitable fluids, including recommended brand(s) of Dexron
TM III/Mer-
conTM Automatic Transmission Fluid.
*5: Never mix different types of fluids (DOT 3 and DOT 4).Capacity (Approximate)
Recommended Fluids/Lubricants
Liter Imp measure
Engine oil
Drain and refillWith oil filter
changeQR20DE,
QR25DE3.9 3-3/8 qt
●Gasoline engine
API SG, SH, SJ or SL *1
ILSAC grade GF-I, GF-II or GF-III *1
ACEA 96-A2
●Diesel engine
API CF-4*1, *2
ACEA B1, B3, B4, B5*1, *2 YD22DDTi 5.2 4-5/8 qt
Without oil filter
changeQR20DE,
QR25DE3.5 3-1/8 qt
YD22DDTi 4.9 4-3/8 qt
Dry engine (engine overhaul)QR20DE,
QR25DE4.5 4 qt
YD22DDTi 6.3 5-1/2 qt
Cooling system (with reservoir)QR20DE,
QR25DE 7.1 6-1/4 qt
●Genuine Nissan Anti-freeze Coolant (L2N) or
equivalent in its quality*3 YD22DDTi 9.5 8-3/8 qt
Reservoir tankQR20DE,
QR25DE0.6 1/2 qt
YD22DDTi 0.6 1/2 qt
Manual transaxle gear oil
2.3 4pt
●Genuine Nissan gear oil or API GL-4, Viscos-
ity SAE 75W-85
Transfer gear oil 0.31 1/2 pt
●API GL-5*1, Viscosity SAE 80W-90
Differential gear oil 0.55 1 pt
●API GL-5*1, Viscosity SAE 80W-90
Automatic transaxle fluid 8.5 7-1/2 qt Genuine Nissan ATF or equivalent*4
Power steering fluid — —
Type Dexron
TM III or equivalent
Brake and clutch fluid — —
●DOT 3 or DOT 4 (US FMVSS No. 116)*5
Multi-purpose grease — — NLGI No. 2 (Lithium soap base)
Page 3798 of 3833
MA-18
RECOMMENDED FLUIDS AND LUBRICANTS
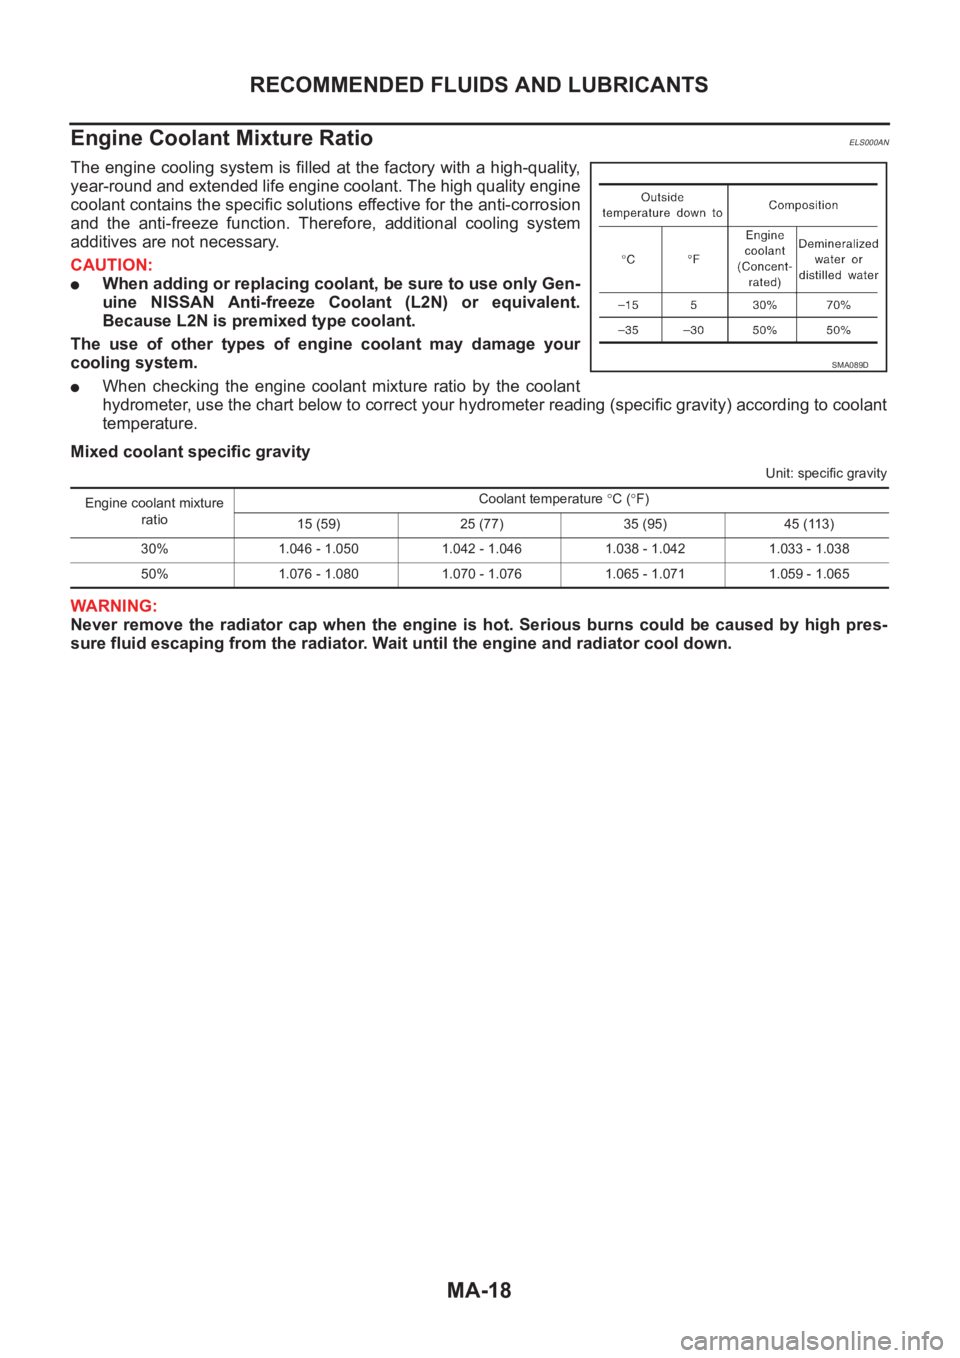
Engine Coolant Mixture Ratio
ELS000AN
The engine cooling system is filled at the factory with a high-quality,
year-round and extended life engine coolant. The high quality engine
coolant contains the specific solutions effective for the anti-corrosion
and the anti-freeze function. Therefore, additional cooling system
additives are not necessary.
CAUTION:
●When adding or replacing coolant, be sure to use only Gen-
uine NISSAN Anti-freeze Coolant (L2N) or equivalent.
Because L2N is premixed type coolant.
The use of other types of engine coolant may damage your
cooling system.
●When checking the engine coolant mixture ratio by the coolant
hydrometer, use the chart below to correct your hydrometer reading (specific gravity) according to coolant
temperature.
Mixed coolant specific gravity
Unit: specific gravity
WARNING:
Never remove the radiator cap when the engine is hot. Serious burns could be caused by high pres-
sure fluid escaping from the radiator. Wait until the engine and radiator cool down.
SMA089D
Engine coolant mixture
ratioCoolant temperature °C (°F)
15 (59) 25 (77) 35 (95) 45 (113)
30% 1.046 - 1.050 1.042 - 1.046 1.038 - 1.042 1.033 - 1.038
50% 1.076 - 1.080 1.070 - 1.076 1.065 - 1.071 1.059 - 1.065
Page 3800 of 3833
MA-20
ENGINE MAINTENANCE (QR20DE·QR25DE)
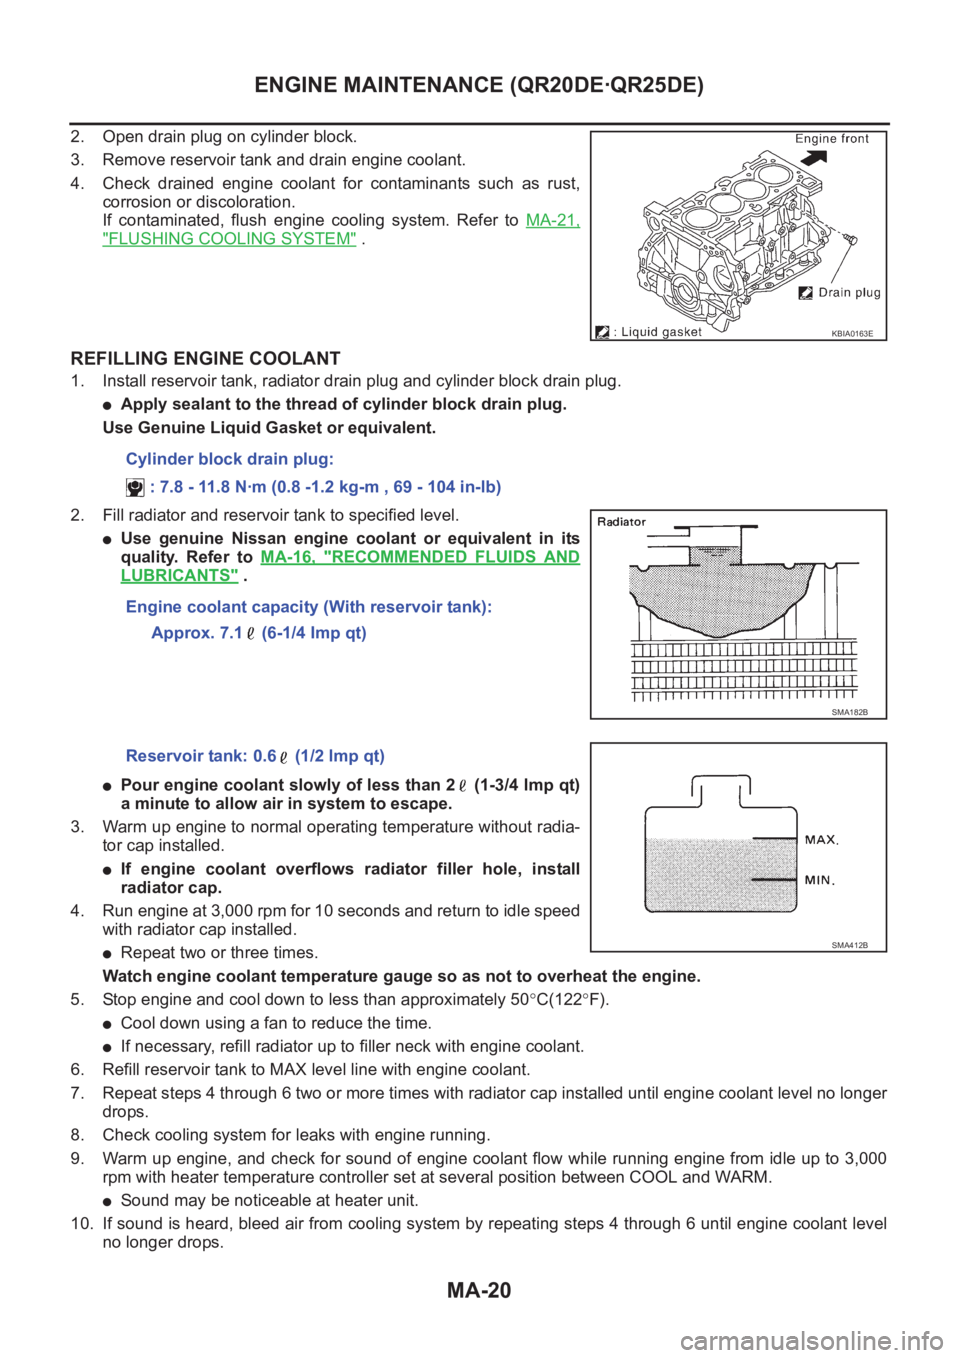
2. Open drain plug on cylinder block.
3. Remove reservoir tank and drain engine coolant.
4. Check drained engine coolant for contaminants such as rust,
corrosion or discoloration.
If contaminated, flush engine cooling system. Refer to MA-21,
"FLUSHING COOLING SYSTEM" .
REFILLING ENGINE COOLANT
1. Install reservoir tank, radiator drain plug and cylinder block drain plug.
●Apply sealant to the thread of cylinder block drain plug.
Use Genuine Liquid Gasket or equivalent.
2. Fill radiator and reservoir tank to specified level.
●Use genuine Nissan engine coolant or equivalent in its
quality. Refer to MA-16, "
RECOMMENDED FLUIDS AND
LUBRICANTS" .
●Pour engine coolant slowly of less than 2 (1-3/4 lmp qt)
a minute to allow air in system to escape.
3. Warm up engine to normal operating temperature without radia-
tor cap installed.
●If engine coolant overflows radiator filler hole, install
radiator cap.
4. Run engine at 3,000 rpm for 10 seconds and return to idle speed
with radiator cap installed.
●Repeat two or three times.
Watch engine coolant temperature gauge so as not to overheat the engine.
5. Stop engine and cool down to less than approximately 50°C(122°F).
●Cool down using a fan to reduce the time.
●If necessary, refill radiator up to filler neck with engine coolant.
6. Refill reservoir tank to MAX level line with engine coolant.
7. Repeat steps 4 through 6 two or more times with radiator cap installed until engine coolant level no longer
drops.
8. Check cooling system for leaks with engine running.
9. Warm up engine, and check for sound of engine coolant flow while running engine from idle up to 3,000
rpm with heater temperature controller set at several position between COOL and WARM.
●Sound may be noticeable at heater unit.
10. If sound is heard, bleed air from cooling system by repeating steps 4 through 6 until engine coolant level
no longer drops.
KBIA0163E
Cylinder block drain plug:
: 7.8 - 11.8 N·m (0.8 -1.2 kg-m , 69 - 104 in-lb)
Engine coolant capacity (With reservoir tank):
Approx. 7.1 (6-1/4 Imp qt)
SMA182B
Reservoir tank: 0.6 (1/2 lmp qt)
SMA412B
Page 3801 of 3833
ENGINE MAINTENANCE (QR20DE·QR25DE)
MA-21
C
D
E
F
G
H
I
J
K
MA
B
MA
●Clean excess engine coolant from engine.
FLUSHING COOLING SYSTEM
1. Fill radiator and reservoir tank with water and reinstall radiator cap.
2. Run engine and warm it up to normal operating temperature.
3. Rev engine two or three times under no-load.
4. Stop engine and wait until it cools down.
5. Drain water.
6. Repeat steps 1 through 5 until clear water begins to drain from radiator.
Checking Cooling SystemELS000JW
WARNING:
Never remove the radiator cap when the engine is hot; serious burns could be caused by high pres-
sure fluid escaping from the radiator.
Wrap a thick cloth around the cap and carefully remove it by turning it a quarter turn to allow built-up
pressure to escape and then turn the cap all the way off.
CHECKING COOLING SYSTEM HOSES
Check hoses for improper attachment, leaks, cracks, damage, loose connections, chafing and deterioration.
CHECKING RADIATOR
Check radiator for mud or clogging. If necessary, clean radiator as follows.
●Be careful not to bend or damage the radiator fins.
●When radiator is cleaned without removal, remove all surrounding parts such as cooling fan, radiator
shroud and horns. Then tape the harness and connectors to prevent water from entering.
1. Apply water by hose to the back side of the radiator core vertically downward.
2. Apply water again to all radiator core surfaces once per minute.
3. Stop washing if any stains no longer flow out from the radiator.
4. Blow air into the back side of radiator core vertically downward.
●Use compressed air lower than 490 kPa (4.9 bar, 5 kg/cm2 , 71 psi) and keep distance more than 30 cm
(11.8 in).
5. Blow air again into all the radiator core surfaces once per minute until no water sprays out.
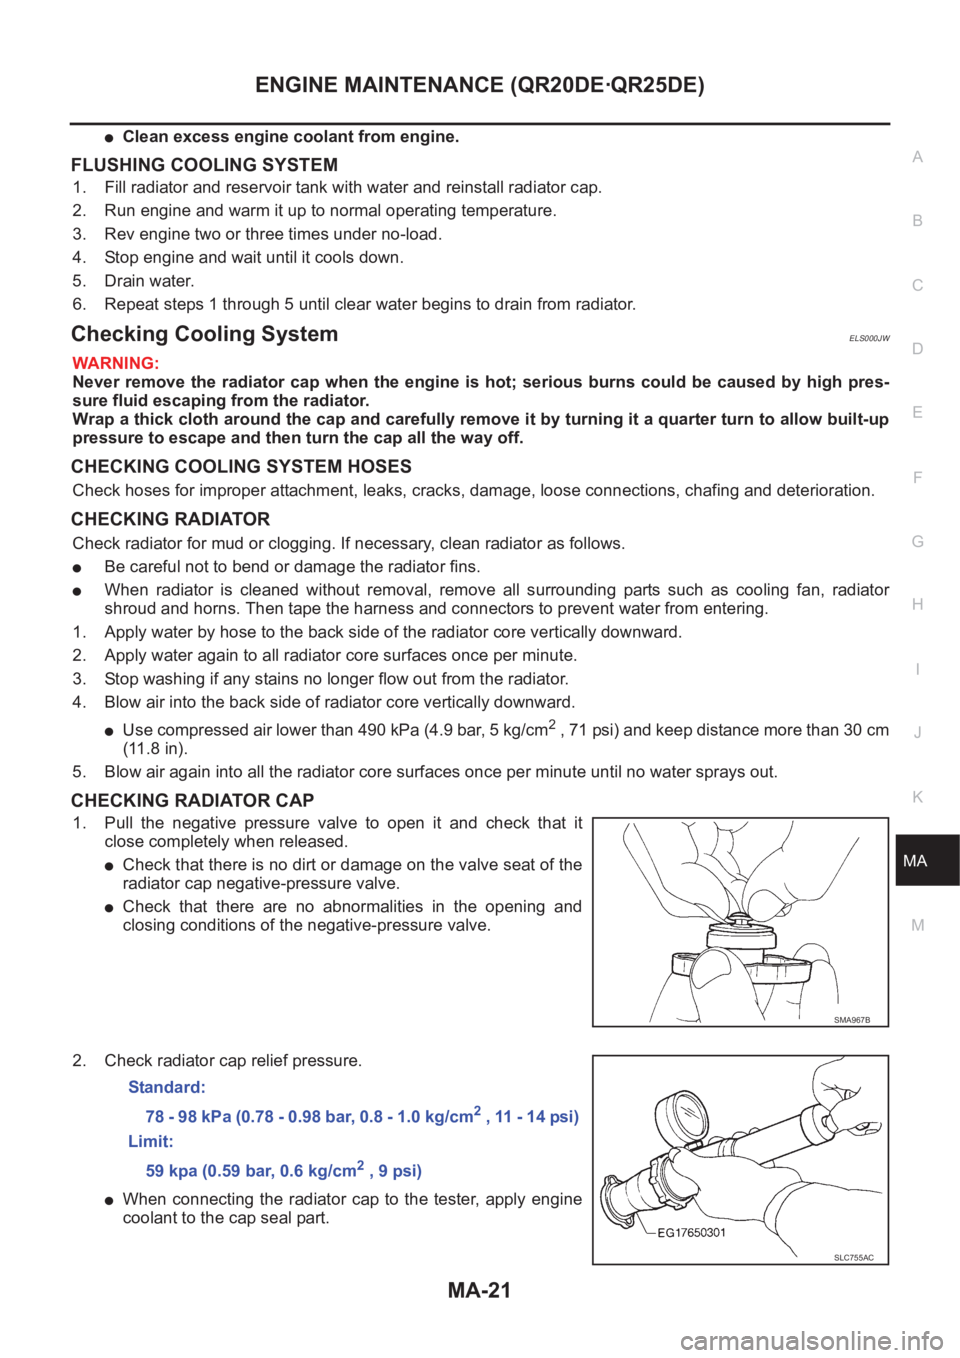
CHECKING RADIATOR CAP
1. Pull the negative pressure valve to open it and check that it
close completely when released.
●Check that there is no dirt or damage on the valve seat of the
radiator cap negative-pressure valve.
●Check that there are no abnormalities in the opening and
closing conditions of the negative-pressure valve.
2. Check radiator cap relief pressure.
●When connecting the radiator cap to the tester, apply engine
coolant to the cap seal part.
SMA967B
Standard:
78 - 98 kPa (0.78 - 0.98 bar, 0.8 - 1.0 kg/cm
2 , 11 - 14 psi)
Limit:
59 kpa (0.59 bar, 0.6 kg/cm
2 , 9 psi)
SLC755AC
Page 3802 of 3833
MA-22
ENGINE MAINTENANCE (QR20DE·QR25DE)
●Replace the radiator cap if there is an abnormality in the negative-pressure valve, or if the open-valve
pressure is outside of the standard values.
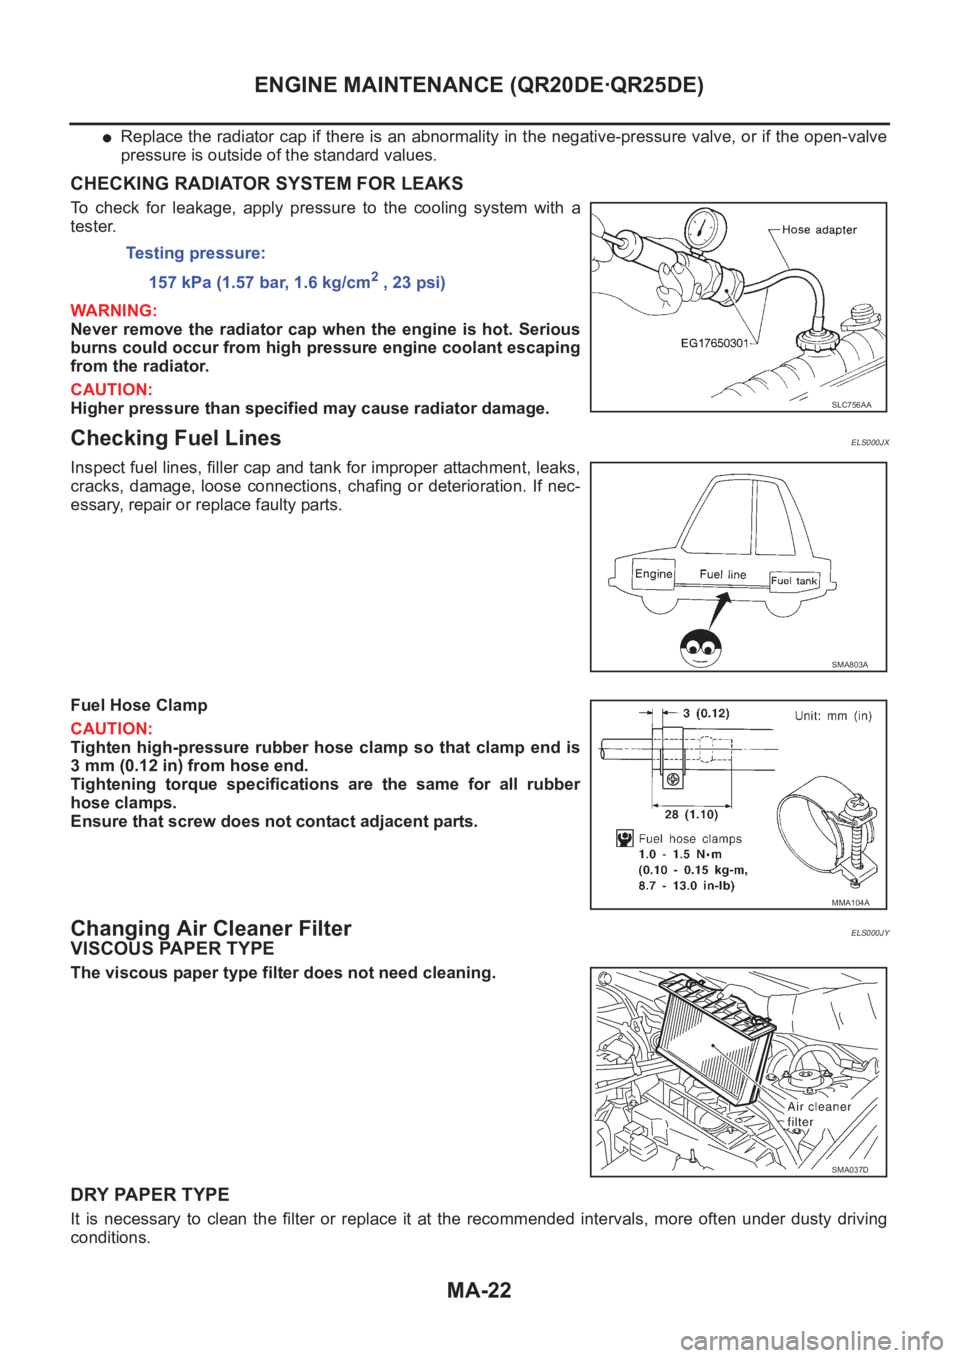
CHECKING RADIATOR SYSTEM FOR LEAKS
To check for leakage, apply pressure to the cooling system with a
tester.
WARNING:
Never remove the radiator cap when the engine is hot. Serious
burns could occur from high pressure engine coolant escaping
from the radiator.
CAUTION:
Higher pressure than specified may cause radiator damage.
Checking Fuel LinesELS000JX
Inspect fuel lines, filler cap and tank for improper attachment, leaks,
cracks, damage, loose connections, chafing or deterioration. If nec-
essary, repair or replace faulty parts.
Fuel Hose Clamp
CAUTION:
Tighten high-pressure rubber hose clamp so that clamp end is
3 mm (0.12 in) from hose end.
Tightening torque specifications are the same for all rubber
hose clamps.
Ensure that screw does not contact adjacent parts.
Changing Air Cleaner FilterELS000JY
VISCOUS PAPER TYPE
The viscous paper type filter does not need cleaning.
DRY PAPER TYPE
It is necessary to clean the filter or replace it at the recommended intervals, more often under dusty driving
conditions.Testing pressure:
157 kPa (1.57 bar, 1.6 kg/cm
2 , 23 psi)
SLC756AA
SMA803A
MMA104A
SMA037D
Page 3806 of 3833

MA-26
ENGINE MAINTENANCE (YD22DDTI)
ENGINE MAINTENANCE (YD22DDTI)
PFP:00100
Checking Drive BeltsELS000CC
●Before inspecting the engine, make sure the engine has cooled
down; wait approximately 30 minutes after the engine has been
stopped.
●Visually inspect all belts for wear, damage or cracks on contact-
ing surfaces and edge areas.
●When measuring deflection, apply 98 N (10 kg, 22 lb) at the
marked point ( ).
CAUTION:
●When checking belt deflection immediately after installa-
tion, first adjust it to the specified value. Then, after turn-
ing the crankshaft two turns or more, re-adjust to the
specified value to avoid variation in deflection between
pulleys.
●Tighten idler pulley lock nut by hand and measure deflection without looseness.
Belt Deflection:
*: When engine is cold.
Tension AdjustmentELS000K5
Adjust belts with the parts shown below.
CAUTION:
●When a new belt is installed as a replacement, adjust it to the value specified under “New” value
because of insufficient adaptability with pulley grooves.
●If the belt deflection of the current belt is out of the “Limit for re-adjusting”, adjust to the
“Adjusted” value.
●When checking belt deflection immediately after installation, first adjust it to the specified value.
Then, after turning crankshaft two turns or more, re-adjust it to the specified value to avoid varia-
tion in deflection between pulleys.
●Make sure the belts are fully fitted into the pulley grooves during installation.
●Handle with care to avoid smearing the belts with engine oil or cooling water etc.
●Do not twist or bend the belts with strong force.
PBIC1251E
Applied beltBelt deflection with 98 N (10 kg, 22 lb) force applied* mm (in)
New Adjusted Limit for re-adjusting
Air conditioner compressor belt 4 - 5 (0.16 - 0.20) 6 - 7 (0.24 - 0.28) 8.5 (0.335)
Alternator and water pump belt 9.0 - 10.5 (0.354 - 0.413) 11.0 - 12.5 (0.433 - 0.492) 16.5 (0.650)
Applied belt Belt adjustment method
Air conditioner compressor belt Adjusting bolt on idler pulley
Alternator and water pump belt Adjusting bolt on alternator
Page 3808 of 3833
MA-28
ENGINE MAINTENANCE (YD22DDTI)
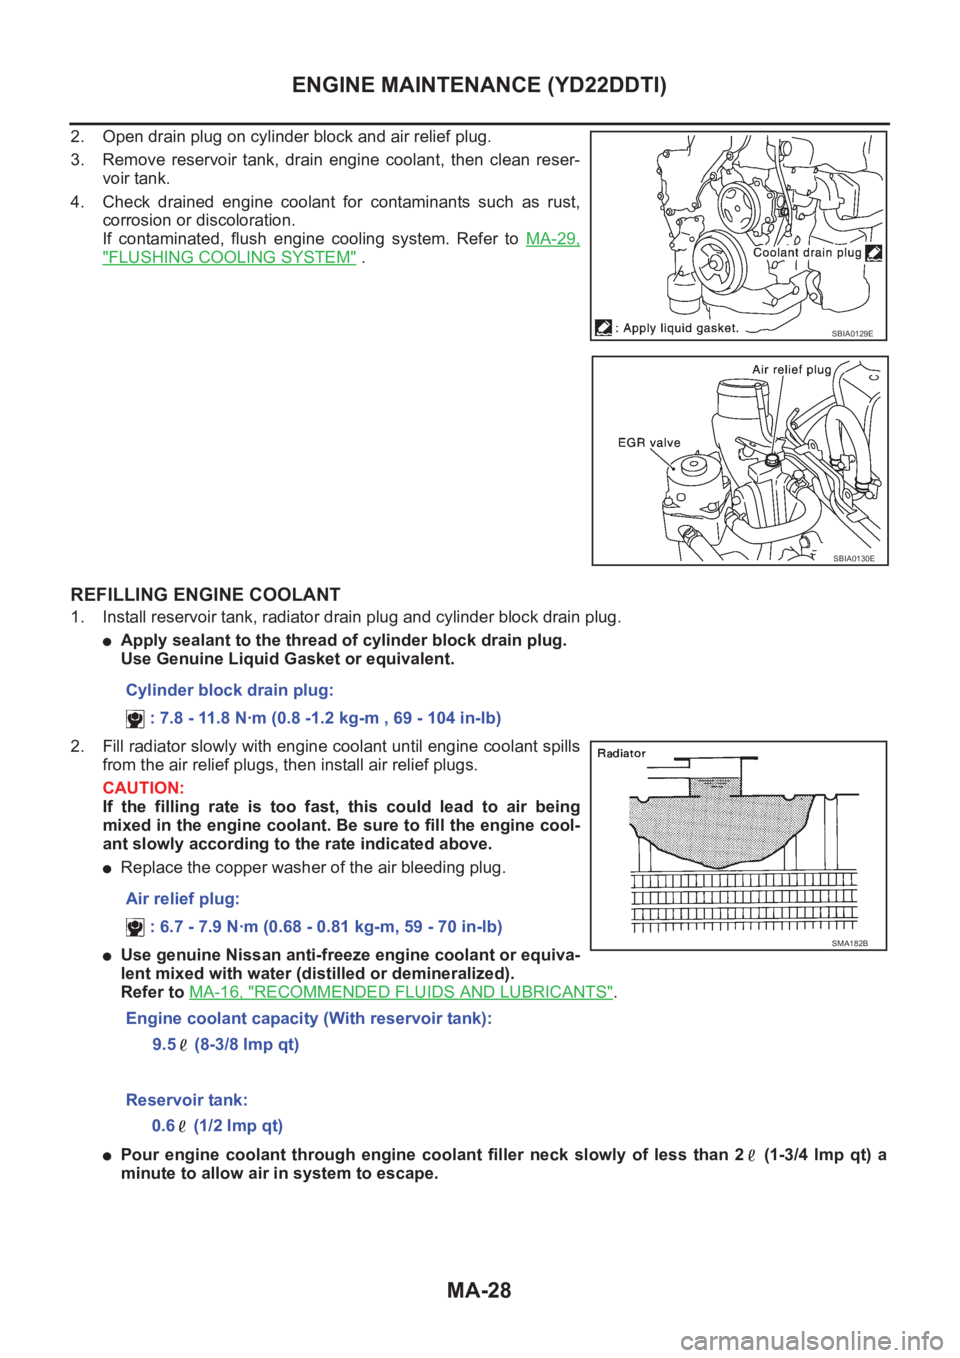
2. Open drain plug on cylinder block and air relief plug.
3. Remove reservoir tank, drain engine coolant, then clean reser-
voir tank.
4. Check drained engine coolant for contaminants such as rust,
corrosion or discoloration.
If contaminated, flush engine cooling system. Refer to MA-29,
"FLUSHING COOLING SYSTEM" .
REFILLING ENGINE COOLANT
1. Install reservoir tank, radiator drain plug and cylinder block drain plug.
●Apply sealant to the thread of cylinder block drain plug.
Use Genuine Liquid Gasket or equivalent.
2. Fill radiator slowly with engine coolant until engine coolant spills
from the air relief plugs, then install air relief plugs.
CAUTION:
If the filling rate is too fast, this could lead to air being
mixed in the engine coolant. Be sure to fill the engine cool-
ant slowly according to the rate indicated above.
●Replace the copper washer of the air bleeding plug.
●Use genuine Nissan anti-freeze engine coolant or equiva-
lent mixed with water (distilled or demineralized).
Refer to MA-16, "
RECOMMENDED FLUIDS AND LUBRICANTS".
●Pour engine coolant through engine coolant filler neck slowly of less than 2 (1-3/4 lmp qt) a
minute to allow air in system to escape.
SBIA0129E
SBIA0130E
Cylinder block drain plug:
: 7.8 - 11.8 N·m (0.8 -1.2 kg-m , 69 - 104 in-lb)
Air relief plug:
: 6.7 - 7.9 N·m (0.68 - 0.81 kg-m, 59 - 70 in-lb)
Engine coolant capacity (With reservoir tank):
9.5 (8-3/8 Imp qt)
SMA182B
Reservoir tank:
0.6 (1/2 lmp qt)
Page 3809 of 3833
ENGINE MAINTENANCE (YD22DDTI)
MA-29
C
D
E
F
G
H
I
J
K
MA
B
MA
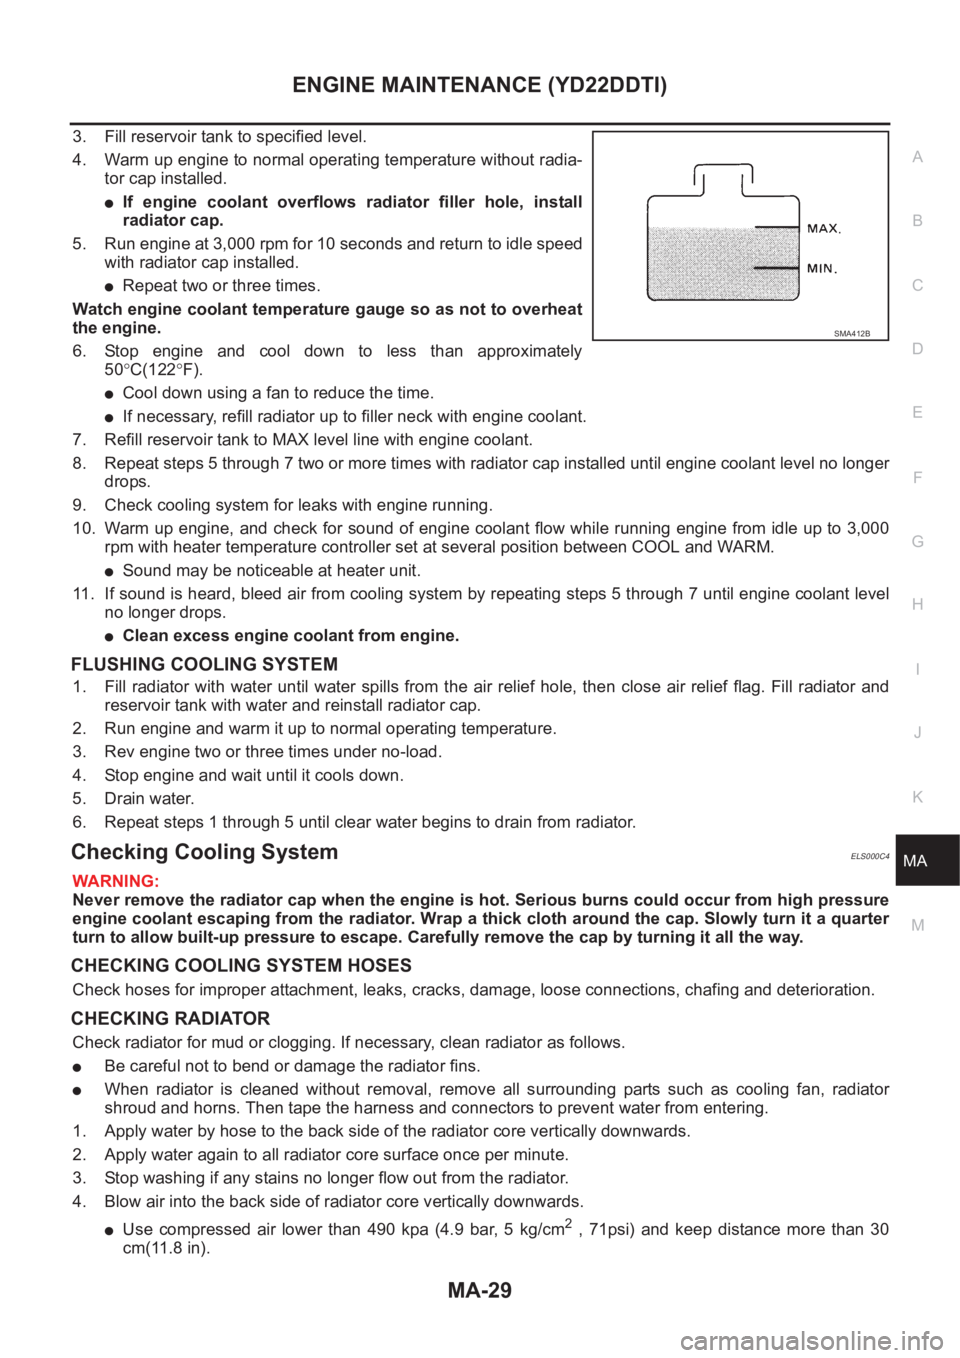
3. Fill reservoir tank to specified level.
4. Warm up engine to normal operating temperature without radia-
tor cap installed.
●If engine coolant overflows radiator filler hole, install
radiator cap.
5. Run engine at 3,000 rpm for 10 seconds and return to idle speed
with radiator cap installed.
●Repeat two or three times.
Watch engine coolant temperature gauge so as not to overheat
the engine.
6. Stop engine and cool down to less than approximately
50°C(122°F).
●Cool down using a fan to reduce the time.
●If necessary, refill radiator up to filler neck with engine coolant.
7. Refill reservoir tank to MAX level line with engine coolant.
8. Repeat steps 5 through 7 two or more times with radiator cap installed until engine coolant level no longer
drops.
9. Check cooling system for leaks with engine running.
10. Warm up engine, and check for sound of engine coolant flow while running engine from idle up to 3,000
rpm with heater temperature controller set at several position between COOL and WARM.
●Sound may be noticeable at heater unit.
11. If sound is heard, bleed air from cooling system by repeating steps 5 through 7 until engine coolant level
no longer drops.
●Clean excess engine coolant from engine.
FLUSHING COOLING SYSTEM
1. Fill radiator with water until water spills from the air relief hole, then close air relief flag. Fill radiator and
reservoir tank with water and reinstall radiator cap.
2. Run engine and warm it up to normal operating temperature.
3. Rev engine two or three times under no-load.
4. Stop engine and wait until it cools down.
5. Drain water.
6. Repeat steps 1 through 5 until clear water begins to drain from radiator.
Checking Cooling SystemELS000C4
WARNING:
Never remove the radiator cap when the engine is hot. Serious burns could occur from high pressure
engine coolant escaping from the radiator. Wrap a thick cloth around the cap. Slowly turn it a quarter
turn to allow built-up pressure to escape. Carefully remove the cap by turning it all the way.
CHECKING COOLING SYSTEM HOSES
Check hoses for improper attachment, leaks, cracks, damage, loose connections, chafing and deterioration.
CHECKING RADIATOR
Check radiator for mud or clogging. If necessary, clean radiator as follows.
●Be careful not to bend or damage the radiator fins.
●When radiator is cleaned without removal, remove all surrounding parts such as cooling fan, radiator
shroud and horns. Then tape the harness and connectors to prevent water from entering.
1. Apply water by hose to the back side of the radiator core vertically downwards.
2. Apply water again to all radiator core surface once per minute.
3. Stop washing if any stains no longer flow out from the radiator.
4. Blow air into the back side of radiator core vertically downwards.
●Use compressed air lower than 490 kpa (4.9 bar, 5 kg/cm2 , 71psi) and keep distance more than 30
cm(11.8 in).
SMA412B