2001 NISSAN X-TRAIL belt
[x] Cancel search: beltPage 3792 of 3833
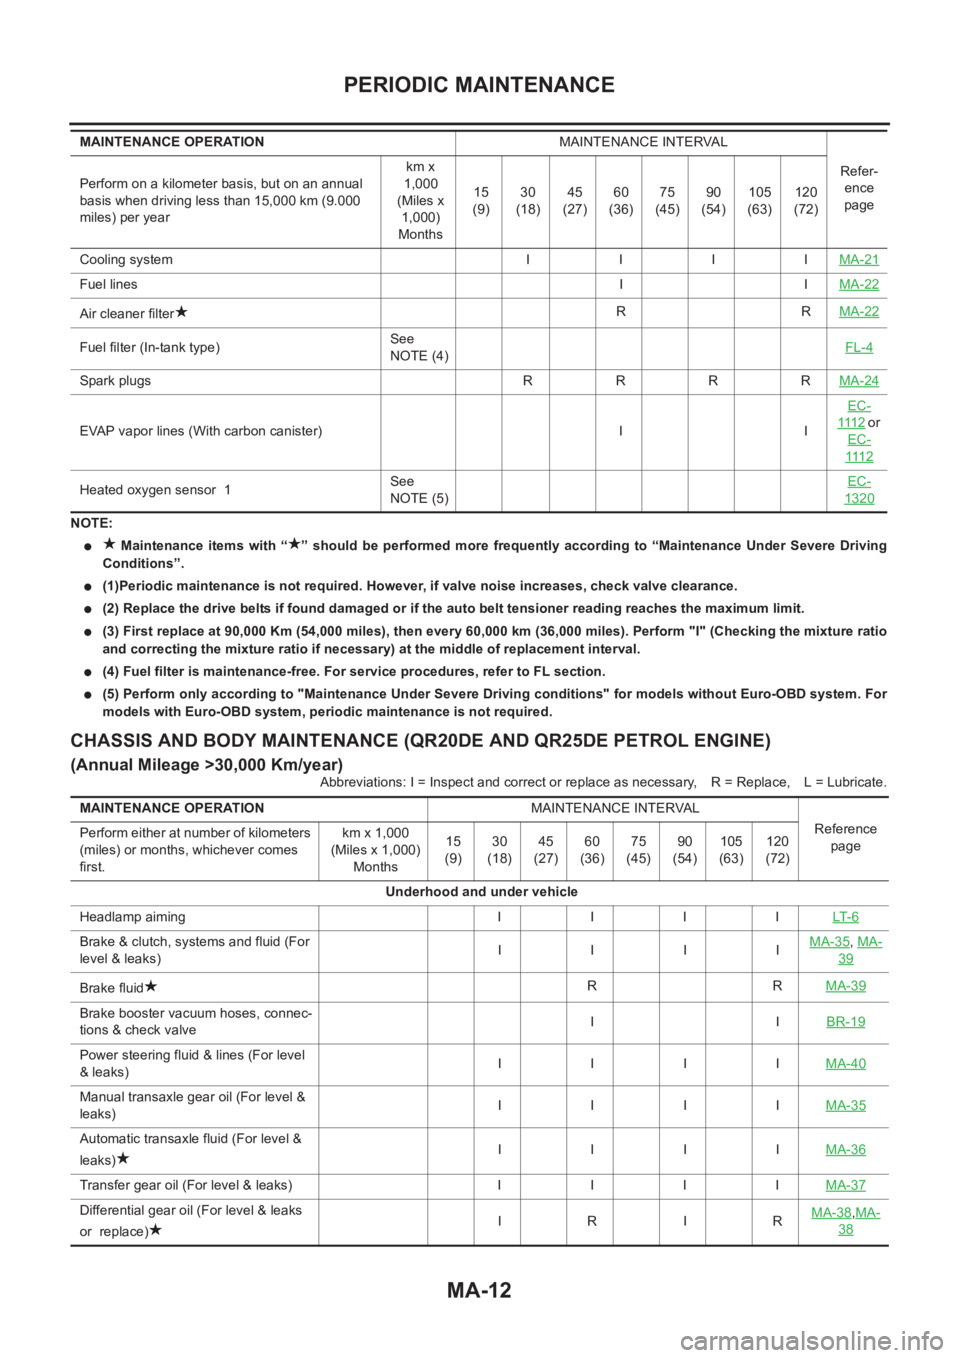
MA-12
PERIODIC MAINTENANCE
NOTE:
● Maintenance items with “ ” should be performed more frequently according to “Maintenance Under Severe Driving
Conditions”.
●(1)Periodic maintenance is not required. However, if valve noise increases, check valve clearance.
●(2) Replace the drive belts if found damaged or if the auto belt tensioner reading reaches the maximum limit.
●(3) First replace at 90,000 Km (54,000 miles), then every 60,000 km (36,000 miles). Perform "I" (Checking the mixture ratio
and correcting the mixture ratio if necessary) at the middle of replacement interval.
●(4) Fuel filter is maintenance-free. For service procedures, refer to FL section.
●(5) Perform only according to "Maintenance Under Severe Driving conditions" for models without Euro-OBD system. For
models with Euro-OBD system, periodic maintenance is not required.
CHASSIS AND BODY MAINTENANCE (QR20DE AND QR25DE PETROL ENGINE)
(Annual Mileage >30,000 Km/year)
Abbreviations: I = Inspect and correct or replace as necessary,R = Replace, L = Lubricate. Cooling system I I I IMA-21
Fuel linesIIMA-22
Air cleaner filterRRMA-22
Fuel filter (In-tank type)See
NOTE (4)FL-4
Spark plugs R R R RMA-24
EVAP vapor lines (With carbon canister) I IEC-111 2 o r
EC-
111 2
Heated oxygen sensor 1 See
NOTE (5)EC-1320
MAINTENANCE OPERATIONMAINTENANCE INTERVAL
Refer-
ence
page Perform on a kilometer basis, but on an annual
basis when driving less than 15,000 km (9.000
miles) per yearkm x
1,000
(Miles x
1,000)
Months15
(9)30
(18)45
(27)60
(36)75
(45)90
(54)105
(63)120
(72)
MAINTENANCE OPERATIONMAINTENANCE INTERVAL
Reference
page Perform either at number of kilometers
(miles) or months, whichever comes
first.km x 1,000
(Miles x 1,000)
Months15
(9)30
(18)45
(27)60
(36)75
(45)90
(54)105
(63)120
(72)
Underhood and under vehicle
Headlamp aiming I I I ILT- 6
Brake & clutch, systems and fluid (For
level & leaks)IIIIMA-35,MA-
39
Brake fluidRRMA-39
Brake booster vacuum hoses, connec-
tions & check valveIIBR-19
Power steering fluid & lines (For level
& leaks)IIIIMA-40
Manual transaxle gear oil (For level &
leaks)IIIIMA-35
Automatic transaxle fluid (For level &
leaks)IIIIMA-36
Transfer gear oil (For level & leaks) I I I IMA-37
Differential gear oil (For level & leaks
or replace)IRIRMA-38,MA-
38
Page 3793 of 3833
PERIODIC MAINTENANCE
MA-13
C
D
E
F
G
H
I
J
K
MA
B
MA
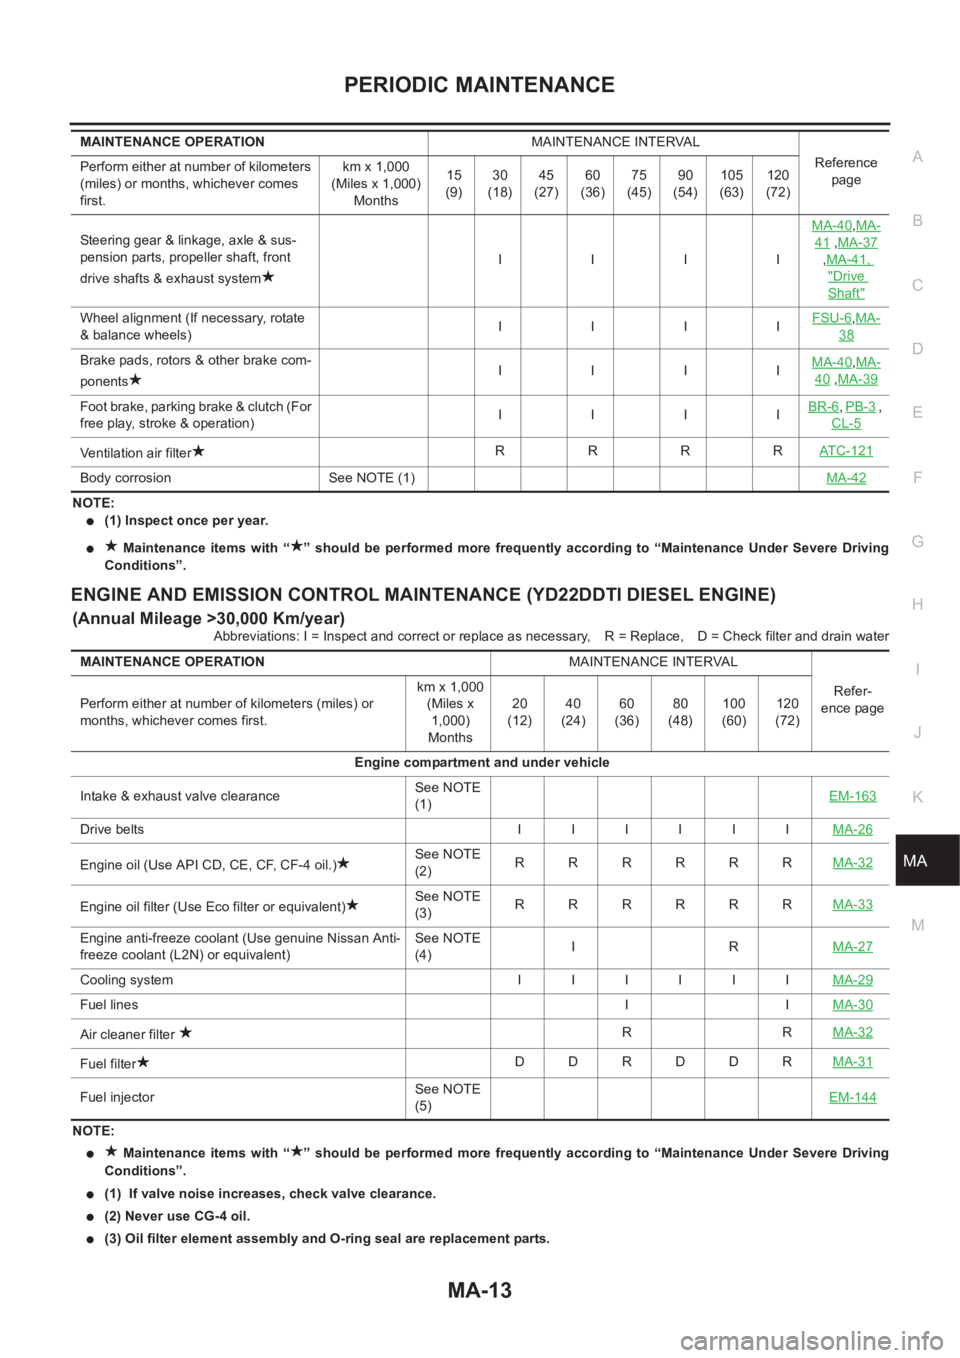
NOTE:
●(1) Inspect once per year.
● Maintenance items with “ ” should be performed more frequently according to “Maintenance Under Severe Driving
Conditions”.
ENGINE AND EMISSION CONTROL MAINTENANCE (YD22DDTI DIESEL ENGINE)
(Annual Mileage >30,000 Km/year)
Abbreviations: I = Inspect and correct or replace as necessary,R = Replace, D = Check filter and drain water
NOTE:
● Maintenance items with “ ” should be performed more frequently according to “Maintenance Under Severe Driving
Conditions”.
●(1) If valve noise increases, check valve clearance.
●(2) Never use CG-4 oil.
●(3) Oil filter element assembly and O-ring seal are replacement parts. Steering gear & linkage, axle & sus-
pension parts, propeller shaft, front
drive shafts & exhaust systemIIIIMA-40
,MA-
41 ,MA-37
,MA-41,
"Drive
Shaft"
Wheel alignment (If necessary, rotate
& balance wheels)IIIIFSU-6,MA-
38
Brake pads, rotors & other brake com-
ponentsIIIIMA-40,MA-
40 ,MA-39
Foot brake, parking brake & clutch (For
free play, stroke & operation)IIIIBR-6,PB-3 ,
CL-5
Ventilation air filterRRRRAT C - 1 2 1
Body corrosion See NOTE (1)MA-42
MAINTENANCE OPERATIONMAINTENANCE INTERVAL
Reference
page Perform either at number of kilometers
(miles) or months, whichever comes
first.km x 1,000
(Miles x 1,000)
Months15
(9)30
(18)45
(27)60
(36)75
(45)90
(54)105
(63)120
(72)
MAINTENANCE OPERATIONMAINTENANCE INTERVAL
Refer-
ence page Perform either at number of kilometers (miles) or
months, whichever comes first.km x 1,000
(Miles x
1,000)
Months20
(12)40
(24)60
(36)80
(48)100
(60)120
(72)
Engine compartment and under vehicle
Intake & exhaust valve clearanceSee NOTE
(1)EM-163
Drive belts I I I I I IMA-26
Engine oil (Use API CD, CE, CF, CF-4 oil.)See NOTE
(2)RRRRRRMA-32
Engine oil filter (Use Eco filter or equivalent)See NOTE
(3)RRRRRRMA-33
Engine anti-freeze coolant (Use genuine Nissan Anti-
freeze coolant (L2N) or equivalent)See NOTE
(4)IRMA-27
Cooling system I I I I I IMA-29
Fuel linesIIMA-30
Air cleaner filter RRMA-32
Fuel filterDDRDDRMA-31
Fuel injectorSee NOTE
(5)EM-144
Page 3799 of 3833

ENGINE MAINTENANCE (QR20DE·QR25DE)
MA-19
C
D
E
F
G
H
I
J
K
MA
B
MA
ENGINE MAINTENANCE (QR20DE·QR25DE) PFP:00100
Checking Drive BeltsELS000KA
WARNING:
Be sure to perform when the engine is stopped.
●Make sure that the indicator (single line notch on fixed side) of drive belt auto-tensioner is within the pos-
sible use range (between three line notches on moving side).
NOTE:
●Check the drive belt auto-tensioner indicator (single line notch on fixed side) when the engine is cold.
●When the new drive belt is installed, the indicator (single line notch on fixed side) should be within the
range A.
●Visually check entire belt for wear, damage or cracks.
●If the indicator (single line notch on fixed side) is out of possible use range or belt is damaged, replace the
belt.
Tension AdjustmentELS000K4
Belt tensioning is not necessary, as it is automatically adjusted by drive belt auto-tensioner.
Changing Engine CoolantELS000JV
WARNING:
●To avoid being scalded, never change the engine coolant when the engine is hot.
●Wrap a thick cloth around cap and carefully remove the cap. First, turn the cap a quarter of a turn
to release built-up pressure. Then turn the cap all the way.
DRAINING ENGINE COOLANT
1. Open radiator drain plug at the bottom of radiator, and remove
radiator cap.
●Be careful not to allow engine coolant to contact drive belts.
PBIC1234E
PBIC0236E
Page 3803 of 3833
ENGINE MAINTENANCE (QR20DE·QR25DE)
MA-23
C
D
E
F
G
H
I
J
K
MA
B
MA
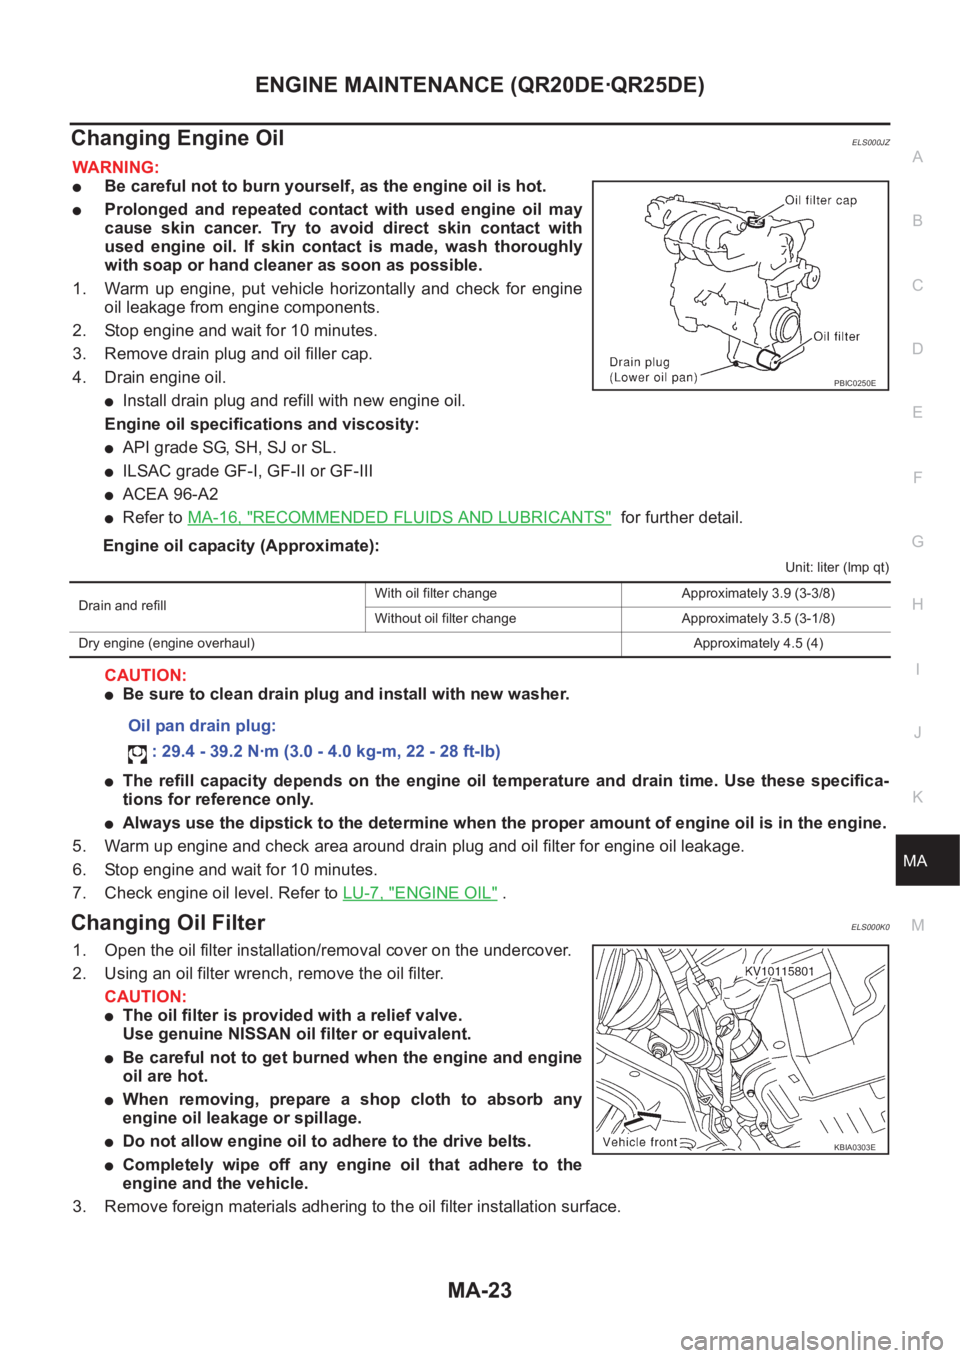
Changing Engine OilELS000JZ
WARNING:
●Be careful not to burn yourself, as the engine oil is hot.
●Prolonged and repeated contact with used engine oil may
cause skin cancer. Try to avoid direct skin contact with
used engine oil. If skin contact is made, wash thoroughly
with soap or hand cleaner as soon as possible.
1. Warm up engine, put vehicle horizontally and check for engine
oil leakage from engine components.
2. Stop engine and wait for 10 minutes.
3. Remove drain plug and oil filler cap.
4. Drain engine oil.
●Install drain plug and refill with new engine oil.
Engine oil specifications and viscosity:
●API grade SG, SH, SJ or SL.
●ILSAC grade GF-I, GF-II or GF-III
●ACEA 96-A2
●Refer to MA-16, "RECOMMENDED FLUIDS AND LUBRICANTS" for further detail.
Engine oil capacity (Approximate):
Unit: liter (lmp qt)
CAUTION:
●Be sure to clean drain plug and install with new washer.
●The refill capacity depends on the engine oil temperature and drain time. Use these specifica-
tions for reference only.
●Always use the dipstick to the determine when the proper amount of engine oil is in the engine.
5. Warm up engine and check area around drain plug and oil filter for engine oil leakage.
6. Stop engine and wait for 10 minutes.
7. Check engine oil level. Refer to LU-7, "
ENGINE OIL" .
Changing Oil FilterELS000K0
1. Open the oil filter installation/removal cover on the undercover.
2. Using an oil filter wrench, remove the oil filter.
CAUTION:
●The oil filter is provided with a relief valve.
Use genuine NISSAN oil filter or equivalent.
●Be careful not to get burned when the engine and engine
oil are hot.
●When removing, prepare a shop cloth to absorb any
engine oil leakage or spillage.
●Do not allow engine oil to adhere to the drive belts.
●Completely wipe off any engine oil that adhere to the
engine and the vehicle.
3. Remove foreign materials adhering to the oil filter installation surface.
PBIC0250E
Drain and refillWith oil filter change Approximately 3.9 (3-3/8)
Without oil filter change Approximately 3.5 (3-1/8)
Dry engine (engine overhaul)Approximately 4.5 (4)
Oil pan drain plug:
: 29.4 - 39.2 N·m (3.0 - 4.0 kg-m, 22 - 28 ft-lb)
KBIA0303E
Page 3806 of 3833

MA-26
ENGINE MAINTENANCE (YD22DDTI)
ENGINE MAINTENANCE (YD22DDTI)
PFP:00100
Checking Drive BeltsELS000CC
●Before inspecting the engine, make sure the engine has cooled
down; wait approximately 30 minutes after the engine has been
stopped.
●Visually inspect all belts for wear, damage or cracks on contact-
ing surfaces and edge areas.
●When measuring deflection, apply 98 N (10 kg, 22 lb) at the
marked point ( ).
CAUTION:
●When checking belt deflection immediately after installa-
tion, first adjust it to the specified value. Then, after turn-
ing the crankshaft two turns or more, re-adjust to the
specified value to avoid variation in deflection between
pulleys.
●Tighten idler pulley lock nut by hand and measure deflection without looseness.
Belt Deflection:
*: When engine is cold.
Tension AdjustmentELS000K5
Adjust belts with the parts shown below.
CAUTION:
●When a new belt is installed as a replacement, adjust it to the value specified under “New” value
because of insufficient adaptability with pulley grooves.
●If the belt deflection of the current belt is out of the “Limit for re-adjusting”, adjust to the
“Adjusted” value.
●When checking belt deflection immediately after installation, first adjust it to the specified value.
Then, after turning crankshaft two turns or more, re-adjust it to the specified value to avoid varia-
tion in deflection between pulleys.
●Make sure the belts are fully fitted into the pulley grooves during installation.
●Handle with care to avoid smearing the belts with engine oil or cooling water etc.
●Do not twist or bend the belts with strong force.
PBIC1251E
Applied beltBelt deflection with 98 N (10 kg, 22 lb) force applied* mm (in)
New Adjusted Limit for re-adjusting
Air conditioner compressor belt 4 - 5 (0.16 - 0.20) 6 - 7 (0.24 - 0.28) 8.5 (0.335)
Alternator and water pump belt 9.0 - 10.5 (0.354 - 0.413) 11.0 - 12.5 (0.433 - 0.492) 16.5 (0.650)
Applied belt Belt adjustment method
Air conditioner compressor belt Adjusting bolt on idler pulley
Alternator and water pump belt Adjusting bolt on alternator
Page 3807 of 3833
ENGINE MAINTENANCE (YD22DDTI)
MA-27
C
D
E
F
G
H
I
J
K
MA
B
MA
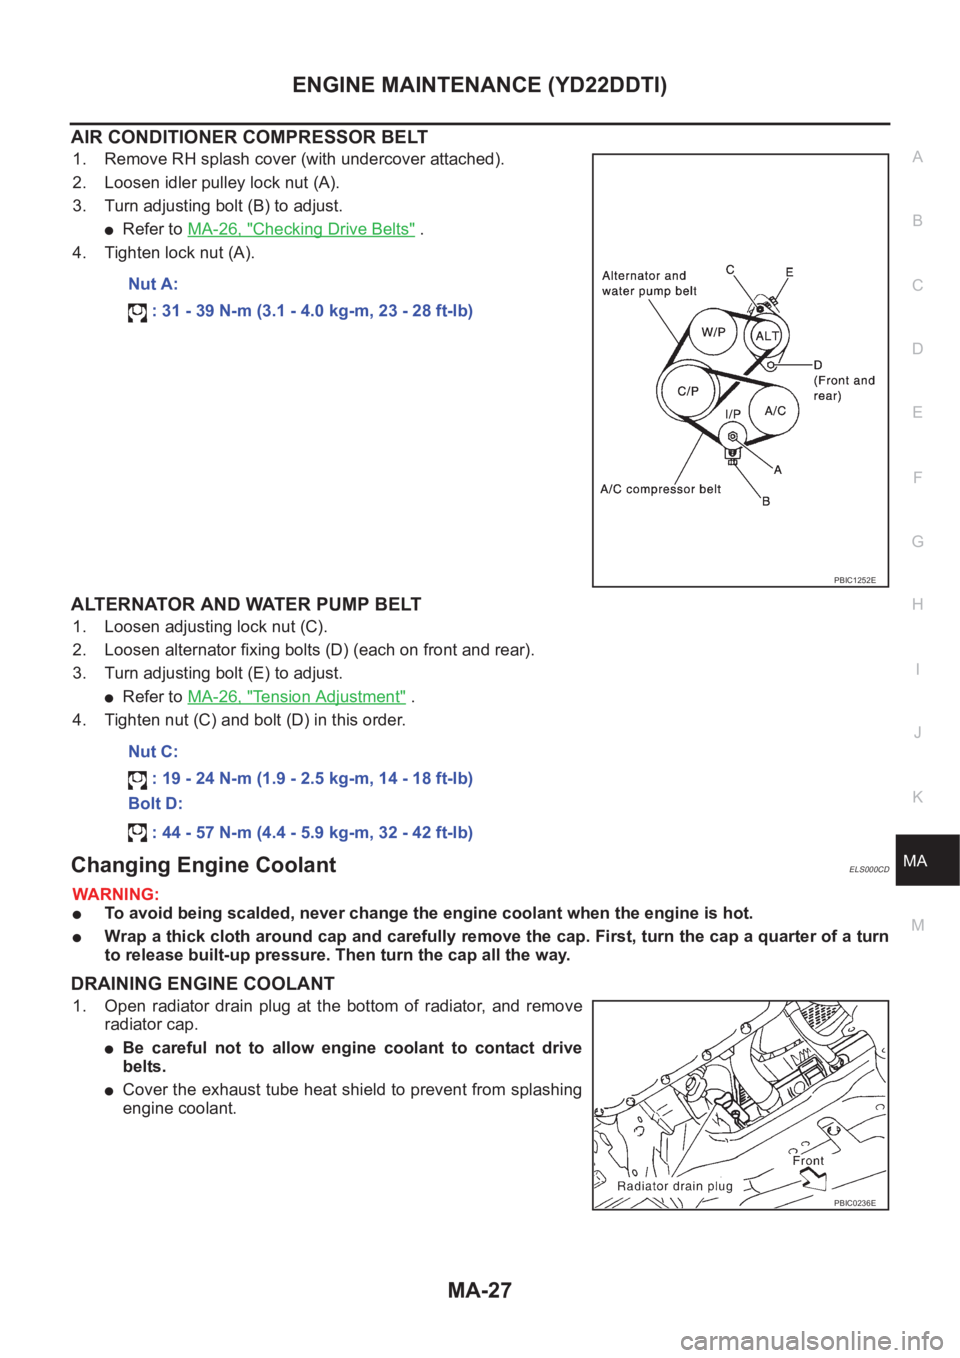
AIR CONDITIONER COMPRESSOR BELT
1. Remove RH splash cover (with undercover attached).
2. Loosen idler pulley lock nut (A).
3. Turn adjusting bolt (B) to adjust.
●Refer to MA-26, "Checking Drive Belts" .
4. Tighten lock nut (A).
ALTERNATOR AND WATER PUMP BELT
1. Loosen adjusting lock nut (C).
2. Loosen alternator fixing bolts (D) (each on front and rear).
3. Turn adjusting bolt (E) to adjust.
●Refer to MA-26, "Tension Adjustment" .
4. Tighten nut (C) and bolt (D) in this order.
Changing Engine CoolantELS000CD
WARNING:
●To avoid being scalded, never change the engine coolant when the engine is hot.
●Wrap a thick cloth around cap and carefully remove the cap. First, turn the cap a quarter of a turn
to release built-up pressure. Then turn the cap all the way.
DRAINING ENGINE COOLANT
1. Open radiator drain plug at the bottom of radiator, and remove
radiator cap.
●Be careful not to allow engine coolant to contact drive
belts.
●Cover the exhaust tube heat shield to prevent from splashing
engine coolant.Nut A:
: 31 - 39 N-m (3.1 - 4.0 kg-m, 23 - 28 ft-lb)
PBIC1252E
Nut C:
: 19 - 24 N-m (1.9 - 2.5 kg-m, 14 - 18 ft-lb)
Bolt D:
: 44 - 57 N-m (4.4 - 5.9 kg-m, 32 - 42 ft-lb)
PBIC0236E
Page 3813 of 3833
ENGINE MAINTENANCE (YD22DDTI)
MA-33
C
D
E
F
G
H
I
J
K
MA
B
MA
Changing Oil FilterELS000CI
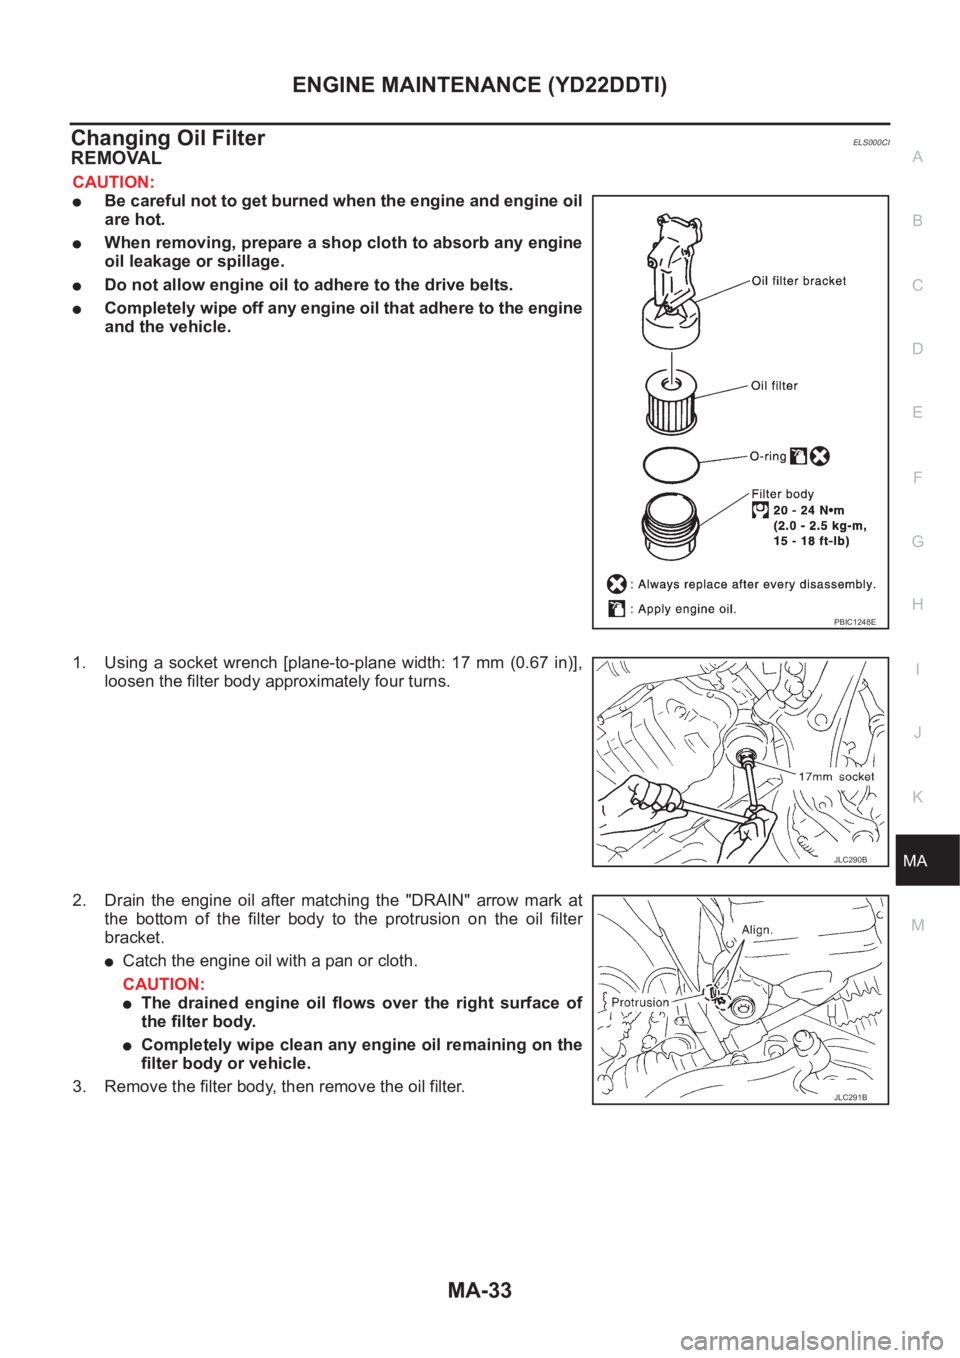
REMOVAL
CAUTION:
●Be careful not to get burned when the engine and engine oil
are hot.
●When removing, prepare a shop cloth to absorb any engine
oil leakage or spillage.
●Do not allow engine oil to adhere to the drive belts.
●Completely wipe off any engine oil that adhere to the engine
and the vehicle.
1. Using a socket wrench [plane-to-plane width: 17 mm (0.67 in)],
loosen the filter body approximately four turns.
2. Drain the engine oil after matching the "DRAIN" arrow mark at
the bottom of the filter body to the protrusion on the oil filter
bracket.
●Catch the engine oil with a pan or cloth.
CAUTION:
●The drained engine oil flows over the right surface of
the filter body.
●Completely wipe clean any engine oil remaining on the
filter body or vehicle.
3. Remove the filter body, then remove the oil filter.
PBIC1248E
JLC290B
JLC291B
Page 3822 of 3833
MA-42
CHASSIS AND BODY MAINTENANCE
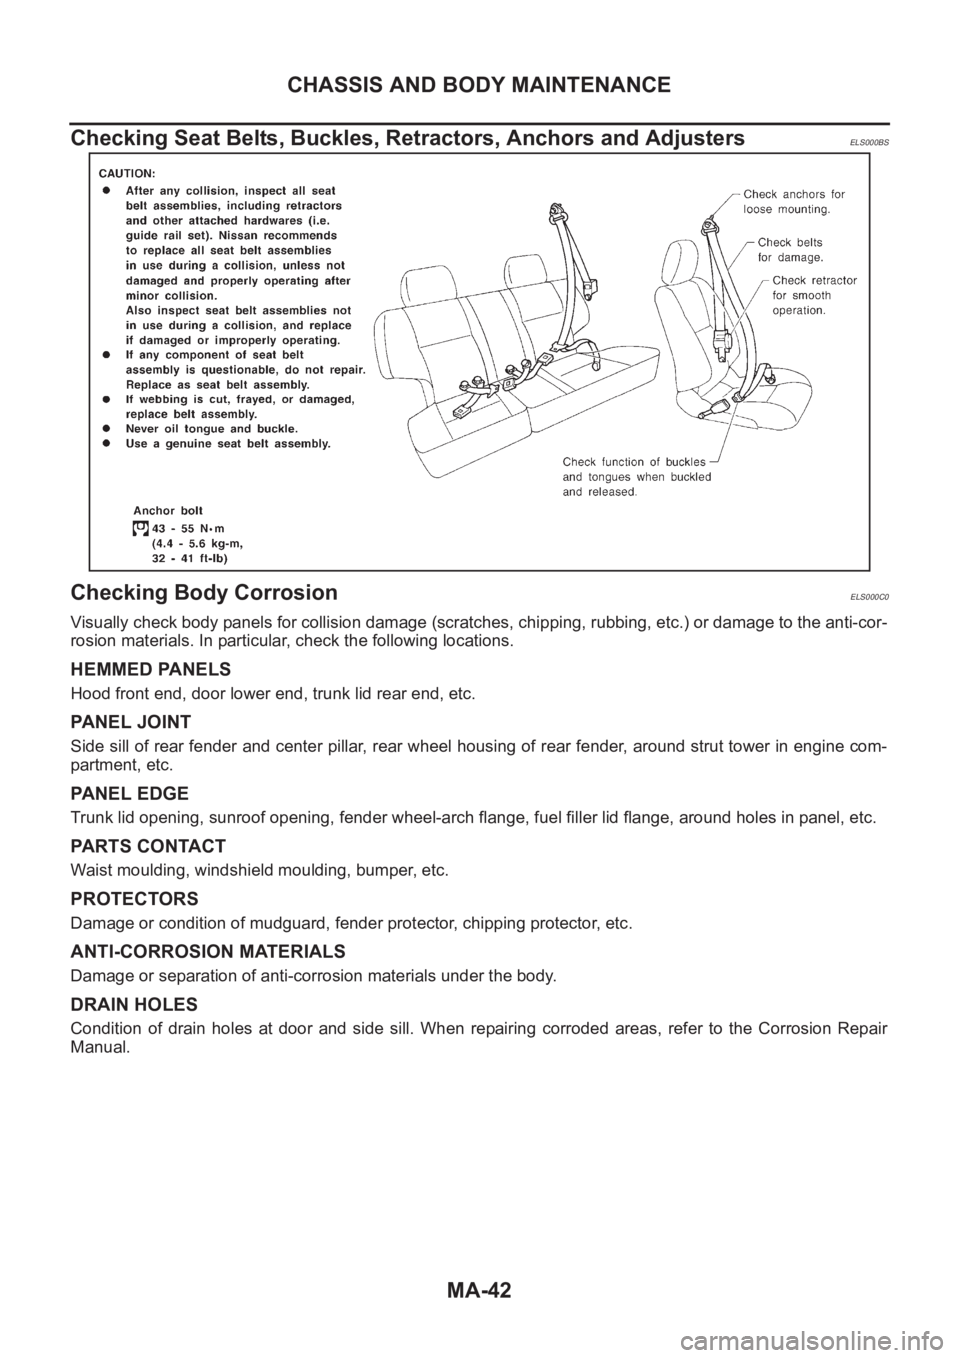
Checking Seat Belts, Buckles, Retractors, Anchors and Adjusters
ELS000BS
Checking Body CorrosionELS000C0
Visually check body panels for collision damage (scratches, chipping, rubbing, etc.) or damage to the anti-cor-
rosion materials. In particular, check the following locations.
HEMMED PANELS
Hood front end, door lower end, trunk lid rear end, etc.
PANEL JOINT
Side sill of rear fender and center pillar, rear wheel housing of rear fender, around strut tower in engine com-
partment, etc.
PANEL EDGE
Trunk lid opening, sunroof opening, fender wheel-arch flange, fuel filler lid flange, around holes in panel, etc.
PARTS CONTACT
Waist moulding, windshield moulding, bumper, etc.
PROTECTORS
Damage or condition of mudguard, fender protector, chipping protector, etc.
ANTI-CORROSION MATERIALS
Damage or separation of anti-corrosion materials under the body.
DRAIN HOLES
Condition of drain holes at door and side sill. When repairing corroded areas, refer to the Corrosion Repair
Manual.