Page 375 of 1306
On Board Diagnosis LogicNEEC0329
DTC No. Malfunction is detected when ... Check Items (Possible Cause)
P1336
1336+A chipping of the flywheel or drive plate gear tooth (cog)
is detected by the ECM.+Harness or connectors
+Crankshaft position sensor (OBD)
+Flywheel
SEF058Y
DTC Confirmation ProcedureNEEC0330NOTE:
If ªDTC Confirmation Procedureº has been previously conducted,
always turn ignition switch OFF and wait at least 5 seconds before
conducting the next test.
With CONSULT-II
1) Turn ignition switch ON and select ªDATA MONITORº mode
with CONSULT-II.
2) Start engine and run it for at least 2 minutes at idle speed.
3) If 1st trip DTC is detected, go to ªDiagnostic Procedureº,
EC-3352.
With GST
Follow the procedure ªWith CONSULT-IIº.
DTC P1336 CKP SENSOR (OBD)KA24DE (EURO OBD)
On Board Diagnosis Logic
EC-3350
Page 377 of 1306

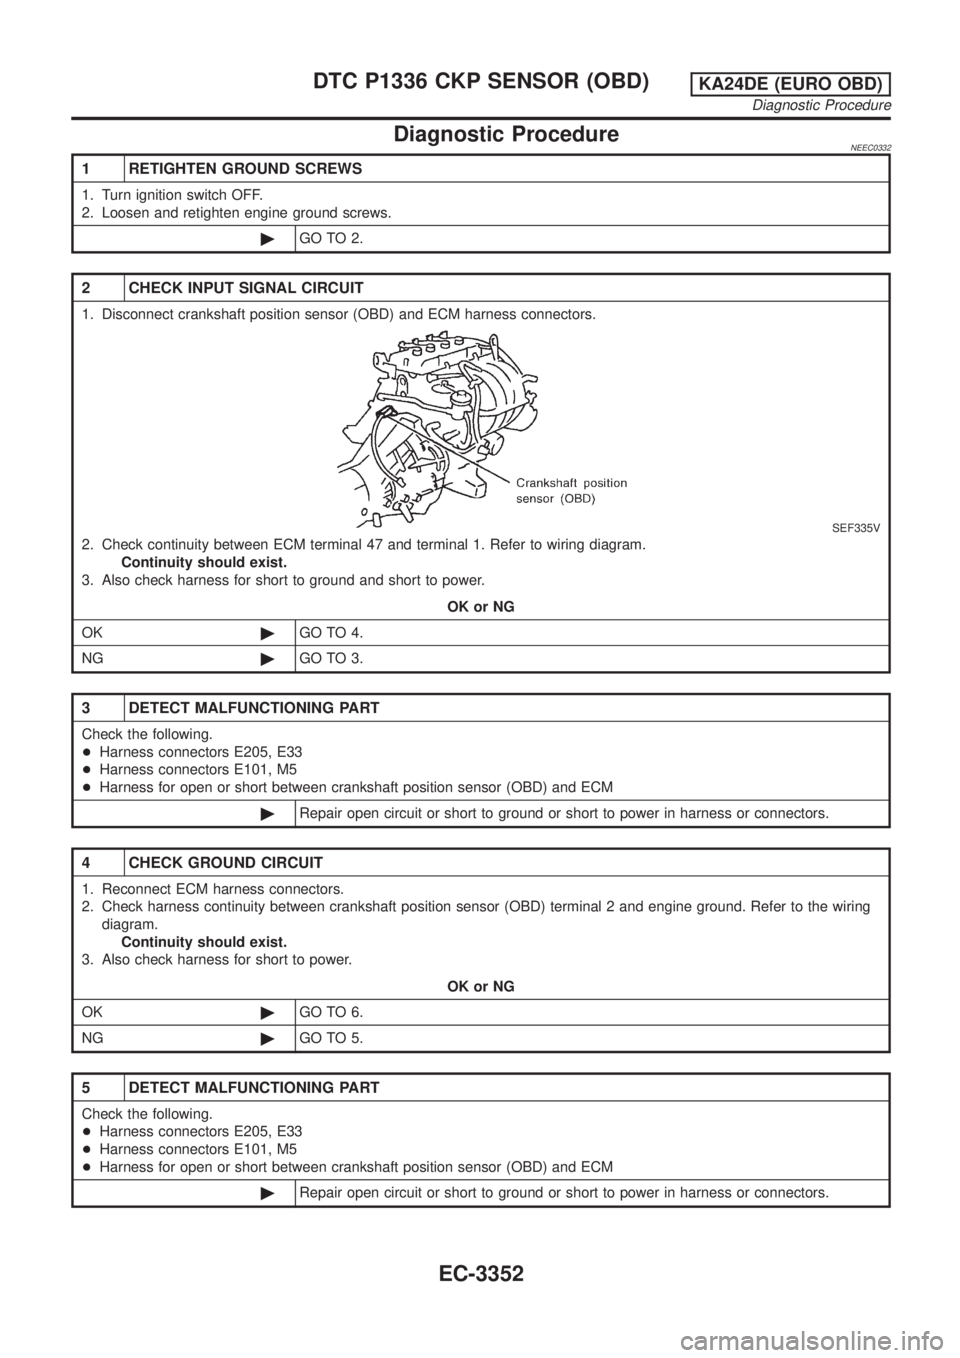
Diagnostic ProcedureNEEC0332
1 RETIGHTEN GROUND SCREWS
1. Turn ignition switch OFF.
2. Loosen and retighten engine ground screws.
©GO TO 2.
2 CHECK INPUT SIGNAL CIRCUIT
1. Disconnect crankshaft position sensor (OBD) and ECM harness connectors.
SEF335V
2. Check continuity between ECM terminal 47 and terminal 1. Refer to wiring diagram.
Continuity should exist.
3. Also check harness for short to ground and short to power.
OK or NG
OK©GO TO 4.
NG©GO TO 3.
3 DETECT MALFUNCTIONING PART
Check the following.
+Harness connectors E205, E33
+Harness connectors E101, M5
+Harness for open or short between crankshaft position sensor (OBD) and ECM
©Repair open circuit or short to ground or short to power in harness or connectors.
4 CHECK GROUND CIRCUIT
1. Reconnect ECM harness connectors.
2. Check harness continuity between crankshaft position sensor (OBD) terminal 2 and engine ground. Refer to the wiring
diagram.
Continuity should exist.
3. Also check harness for short to power.
OK or NG
OK©GO TO 6.
NG©GO TO 5.
5 DETECT MALFUNCTIONING PART
Check the following.
+Harness connectors E205, E33
+Harness connectors E101, M5
+Harness for open or short between crankshaft position sensor (OBD) and ECM
©Repair open circuit or short to ground or short to power in harness or connectors.
DTC P1336 CKP SENSOR (OBD)KA24DE (EURO OBD)
Diagnostic Procedure
EC-3352
Page 378 of 1306
6 CHECK SHIELD CIRCUIT
1. Turn ignition switch OFF.
2. Disconnect harness connectors E205, E33.
3. Check harness continuity between harness connector E33 terminal 5 and ground. Refer to wiring diagram.
Continuity should exist
4. Also check harness for short to power.
5. Then reconnect harness connectors.
OK or NG
OK©GO TO 8.
NG©GO TO 7.
7 DETECT MALFUNCTIONING PART
Check the following.
+Harness connectors E101, M5
+Joint connector-3 (Refer to ªHARNESS LAYOUTº, EL section.)
+Harness for open or short between harness connector E33 and engine ground
©Repair open circuit or short to power in harness or connectors.
8 CHECK IMPROPER INSTALLATION
Loosen and retighten the fixing bolt of the crankshaft position sensor (OBD). Then retest.
Trouble is not fixed.©GO TO 9.
DTC P1336 CKP SENSOR (OBD)KA24DE (EURO OBD)
Diagnostic Procedure
EC-3353
Page 380 of 1306

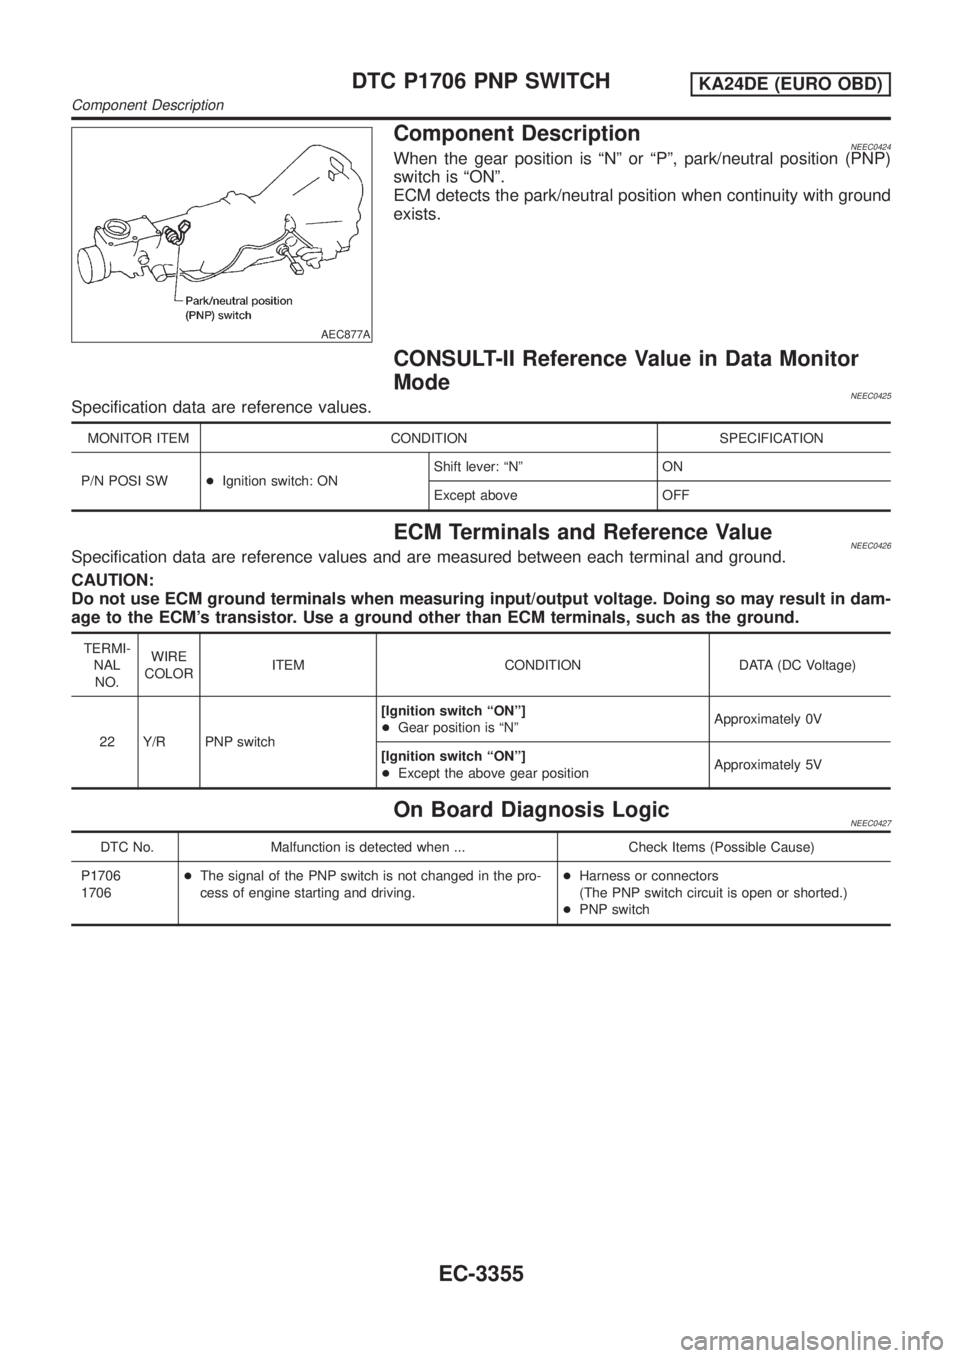
AEC877A
Component DescriptionNEEC0424When the gear position is ªNº or ªPº, park/neutral position (PNP)
switch is ªONº.
ECM detects the park/neutral position when continuity with ground
exists.
CONSULT-II Reference Value in Data Monitor
Mode
NEEC0425Specification data are reference values.
MONITOR ITEM CONDITION SPECIFICATION
P/N POSI SW+Ignition switch: ONShift lever: ªNº ON
Except above OFF
ECM Terminals and Reference ValueNEEC0426Specification data are reference values and are measured between each terminal and ground.
CAUTION:
Do not use ECM ground terminals when measuring input/output voltage. Doing so may result in dam-
age to the ECM's transistor. Use a ground other than ECM terminals, such as the ground.
TERMI-
NAL
NO.WIRE
COLORITEM CONDITION DATA (DC Voltage)
22 Y/R PNP switch[Ignition switch ªONº]
+Gear position is ªNºApproximately 0V
[Ignition switch ªONº]
+Except the above gear positionApproximately 5V
On Board Diagnosis LogicNEEC0427
DTC No. Malfunction is detected when ... Check Items (Possible Cause)
P1706
1706+The signal of the PNP switch is not changed in the pro-
cess of engine starting and driving.+Harness or connectors
(The PNP switch circuit is open or shorted.)
+PNP switch
DTC P1706 PNP SWITCHKA24DE (EURO OBD)
Component Description
EC-3355
Page 381 of 1306

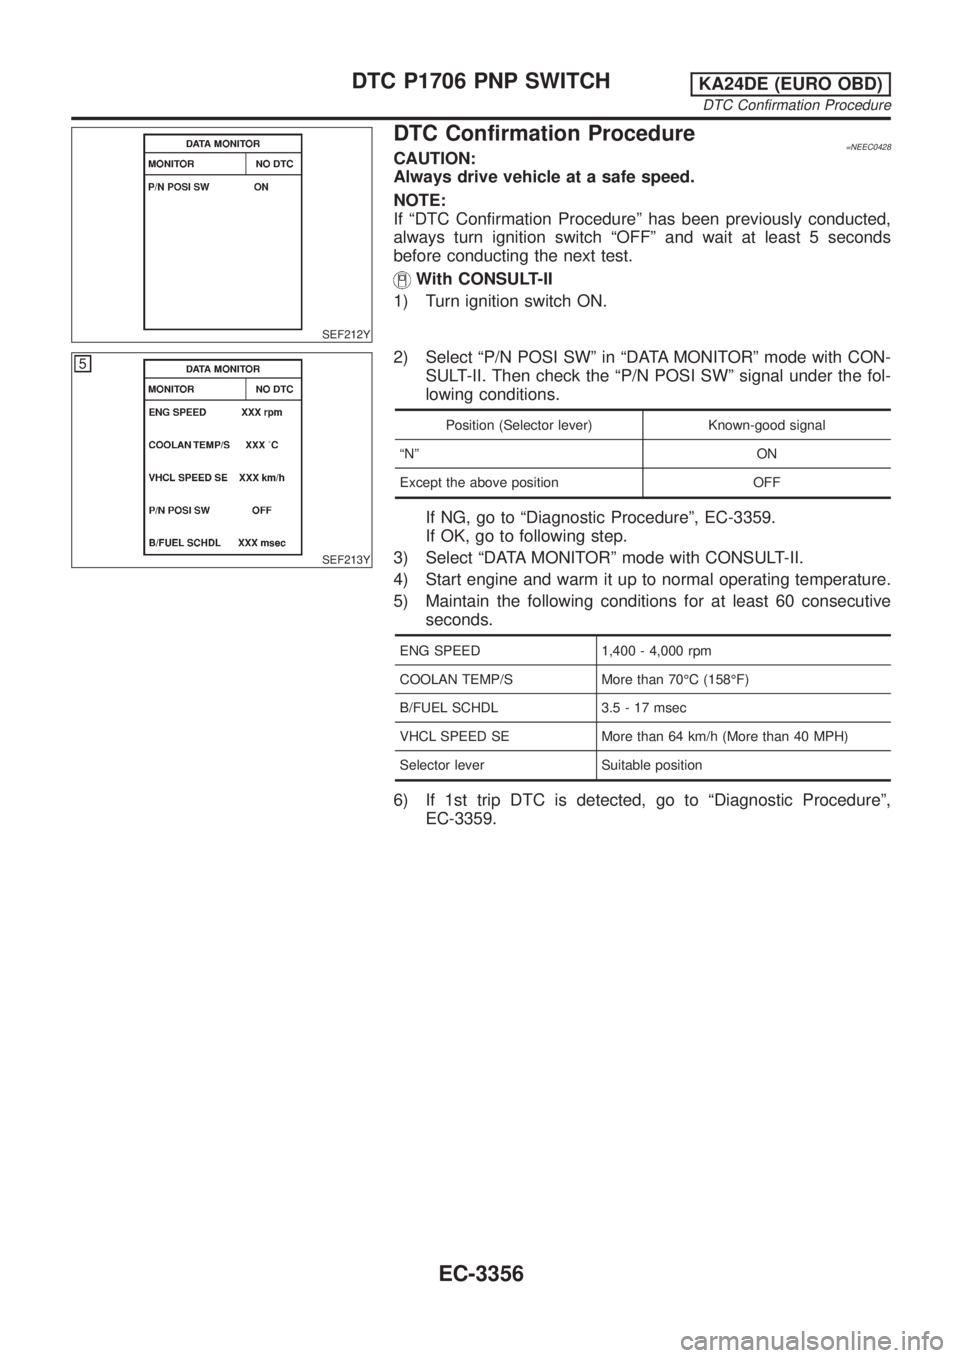
SEF212Y
DTC Confirmation Procedure=NEEC0428CAUTION:
Always drive vehicle at a safe speed.
NOTE:
If ªDTC Confirmation Procedureº has been previously conducted,
always turn ignition switch ªOFFº and wait at least 5 seconds
before conducting the next test.
With CONSULT-II
1) Turn ignition switch ON.
SEF213Y
2) Select ªP/N POSI SWº in ªDATA MONITORº mode with CON-
SULT-II. Then check the ªP/N POSI SWº signal under the fol-
lowing conditions.
Position (Selector lever) Known-good signal
ªNº ON
Except the above position OFF
If NG, go to ªDiagnostic Procedureº, EC-3359.
If OK, go to following step.
3) Select ªDATA MONITORº mode with CONSULT-II.
4) Start engine and warm it up to normal operating temperature.
5) Maintain the following conditions for at least 60 consecutive
seconds.
ENG SPEED 1,400 - 4,000 rpm
COOLAN TEMP/S More than 70ÉC (158ÉF)
B/FUEL SCHDL 3.5 - 17 msec
VHCL SPEED SE More than 64 km/h (More than 40 MPH)
Selector lever Suitable position
6) If 1st trip DTC is detected, go to ªDiagnostic Procedureº,
EC-3359.
DTC P1706 PNP SWITCHKA24DE (EURO OBD)
DTC Confirmation Procedure
EC-3356
Page 390 of 1306
Diagnostic ProcedureNEEC0325
1 INSPECTION START
Turn ignition switch ªOFFº, and restart engine.
Is engine running?
YesorNo
Yes (With CONSULT-II)©GO TO 2.
Yes (Without CONSULT-
II)©GO TO 3.
No©GO TO 4.
2 CHECK OVERALL FUNCTION
With CONSULT-II
1. Perform ªPOWER BALANCEº in ªACTIVE TESTº mode with CONSULT-II.
2. Make sure that all circuits do not produce a momentary engine speed drop.
SEF981Z
OK or NG
OK©INSPECTION END
NG©GO TO 7.
3 CHECK OVERALL FUNCTION
Without CONSULT-II
1. Let engine idle.
2. Read the voltage signal between ECM terminal 1 and ground with an oscilloscope.
3. Verify that the oscilloscope screen shows the signal wave as shown below.
SEF984Z
OK or NG
OK©INSPECTION END
NG©GO TO 7.
IGNITION SIGNALKA24DE (EURO OBD)
Diagnostic Procedure
EC-3365
Page 391 of 1306
4 CHECK POWER SUPPLY
1. Turn ignition switch OFF.
2. Disconnect ignition coil harness connector.
SEC276D
3. Turn ignition switch ON.
4. Check voltage between terminal 7 and ground with CONSULT-II or tester.
AEC698
Voltage: Battery voltage
OK or NG
OK©GO TO 6.
NG©GO TO 5.
5 DETECT MALFUNCTIONING PART
Check the following.
+Harness connectors E101, M5
+Harness for open or short between ignition coil and ECM relay
+Harness for open or short between ECM relay and fuse
©Repair harness or connectors.
6 CHECK GROUND CIRCUIT
1. Turn ignition switch OFF.
2. Disconnect power transistor harness connector.
3. Check harness continuity between power transistor terminal 2 and engine ground. Refer to Wiring Diagram.
Continuity should exist.
4. Also check harness for short to power.
OK or NG
OK©GO TO 7.
NG©Repair open circuit or short to power in harness or connectors.
IGNITION SIGNALKA24DE (EURO OBD)
Diagnostic Procedure
EC-3366
Page 396 of 1306
Diagnostic ProcedureNEEC0438
1 CHECK OVERALL FUNCTION
With CONSULT-II
1. Start engine.
2. Perform ªPOWER BALANCEº in ªACTIVE TESTº mode with CONSULT-II.
SEF981Z
3. Make sure that each circuit produces a momentary engine speed drop.
Without CONSULT-II
1. Start engine.
2. Listen to each injector operating sound.
MEC703B
Clicking noise should be heard.
OK or NG
OK©INSPECTION END
NG©GO TO 2.
INJECTORKA24DE (EURO OBD)
Diagnostic Procedure
EC-3371