Page 4 of 1306

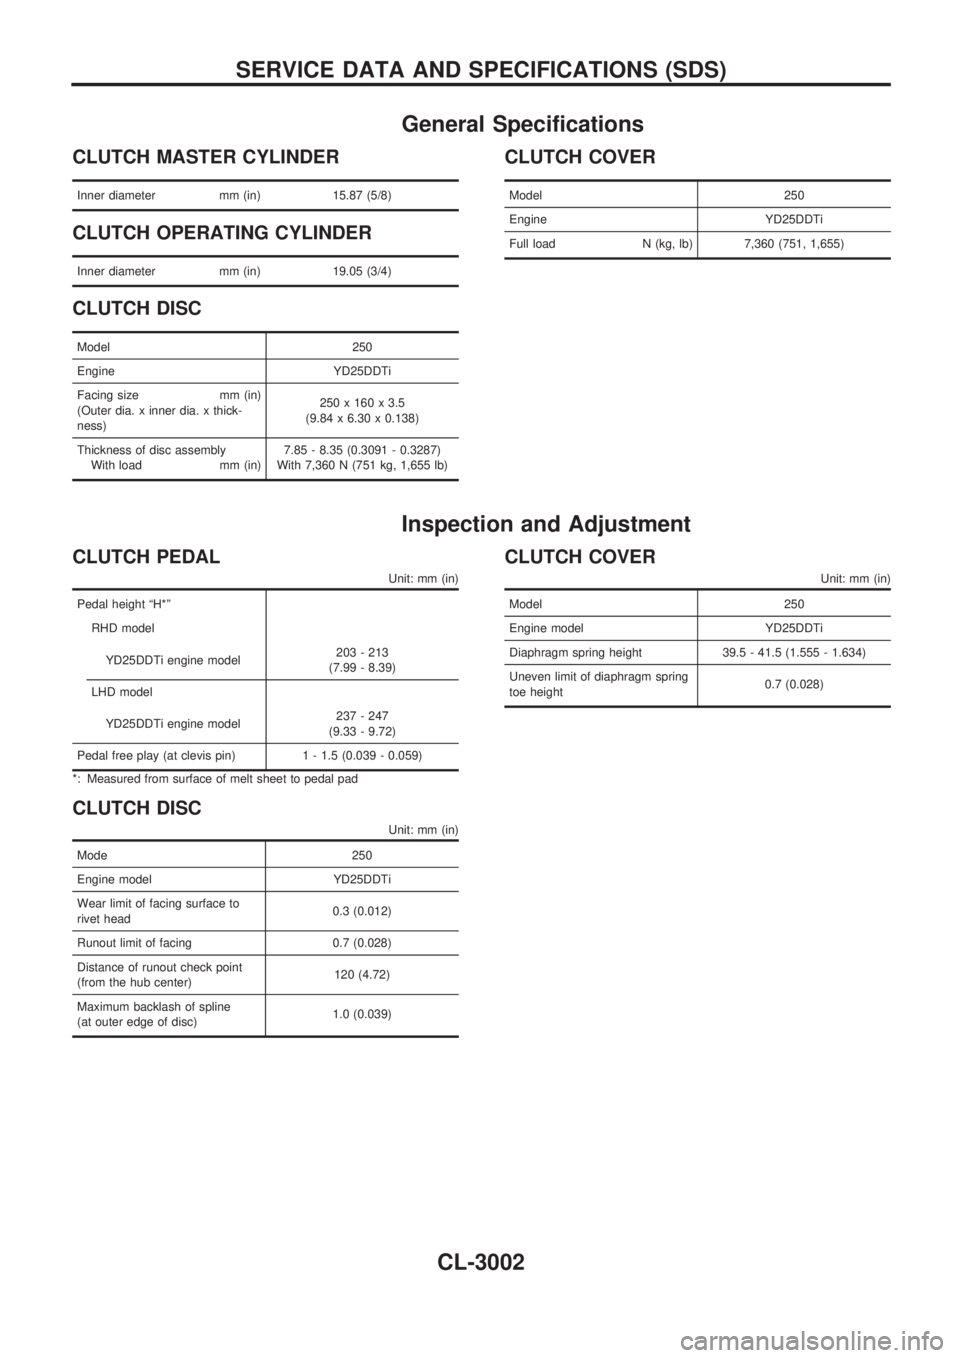
General Specifications
CLUTCH MASTER CYLINDER
Inner diameter mm (in) 15.87 (5/8)
CLUTCH OPERATING CYLINDER
Inner diameter mm (in) 19.05 (3/4)
CLUTCH DISC
Model 250
Engine YD25DDTi
Facing size mm (in)
(Outer dia. x inner dia. x thick-
ness)250 x 160 x 3.5
(9.84 x 6.30 x 0.138)
Thickness of disc assembly
With load mm (in)7.85 - 8.35 (0.3091 - 0.3287)
With 7,360 N (751 kg, 1,655 lb)
CLUTCH COVER
Model 250
Engine YD25DDTi
Full load N (kg, lb) 7,360 (751, 1,655)
Inspection and Adjustment
CLUTCH PEDAL
Unit: mm (in)
Pedal height ªH*º
RHD model
YD25DDTi engine model203 - 213
(7.99 - 8.39)
LHD model
YD25DDTi engine model237 - 247
(9.33 - 9.72)
Pedal free play (at clevis pin) 1 - 1.5 (0.039 - 0.059)
*: Measured from surface of melt sheet to pedal pad
CLUTCH DISC
Unit: mm (in)
Mode 250
Engine model YD25DDTi
Wear limit of facing surface to
rivet head0.3 (0.012)
Runout limit of facing 0.7 (0.028)
Distance of runout check point
(from the hub center)120 (4.72)
Maximum backlash of spline
(at outer edge of disc)1.0 (0.039)
CLUTCH COVER
Unit: mm (in)
Model 250
Engine model YD25DDTi
Diaphragm spring height 39.5 - 41.5 (1.555 - 1.634)
Uneven limit of diaphragm spring
toe height0.7 (0.028)
SERVICE DATA AND SPECIFICATIONS (SDS)
CL-3002
Page 162 of 1306
4 CHECK HEATED OXYGEN SENSOR 1 HEATER
Check resistance between terminals 1 and 3.
SEF731Z
Resistance: 2.3 - 4.3Wat 25ÉC (77ÉF)
Check continuity between terminals 1 and 2, 3 and 2.
Continuity should not exist.
CAUTION:
+Discard any heated oxygen sensor which has been dropped from a height of more than 0.5 m (19.7 in) onto a
hard surface such as a concrete floor; use a new one.
+Before installing new oxygen sensor, clean exhaust system threads using Oxygen Sensor Thread Cleaner tool
J-43897-18 or J-43897-12 and approved anti-seize lubricant.
OK or NG
OK©GO TO 5.
NG©Replace heated oxygen sensor 1.
5 CHECK INTERMITTENT INCIDENT
Perform ªTROUBLE DIAGNOSIS FOR INTERMITTENT INCIDENTº, EC-3123.
©INSPECTION END
DTC P0031, P0032 HO2S1 HEATERKA24DE (EURO OBD)
Diagnostic Procedure
EC-3137
Page 167 of 1306
4 CHECK HEATED OXYGEN SENSOR 2 HEATER
Check the following.
1. Check resistance between terminals 2 and 3.
SEF221W
Resistance: 2.3 - 4.3Wat 25ÉC (77ÉF)
2. Check continuity.
MTBL0330
CAUTION:
+Discard any heated oxygen sensor which has been dropped from a height of more than 0.5 m (19.7 in) onto a
hard surface such as a concrete floor; use a new one.
+Before installing new oxygen sensor, clean exhaust system threads using Oxygen Sensor Thread Cleaner tool
J-43897-18 or J-43897-12 and approved anti-seize lubricant.
OK or NG
OK©GO TO 5.
NG©Replace heated oxygen sensor 2.
5 CHECK INTERMITTENT INCIDENT
Perform ªTROUBLE DIAGNOSIS FOR INTERMITTENT INCIDENTº, EC-3123.
©INSPECTION END
DTC P0037, P0038 HO2S2 HEATERKA24DE (EURO OBD)
Diagnostic Procedure
EC-3142
Page 225 of 1306

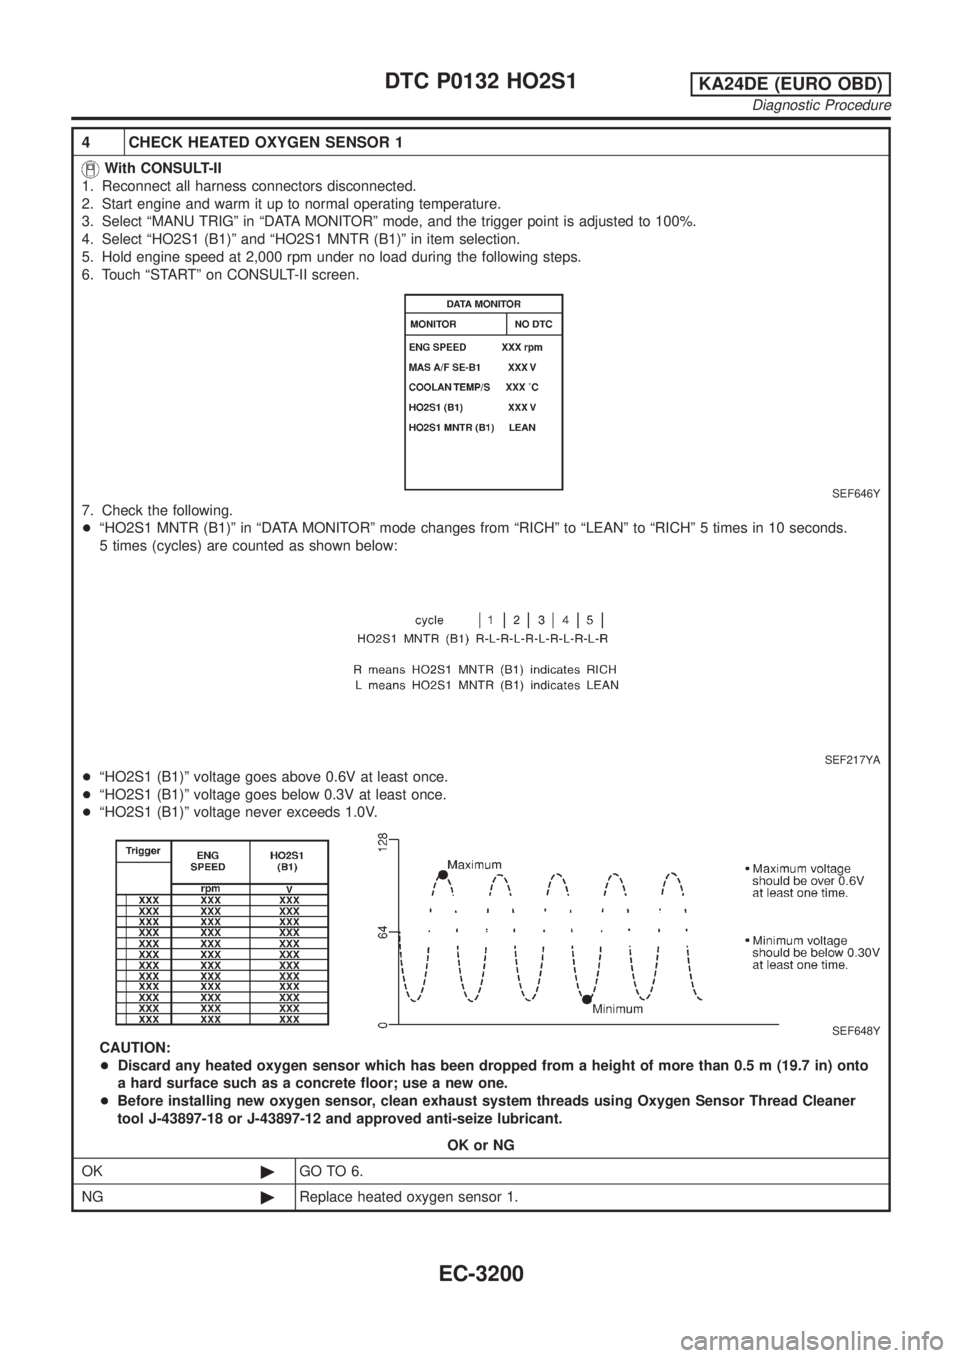
4 CHECK HEATED OXYGEN SENSOR 1
With CONSULT-II
1. Reconnect all harness connectors disconnected.
2. Start engine and warm it up to normal operating temperature.
3. Select ªMANU TRIGº in ªDATA MONITORº mode, and the trigger point is adjusted to 100%.
4. Select ªHO2S1 (B1)º and ªHO2S1 MNTR (B1)º in item selection.
5. Hold engine speed at 2,000 rpm under no load during the following steps.
6. Touch ªSTARTº on CONSULT-II screen.
SEF646Y
7. Check the following.
+ªHO2S1 MNTR (B1)º in ªDATA MONITORº mode changes from ªRICHº to ªLEANº to ªRICHº 5 times in 10 seconds.
5 times (cycles) are counted as shown below:
SEF217YA
+ªHO2S1 (B1)º voltage goes above 0.6V at least once.
+ªHO2S1 (B1)º voltage goes below 0.3V at least once.
+ªHO2S1 (B1)º voltage never exceeds 1.0V.
SEF648Y
CAUTION:
+Discard any heated oxygen sensor which has been dropped from a height of more than 0.5 m (19.7 in) onto
a hard surface such as a concrete floor; use a new one.
+Before installing new oxygen sensor, clean exhaust system threads using Oxygen Sensor Thread Cleaner
tool J-43897-18 or J-43897-12 and approved anti-seize lubricant.
OK or NG
OK©GO TO 6.
NG©Replace heated oxygen sensor 1.
DTC P0132 HO2S1KA24DE (EURO OBD)
Diagnostic Procedure
EC-3200
Page 226 of 1306

5 CHECK HEATED OXYGEN SENSOR 1
Without CONSULT-II
1. Reconnect all harness connectors disconnected.
2. Start engine and warm it up to normal operating temperature.
3. Set voltmeter probes between ECM terminal 50 (Heated oxygen sensor 1 signal) and engine ground.
AEC873A
4. Check the following with engine speed held at 2,000 rpm constant under no load.
+The voltage fluctuates between 0 to 0.3V and 0.6 to 1.0V more than five times within 10 seconds.
1 time: 0 - 0.3V®0.6 - 1.0V®0 - 0.3V
2 times: 0 - 0.3V®0.6 - 1.0V®0 - 0.3V®0.6 - 1.0V®0 - 0.3V
+The maximum voltage is over 0.6V at least one time.
+The minimum voltage is below 0.3V at least one time.
+The voltage never exceeds 1.0V.
CAUTION:
+Discard any heated oxygen sensor which has been dropped from a height of more than 0.5 m (19.7 in) onto
a hard surface such as a concrete floor; use a new one.
+Before installing new oxygen sensor, clean exhaust system threads using Oxygen Sensor Thread Cleaner
tool J-43897-18 or J-43897-12 and approved anti-seize lubricant.
OK or NG
OK©GO TO 6.
NG©Replace heated oxygen sensor 1.
6 CHECK SHIELD CIRCUIT
1. Turn ignition switch OFF.
2. Remove joint connector-3.
3. Check the following.
+Continuity between joint connector-3 terminal 1 and ground
+Joint connector-3
(Refer to ªHARNESS LAYOUTº, EL section.)
Continuity should exist.
4. Also check harness for short to power. Then reconnect joint connector.
OK or NG
OK©GO TO 7.
NG©Repair open circuit, short to power in harness or connectors.
7 CHECK INTERMITTENT INCIDENT
Perform ªTROUBLE DIAGNOSIS FOR INTERMITTENT INCIDENTº, EC-3123.
©INSPECTION END
DTC P0132 HO2S1KA24DE (EURO OBD)
Diagnostic Procedure
EC-3201
Page 233 of 1306

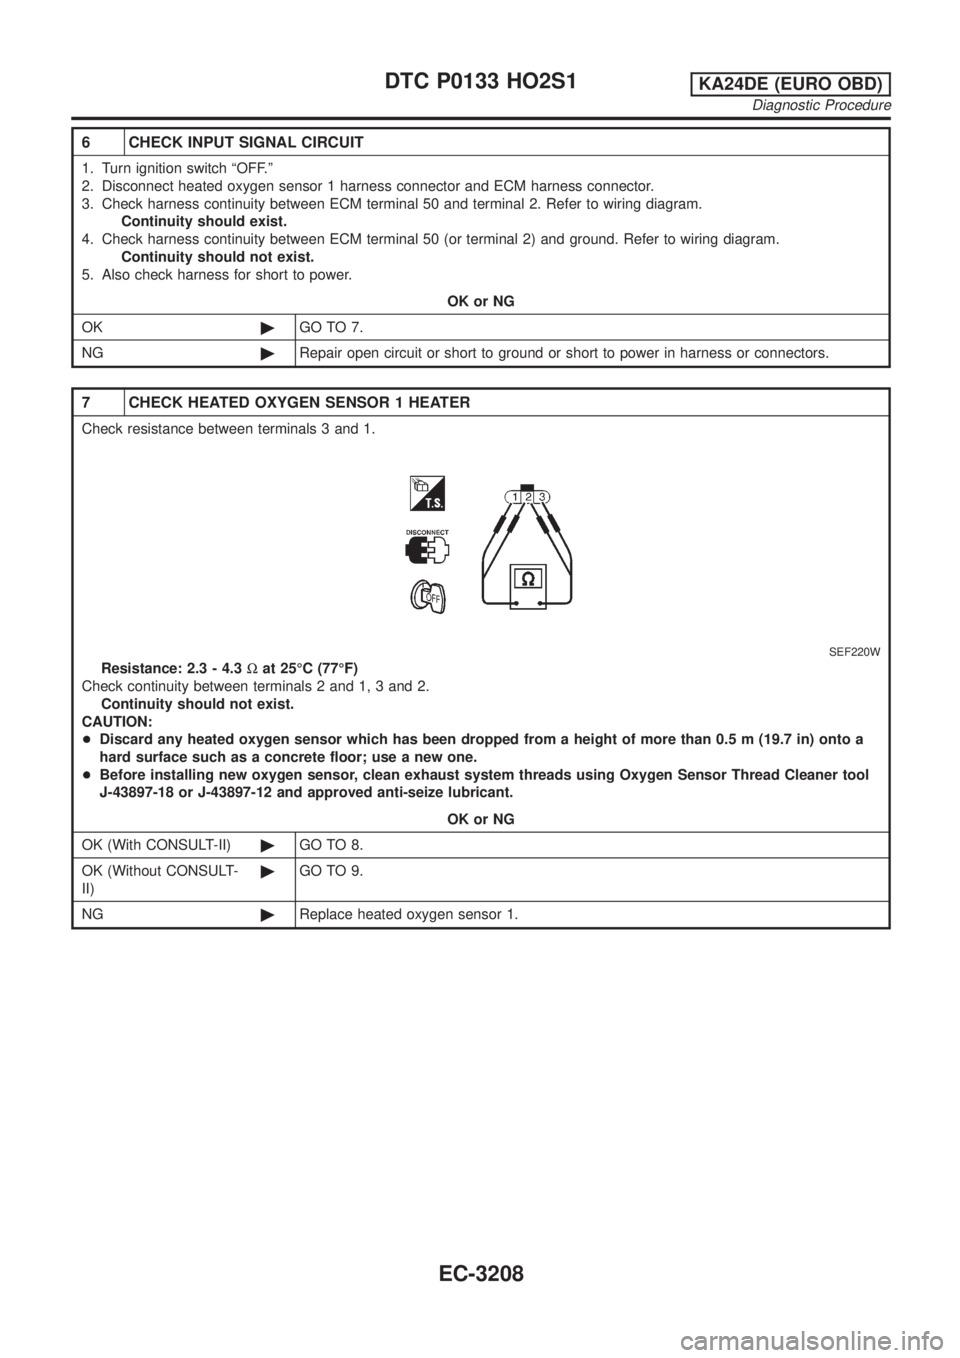
6 CHECK INPUT SIGNAL CIRCUIT
1. Turn ignition switch ªOFF.º
2. Disconnect heated oxygen sensor 1 harness connector and ECM harness connector.
3. Check harness continuity between ECM terminal 50 and terminal 2. Refer to wiring diagram.
Continuity should exist.
4. Check harness continuity between ECM terminal 50 (or terminal 2) and ground. Refer to wiring diagram.
Continuity should not exist.
5. Also check harness for short to power.
OK or NG
OK©GO TO 7.
NG©Repair open circuit or short to ground or short to power in harness or connectors.
7 CHECK HEATED OXYGEN SENSOR 1 HEATER
Check resistance between terminals 3 and 1.
SEF220W
Resistance: 2.3 - 4.3Wat 25ÉC (77ÉF)
Check continuity between terminals 2 and 1, 3 and 2.
Continuity should not exist.
CAUTION:
+Discard any heated oxygen sensor which has been dropped from a height of more than 0.5 m (19.7 in) onto a
hard surface such as a concrete floor; use a new one.
+Before installing new oxygen sensor, clean exhaust system threads using Oxygen Sensor Thread Cleaner tool
J-43897-18 or J-43897-12 and approved anti-seize lubricant.
OK or NG
OK (With CONSULT-II)©GO TO 8.
OK (Without CONSULT-
II)©GO TO 9.
NG©Replace heated oxygen sensor 1.
DTC P0133 HO2S1KA24DE (EURO OBD)
Diagnostic Procedure
EC-3208
Page 234 of 1306

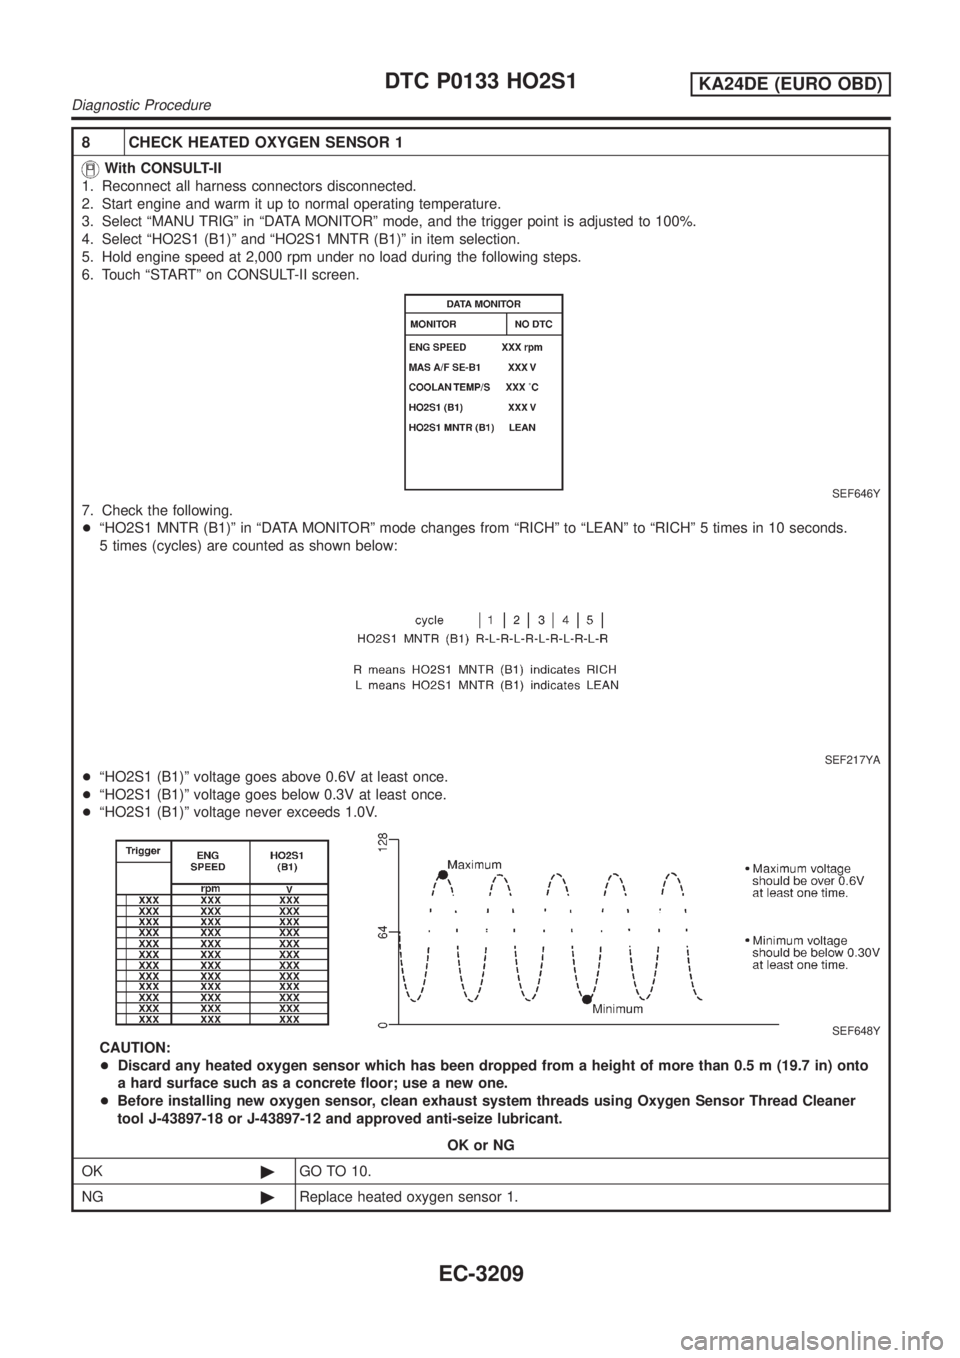
8 CHECK HEATED OXYGEN SENSOR 1
With CONSULT-II
1. Reconnect all harness connectors disconnected.
2. Start engine and warm it up to normal operating temperature.
3. Select ªMANU TRIGº in ªDATA MONITORº mode, and the trigger point is adjusted to 100%.
4. Select ªHO2S1 (B1)º and ªHO2S1 MNTR (B1)º in item selection.
5. Hold engine speed at 2,000 rpm under no load during the following steps.
6. Touch ªSTARTº on CONSULT-II screen.
SEF646Y
7. Check the following.
+ªHO2S1 MNTR (B1)º in ªDATA MONITORº mode changes from ªRICHº to ªLEANº to ªRICHº 5 times in 10 seconds.
5 times (cycles) are counted as shown below:
SEF217YA
+ªHO2S1 (B1)º voltage goes above 0.6V at least once.
+ªHO2S1 (B1)º voltage goes below 0.3V at least once.
+ªHO2S1 (B1)º voltage never exceeds 1.0V.
SEF648Y
CAUTION:
+Discard any heated oxygen sensor which has been dropped from a height of more than 0.5 m (19.7 in) onto
a hard surface such as a concrete floor; use a new one.
+Before installing new oxygen sensor, clean exhaust system threads using Oxygen Sensor Thread Cleaner
tool J-43897-18 or J-43897-12 and approved anti-seize lubricant.
OK or NG
OK©GO TO 10.
NG©Replace heated oxygen sensor 1.
DTC P0133 HO2S1KA24DE (EURO OBD)
Diagnostic Procedure
EC-3209
Page 235 of 1306

9 CHECK HEATED OXYGEN SENSOR 1
Without CONSULT-II
1. Reconnect all harness connectors disconnected.
2. Start engine and warm it up to normal operating temperature.
3. Set voltmeter probes between ECM terminal 50 (Heated oxygen sensor 1 signal) and engine ground.
AEC873A
4. Check the following with engine speed held at 2,000 rpm constant under no load.
+The voltage fluctuates between 0 to 0.3V and 0.6 to 1.0V more than five times within 10 seconds.
1 time: 0 - 0.3V®0.6 - 1.0V®0 - 0.3V
2 times: 0 - 0.3V®0.6 - 1.0V®0 - 0.3V®0.6 - 1.0V®0 - 0.3V
+The maximum voltage is over 0.6V at least one time.
+The minimum voltage is below 0.3V at least one time.
+The voltage never exceeds 1.0V.
CAUTION:
+Discard any heated oxygen sensor which has been dropped from a height of more than 0.5 m (19.7 in) onto
a hard surface such as a concrete floor; use a new one.
+Before installing new oxygen sensor, clean exhaust system threads using Oxygen Sensor Thread Cleaner
tool J-43897-18 or J-43897-12 and approved anti-seize lubricant.
OK or NG
OK©GO TO 10.
NG©Replace heated oxygen sensor 1.
DTC P0133 HO2S1KA24DE (EURO OBD)
Diagnostic Procedure
EC-3210