Page 619 of 2898

BODY & TRIM
SECTION
BT
CONTENTS
PRECAUTIONS...............................................................3
Service Notice..............................................................3
Supplemental Restraint System (SRS)²AIR
BAG²and²SEAT BELT PRE-TENSIONER²...............3
CLIP AND FASTENER....................................................4
Description ...................................................................4
CHASSIS AND BODY MAINTENANCE (FOR
EUROPE).........................................................................6
Checking Body Corrosion ............................................6
BODY FRONT END.........................................................7
Removal and Installation .............................................7
FRONT BUMPER ASSEMBLY....................................7
BODY REAR END AND OPENER................................10
Removal and Installation (Sedan) .............................10
REAR BUMPER ASSEMBLY....................................10
Removal and Installation (Hatchback).......................13
REAR BUMPER ASSEMBLY....................................13
DOOR.............................................................................16
Adjustment .................................................................16
STRIKER ADJUSTMENT..........................................16
Front Door Glass .......................................................17
FRONT DOOR GLASS AND REGULATOR................17
Rear Door Glass ........................................................18
REAR DOOR GLASS AND REGULATOR..................19
Front Door Lock .........................................................21
BELL CRANK ADJUSTMENT....................................21
OUTSIDE HANDLE ROD ADJUSTMENT...................21
REMOVAL...............................................................22
Rear Door Lock .........................................................23
OUTSIDE HANDLE ROD ADJUSTMENT...................23
REMOVAL...............................................................24
INSTRUMENT PANEL ASSEMBLY.............................25
Removal and Installation ...........................................25
SIDE AND FLOOR TRIM...............................................31
Removal and Installation ...........................................31
SEDAN...................................................................31
3-DOOR HATCHBACK.............................................34
5-DOOR HATCHBACK.............................................36
DOOR TRIM...................................................................39
Removal and Installation ...........................................39ROOF TRIM...................................................................43
Removal and Installation ...........................................43
TRUNK ROOM TRIM.....................................................45
Removal and Installation ...........................................45
SEDAN...................................................................45
BACK DOOR TRIM.......................................................46
Removal and Installation ...........................................46
3-DOOR AND 5-DOOR HATCHBACK.......................46
EXTERIOR.....................................................................47
Removal and Installation ...........................................47
FRONT SEAT................................................................56
Removal and Installation ...........................................56
MANUAL SEAT (SEDAN).........................................57
MANUAL SEAT (HATCHBACK)................................58
Heated Seat ...............................................................59
Active Head Restraint ................................................59
OPERATION OUTLINE............................................59
REAR SEAT...................................................................60
Removal and Installation ...........................................60
SEDAN...................................................................60
SEDAN (FOR EUROPE)...........................................61
HATCHBACK...........................................................62
SUNROOF......................................................................63
Adjustment .................................................................63
Removal .....................................................................63
Trouble Diagnoses.....................................................67
DIAGNOSTIC TABLE................................................67
WIND DEFLECTOR.................................................67
ADJUSTMENT.........................................................68
DRAIN HOSES........................................................69
WEATHERSTRIP.....................................................69
LINK AND WIRE ASSEMBLY....................................70
WINDSHIELD AND WINDOWS....................................71
Removal and Installation ...........................................71
REMOVAL...............................................................71
INSTALLATION........................................................71
WINDSHIELD..........................................................72
SIDE WINDOW........................................................73
BACK DOOR WINDOW............................................74
DOOR MIRROR.............................................................75
Page 624 of 2898

Checking Body CorrosionNJBT0033Visually check the body sheet metal panel for corrosion, paint damage (scratches, chipping, rubbing, etc.) or
damage to the anti-corrosion materials. In particular, check the following locations.
Hemmed portion
Hood front end, door lower end, trunk lid rear end, etc.
Panel joint
Side sill of rear fender and center pillar, rear wheel housing of rear fender, around strut tower in engine
compartment, etc.
Panel edge
Trunk lid opening, sunroof opening, fender wheelarch flange, fuel filler lid flange, around holes in panel, etc.
Parts contact
Waist molding, windshield molding, bumper, etc.
Protectors
Damage or condition of mudguard, fender protector, chipping protector, etc.
Anti-corrosion materials
Damage or separation of anti-corrosion materials under the body.
Drain holes
Condition of drain holes at door and side sill.
When repairing corroded areas, refer to the Corrosion Repair Manual.
CHASSIS AND BODY MAINTENANCE (FOR EUROPE)
Checking Body Corrosion
BT-6
Page 661 of 2898
Removal and InstallationNJBT00151. Remove rear seat. Refer to ªREAR SEATº for details, BT-60.
2. Remove shoulder anchor bolts. Refer to RS-5, ªFront Seat Beltº for details.
3. Remove front pillar garnishes, center pillar upper garnishes, center pillar lower garnishes and rear pillar
garnishes. Refer to ªSIDE AND FLOOR TRIMº for details, BT-31.
4. Push back the front seat back.
5. Remove sunroof and spot lamp switch, then disconnect connectors. (Model with sunroof)
6. Remove sunroof welt. (Model with sunroof)
7. Remove interior lamp assembly, then disconnect connectors.
8. Remove rear interior lamp assembly, then disconnect connector.(For Hatchback)
9. Remove rear seat belt center finisher.
(For Hatchback)
10. Remove sun visors.
11. Remove assist grips.
12. Remove clips securing headlining, then remove headlining from vehicle through front passenger side.
SBT055A
ROOF TRIM
Removal and Installation
BT-43
Page 662 of 2898
SBT056A
ROOF TRIM
Removal and Installation (Cont'd)
BT-44
Page 681 of 2898

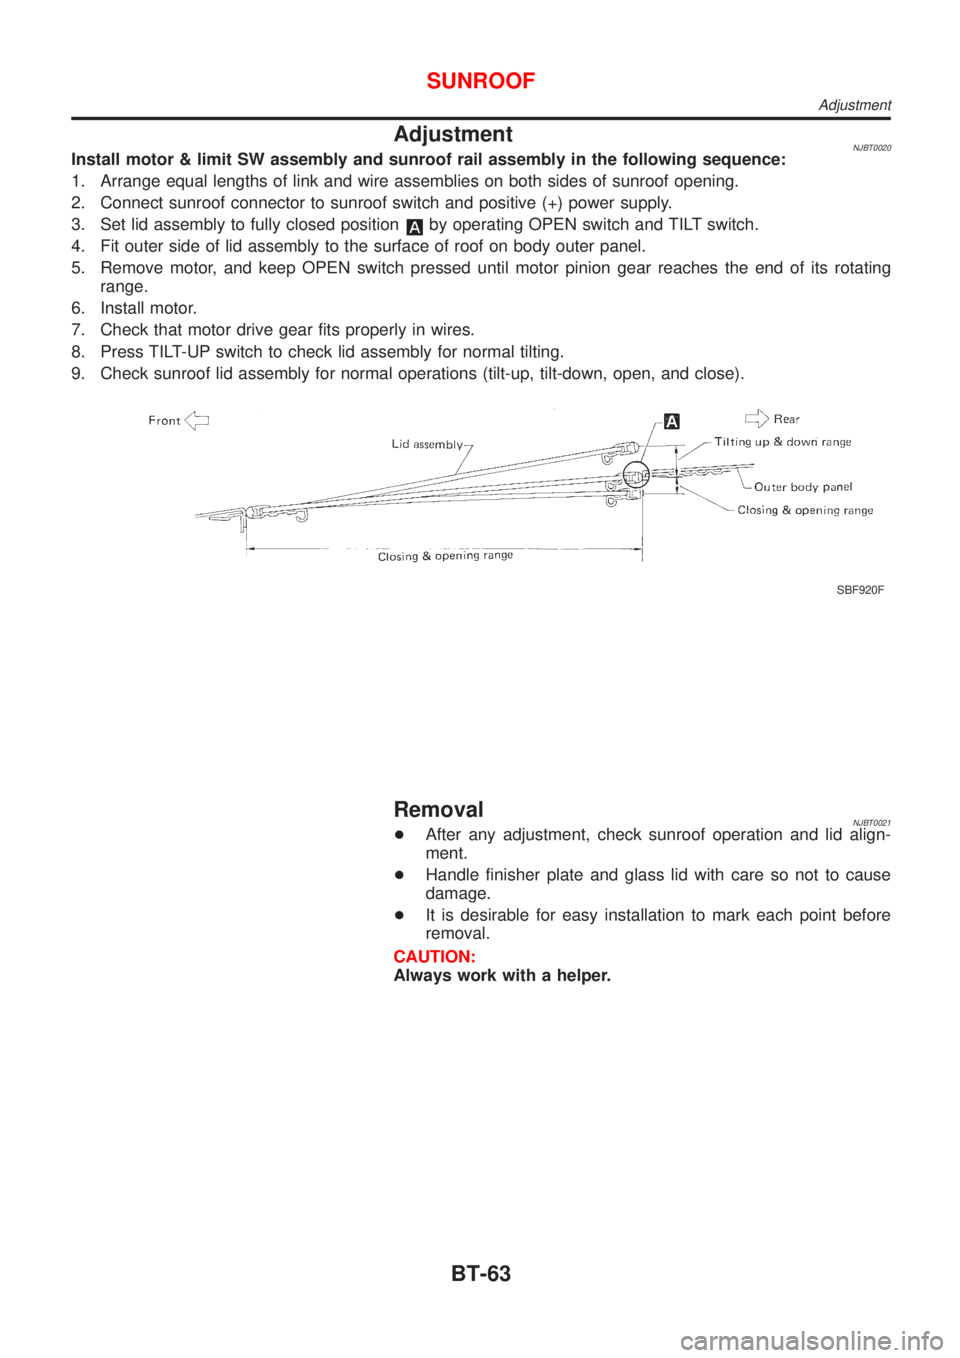
AdjustmentNJBT0020Install motor & limit SW assembly and sunroof rail assembly in the following sequence:
1. Arrange equal lengths of link and wire assemblies on both sides of sunroof opening.
2. Connect sunroof connector to sunroof switch and positive (+) power supply.
3. Set lid assembly to fully closed position
by operating OPEN switch and TILT switch.
4. Fit outer side of lid assembly to the surface of roof on body outer panel.
5. Remove motor, and keep OPEN switch pressed until motor pinion gear reaches the end of its rotating
range.
6. Install motor.
7. Check that motor drive gear fits properly in wires.
8. Press TILT-UP switch to check lid assembly for normal tilting.
9. Check sunroof lid assembly for normal operations (tilt-up, tilt-down, open, and close).
SBF920F
RemovalNJBT0021+After any adjustment, check sunroof operation and lid align-
ment.
+Handle finisher plate and glass lid with care so not to cause
damage.
+It is desirable for easy installation to mark each point before
removal.
CAUTION:
Always work with a helper.
SUNROOF
Adjustment
BT-63
Page 682 of 2898
SBT838
*1 BT-43 *2 EL-292
SUNROOF
Removal (Cont'd)
BT-64
Page 683 of 2898
NBT193
SUNROOF
Removal (Cont'd)
BT-65
Page 684 of 2898
SBT826
Record the number of shims placed between glass lid assem-
bly and link and wire assembly. Remove securing nuts and glass
lid assembly.
SBT827
Remove screws from left and right sides of each wind deflector
holder. Extract pawls through rail holes, then remove left and right
sides of wind deflector holder. Remove screws from front end of
sunroof unit. Extract pawls through frame holes, then remove wind
deflector from frame assembly.
SBT828
CAUTION:
+Before removing sunroof motor, make sure that sunroof is
fully closed.
+After removing sunroof motor, never attempt to rotate
sunroof motor as a single unit.
SBT829
Remove shade stoppers (2 points) from rear end of sunroof
frame assembly. Remove sun shade from rear end of sunroof
frame assembly.
SUNROOF
Removal (Cont'd)
BT-66