2001 NISSAN ALMERA N16 torque
[x] Cancel search: torquePage 4 of 2493
TOWING AN AUTOMATIC TRANSAXLE MODEL
WITH REAR WHEELS RAISED (WITH FRONT
WHEELS ON GROUND)
..........................................47
TOWING POINT.......................................................48TIGHTENING TORQUE OF STANDARD BOLTS........49
ISO 15031-2 TERMINOLOGY LIST..............................50
ISO 15031-2 ..............................................................50
CONTENTS(Cont'd)
GI-2
Page 12 of 2493

NJGI0002
+The captionsWARNINGandCAUTIONwarm you of steps that must be followed to prevent personal injury
and/or damage to some part of the vehicle.
WARNINGindicates the possibility of personal injury if instructions are not followed.
CAUTIONindicates the possibility of component damage if instructions are not followed.
BOLD TYPED STATEMENTSexceptWARNINGandCAUTIONgive you helpful information.
+ALPHABETICAL INDEXis provided at the end of this manual so that you can rapidly find the item and
page you are searching for.
+A QUICK REFERENCE INDEX, a black tab (e.g.
) is provided on the first page. You can quickly find
the first page of each section by matching it to the section's black tab.
+THE CONTENTSare listed on the first page of each section.
+THE TITLEis indicated on the upper portion of each page and shows the part or system.
+THE PAGE NUMBERof each section consists of two letters which designate the particular section and a
number (e.g. ªBR-5º).
+THE LARGE ILLUSTRATIONSare exploded views (See below.) and contain tightening torques, lubrica-
tion points, section number of thePARTS CATALOG(e.g. SEC. 440) and other information necessary to
perform repairs.
The illustrations should be used in reference to service matters only. When ordering parts, refer to the
appropriatePARTS CATALOG.
SBR364AC
+THE SMALL ILLUSTRATIONSshow the important steps such as inspection, use of special tools, knacks
of work and hidden or tricky steps which are not shown in the previous large illustrations.
Assembly, inspection and adjustment procedures for the complicated units such as the automatic transaxle
or transmission, etc. are presented in a step-by-step format where necessary.
+TheUNITSgiven in this manual are primarily expressed as the SI UNIT (International System of Unit),
and alternatively expressed in the metric system and in the yard/pound system.
ªExampleº
Tightening torque:
59 - 78 N´m (6.0 - 8.0 kg-m, 43 - 58 ft-lb)
+TROUBLE DIAGNOSESare included in sections dealing with complicated components.
HOW TO USE THIS MANUAL
GI-10
Page 13 of 2493

+SERVICE DATA AND SPECIFICATIONSare contained at the end of each section for quick reference of
data.
+The followingSYMBOLS AND ABBREVIATIONSare used:
SYMBOL ABBREVIATION SYMBOL ABBREVIATION
Tightening torque
2WD2-Wheel Drive
Should be lubricated with grease. Unless oth-
erwise indicated, use recommended multi-pur-
pose grease.A/CAir Conditioner
Should be lubricated with oil. P/S Power Steering
Sealing point SST Special Service Tools
Checking point SAE Society of Automotive Engineers, Inc.
Always replace after every disassembly. ATF Automatic Transmission Fluid
jP
Apply petroleum jelly.
D1Drive range 1st gear
Apply ATF. D2Drive range 2nd gear
HSelect with proper thickness. D
3Drive range 3rd gear
IAdjustment is required. D
4Drive range 4th gear
SDS Service Data and Specifications OD Overdrive
LH, RH Left-Hand, Right-Hand 2
22nd range 2nd gear
FR, RR Front, Rear 2
12nd range 1st gear
M/T Manual Transaxle/Transmission 1
21st range 2nd gear
A/T Automatic Transaxle/Transmission 1
11st range 1st gear
HOW TO USE THIS MANUAL
GI-11
Page 51 of 2493
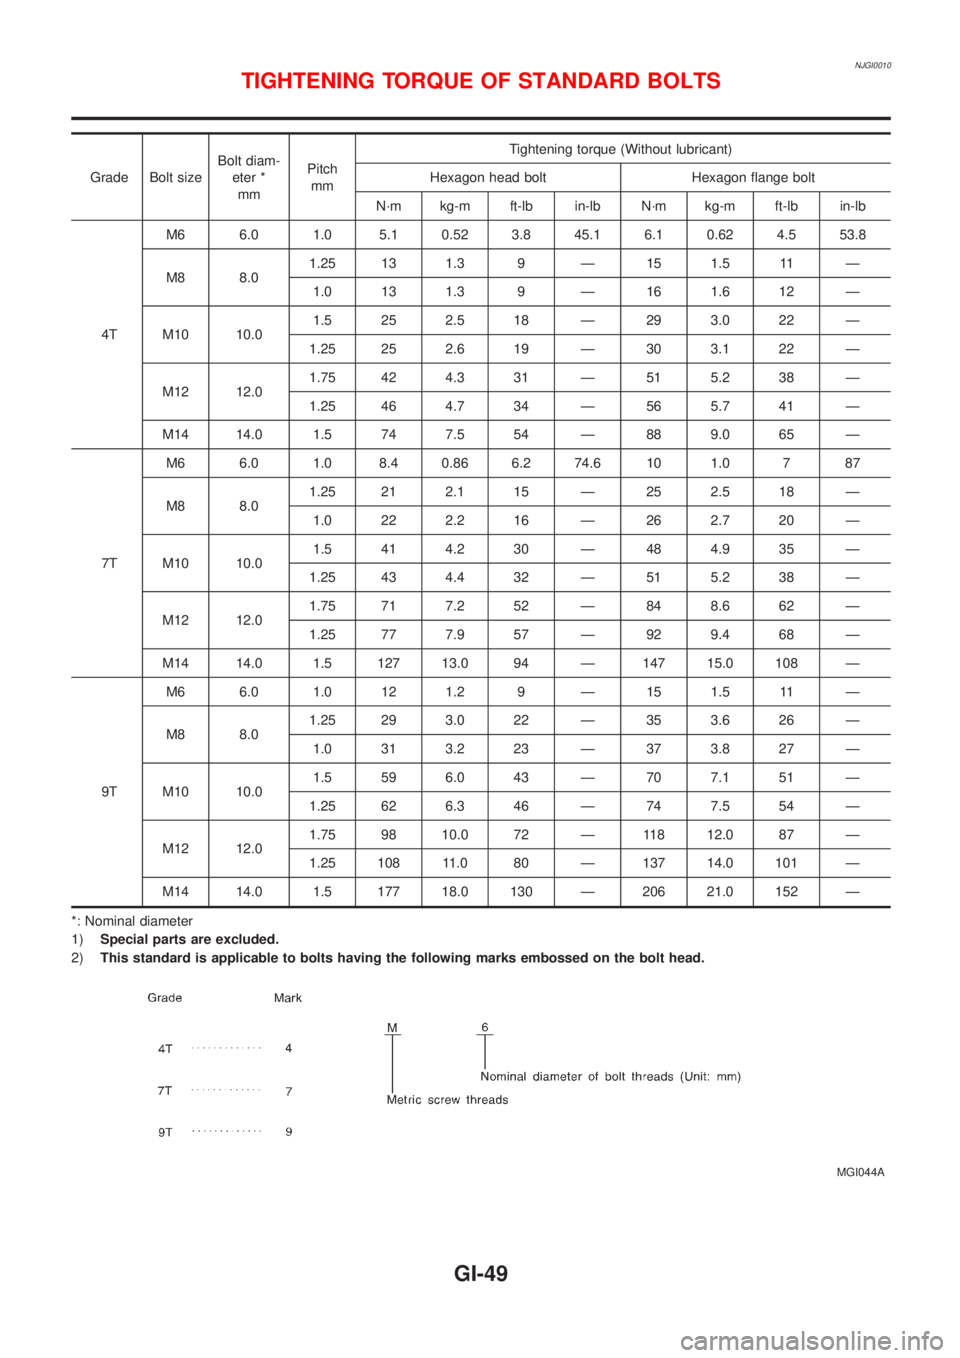
NJGI0010
Grade Bolt sizeBolt diam-
eter *
mmPitch
mmTightening torque (Without lubricant)
Hexagon head bolt Hexagon flange bolt
N´m kg-m ft-lb in-lb N´m kg-m ft-lb in-lb
4TM6 6.0 1.0 5.1 0.52 3.8 45.1 6.1 0.62 4.5 53.8
M8 8.01.25 13 1.3 9 Ð 15 1.5 11 Ð
1.0 13 1.3 9 Ð 16 1.6 12 Ð
M10 10.01.5 25 2.5 18 Ð 29 3.0 22 Ð
1.25 25 2.6 19 Ð 30 3.1 22 Ð
M12 12.01.75 42 4.3 31 Ð 51 5.2 38 Ð
1.25 46 4.7 34 Ð 56 5.7 41 Ð
M14 14.0 1.5 74 7.5 54 Ð 88 9.0 65 Ð
7TM6 6.0 1.0 8.4 0.86 6.2 74.6 10 1.0 7 87
M8 8.01.25 21 2.1 15 Ð 25 2.5 18 Ð
1.0 22 2.2 16 Ð 26 2.7 20 Ð
M10 10.01.5 41 4.2 30 Ð 48 4.9 35 Ð
1.25 43 4.4 32 Ð 51 5.2 38 Ð
M12 12.01.75 71 7.2 52 Ð 84 8.6 62 Ð
1.25 77 7.9 57 Ð 92 9.4 68 Ð
M14 14.0 1.5 127 13.0 94 Ð 147 15.0 108 Ð
9TM6 6.0 1.0 12 1.2 9 Ð 15 1.5 11 Ð
M8 8.01.25 29 3.0 22 Ð 35 3.6 26 Ð
1.0 31 3.2 23 Ð 37 3.8 27 Ð
M10 10.01.5 59 6.0 43 Ð 70 7.1 51 Ð
1.25 62 6.3 46 Ð 74 7.5 54 Ð
M12 12.01.75 98 10.0 72 Ð 118 12.0 87 Ð
1.25 108 11.0 80 Ð 137 14.0 101 Ð
M14 14.0 1.5 177 18.0 130 Ð 206 21.0 152 Ð
*: Nominal diameter
1)Special parts are excluded.
2)This standard is applicable to bolts having the following marks embossed on the bolt head.
MGI044A
TIGHTENING TORQUE OF STANDARD BOLTS
GI-49
Page 55 of 2493
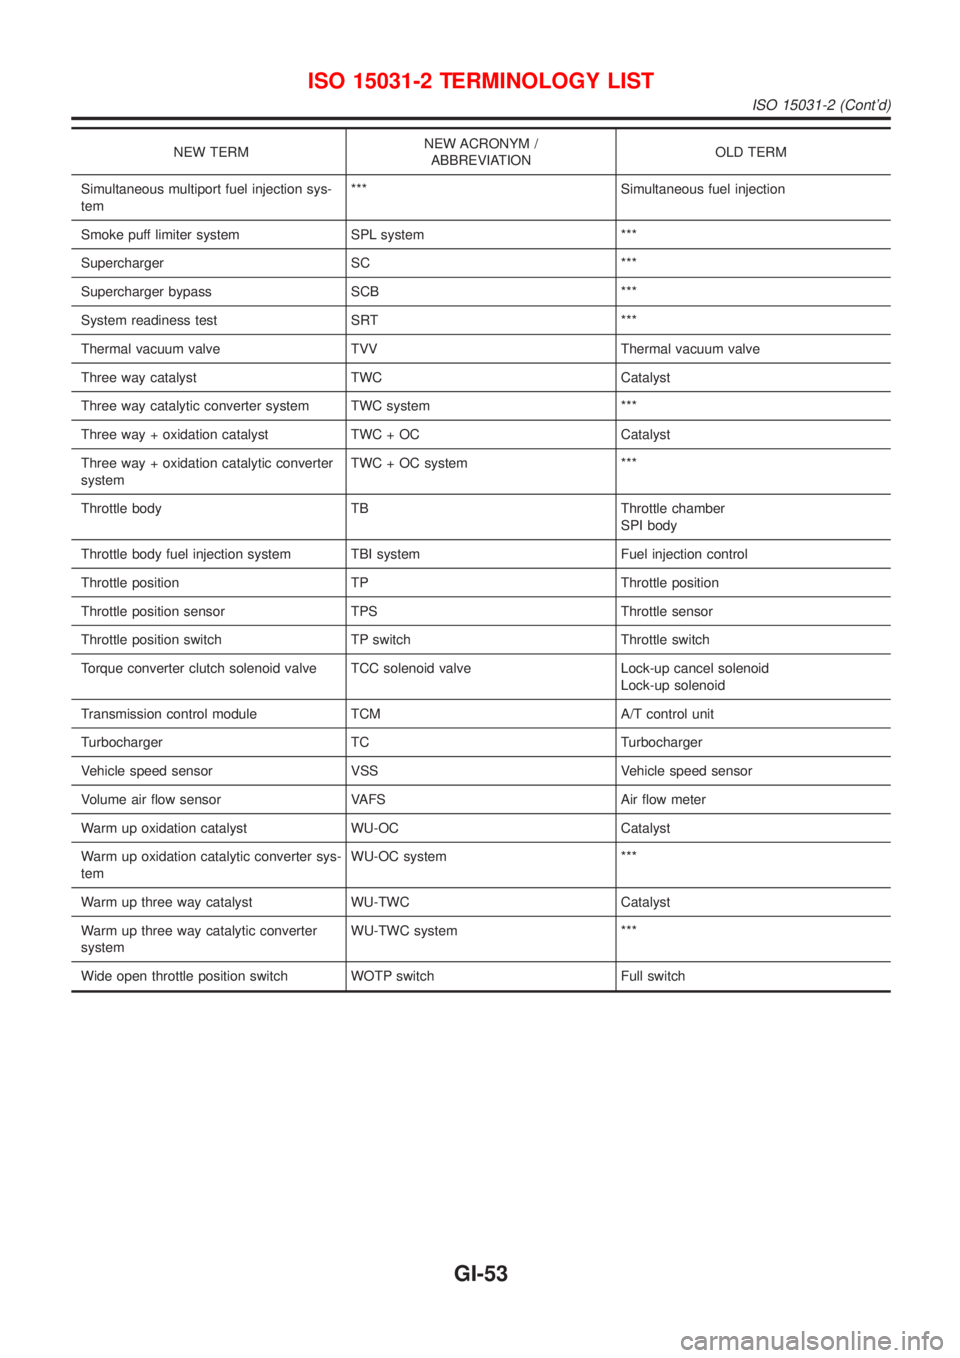
NEW TERMNEW ACRONYM /
ABBREVIATIONOLD TERM
Simultaneous multiport fuel injection sys-
tem*** Simultaneous fuel injection
Smoke puff limiter system SPL system ***
Supercharger SC ***
Supercharger bypass SCB ***
System readiness test SRT ***
Thermal vacuum valve TVV Thermal vacuum valve
Three way catalyst TWC Catalyst
Three way catalytic converter system TWC system ***
Three way + oxidation catalyst TWC + OC Catalyst
Three way + oxidation catalytic converter
systemTWC + OC system ***
Throttle body TB Throttle chamber
SPI body
Throttle body fuel injection system TBI system Fuel injection control
Throttle position TP Throttle position
Throttle position sensor TPS Throttle sensor
Throttle position switch TP switch Throttle switch
Torque converter clutch solenoid valve TCC solenoid valve Lock-up cancel solenoid
Lock-up solenoid
Transmission control module TCM A/T control unit
Turbocharger TC Turbocharger
Vehicle speed sensor VSS Vehicle speed sensor
Volume air flow sensor VAFS Air flow meter
Warm up oxidation catalyst WU-OC Catalyst
Warm up oxidation catalytic converter sys-
temWU-OC system ***
Warm up three way catalyst WU-TWC Catalyst
Warm up three way catalytic converter
systemWU-TWC system ***
Wide open throttle position switch WOTP switch Full switch
ISO 15031-2 TERMINOLOGY LIST
ISO 15031-2 (Cont'd)
GI-53
Page 61 of 2493

Engine and Emission Control Maintenance
(Gasoline engine)
NJMA0005S04Abbreviations: I = Inspect and correct or replace as necessary, R = Replace, A = Adjust, C = Clean, E = Check and correct the
engine coolant mixture ratio.
MAINTENANCE OPERATIONMAINTENANCE INTERVAL
Refer-
ence
page Perform either at number of kilometers (miles)
or months, whichever comes first.km x 1,000
(Miles x 1,000)
Months1
(0.6)
Ð10
(6)
620
(12)
1230
(18)
1840
(24)
2450
(30)
3060
(36)
3670
(42)
4280
(48)
48
Underhood and under vehicle
Torque of manifolds & exhaust tube nuts*1 I Ð
Intake & exhaust valve clearance*2AAAAEM-42
Drive belts I*1 I*1 I I*1 I EM-15
Engine oil (Use API SE, SF, SG, SH or SJ
oil.)HRRRRRRRRLC-8
Engine oil filter (Use Part No. 15208 65F01 or
equivalent)HRRRRRRRRLC-9
Engine coolant (Use Nissan genuine engine
coolant L2N or equivalent in its quality.)See NOTE (1) E R LC-17
Cooling systemIIIILC-12
Fuel linesI I FE-5
Air cleaner filter (Dry paper type)HCCCRCCCREM-0
Air cleaner filter (Viscous paper type)HR R EM-17
Fuel filter See NOTE (2) FE-9
Positive crankcase ventilation (PCV) system I*1 I*1 I*1 I*1 EC-37
Spark plugs (Conventional type)*3 R R EM-18
Spark plugs (Conventional type, For leaded
fuel)*1I R I R I R I R EM-18
Spark plugs (Conventional type, For unleaded
fuel)*1I I I R I I I R EM-18
EVAP vapor lines (With carbon canister) I I EC-34
Vacuum hoses & connections*1IIIIEC-27
Heated oxygen sensor (Exhaust gas sensor) I I EC-176
NOTE:
HMaintenance items with ªHº should be performed more frequently according to ªMaintenance Under Severe Driving Con-
ditionsº.
(1) Use Nissan genuine engine coolant, or equivalent in its quality, in order to avoid possible aluminum corrosion within the
engine cooling system caused by the use of non-genuine engine coolant. After first replacement, replace every 40,000 km (24,
000 miles) or 24 months.
(2) Maintenance-free item. For service procedures, refer to FE section.
*1: Models without three way catalyst
*2: For models with three way catalyst, periodic maintenance is not required. However, if valve noise increases, check valve clearance.
*3: Models with three way catalyst
PERIODIC MAINTENANCE (EXCEPT FOR EUROPE)
Engine and Emission Control Maintenance (Gasoline engine)
MA-5
Page 82 of 2493
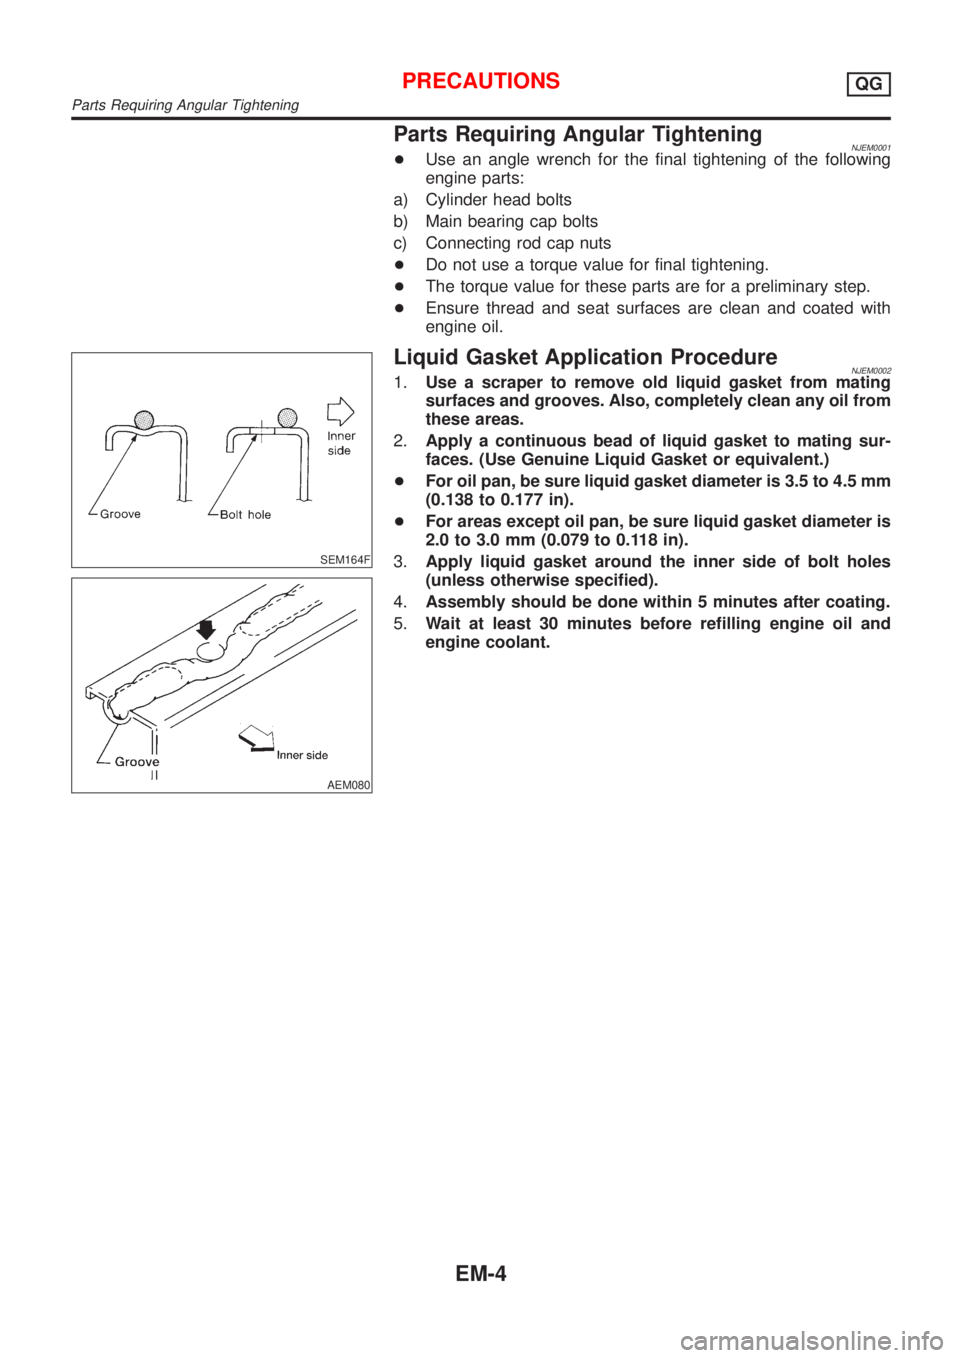
Parts Requiring Angular TighteningNJEM0001+Use an angle wrench for the final tightening of the following
engine parts:
a) Cylinder head bolts
b) Main bearing cap bolts
c) Connecting rod cap nuts
+Do not use a torque value for final tightening.
+The torque value for these parts are for a preliminary step.
+Ensure thread and seat surfaces are clean and coated with
engine oil.
SEM164F
AEM080
Liquid Gasket Application ProcedureNJEM00021.Use a scraper to remove old liquid gasket from mating
surfaces and grooves. Also, completely clean any oil from
these areas.
2.Apply a continuous bead of liquid gasket to mating sur-
faces. (Use Genuine Liquid Gasket or equivalent.)
+For oil pan, be sure liquid gasket diameter is 3.5 to 4.5 mm
(0.138 to 0.177 in).
+For areas except oil pan, be sure liquid gasket diameter is
2.0 to 3.0 mm (0.079 to 0.118 in).
3.Apply liquid gasket around the inner side of bolt holes
(unless otherwise specified).
4.Assembly should be done within 5 minutes after coating.
5.Wait at least 30 minutes before refilling engine oil and
engine coolant.
PRECAUTIONSQG
Parts Requiring Angular Tightening
EM-4
Page 106 of 2493
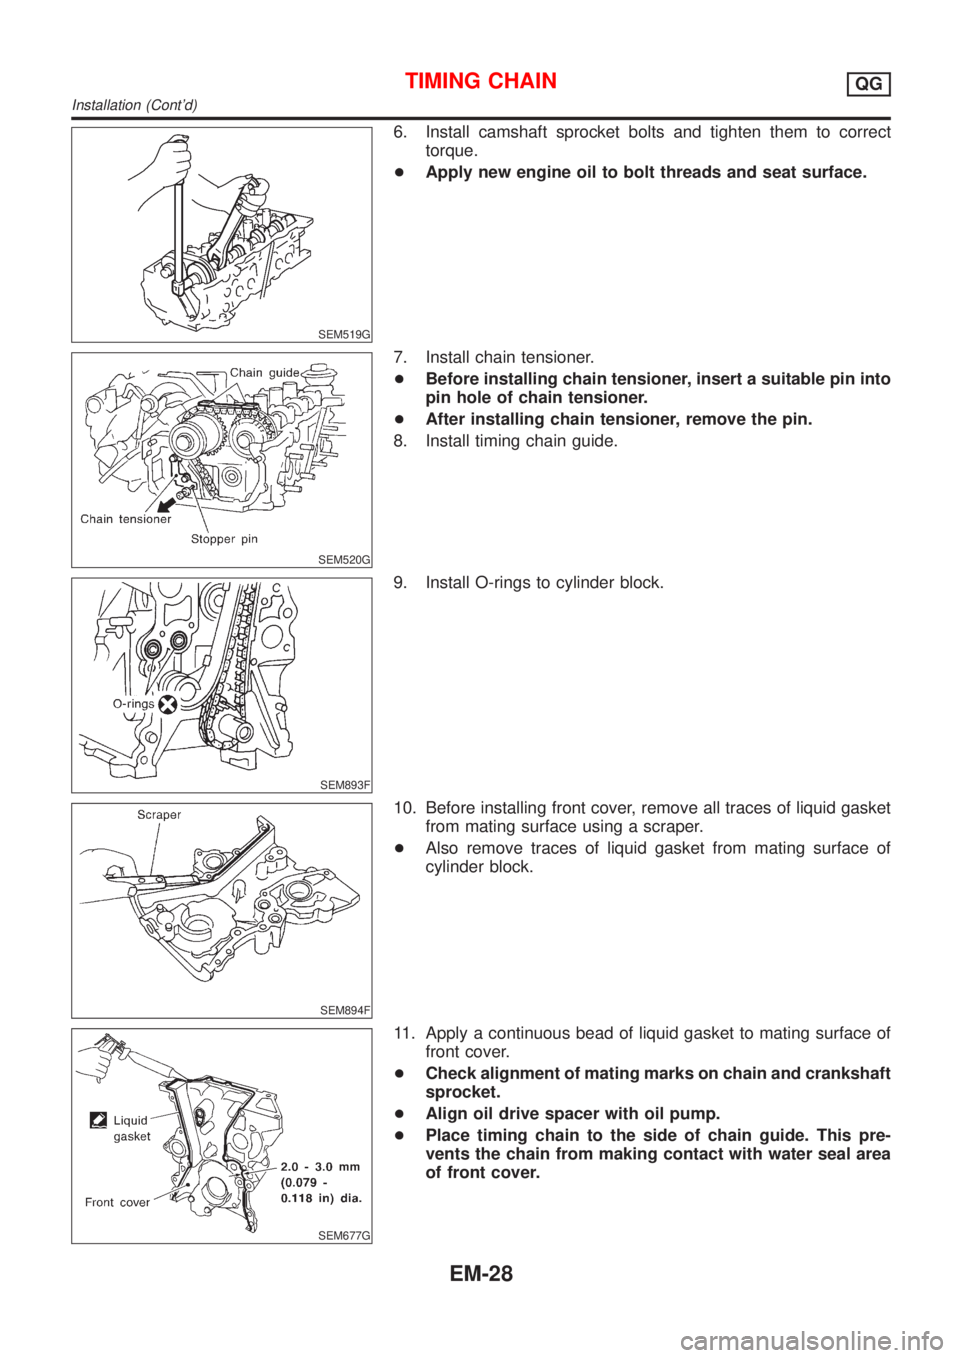
SEM519G
6. Install camshaft sprocket bolts and tighten them to correct
torque.
+Apply new engine oil to bolt threads and seat surface.
SEM520G
7. Install chain tensioner.
+Before installing chain tensioner, insert a suitable pin into
pin hole of chain tensioner.
+After installing chain tensioner, remove the pin.
8. Install timing chain guide.
SEM893F
9. Install O-rings to cylinder block.
SEM894F
10. Before installing front cover, remove all traces of liquid gasket
from mating surface using a scraper.
+Also remove traces of liquid gasket from mating surface of
cylinder block.
SEM677G
11. Apply a continuous bead of liquid gasket to mating surface of
front cover.
+Check alignment of mating marks on chain and crankshaft
sprocket.
+Align oil drive spacer with oil pump.
+Place timing chain to the side of chain guide. This pre-
vents the chain from making contact with water seal area
of front cover.
TIMING CHAINQG
Installation (Cont'd)
EM-28