Page 2051 of 2395
SPD893
3. Place the pinion preload shim selector Tool, J34309-1, gauge
screw assembly with the pinion rear bearing inner cone
installed into the final drive housing.
SPD199A
4. Assemble the front pinion bearing inner cone and the J34309-2
gauge anvil together with the J34309-1 gauge screw in the
final drive housing. Make sure that the pinion height gauge
plate, J34309-16, will turn a full 360 degrees, and tighten the
two sections together by hand.
SPD770
5. Turn the assembly several times to seat the bearings.
SPD234A
6. Measure the turning torque at the end of the J34309-2 gauge
anvil using torque wrench J25765A.
Turning torque specification:
1.0 - 1.3 N´m (10 - 13 kg-cm, 8.7 - 11.3 in-lb)
SPD208A
7. Place the J34309-1 ªR200Aº pinion height adapter onto the
gauge plate and tighten it by hand.
CAUTION:
Make sure all machined surfaces are clean.
FRONT FINAL DRIVER200A
Adjustment (Cont'd)
PD-26
Page 2058 of 2395
SPD581
4. Place pinion front bearing inner cone in final drive housing.
SPD680
5. Apply multi-purpose grease to cavity at sealing lips of oil seal.
Install front oil seal.
Tool number:
KV38100500 (J25273)
SPD658
6. Place drive pinion bearing spacer, drive pinion bearing adjust-
ing washer and drive pinion in final drive housing.
SPD681
7. Insert companion flange into drive pinion by tapping the com-
panion flange with a soft hammer.
SPD478A
8. Tighten pinion nut to the specified torque.
The threaded portion of drive pinion and pinion nut should be
free from oil or grease.
Tool number: KV38108300 (J44195)
GI
MA
EM
LC
EC
FE
AT
TF
AX
SU
BR
ST
RS
BT
HA
SC
EL
IDX
FRONT FINAL DRIVER200A
Assembly (Cont'd)
PD-33
Page 2063 of 2395

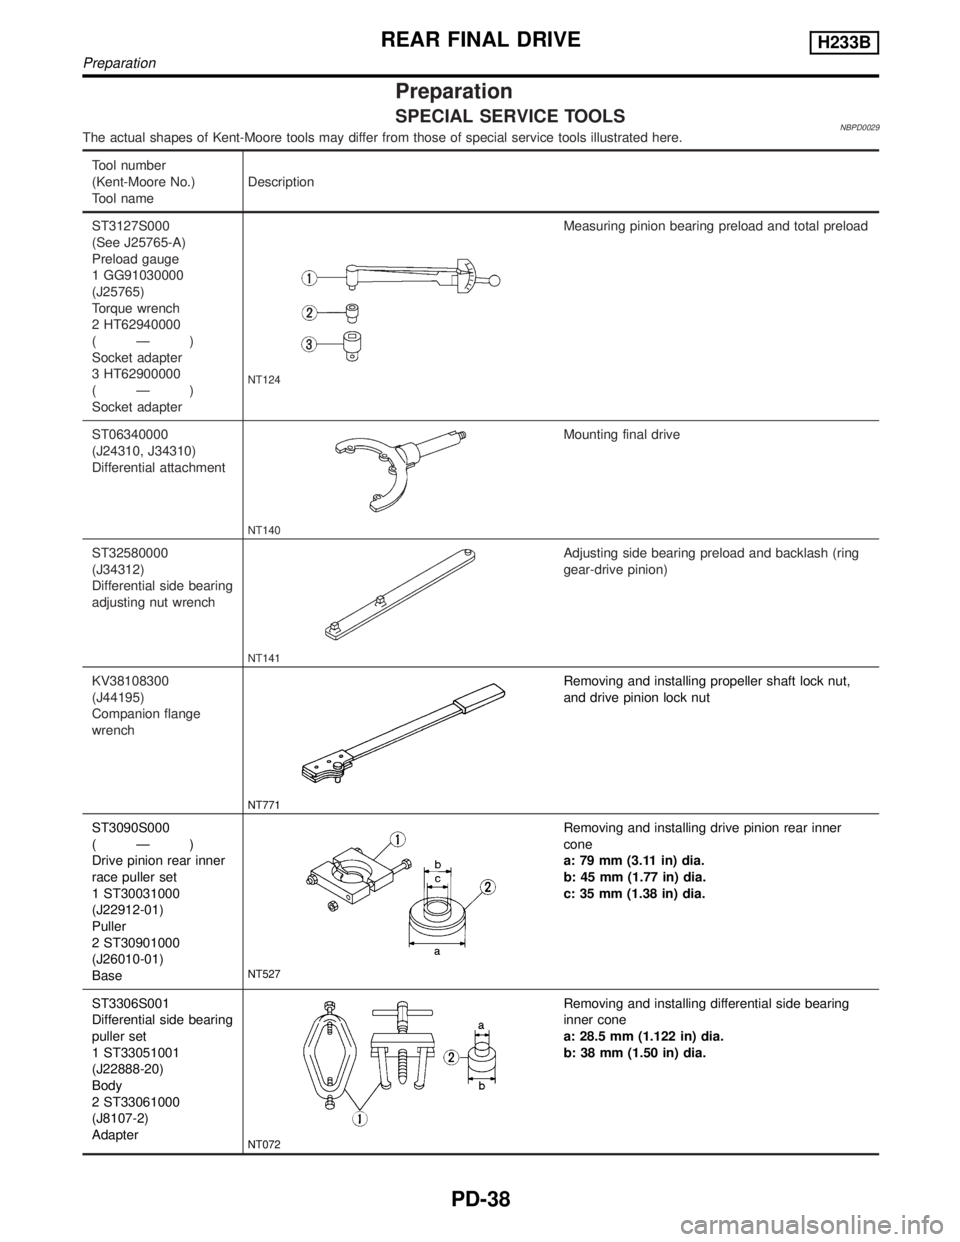
Preparation
SPECIAL SERVICE TOOLSNBPD0029The actual shapes of Kent-Moore tools may differ from those of special service tools illustrated here.
Tool number
(Kent-Moore No.)
Tool nameDescription
ST3127S000
(See J25765-A)
Preload gauge
1 GG91030000
(J25765)
Torque wrench
2 HT62940000
(Ð)
Socket adapter
3 HT62900000
(Ð)
Socket adapter
NT124
Measuring pinion bearing preload and total preload
ST06340000
(J24310, J34310)
Differential attachment
NT140
Mounting final drive
ST32580000
(J34312)
Differential side bearing
adjusting nut wrench
NT141
Adjusting side bearing preload and backlash (ring
gear-drive pinion)
KV38108300
(J44195)
Companion flange
wrench
NT771
Removing and installing propeller shaft lock nut,
and drive pinion lock nut
ST3090S000
(Ð)
Drive pinion rear inner
race puller set
1 ST30031000
(J22912-01)
Puller
2 ST30901000
(J26010-01)
Base
NT527
Removing and installing drive pinion rear inner
cone
a: 79 mm (3.11 in) dia.
b: 45 mm (1.77 in) dia.
c: 35 mm (1.38 in) dia.
ST3306S001
Differential side bearing
puller set
1 ST33051001
(J22888-20)
Body
2 ST33061000
(J8107-2)
Adapter
NT072
Removing and installing differential side bearing
inner cone
a: 28.5 mm (1.122 in) dia.
b: 38 mm (1.50 in) dia.
REAR FINAL DRIVEH233B
Preparation
PD-38
Page 2065 of 2395
Tool number
(Kent-Moore No.)
Tool nameDescription
(J25269-18)
Side bearing discs
(2 Req'd)
NT135
Selecting pinion height adjusting washer
KV381052S0
(Ð)
Rear axle shaft dummy
1 KV38105210
(Ð)
Torque wrench side
2 KV38105220
(Ð)
Vice side
NT142
Checking differential torque on limited slip differen-
tial
KV38100500
(J25273)
Gear carrier front oil
seal drift
NT115
Installing front oil seal
a: 85 mm (3.35 in) dia.
b: 60 mm (2.36 in) dia.
Noise, Vibration and Harshness (NVH)
Troubleshooting
NBPD0051Refer to ªNVH TROUBLESHOOTING CHARTº, PD-3.
SPD479A
On-vehicle Service
FRONT OIL SEAL REPLACEMENTNBPD00301. Remove propeller shaft.
2. Loosen drive pinion nut.
Tool number: KV38108300 (J44195)
SPD737
3. Remove companion flange.
REAR FINAL DRIVEH233B
Preparation (Cont'd)
PD-40
Page 2072 of 2395

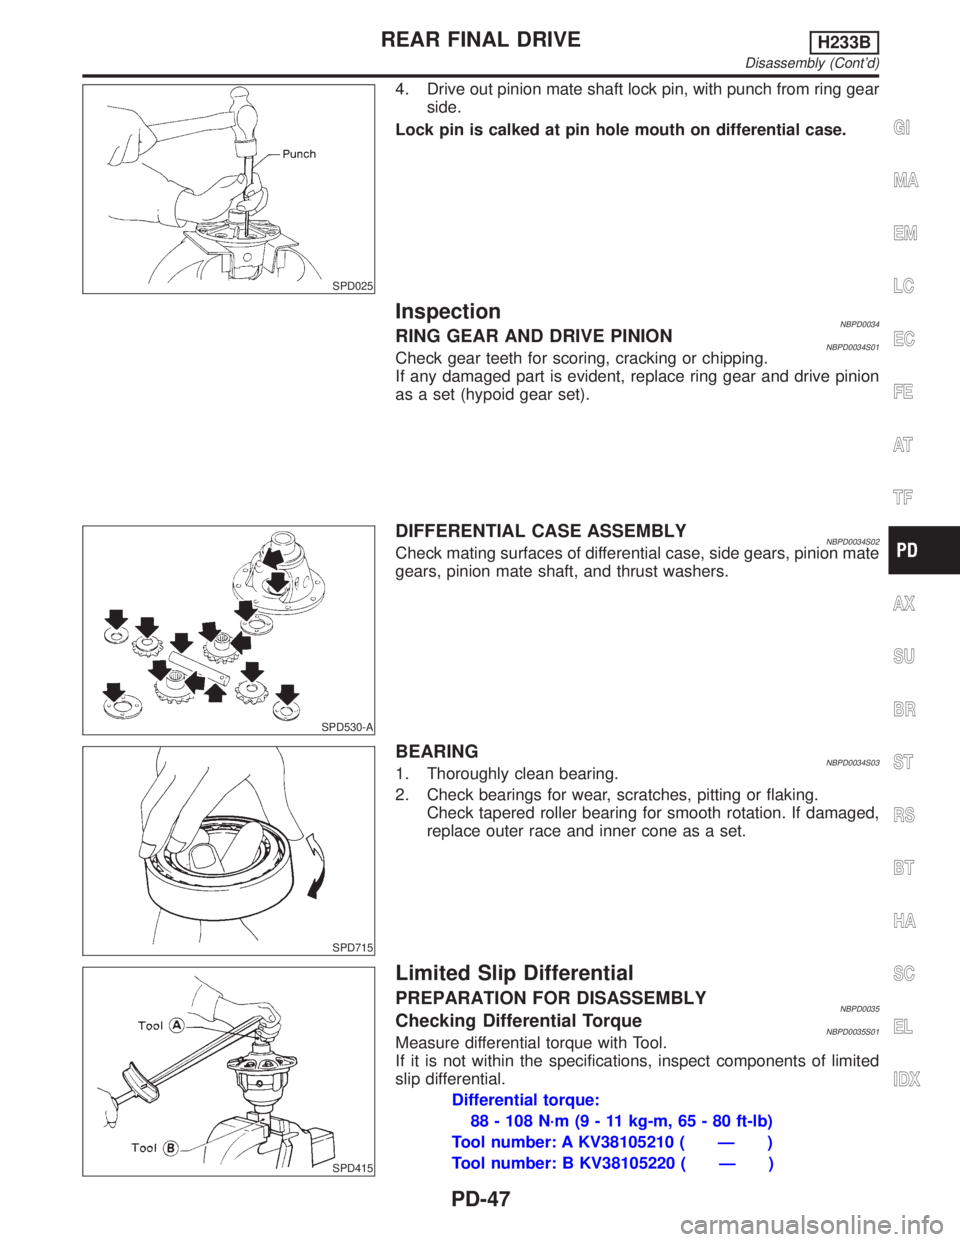
SPD025
4. Drive out pinion mate shaft lock pin, with punch from ring gear
side.
Lock pin is calked at pin hole mouth on differential case.
InspectionNBPD0034RING GEAR AND DRIVE PINIONNBPD0034S01Check gear teeth for scoring, cracking or chipping.
If any damaged part is evident, replace ring gear and drive pinion
as a set (hypoid gear set).
SPD530-A
DIFFERENTIAL CASE ASSEMBLYNBPD0034S02Check mating surfaces of differential case, side gears, pinion mate
gears, pinion mate shaft, and thrust washers.
SPD715
BEARINGNBPD0034S031. Thoroughly clean bearing.
2. Check bearings for wear, scratches, pitting or flaking.
Check tapered roller bearing for smooth rotation. If damaged,
replace outer race and inner cone as a set.
SPD415
Limited Slip Differential
PREPARATION FOR DISASSEMBLYNBPD0035Checking Differential TorqueNBPD0035S01Measure differential torque with Tool.
If it is not within the specifications, inspect components of limited
slip differential.
Differential torque:
88 - 108 N´m (9 - 11 kg-m, 65 - 80 ft-lb)
Tool number: A KV38105210 ( Ð )
Tool number: B KV38105220 ( Ð )
GI
MA
EM
LC
EC
FE
AT
TF
AX
SU
BR
ST
RS
BT
HA
SC
EL
IDX
REAR FINAL DRIVEH233B
Disassembly (Cont'd)
PD-47
Page 2078 of 2395

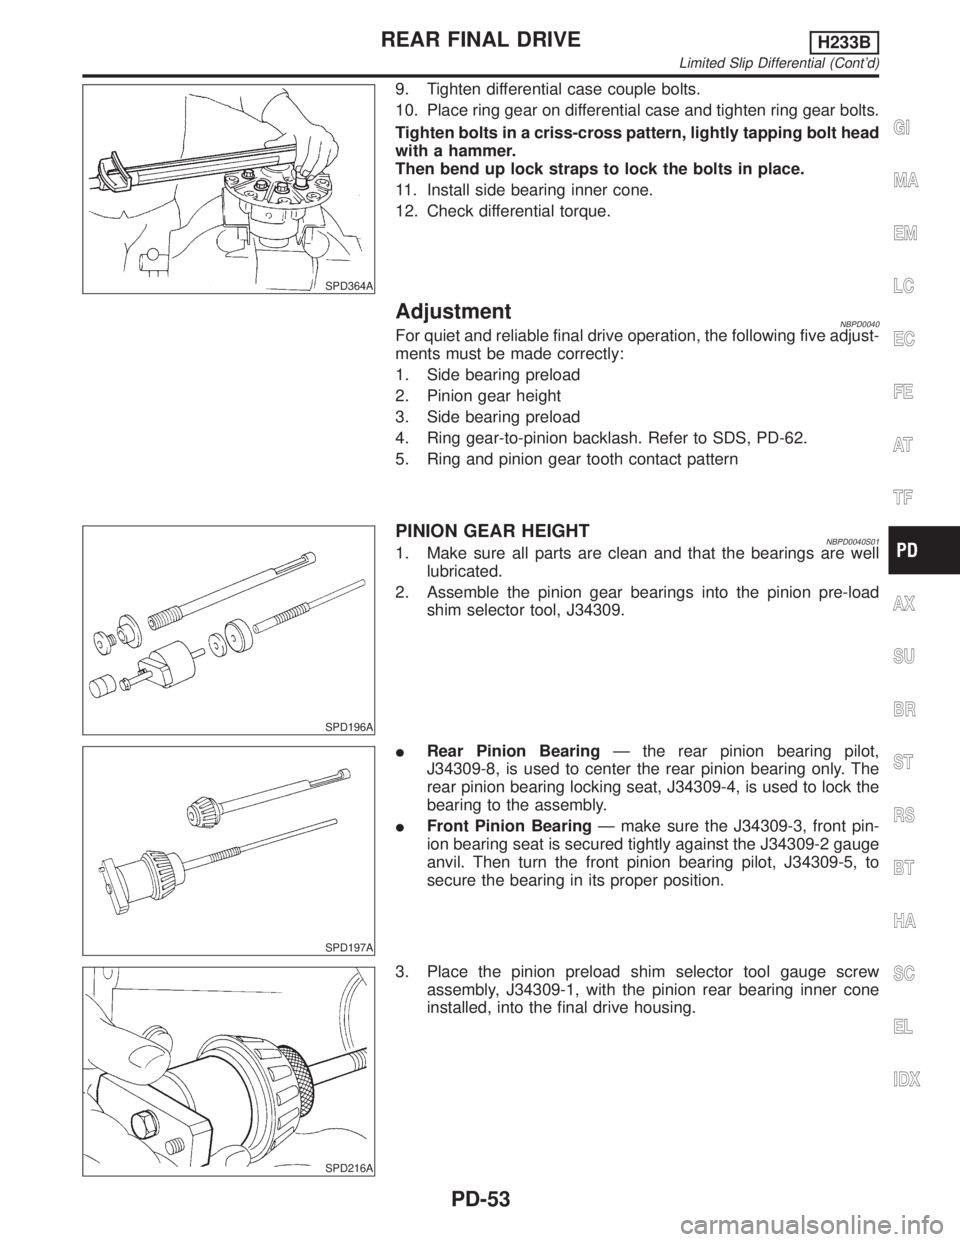
SPD364A
9. Tighten differential case couple bolts.
10. Place ring gear on differential case and tighten ring gear bolts.
Tighten bolts in a criss-cross pattern, lightly tapping bolt head
with a hammer.
Then bend up lock straps to lock the bolts in place.
11. Install side bearing inner cone.
12. Check differential torque.
AdjustmentNBPD0040For quiet and reliable final drive operation, the following five adjust-
ments must be made correctly:
1. Side bearing preload
2. Pinion gear height
3. Side bearing preload
4. Ring gear-to-pinion backlash. Refer to SDS, PD-62.
5. Ring and pinion gear tooth contact pattern
SPD196A
PINION GEAR HEIGHTNBPD0040S011. Make sure all parts are clean and that the bearings are well
lubricated.
2. Assemble the pinion gear bearings into the pinion pre-load
shim selector tool, J34309.
SPD197A
IRear Pinion BearingÐ the rear pinion bearing pilot,
J34309-8, is used to center the rear pinion bearing only. The
rear pinion bearing locking seat, J34309-4, is used to lock the
bearing to the assembly.
IFront Pinion BearingÐ make sure the J34309-3, front pin-
ion bearing seat is secured tightly against the J34309-2 gauge
anvil. Then turn the front pinion bearing pilot, J34309-5, to
secure the bearing in its proper position.
SPD216A
3. Place the pinion preload shim selector tool gauge screw
assembly, J34309-1, with the pinion rear bearing inner cone
installed, into the final drive housing.
GI
MA
EM
LC
EC
FE
AT
TF
AX
SU
BR
ST
RS
BT
HA
SC
EL
IDX
REAR FINAL DRIVEH233B
Limited Slip Differential (Cont'd)
PD-53
Page 2079 of 2395
SPD217A
4. Install the J34309-2 gauge anvil with the front pinion bearing
into the final drive housing and assemble it to the J34309-1
gauge screw. Make sure that the J34309-16 gauge plate will
turn a full 360 degrees, and tighten the two sections by hand
to set bearing pre-load.
5. Turn the assembly several times to seat the bearings.
SPD234A
6. Measure the turning torque at the end of the J34309-2 gauge
anvil using torque wrench J25765A.
Turning torque specification:
0.4 - 0.9 N´m (4 - 9 kg-cm, 3.5 - 7.8 in-lb)
SPD208A
7. Place the J34309-12 ªH233Bº pinion height adapter onto the
gauge plate and tighten it by hand.
CAUTION:
Make sure all machined surfaces are clean.
SPD286A
PINION HEIGHT ADJUSTING WASHER SELECTION
8. Position the J25269-18 side bearing discs and the arbor into
the side bearing bores.
SPD237A
9. Install the bearing caps and torque the bolts.
Specification:
93 - 103 N´m (9.5 - 10.5 kg-m, 69 - 76 ft-lb)
REAR FINAL DRIVEH233B
Adjustment (Cont'd)
PD-54
Page 2084 of 2395
SPD581
4. Place pinion front bearing inner cone in gear carrier.
SPD291A
5. Apply multi-purpose grease to cavity at sealing lips of oil seal.
Install front oil seal.
Tool number:
A ST30720000 (J25405)
B KV38102510 ( Ð )
SPD935-A
6. Install drive pinion bearing spacer, pinion bearing adjusting
shim and drive pinion in gear carrier.
SPD697
7. Insert companion flange into drive pinion by tapping the com-
panion flange with a soft hammer.
SPD481A
8. Tighten pinion nut to the specified torque.
The threaded portion of drive pinion and pinion nut should be
free from oil or grease.
Tool number: KV38108300 (J44195)
GI
MA
EM
LC
EC
FE
AT
TF
AX
SU
BR
ST
RS
BT
HA
SC
EL
IDX
REAR FINAL DRIVEH233B
Assembly (Cont'd)
PD-59