Page 187 of 363

�Û�µ
The tape direction indicator will light
to show you which side of the
cassette is playing. The indicates
thesideyouinsertedfacingupward
is now playing. If you want to play
the other side, press the PROG
button.
Dolby B noise reduction turns on
when you insert a cassette. If the
tape was not recorded with Dolby B
noise reduction, turn it of f by
pressing the NR button. With a cassette playing, you can use
the FF, REW, SKIP, or REPEAT
f unction to f ind a desired program.
If you turn the system of f while a
tape is playing, either with the PWR/
VOL knob or by turning of f the
ignition, the cassette will remain in
the drive. When you turn the system
back on, the cassette player will be in
pause mode. To begin playing, press
the PLAY button.
To switch to the radio or CD player
while a tape is playing, press the
AM/FM, or CD button. To change
back to the cassette player, push the
CD button. Fast Forward and
Rewind move the tape rapidly. Press
and release the side of the
TUNE bar to fast forward the tape,
or the side to rewind. You will
see FF or REW f lashing in the
display. To stop f ast f orward or
rewind, press either side of the
TUNE bar or the PLAY button. If the
system reaches the end of the tape
while in f ast f orward or rewind, it
automatically stops that function,
reverses direction, and begins to play.
Dolby remains of f until you turn it on
by pressing the button again.
When the system reaches the end of
the tape, it will automatically reverse
direction and play the other side. If
you want to remove the cassette
f rom the drive, press the EJECT
button on the cassette player.
Audio System
Comf ort and Convenience Feat ures T ape Search Functions
FF/REW
188
Page 189 of 363

The cassette player picks up dirt and
oxides f rom the tape. This contami-
nation builds up over time and
causes the sound quality to degrade.
To prevent this, you should clean the
player af ter every 30 hours of use.
Your dealer has a cleaning kit
available.
If you do not clean the cassette
player regularly, it may eventually
become impossible to remove the
contamination with a normal
cleaning kit.
Use 100-minute or shorter cassettes.
Cassettes longer than that use
thinner tape that may break or jam
the drive.Look at the cassette before you
insert it. If the tape is loose, tighten
it by turning a hub with a pencil or
your f inger.
If the label is peeling of f , remove it
from the cassette or it could cause
the cassette to jam in the player.
Never try to insert a warped or
damaged cassette in the player.
When they are not in use, store
cassettes in their cases to protect
them f rom dust and moisture. Never
place cassettes where they will be
exposed to direct sunlight, high heat,
or high humidity. If a cassette is
exposed to extreme heat or cold, let
it reach a moderate temperature
bef ore inserting it in the player.
Never try to insert f oreign objects
into the cassette player.If you see the error indication
‘‘ ’’ (LX model)/‘‘ ’’
(EX model) on the display, press the
EJECT button and remove the
cassette from the unit. Make sure
the tape is not damaged. If the
cassette will not eject or the error
indication stays on after the cassette
ejects, take the vehicle to your
Honda dealer.
If a problem develops in the connec-
tion between the cassette player and
the radio, you will see ‘‘ ’’ in
the display. Take the vehicle to your
Honda dealer.
On LX model
Audio System
Comf ort and Convenience Feat ures
Caring f or the Cassette Player 190
Page 192 of 363
, or
the hood, will cause it to alarm. It
also alarms if the radio is removed
f rom the dashboard or")
Once the security system is set,
opening any door (without using the
key or the remote transmitter), or
the hood, will cause it to alarm. It
also alarms if the radio is removed
f rom the dashboard or the wiring is
cut.Do not attempt to alter this system
or add other devices to it.
The security system helps to protect
your vehicle and valuables f rom thef t.
The horn sounds and a combination
of headlights, parking lights, side
marker lights and taillights f lashes if
someone attempts to break into your
vehicleorremovetheradio.This
alarm continues f or two minutes,
then the alarm stops. To reset an
alarming system before the two
minutes have elapsed, unlock either
f ront door with the key or the
remote transmitter.
The security system sets auto-
matically fifteen seconds after you
lock the doors, hood, and tailgate.
For the system to activate, you must
lock the doors f rom the outside with
the key, or remote transmitter. The
security system light next to the low
oil pressure indicator starts blinking
immediately to show you the system
is setting itself . With the system set, you can still
open the tailgate with the master key
or the remote transmitter without
triggering the alarm. The alarm will
sound if the tailgate lock is f orced, or
the tailgate is opened with the
tailgate release handle.
The security system will not set if
the hood, tailgate, or any door is not
f ully closed. If the system will not set,
check the Door Lamp Monitor on
the instrument panel (see page ),
to see if the doors and tailgate are
f ully closed. Since it is not part of the
monitor display, manually check thehood.
64
On EX model
Security System
Comf ort and Convenience Feat ures
193
SSEECCUURRIITTYYSSYYSSTTEEMMLLIIGGHHTT
Page 197 of 363

Remove the f uel f ill cap slowly.
You may hear a hissing sound as
pressure inside the tank escapes.
Place the cap in the holder on the
fuel fill door.
Stop f illing the tank af ter the f uel
nozzle automatically clicks of f . Do
not try to ‘‘top off’’ the tank, leave
some room f or the f uel to expand
with temperature changes.Shift to Park or Neutral and set
the parking brake. Pull the hood
release handle located under the
lower lef t corner of the dashboard.
The hood will pop up slightly.
Screw the f uel f ill cap back on,
tighten it until it clicks several
times. If you do not properly
tighten the cap, the Malfunction
Indicator Lamp may come on (see
page ).
Push the f uel f ill door closed until
it latches.
Your vehicle has an on-board
ref ueling vapor recovery system to
help keep f uel vapors f rom going
into the atmosphere. If the fuel
pump keeps clicking of f even though
the tank is not full, there may be a
problem with this system. Consult
your dealer. 1.
3. 4.
5. 6.
320
Service Station Procedures
Bef ore Driving Opening the Hood
198
HHOOOODDRREELLEEAASSEEHHAANNDDLLEE
Page 199 of 363
Wipe the dipstick with a clean
cloth or paper towel.
Check the engine oil level every time
you f ill the vehicle with f uel. Wait a
f ew minutes af ter turning the engine
of f bef ore you check the oil.
Remove the dipstick (orange
handle).
To close the hood, lif t it up slightly to
remove the support rod f rom the
hole. Put the support rod back into
its holding clip. Lower the hood to
about a f oot (30 cm) above the
fender,thenletitdrop.
Afterclosingthehood,makesureit
is securely latched.
2.
1.
Service Station Procedures
Bef ore Driving
Oil Check
200
DDIIPPSSTTIICCKK
Page 202 of 363

Your dealer has genuine Honda
accessories that allow you to
personalize your vehicle. These
accessories have been designed and
approved f or your vehicle, and are
covered by warranty.However, if electronic accessories
are improperly installed, or exceed
your vehicle’s electrical system
capacity, they can interf ere with theoperation of your vehicle, or even
cause the airbags to deploy.
Make sure the accessory does not
obscure any lights, or interf ere
with proper vehicle operation or
perf ormance.
Be sure electronic accessories do
not overload electrical circuits
(see page ).
Have the installer contact your
Honda dealer f or assistance bef ore
installing any electronic accessory.
If possible, have your dealer inspect
the f inal installation.
Modif ying your vehicle, or installing
some non-Honda accessories, can
make your vehicle unsaf e. Bef ore
you make any modif ications or add
anyaccessories,besuretoreadthe
f ollowing inf ormation.
Bef ore installing any accessory:
When properly installed, cellular
phones, alarms, two-way radios, and
low-powered audio systems should
not interf ere with your vehicle’s
computer-controlled systems, such
as the SRS and anti-lock brake
system.
Non-Honda accessories are usually
designed f or universal applications.
Although aftermarket accessories
may f it on your vehicle, they may not
meet f actory specif ications, and
could adversely af f ect your vehicle’s
handling and stability. (See
‘‘Modif ications’’ on page f or
additional information.)
204 323
A ccessories
A ccessories and Modif ications
Bef ore Driving
203
Improper accessories or
modifications can affect your
vehicle’s handling, stability and
performance, and cause a
crash in which you can be hurt
or killed.
Follow all instructions in this
owner’s manual regarding
accessories and modifications.
Page 204 of 363
�Î�Î
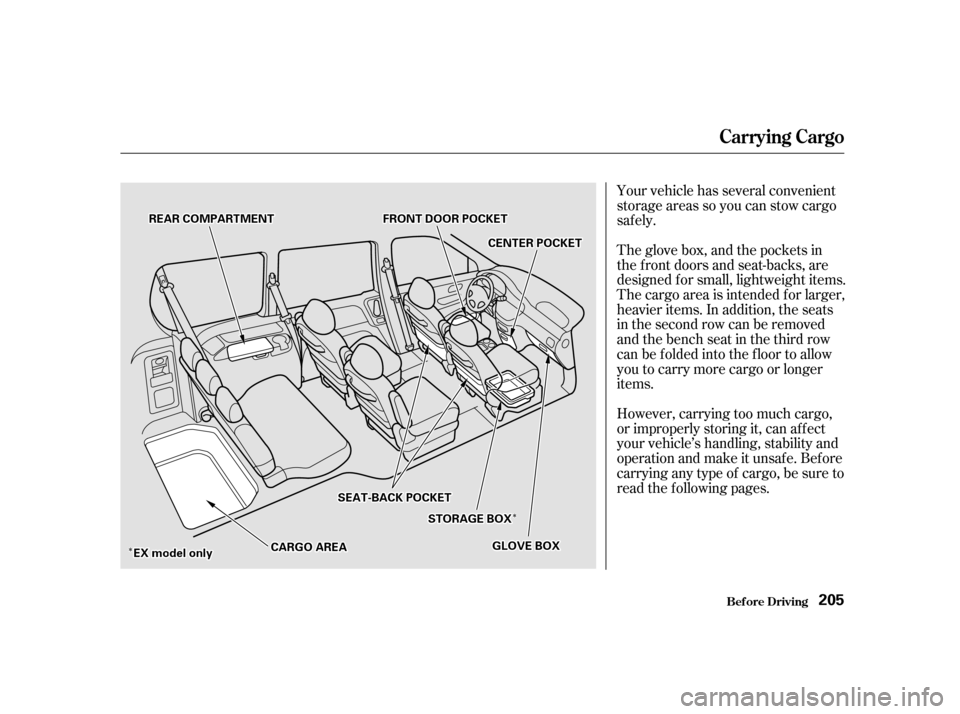
�Î�ÎYour vehicle has several convenient
storage areas so you can stow cargo
saf ely.
The glove box, and the pockets in
the f ront doors and seat-backs, are
designed f or small, lightweight items.
The cargo area is intended f or larger,
heavier items. In addition, the seats
in the second row can be removed
andthebenchseatinthethirdrow
can be f olded into the f loor to allow
you to carry more cargo or longer
items.
However, carrying too much cargo,
or improperly storing it, can af f ect
your vehicle’s handling, stability and
operation and make it unsafe. Before
carrying any type of cargo, be sure to
read the f ollowing pages.
Carrying Cargo
Bef ore Driving
205
FFRROONNTTDDOOOORRPPOOCCKKEETT
GGLLOOVVEEBBOOXX
SSEEAATT--BBAACCKKPPOOCCKKEETT
SSTTOORRAAGGEEBBOOXX
RREEAARRCCOOMMPPAARRTTMMEENNTT
CCEENNTTEERRPPOOCCKKEETT
EEXXmmooddeelloonnllyyCCAARRGGOOAARREEAA
Page 209 of 363

Youshoulddothefollowingchecks
and adjustments every day bef ore
you drive your vehicle.Make sure all windows, mirrors,
and outside lights are clean and
unobstructed. Remove f rost, snow,
or ice. Check the adjustment of the seat
(see page ).
Check the adjustment of the
inside and outside mirrors (see
page ).
Check the adjustment of the
steering wheel (see page ).
Fasten your seat belt. Check that
your passengers have f astened
their seat belts (see page ).Turn the ignition switch ON (II).
Check the indicator lights in the
instrument panel.
Start the engine (see page ).
Check the gauges and indicator
lights in the instrument panel (see
page ).
Check that any items you may be
carrying with you inside are stored
properly or f astened down
securely.
Visually check the tires. If a tire
looks low, use a gauge to check its
pressure.
Check that the hood and tailgate
arefullyclosed. Makesurethedoorsandtailgate
are securely closed and locked.
3. 2.
1.
4. 5.
6. 7. 8. 9. 11.
12. 10.
15
105
121 76 211
61
Preparing to Drive
Driving
210