2001 DODGE RAM wheel
[x] Cancel search: wheelPage 1634 of 2889

INSTALLATION
(1) Align reference marks and install pitman arm.
(2) Install the lock washer and retaining nut on
the pitman shaft and tighten nut to 251 N´m (185 ft.
lbs.).
(3) Install drag link to the pitman arm. Install the
nut and tighten to 108 N´m (80 ft. lbs.).
(4) Install drag link to the right steering knuckle.
Install the nut and tighten to 88 N´m (65 ft. lbs.).
(5) Install tie rod to the left steering knuckle and
drag link. Install the nuts and tighten to 108 N´m
(80 ft. lbs.).(6) Install steering damper on the axle. Tighten
nut to 95 N´m (75 ft. lbs.).
(7) Install steering damper on the tie rod. Tighten
nut to 81 N´m (60 ft. lbs.).
(8) Remove the supports and lower the vehicle to
the surface. Center steering wheel and adjust toe,
refer to Group 2 Suspension.
(9) After adjustment tighten tie rod adjustment
sleeve clamp bolts to 61 N´m (45 ft. lbs.).
NOTE: Position the clamp on the sleeve so retaining
bolt is located on the bottom side of the sleeve.
SPECIFICATIONS
TORQUE CHART
TORQUE SPECIFICATIONS
DESCRIPTION N´m Ft. Lbs. In. Lbs.
Pitman Arm
Gear Shaft251 185 Ð
Drag Link
Pitman Arm108 80 Ð
Drag Link
Tie Rod88 65 Ð
Drag Link
Adjuster Clamp61 45 Ð
Tie Rod End
Knuckle108 80 Ð
Tie Rod End
Adjuster Clamp61 45 Ð
Steering Damper
Axle95 70 Ð
Steering Damper
Tie Rod81 60 Ð
BR/BELINKAGE - 4WD 19 - 41
LINKAGE - 4WD (Continued)
Page 1636 of 2889
TRANSMISSION AND TRANSFER CASE
TABLE OF CONTENTS
page page
MANUAL - NV3500........................1
MANUAL - NV4500.......................44
MANUAL - NV5600.......................91
AUTOMATIC TRANSMISSION - 42RE........134
AUTOMATIC TRANSMISSION - 44RE........305AUTOMATIC TRANSMISSION - 46RE........477
AUTOMATIC TRANSMISSION - 47RE........648
TRANSFER CASE - NV231HD..............820
TRANSFER CASE - NV241LD..............855
TRANSFER CASE - NV241HD..............890
MANUAL - NV3500
TABLE OF CONTENTS
page page
MANUAL - NV3500
DESCRIPTION............................1
OPERATION.............................1
DIAGNOSIS AND TESTING..................3
MANUAL TRANSMISSION.................3
REMOVAL...............................3
DISASSEMBLY............................5CLEANING..............................15
INSPECTION............................15
ASSEMBLY.............................17
INSTALLATION...........................40
SPECIFICATIONS........................41
SPECIAL TOOLS.........................41
MANUAL - NV3500
DESCRIPTION
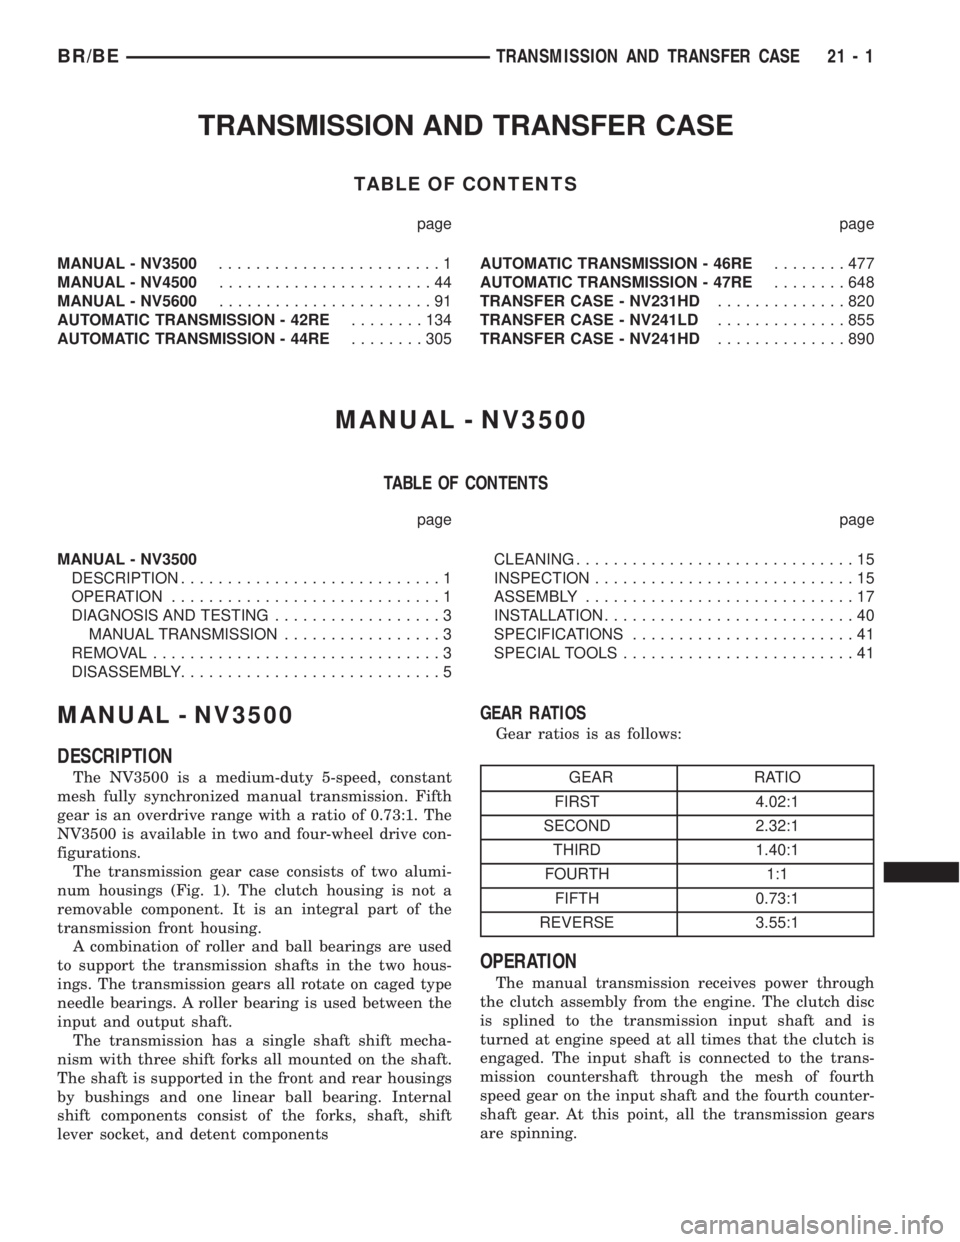
The NV3500 is a medium-duty 5-speed, constant
mesh fully synchronized manual transmission. Fifth
gear is an overdrive range with a ratio of 0.73:1. The
NV3500 is available in two and four-wheel drive con-
figurations.
The transmission gear case consists of two alumi-
num housings (Fig. 1). The clutch housing is not a
removable component. It is an integral part of the
transmission front housing.
A combination of roller and ball bearings are used
to support the transmission shafts in the two hous-
ings. The transmission gears all rotate on caged type
needle bearings. A roller bearing is used between the
input and output shaft.
The transmission has a single shaft shift mecha-
nism with three shift forks all mounted on the shaft.
The shaft is supported in the front and rear housings
by bushings and one linear ball bearing. Internal
shift components consist of the forks, shaft, shift
lever socket, and detent components
GEAR RATIOS
Gear ratios is as follows:
GEAR RATIO
FIRST 4.02:1
SECOND 2.32:1
THIRD 1.40:1
FOURTH 1:1
FIFTH 0.73:1
REVERSE 3.55:1
OPERATION
The manual transmission receives power through
the clutch assembly from the engine. The clutch disc
is splined to the transmission input shaft and is
turned at engine speed at all times that the clutch is
engaged. The input shaft is connected to the trans-
mission countershaft through the mesh of fourth
speed gear on the input shaft and the fourth counter-
shaft gear. At this point, all the transmission gears
are spinning.
BR/BETRANSMISSION AND TRANSFER CASE 21 - 1
Page 1639 of 2889
TWO WHEEL DRIVE
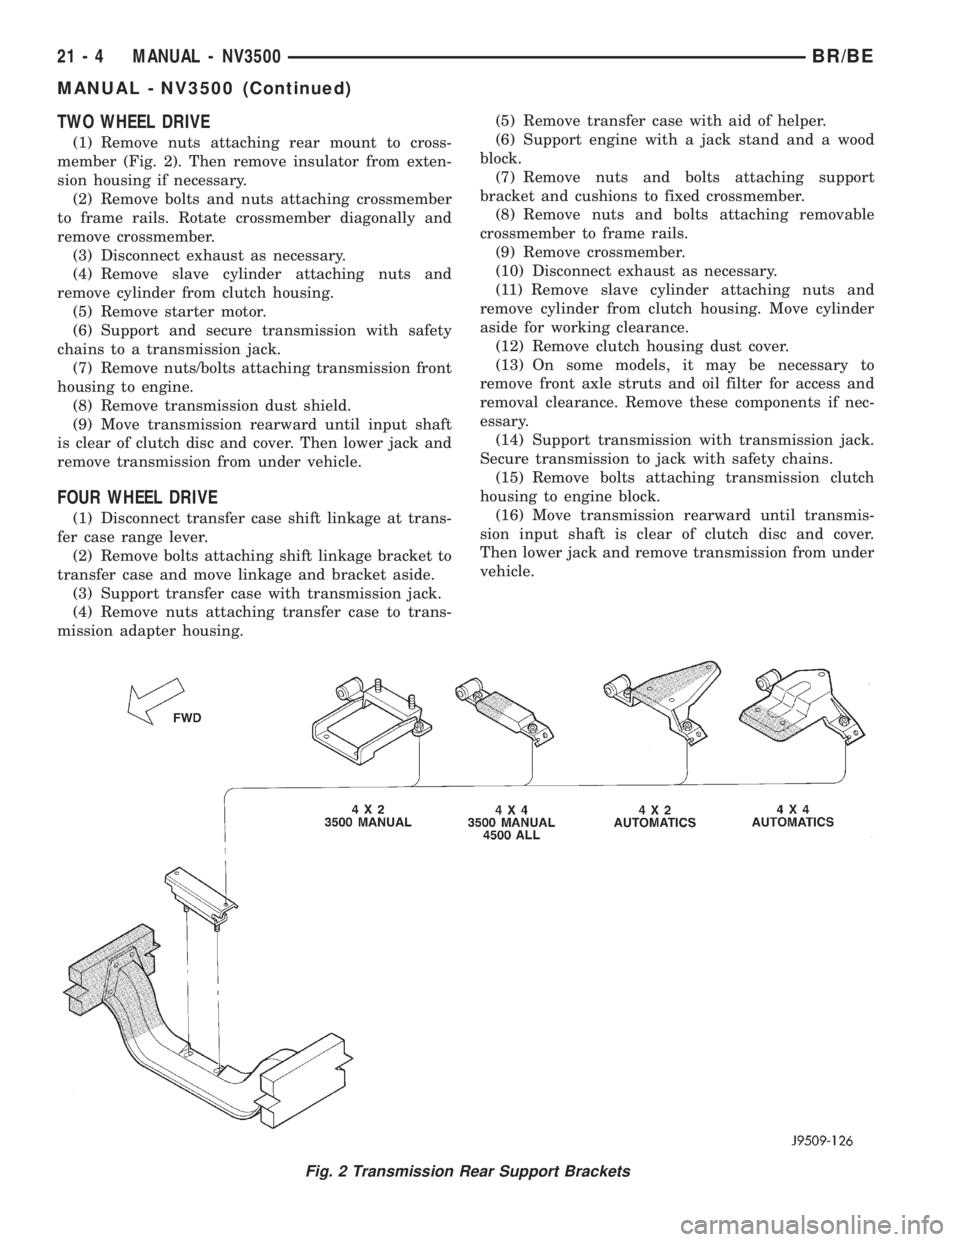
(1) Remove nuts attaching rear mount to cross-
member (Fig. 2). Then remove insulator from exten-
sion housing if necessary.
(2) Remove bolts and nuts attaching crossmember
to frame rails. Rotate crossmember diagonally and
remove crossmember.
(3) Disconnect exhaust as necessary.
(4) Remove slave cylinder attaching nuts and
remove cylinder from clutch housing.
(5) Remove starter motor.
(6) Support and secure transmission with safety
chains to a transmission jack.
(7) Remove nuts/bolts attaching transmission front
housing to engine.
(8) Remove transmission dust shield.
(9) Move transmission rearward until input shaft
is clear of clutch disc and cover. Then lower jack and
remove transmission from under vehicle.
FOUR WHEEL DRIVE
(1) Disconnect transfer case shift linkage at trans-
fer case range lever.
(2) Remove bolts attaching shift linkage bracket to
transfer case and move linkage and bracket aside.
(3) Support transfer case with transmission jack.
(4) Remove nuts attaching transfer case to trans-
mission adapter housing.(5) Remove transfer case with aid of helper.
(6) Support engine with a jack stand and a wood
block.
(7) Remove nuts and bolts attaching support
bracket and cushions to fixed crossmember.
(8) Remove nuts and bolts attaching removable
crossmember to frame rails.
(9) Remove crossmember.
(10) Disconnect exhaust as necessary.
(11) Remove slave cylinder attaching nuts and
remove cylinder from clutch housing. Move cylinder
aside for working clearance.
(12) Remove clutch housing dust cover.
(13) On some models, it may be necessary to
remove front axle struts and oil filter for access and
removal clearance. Remove these components if nec-
essary.
(14) Support transmission with transmission jack.
Secure transmission to jack with safety chains.
(15) Remove bolts attaching transmission clutch
housing to engine block.
(16) Move transmission rearward until transmis-
sion input shaft is clear of clutch disc and cover.
Then lower jack and remove transmission from under
vehicle.
Fig. 2 Transmission Rear Support Brackets
21 - 4 MANUAL - NV3500BR/BE
MANUAL - NV3500 (Continued)
Page 1644 of 2889
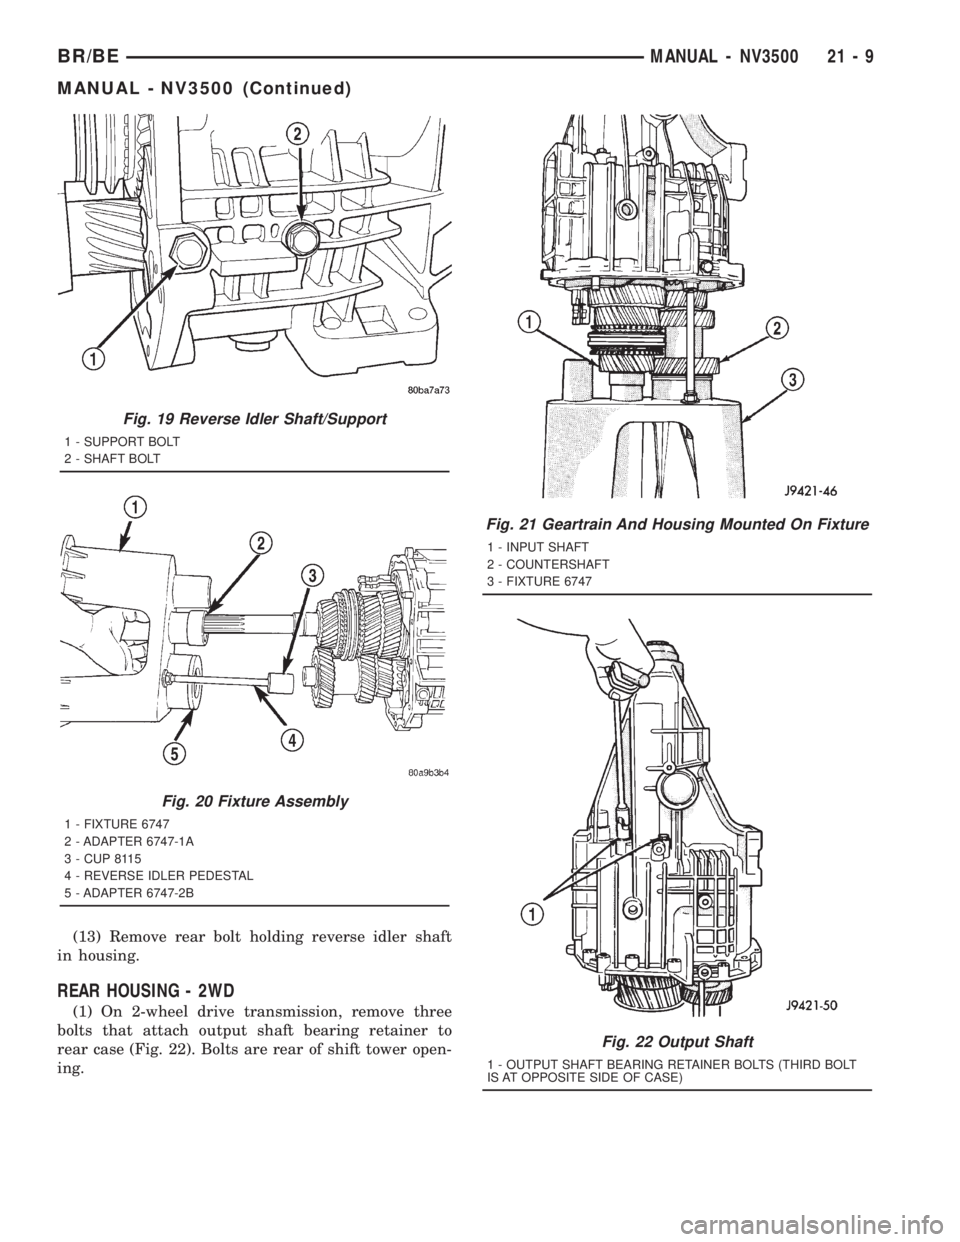
(13) Remove rear bolt holding reverse idler shaft
in housing.
REAR HOUSING - 2WD
(1) On 2-wheel drive transmission, remove three
bolts that attach output shaft bearing retainer to
rear case (Fig. 22). Bolts are rear of shift tower open-
ing.
Fig. 19 Reverse Idler Shaft/Support
1 - SUPPORT BOLT
2 - SHAFT BOLT
Fig. 20 Fixture Assembly
1 - FIXTURE 6747
2 - ADAPTER 6747-1A
3 - CUP 8115
4 - REVERSE IDLER PEDESTAL
5 - ADAPTER 6747-2B
Fig. 21 Geartrain And Housing Mounted On Fixture
1 - INPUT SHAFT
2 - COUNTERSHAFT
3 - FIXTURE 6747
Fig. 22 Output Shaft
1 - OUTPUT SHAFT BEARING RETAINER BOLTS (THIRD BOLT
IS AT OPPOSITE SIDE OF CASE)
BR/BEMANUAL - NV3500 21 - 9
MANUAL - NV3500 (Continued)
Page 1649 of 2889
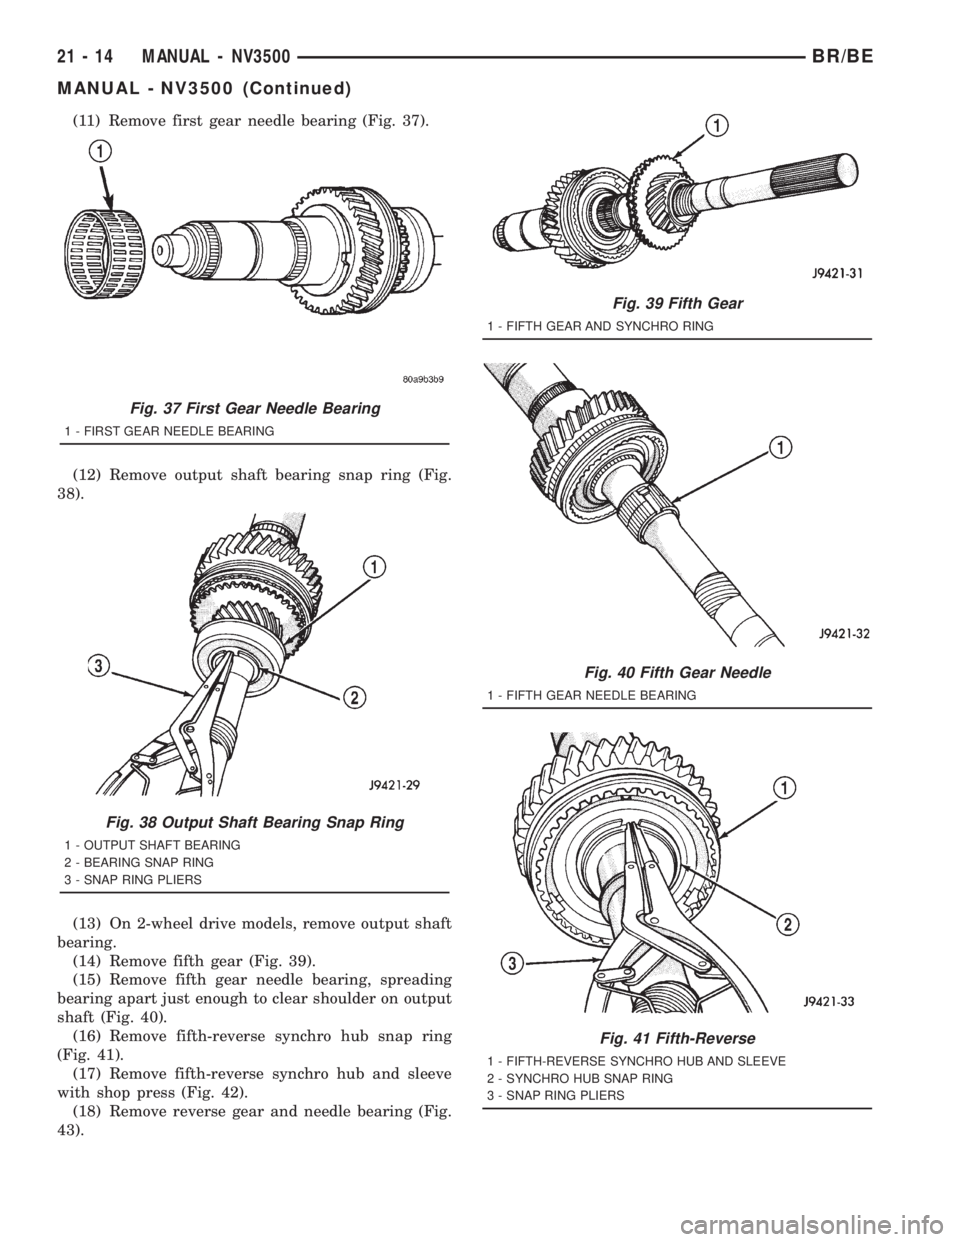
(11) Remove first gear needle bearing (Fig. 37).
(12) Remove output shaft bearing snap ring (Fig.
38).
(13) On 2-wheel drive models, remove output shaft
bearing.
(14) Remove fifth gear (Fig. 39).
(15) Remove fifth gear needle bearing, spreading
bearing apart just enough to clear shoulder on output
shaft (Fig. 40).
(16) Remove fifth-reverse synchro hub snap ring
(Fig. 41).
(17) Remove fifth-reverse synchro hub and sleeve
with shop press (Fig. 42).
(18) Remove reverse gear and needle bearing (Fig.
43).
Fig. 37 First Gear Needle Bearing
1 - FIRST GEAR NEEDLE BEARING
Fig. 38 Output Shaft Bearing Snap Ring
1 - OUTPUT SHAFT BEARING
2 - BEARING SNAP RING
3 - SNAP RING PLIERS
Fig. 39 Fifth Gear
1 - FIFTH GEAR AND SYNCHRO RING
Fig. 40 Fifth Gear Needle
1 - FIFTH GEAR NEEDLE BEARING
Fig. 41 Fifth-Reverse
1 - FIFTH-REVERSE SYNCHRO HUB AND SLEEVE
2 - SYNCHRO HUB SNAP RING
3 - SNAP RING PLIERS
21 - 14 MANUAL - NV3500BR/BE
MANUAL - NV3500 (Continued)
Page 1665 of 2889
(11) On 2-wheel drive transmission, thread one
Alignment Pin 8120 in center or passenger side hole
of output shaft bearing retainer. Then position
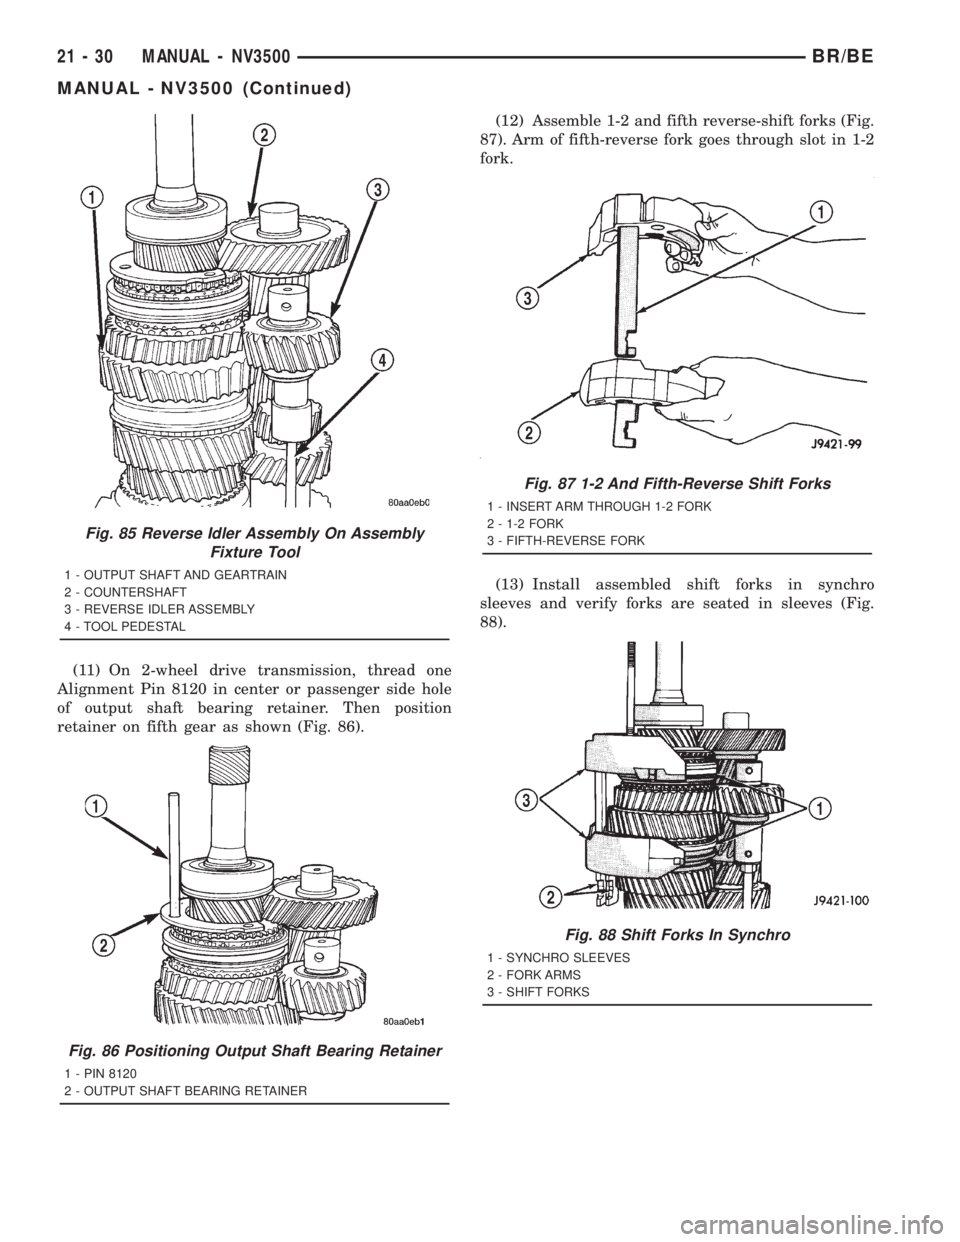
retainer on fifth gear as shown (Fig. 86).(12) Assemble 1-2 and fifth reverse-shift forks (Fig.
87). Arm of fifth-reverse fork goes through slot in 1-2
fork.
(13) Install assembled shift forks in synchro
sleeves and verify forks are seated in sleeves (Fig.
88).
Fig. 85 Reverse Idler Assembly On Assembly
Fixture Tool
1 - OUTPUT SHAFT AND GEARTRAIN
2 - COUNTERSHAFT
3 - REVERSE IDLER ASSEMBLY
4 - TOOL PEDESTAL
Fig. 86 Positioning Output Shaft Bearing Retainer
1 - PIN 8120
2 - OUTPUT SHAFT BEARING RETAINER
Fig. 87 1-2 And Fifth-Reverse Shift Forks
1 - INSERT ARM THROUGH 1-2 FORK
2 - 1-2 FORK
3 - FIFTH-REVERSE FORK
Fig. 88 Shift Forks In Synchro
1 - SYNCHRO SLEEVES
2 - FORK ARMS
3 - SHIFT FORKS
21 - 30 MANUAL - NV3500BR/BE
MANUAL - NV3500 (Continued)
Page 1675 of 2889
(5) Fill transmission to bottom edge of fill plug
hole with Mopar Transmission Lubricant.
(6) Install and tighten fill plug to 34 N´m (25 ft.
lbs.).
(7) Check transmission vent. Be sure vent is open
and not restricted.
INSTALLATION
NOTE: If a new transmission is being installed, be
sure to use all components supplied with the new
transmission. For example, if a new shift tower is
supplied with the new transmission, do not re-use
the original shift tower.
Make sure transmission front housing mounting
surface is clean. Before installation apply light coat
of Mopar high temperature bearing grease to contact
surfaces of following components:
²input shaft splines.
²release bearing slide surface of front retainer.
²release bearing bore.
²release fork.
²release fork ball stud.
²propeller shaft slip yoke.
(1) Support and secure transmission to jack with
safety chains.
(2) Raise and align transmission input shaft with
clutch disc, then slide transmission into place.
(3) Install and tighten transmission bolts to 54-61
N´m (40-45 ft. lbs.). Be sure front housing is fully
seated before tightening bolts. Install front dust
cover after all bolts are tightened.
(4) Fill transmission with Mopar lubricant. Correct
fill level is to bottom edge of fill plug hole.
(5) Connect backup lamp switch wires.(6) Connect transmission harnesses to clips on
case.
(7) Install crossmember. Tighten crossmember-to-
frame bolts to 68 N´m (50 ft. lbs.).
(8) Tighten crossmember-to-transmission insulator
nuts to 68 N´m (50 ft. lbs.).
(9) Install slave cylinder. Tighten cylinder nuts to
23 N´m (200 in. lbs.).
(10) Remove jack used to support transmission.
(11) Install strut bolts/nuts, if removed. Also
install oil filter if removal was necessary.
(12) Install and connect exhaust system. Align
exhaust components before tightening clamp and
bracket bolts and nuts. Be sure exhaust components
are clear of all chassis and driveline components.
TWO WHEEL DRIVE
(1) Align and install propeller shaft.
(2) Verify that all linkage components, hoses and
electrical wires have been connected.
(3) Remove any remaining support stands and
lower vehicle.
(4) Install crankshaft position sensor.
(5) Connect battery negative cable.
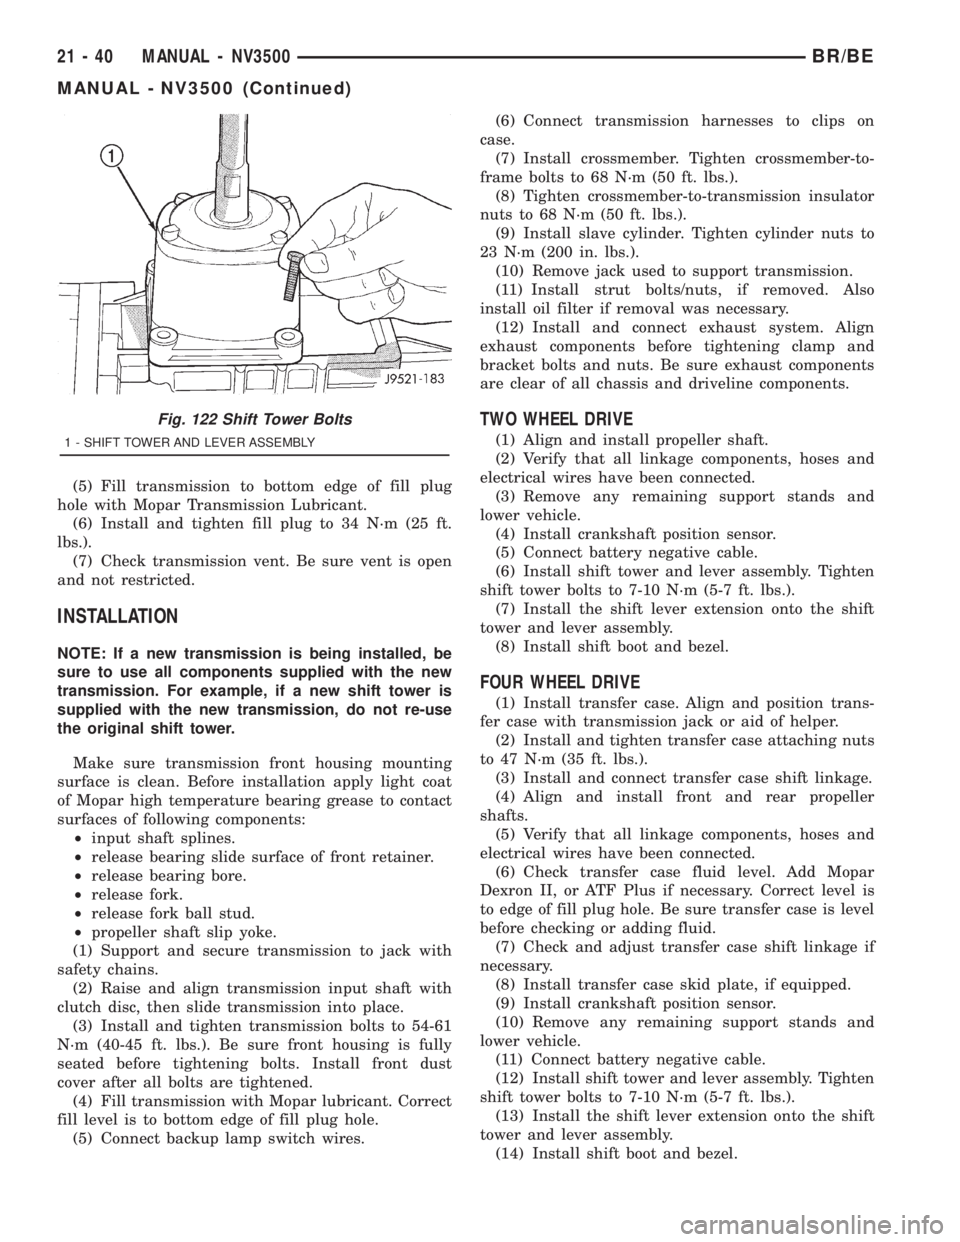
(6) Install shift tower and lever assembly. Tighten
shift tower bolts to 7-10 N´m (5-7 ft. lbs.).
(7) Install the shift lever extension onto the shift
tower and lever assembly.
(8) Install shift boot and bezel.
FOUR WHEEL DRIVE
(1) Install transfer case. Align and position trans-
fer case with transmission jack or aid of helper.
(2) Install and tighten transfer case attaching nuts
to 47 N´m (35 ft. lbs.).
(3) Install and connect transfer case shift linkage.
(4) Align and install front and rear propeller
shafts.
(5) Verify that all linkage components, hoses and
electrical wires have been connected.
(6) Check transfer case fluid level. Add Mopar
Dexron II, or ATF Plus if necessary. Correct level is
to edge of fill plug hole. Be sure transfer case is level
before checking or adding fluid.
(7) Check and adjust transfer case shift linkage if
necessary.
(8) Install transfer case skid plate, if equipped.
(9) Install crankshaft position sensor.
(10) Remove any remaining support stands and
lower vehicle.
(11) Connect battery negative cable.
(12) Install shift tower and lever assembly. Tighten
shift tower bolts to 7-10 N´m (5-7 ft. lbs.).
(13) Install the shift lever extension onto the shift
tower and lever assembly.
(14) Install shift boot and bezel.
Fig. 122 Shift Tower Bolts
1 - SHIFT TOWER AND LEVER ASSEMBLY
21 - 40 MANUAL - NV3500BR/BE
MANUAL - NV3500 (Continued)
Page 1682 of 2889
A leak at the front of the transmission will be from
either the front bearing retainer or retainer seal.
Lubricant may be seen dripping from the clutch
housing after extended operation. If the leak is
severe, it may also contaminate the clutch disc caus-
ing the disc to slip, grab and or chatter.
A correct lubricant level check can only be made
when the vehicle is level. Also allow the lubricant to
settle for a minute or so before checking. These rec-
ommendations will ensure an accurate check and
avoid an underfill or overfill condition. Always check
the lubricant level after any addition of fluid to avoid
an incorrect lubricant level condition.
HARD SHIFTING
Hard shifting is usually caused by a low lubricant
level, improper or contaminated lubricants. The con-
sequence of using non-recommended lubricants is
noise, excessive wear, internal bind and hard shift-
ing. Substantial lubricant leaks can result in gear,
shift rail, synchro, and bearing damage. If a leak
goes undetected for an extended period, the first indi-
cations of component damage are usually hard shift-
ing and noise.
Component damage, incorrect clutch adjustment or
damaged clutch pressure plate or disc are additional
probable causes of increased shift effort. Incorrect
adjustment or a worn/damaged pressure plate or disc
can cause incorrect release. If clutch problem is
advanced, gear clash during shifts can result. Worn
or damaged synchro rings can cause gear clash when
shifting into any forward gear. In some new or
rebuilt transmissions, new synchro rings may tend to
stick slightly causing hard or noisy shifts. In most
cases this condition will decline as the rings wear-in.
TRANSMISSION NOISE
Most manual transmissions make some noise dur-
ing normal operation. Rotating gears generate a mild
whine that is audible, but generally only at extreme
speeds.
Severe highly audible transmission noise is gener-
ally the initial indicator of a lubricant problem.
Insufficient, improper or contaminated lubricant will
promote rapid wear of gears, synchros, shift rails,
forks and bearings. The overheating caused by a
lubricant problem, can also lead to gear breakage.
REMOVAL
(1) Disconnect battery negative cable.
(2) Shift transmission into Neutral.
(3) Remove shift boot screws from floorpan and
slide boot upward on the shift lever.
(4) Remove shift lever extension from shift tower
and lever assembly.(5) Remove shift tower bolts holding tower to iso-
lator plate and transmission shift cover.
(6) Remove shift tower and isolator plate from
transmission shift cover.
(7) Raise and support vehicle.
(8) Remove skid plate, if equipped.
(9) Mark propeller shaft and axle yokes for instal-
lation reference and remove shaft/shafts.
(10) Remove exhaust system Y-pipe.
(11) Disconnect speed sensor and backup light
switch connectors.
(12) Support engine with safety stand and a wood
block.
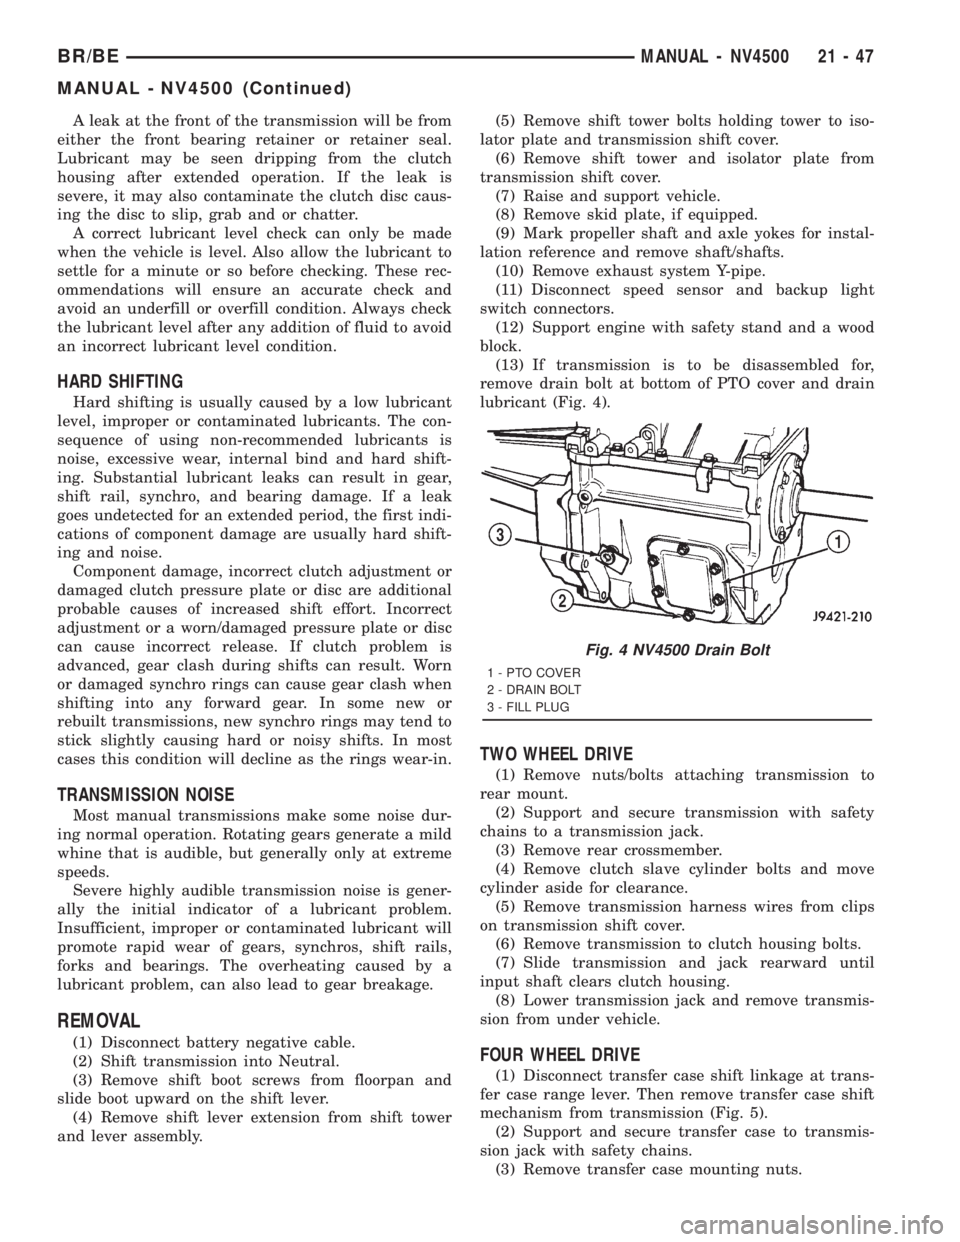
(13) If transmission is to be disassembled for,
remove drain bolt at bottom of PTO cover and drain
lubricant (Fig. 4).
TWO WHEEL DRIVE
(1) Remove nuts/bolts attaching transmission to
rear mount.
(2) Support and secure transmission with safety
chains to a transmission jack.
(3) Remove rear crossmember.
(4) Remove clutch slave cylinder bolts and move
cylinder aside for clearance.
(5) Remove transmission harness wires from clips
on transmission shift cover.
(6) Remove transmission to clutch housing bolts.
(7) Slide transmission and jack rearward until
input shaft clears clutch housing.
(8) Lower transmission jack and remove transmis-
sion from under vehicle.
FOUR WHEEL DRIVE
(1) Disconnect transfer case shift linkage at trans-
fer case range lever. Then remove transfer case shift
mechanism from transmission (Fig. 5).
(2) Support and secure transfer case to transmis-
sion jack with safety chains.
(3) Remove transfer case mounting nuts.
Fig. 4 NV4500 Drain Bolt
1 - PTO COVER
2 - DRAIN BOLT
3 - FILL PLUG
BR/BEMANUAL - NV4500 21 - 47
MANUAL - NV4500 (Continued)