2001 DODGE RAM wheel
[x] Cancel search: wheelPage 1717 of 2889
INSTALLATION
NOTE: If a new transmission is being installed, be
sure to use all components supplied with the new
transmission. For example, if a new shift tower is
supplied with the new transmission, do not re-use
the original shift tower.
Befor installation apply light coat of Mopar high
temperature bearing grease to contact surfaces of fol-
lowing components:
²input shaft splines.
²release bearing slide surface of front retainer.
²release bearing bore.
²release fork.
²release fork ball stud.
²propeller shaft slip yoke.
(1) Apply sealer to threads of bottom PTO cover
bolt and install bolt in case.
(2) Mount transmission on jack and position trans-
mission under vehicle.
(3) Raise transmission until input shaft is centered
in release bearing and clutch disc hub.
(4) Move transmission forward and start input
shaft in release bearing, clutch disc and pilot bush-
ing.
(5) Work transmission forward until seated against
clutch housing. Do not allow transmission to remain
unsupported after input shaft has entered clutch
disc.
(6) Install and tighten transmission-to-clutch hous-
ing bolts to 108 N´m (80 ft. lbs.).
(7) Install transmission mount on transmission or
rear crossmember.
(8) Install rear crossmember.
(9) Remove transmission jack and engine support
fixture.
(10) Position transmission harness wires in clips
on shift cover.
(11) Install clutch slave cylinder and install slave
cylinder shield, if equipped.
(12) Connect speed sensor and backup light switch
wires.
TWO WHEEL DRIVE
(1) Fill transmission with recommended lubricant.
Correct fill level is bottom edge of fill plug hole.
(2) Align and install propeller shaft.
(3) Lower vehicle.
(4) Clean the mating surfaces of shift tower, isola-
tor plate, and shift cover with suitable wax and
grease remover.
(5) Apply Mopar Gasket Maker, or equivalent, to
the sealing surface of the shift cover. Do not over
apply sealant.(6) Install the isolator plate onto the shift cover,
metal side down.
(7) Install the shift tower onto the isolator plate.
No sealant is necessary between the shift tower and
the isolator plate.
(8) Verify that the shift tower, isolator plate, and
the shift tower bushings are properly aligned.
(9) Install the bolts to hold the shift tower to the
isolator plate and the shift cover. Tighten the shift
tower bolts to 10.2±11.25 N´m (7.5±8.3 ft. lbs.).
(10) Install the shift lever extension onto the shift
tower and lever assembly.
(11) Install shift boot and bezel.
(12) Connect battery negative cable.
FOUR WHEEL DRIVE
(1) Install transfer case shift mechanism on trans-
mission.
(2) Install transfer case on transmission jack.
Secure transfer case to jack with safety chains.
(3) Raise jack and align transfer case input gear
with transmission mainshaft.
(4) Move transfer case forward and seat it on
adapter.
(5) Install and tighten transfer case attaching
nuts. Tighten nuts to 41-47 N´m (30-35 ft. lbs.) if
case has 3/8 studs, or 30-41 N´m (22-30 ft. lbs.) if
case has 5/16 studs.
(6) Install transfer case shift mechanism to side of
transfer case.
(7) Connect transfer case shift lever to range lever
on transfer case.
(8) Align and connect propeller shafts.
(9) Fill transmission with required lubricant.
Check lubricant level in transfer case and add lubri-
cant if necessary.
(10) Install transfer case skid plate, if equipped,
and crossmember. Tighten attaching bolts/nuts to 41
N´m (30 ft. lbs.) torque.
(11) Install exhaust system components.
(12) Lower vehicle.
(13) Clean the mating surfaces of shift tower, iso-
lator plate, and shift cover with suitable wax and
grease remover.
(14) Apply Mopar Gasket Maker, or equivalent, to
the sealing surface of the shift cover. Do not over
apply sealant.
(15) Install the isolator plate onto the shift cover,
metal side down.
(16) Install the shift tower onto the isolator plate.
No sealant is necessary between the shift tower and
the isolator plate.
(17) Verify that the shift tower, isolator plate, and
the shift tower bushings are properly aligned.
21 - 82 MANUAL - NV4500BR/BE
MANUAL - NV4500 (Continued)
Page 1729 of 2889
A leak at the front of the transmission will be from
either the front bearing retainer or retainer seal.
Lubricant may be seen dripping from the clutch
housing after extended operation. If the leak is
severe, it may also contaminate the clutch disc caus-
ing the disc to slip, grab and or chatter.
A correct lubricant level check can only be made
when the vehicle is level. Also allow the lubricant to
settle for a minute or so before checking. These rec-
ommendations will ensure an accurate check and
avoid an underfill or overfill condition. Always check
the lubricant level after any addition of fluid to avoid
an incorrect lubricant level condition.
HARD SHIFTING
Hard shifting is usually caused by a low lubricant
level, improper or contaminated lubricants. The con-
sequence of using non-recommended lubricants is
noise, excessive wear, internal bind and hard shift-
ing. Substantial lubricant leaks can result in gear,
shift rail, synchro, and bearing damage. If a leak
goes undetected for an extended period, the first indi-
cations of component damage are usually hard shift-
ing and noise.
Component damage, incorrect clutch adjustment or
damaged clutch pressure plate or disc are additional
probable causes of increased shift effort. Incorrect
adjustment or a worn/damaged pressure plate or disc
can cause incorrect release. If clutch problem is
advanced, gear clash during shifts can result. Worn
or damaged synchro rings can cause gear clash when
shifting into any forward gear. In some new or
rebuilt transmissions, new synchro rings may tend to
stick slightly causing hard or noisy shifts. In most
cases this condition will decline as the rings wear-in.
TRANSMISSION NOISE
Most manual transmissions make some noise dur-
ing normal operation. Rotating gears generate a mild
whine that is audible, but generally only at extreme
speeds.
Severe highly audible transmission noise is gener-
ally the initial indicator of a lubricant problem.
Insufficient, improper or contaminated lubricant will
promote rapid wear of gears, synchros, shift rails,
forks and bearings. The overheating caused by a
lubricant problem, can also lead to gear breakage.
REMOVAL
NOTE: Use a heavy duty scissors style transmis-
sion jack for remove of the transmission.
(1) Disconnect battery negative cable.
(2) Shift transmission into Neutral.
(3) Remove screws attaching shift boot to floorpan.
Then slide boot upward on the shift lever.(4) Remove the bolts holding the shift tower to the
isolator plate and transmission gear case.
(5) Remove the shift tower and isolator plate from
the transmission gear case.
(6) Raise and support vehicle.
(7) Remove skid plate, if equipped.
(8) Mark propeller shaft/shafts and axle yokes for
installation reference.
(9) Remove propeller shaft.
(10) Disconnect and remove exhaust system as
necessary.
(11) Disconnect wires at backup light switch.
(12) Support engine with adjustable safety stand
and wood block.
(13) If transmission is to be disassembled for
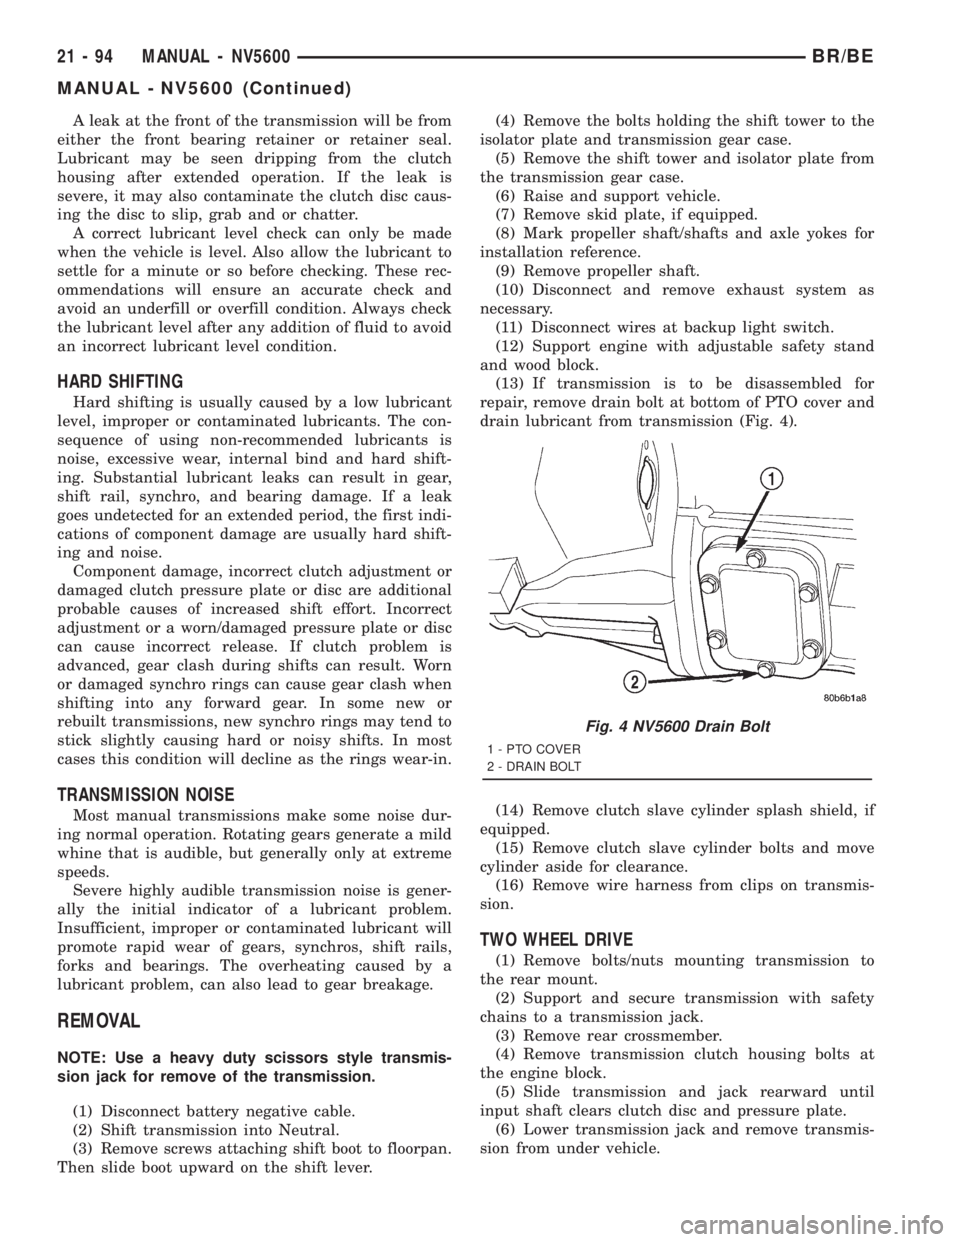
repair, remove drain bolt at bottom of PTO cover and
drain lubricant from transmission (Fig. 4).
(14) Remove clutch slave cylinder splash shield, if
equipped.
(15) Remove clutch slave cylinder bolts and move
cylinder aside for clearance.
(16) Remove wire harness from clips on transmis-
sion.
TWO WHEEL DRIVE
(1) Remove bolts/nuts mounting transmission to
the rear mount.
(2) Support and secure transmission with safety
chains to a transmission jack.
(3) Remove rear crossmember.
(4) Remove transmission clutch housing bolts at
the engine block.
(5) Slide transmission and jack rearward until
input shaft clears clutch disc and pressure plate.
(6) Lower transmission jack and remove transmis-
sion from under vehicle.
Fig. 4 NV5600 Drain Bolt
1 - PTO COVER
2 - DRAIN BOLT
21 - 94 MANUAL - NV5600BR/BE
MANUAL - NV5600 (Continued)
Page 1730 of 2889
FOUR WHEEL DRIVE
(1) Disconnect transfer case shift linkage at trans-
fer case range lever.
(2) Support and secure transfer case with safety
chains to a transmission jack.
(3) Remove transfer case mounting nuts.
(4) Move transfer case rearward until input gear
clears transmission mainshaft.
(5) Lower transfer case assembly and move it from
under vehicle.
(6) Support and secure transmission with safety
chains to a transmission jack.
(7) Remove bolts/nuts attaching transmission
mount to rear crossmember.
(8) Remove rear crossmember.
(9) Remove transmission clutch housing bolts at
the engine block.
(10) Move transmission rearward until input shaft
clears clutch disc.
(11) Lower transmission and remove it from under
vehicle.
DISASSEMBLY
NOTE: The use of Fixture 8241 for moving and han-
dling the NV5600 is required. The fixture supports
the transmission at the center of gravity in order to
ease mounting the transmission into the build fix-
ture.
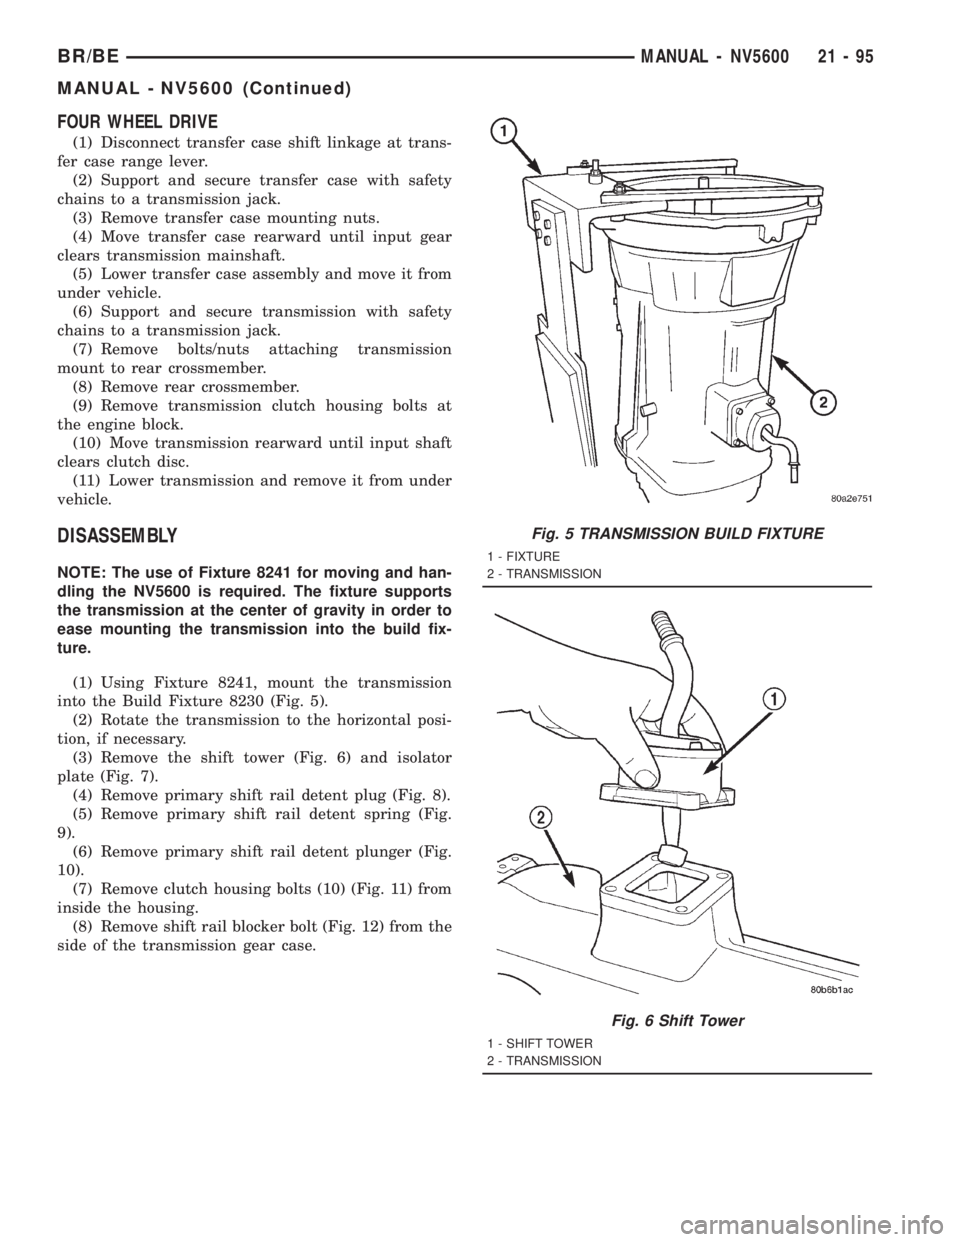
(1) Using Fixture 8241, mount the transmission
into the Build Fixture 8230 (Fig. 5).
(2) Rotate the transmission to the horizontal posi-
tion, if necessary.
(3) Remove the shift tower (Fig. 6) and isolator
plate (Fig. 7).
(4) Remove primary shift rail detent plug (Fig. 8).
(5) Remove primary shift rail detent spring (Fig.
9).
(6) Remove primary shift rail detent plunger (Fig.
10).
(7) Remove clutch housing bolts (10) (Fig. 11) from
inside the housing.
(8) Remove shift rail blocker bolt (Fig. 12) from the
side of the transmission gear case.
Fig. 5 TRANSMISSION BUILD FIXTURE
1 - FIXTURE
2 - TRANSMISSION
Fig. 6 Shift Tower
1 - SHIFT TOWER
2 - TRANSMISSION
BR/BEMANUAL - NV5600 21 - 95
MANUAL - NV5600 (Continued)
Page 1760 of 2889
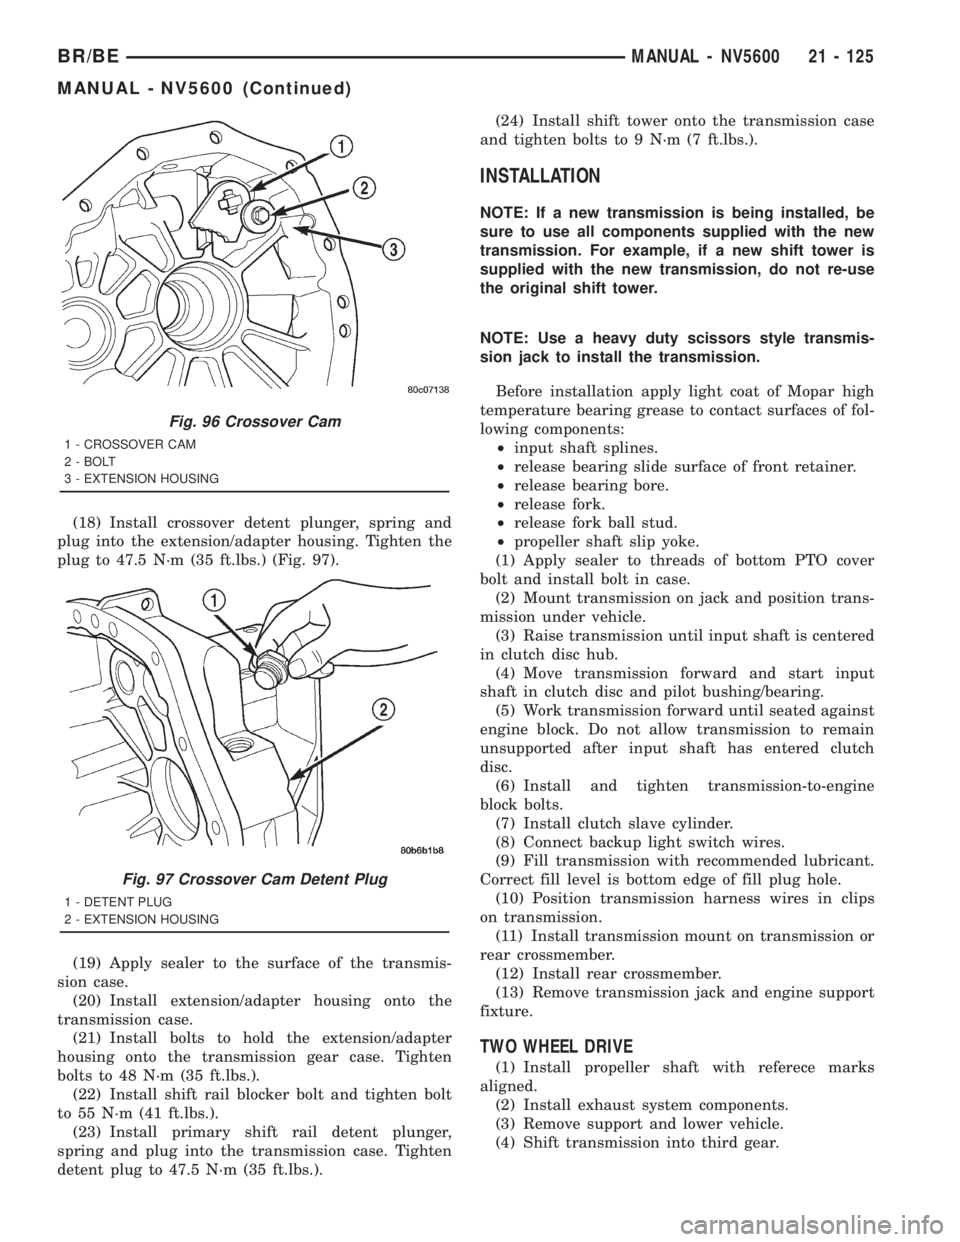
(18) Install crossover detent plunger, spring and
plug into the extension/adapter housing. Tighten the
plug to 47.5 N´m (35 ft.lbs.) (Fig. 97).
(19) Apply sealer to the surface of the transmis-
sion case.
(20) Install extension/adapter housing onto the
transmission case.
(21) Install bolts to hold the extension/adapter
housing onto the transmission gear case. Tighten
bolts to 48 N´m (35 ft.lbs.).
(22) Install shift rail blocker bolt and tighten bolt
to 55 N´m (41 ft.lbs.).
(23) Install primary shift rail detent plunger,
spring and plug into the transmission case. Tighten
detent plug to 47.5 N´m (35 ft.lbs.).(24) Install shift tower onto the transmission case
and tighten bolts to 9 N´m (7 ft.lbs.).
INSTALLATION
NOTE: If a new transmission is being installed, be
sure to use all components supplied with the new
transmission. For example, if a new shift tower is
supplied with the new transmission, do not re-use
the original shift tower.
NOTE: Use a heavy duty scissors style transmis-
sion jack to install the transmission.
Before installation apply light coat of Mopar high
temperature bearing grease to contact surfaces of fol-
lowing components:
²input shaft splines.
²release bearing slide surface of front retainer.
²release bearing bore.
²release fork.
²release fork ball stud.
²propeller shaft slip yoke.
(1) Apply sealer to threads of bottom PTO cover
bolt and install bolt in case.
(2) Mount transmission on jack and position trans-
mission under vehicle.
(3) Raise transmission until input shaft is centered
in clutch disc hub.
(4) Move transmission forward and start input
shaft in clutch disc and pilot bushing/bearing.
(5) Work transmission forward until seated against
engine block. Do not allow transmission to remain
unsupported after input shaft has entered clutch
disc.
(6) Install and tighten transmission-to-engine
block bolts.
(7) Install clutch slave cylinder.
(8) Connect backup light switch wires.
(9) Fill transmission with recommended lubricant.
Correct fill level is bottom edge of fill plug hole.
(10) Position transmission harness wires in clips
on transmission.
(11) Install transmission mount on transmission or
rear crossmember.
(12) Install rear crossmember.
(13) Remove transmission jack and engine support
fixture.
TWO WHEEL DRIVE
(1) Install propeller shaft with referece marks
aligned.
(2) Install exhaust system components.
(3) Remove support and lower vehicle.
(4) Shift transmission into third gear.
Fig. 96 Crossover Cam
1 - CROSSOVER CAM
2 - BOLT
3 - EXTENSION HOUSING
Fig. 97 Crossover Cam Detent Plug
1 - DETENT PLUG
2 - EXTENSION HOUSING
BR/BEMANUAL - NV5600 21 - 125
MANUAL - NV5600 (Continued)
Page 1761 of 2889
(5) Clean the mating surfaces of shift tower and
isolator plate with suitable wax and grease remover.
(6) Apply Mopar Gasket Maker or equivalent to
sealing surface of the transmission case. Do not over
apply sealant.
(7) Install isolator plate onto the transmission case
metal side down.
(8) Install shift tower onto the isolator plate. No
sealant is necessary between the shift tower and top
of isolator plate.
(9) Verify that the shift tower, isolator plate and
the shift socket are properly aligned.
(10) Install bolts to hold the shift tower to the iso-
lator plate and the transmission case. Tighten bolts
to 10.2±11.25 N´m (7.5±8.3 ft. lbs.).
(11) Install shift boot and bezel.
(12) Connect battery negative cable.
FOUR WHEEL DRIVE
(1) Install and secure transfer case on the trans-
mission jack.
(2) Raise and align transfer case input gear with
transmission mainshaft.
(3) Move transfer case forward and seat it on
adapter.
(4) Install and tighten transfer case mounting nuts
to 41-47 N´m (30-35 ft. lbs.) if case has 3/8 studs. If
case has 5/16 studs tighten to 30-41 N´m (22-30 ft.
lbs.).
(5) Connect transfer case shift lever to range lever
on transfer case.(6) Install propeller shafts with reference marks
aligned.
(7) Fill transmission with required lubricant.
Check lubricant level in transfer case and add lubri-
cant if necessary.
(8) Install transfer case skid plate, if equipped,
and crossmember. Tighten attaching bolts/nuts to 41
N´m (30 ft. lbs.).
(9) Install exhaust system components.
(10) Remove support and lower vehicle.
(11) Shift transmission into third gear.
(12) Clean the mating surfaces of shift tower, iso-
lator plate, and transmission case with suitable wax
and grease remover.
(13) Apply Mopar Gasket Maker or equivalent to
the sealing surface of the transmission case. Do not
over apply sealant.
(14) Install isolator plate onto the transmission
case, metal side down.
(15) Install shift tower onto the isolator plate. No
sealant is necessary between the shift tower and top
of isolator plate.
(16) Verify that the shift tower, isolator plate and
the shift tower bushings are properly aligned.
(17) Install the bolts to hold the shift tower to the
isolator plate and the transmission case. Tighten the
shift tower bolts to 10.2±11.25 N´m (7.5±8.3 ft. lbs.).
(18) Install shift lever boot and bezel.
(19) Connect battery negative cable.
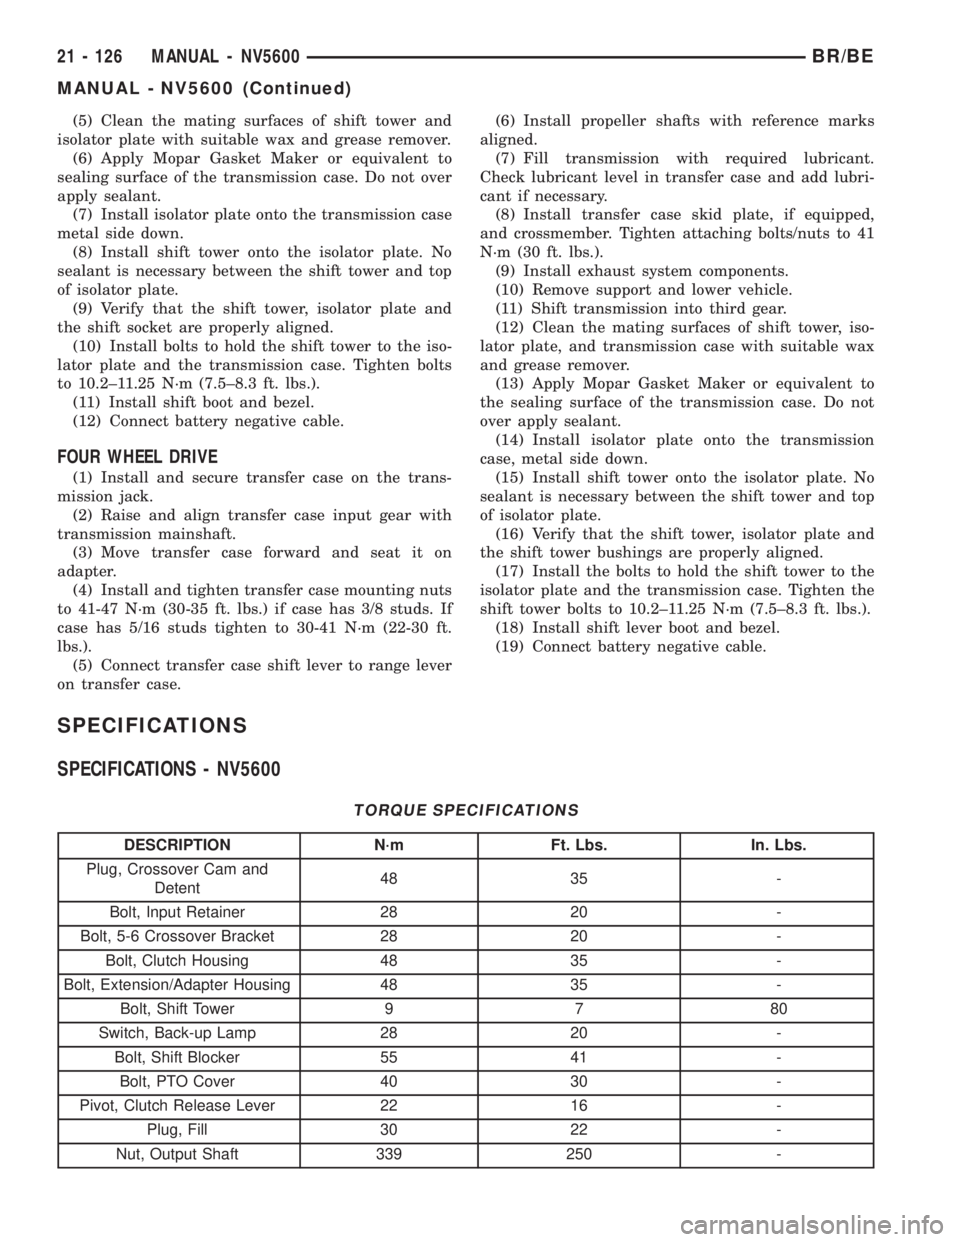
SPECIFICATIONS
SPECIFICATIONS - NV5600
TORQUE SPECIFICATIONS
DESCRIPTION N´m Ft. Lbs. In. Lbs.
Plug, Crossover Cam and
Detent48 35 -
Bolt, Input Retainer 28 20 -
Bolt, 5-6 Crossover Bracket 28 20 -
Bolt, Clutch Housing 48 35 -
Bolt, Extension/Adapter Housing 48 35 -
Bolt, Shift Tower 9 7 80
Switch, Back-up Lamp 28 20 -
Bolt, Shift Blocker 55 41 -
Bolt, PTO Cover 40 30 -
Pivot, Clutch Release Lever 22 16 -
Plug, Fill 30 22 -
Nut, Output Shaft 339 250 -
21 - 126 MANUAL - NV5600BR/BE
MANUAL - NV5600 (Continued)
Page 1776 of 2889
SECOND GEAR POWERFLOW
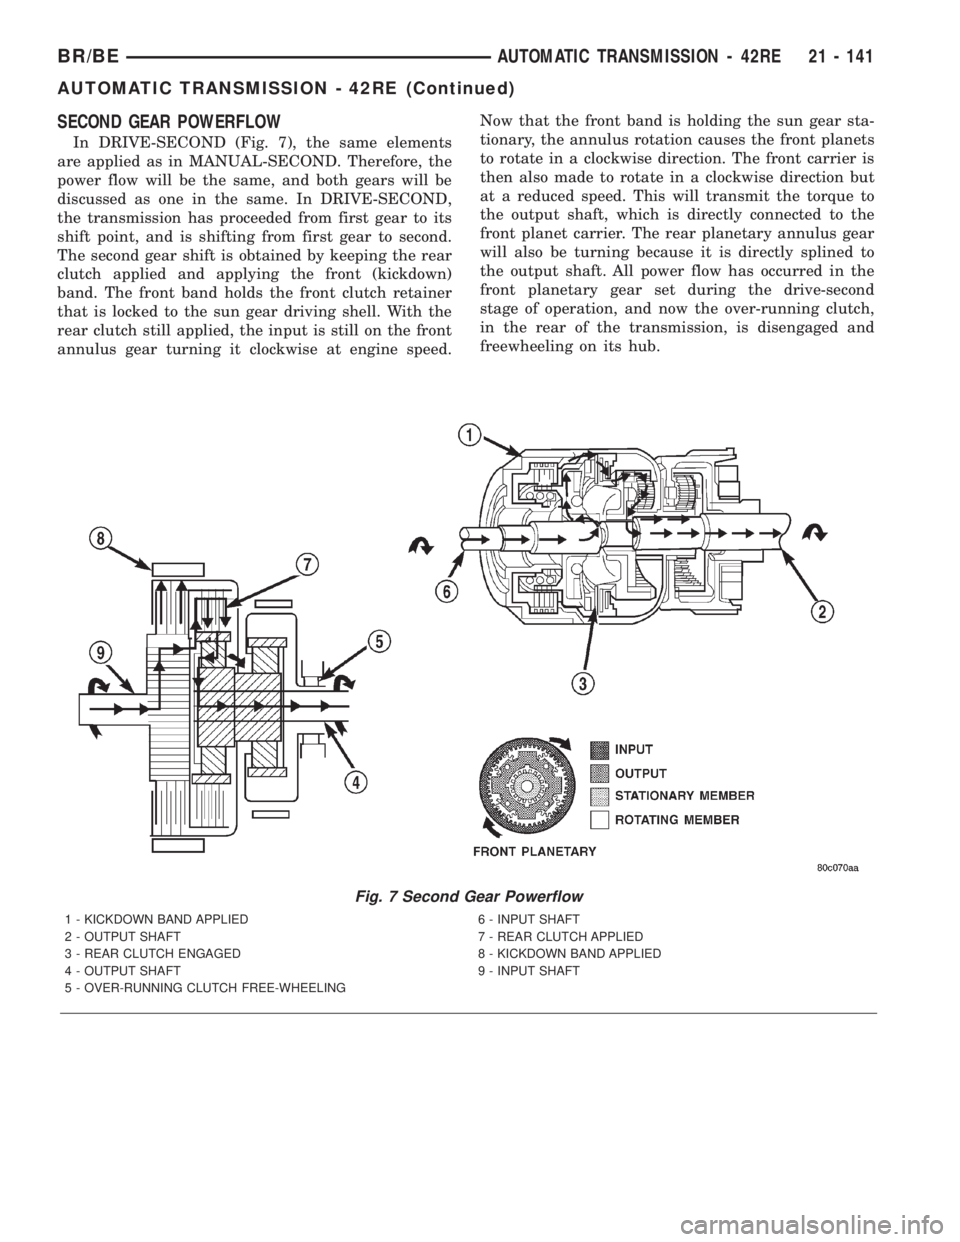
In DRIVE-SECOND (Fig. 7), the same elements
are applied as in MANUAL-SECOND. Therefore, the
power flow will be the same, and both gears will be
discussed as one in the same. In DRIVE-SECOND,
the transmission has proceeded from first gear to its
shift point, and is shifting from first gear to second.
The second gear shift is obtained by keeping the rear
clutch applied and applying the front (kickdown)
band. The front band holds the front clutch retainer
that is locked to the sun gear driving shell. With the
rear clutch still applied, the input is still on the front
annulus gear turning it clockwise at engine speed.Now that the front band is holding the sun gear sta-
tionary, the annulus rotation causes the front planets
to rotate in a clockwise direction. The front carrier is
then also made to rotate in a clockwise direction but
at a reduced speed. This will transmit the torque to
the output shaft, which is directly connected to the
front planet carrier. The rear planetary annulus gear
will also be turning because it is directly splined to
the output shaft. All power flow has occurred in the
front planetary gear set during the drive-second
stage of operation, and now the over-running clutch,
in the rear of the transmission, is disengaged and
freewheeling on its hub.
Fig. 7 Second Gear Powerflow
1 - KICKDOWN BAND APPLIED 6 - INPUT SHAFT
2 - OUTPUT SHAFT 7 - REAR CLUTCH APPLIED
3 - REAR CLUTCH ENGAGED 8 - KICKDOWN BAND APPLIED
4 - OUTPUT SHAFT 9 - INPUT SHAFT
5 - OVER-RUNNING CLUTCH FREE-WHEELING
BR/BEAUTOMATIC TRANSMISSION - 42RE 21 - 141
AUTOMATIC TRANSMISSION - 42RE (Continued)
Page 1777 of 2889
DIRECT DRIVE POWERFLOW
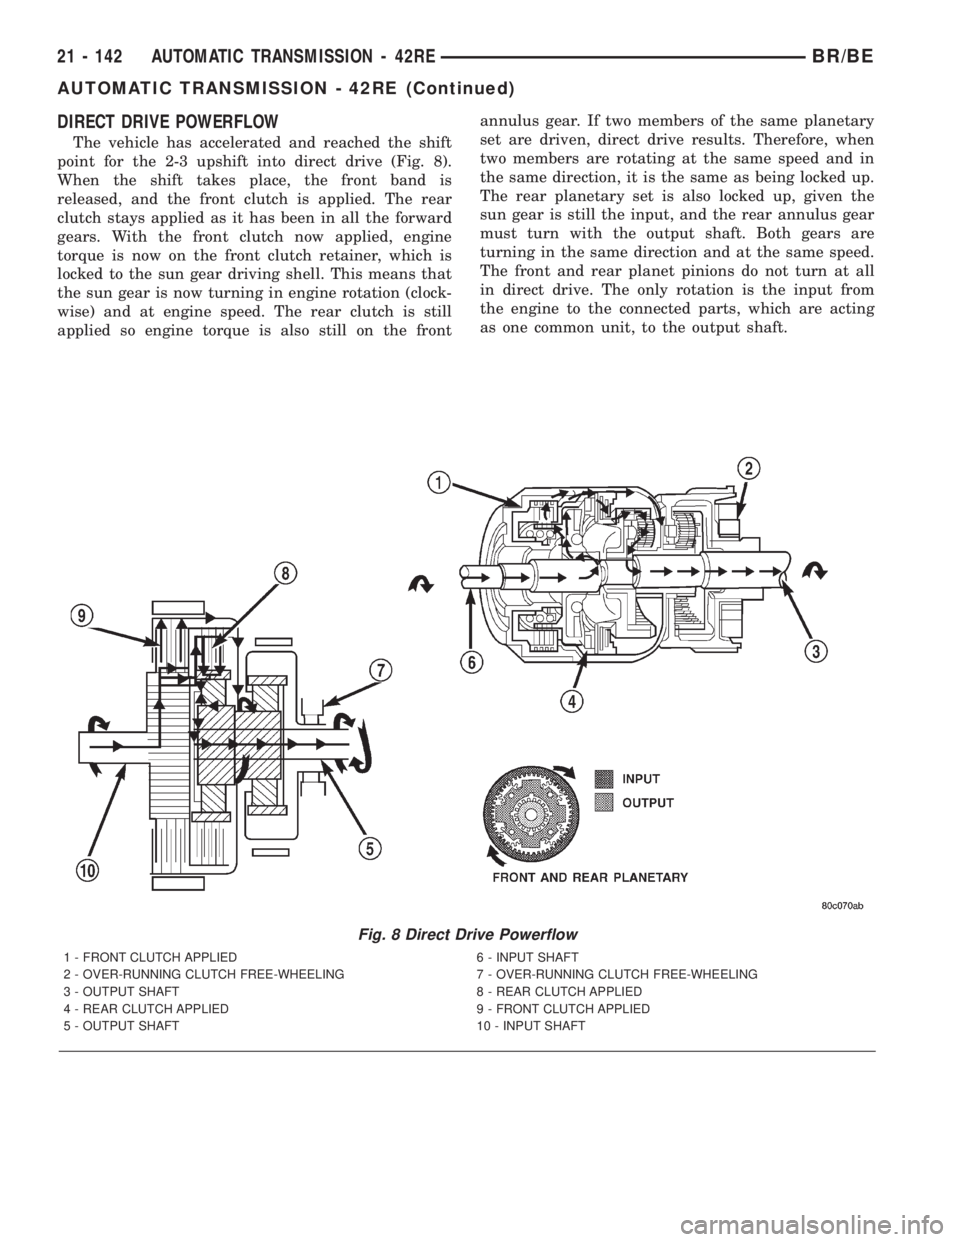
The vehicle has accelerated and reached the shift
point for the 2-3 upshift into direct drive (Fig. 8).
When the shift takes place, the front band is
released, and the front clutch is applied. The rear
clutch stays applied as it has been in all the forward
gears. With the front clutch now applied, engine
torque is now on the front clutch retainer, which is
locked to the sun gear driving shell. This means that
the sun gear is now turning in engine rotation (clock-
wise) and at engine speed. The rear clutch is still
applied so engine torque is also still on the frontannulus gear. If two members of the same planetary
set are driven, direct drive results. Therefore, when
two members are rotating at the same speed and in
the same direction, it is the same as being locked up.
The rear planetary set is also locked up, given the
sun gear is still the input, and the rear annulus gear
must turn with the output shaft. Both gears are
turning in the same direction and at the same speed.
The front and rear planet pinions do not turn at all
in direct drive. The only rotation is the input from
the engine to the connected parts, which are acting
as one common unit, to the output shaft.
Fig. 8 Direct Drive Powerflow
1 - FRONT CLUTCH APPLIED 6 - INPUT SHAFT
2 - OVER-RUNNING CLUTCH FREE-WHEELING 7 - OVER-RUNNING CLUTCH FREE-WHEELING
3 - OUTPUT SHAFT 8 - REAR CLUTCH APPLIED
4 - REAR CLUTCH APPLIED 9 - FRONT CLUTCH APPLIED
5 - OUTPUT SHAFT 10 - INPUT SHAFT
21 - 142 AUTOMATIC TRANSMISSION - 42REBR/BE
AUTOMATIC TRANSMISSION - 42RE (Continued)
Page 1778 of 2889
FOURTH GEAR POWERFLOW
Fourth gear overdrive range is electronically con-
trolled and hydraulically activated. Various sensor
inputs are supplied to the powertrain control module
to operate the overdrive solenoid on the valve body.
The solenoid contains a check ball that opens and
closes a vent port in the 3-4 shift valve feed passage.
The overdrive solenoid (and check ball) are not ener-
gized in first, second, third, or reverse gear. The vent
port remains open, diverting line pressure from the
2-3 shift valve away from the 3-4 shift valve. The
overdrive control switch must be in the ON position
to transmit overdrive status to the PCM. A 3-4
upshift occurs only when the overdrive solenoid is
energized by the PCM. The PCM energizes the over-
drive solenoid during the 3-4 upshift. This causes the
solenoid check ball to close the vent port allowing
line pressure from the 2-3 shift valve to act directly
on the 3-4 upshift valve. Line pressure on the 3-4
shift valve overcomes valve spring pressure moving
the valve to the upshift position. This action exposes
the feed passages to the 3-4 timing valve, 3-4 quick
fill valve, 3-4 accumulator, and ultimately to the
overdrive piston. Line pressure through the timing
valve moves the overdrive piston into contact with
the overdrive clutch. The direct clutch is disengaged
before the overdrive clutch is engaged. The boost
valve provides increased fluid apply pressure to the
overdrive clutch during 3-4 upshifts, and when accel-
erating in fourth gear. The 3-4 accumulator cushions
overdrive clutch engagement to smooth 3-4 upshifts.
The accumulator is charged at the same time as
apply pressure acts against the overdrive piston.
DIAGNOSIS AND TESTING - AUTOMATIC
TRANSMISSION
Automatic transmission problems can be a result of
poor engine performance, incorrect fluid level, incor-
rect linkage or cable adjustment, band or hydraulic
control pressure adjustments, hydraulic system mal-
functions or electrical/mechanical component mal-
functions. Begin diagnosis by checking the easily
accessible items such as: fluid level and condition,
linkage adjustments and electrical connections. A
road test will determine if further diagnosis is neces-
sary.
DIAGNOSIS AND TESTING - PRELIMINARY
Two basic procedures are required. One procedure
for vehicles that are drivable and an alternate proce-
dure for disabled vehicles (will not back up or move
forward).
VEHICLE IS DRIVEABLE
(1) Check for transmission fault codes using DRBt
scan tool.(2) Check fluid level and condition.
(3) Adjust throttle and gearshift linkage if com-
plaint was based on delayed, erratic, or harsh shifts.
(4) Road test and note how transmission upshifts,
downshifts, and engages.
(5) Perform hydraulic pressure test if shift prob-
lems were noted during road test.
(6) Perform air-pressure test to check clutch-band
operation.
VEHICLE IS DISABLED
(1) Check fluid level and condition.
(2) Check for broken or disconnected gearshift or
throttle linkage.
(3) Check for cracked, leaking cooler lines, or loose
or missing pressure-port plugs.
(4) Raise and support vehicle on safety stands,
start engine, shift transmission into gear, and note
following:
(a) If propeller shaft turns but wheels do not,
problem is with differential or axle shafts.
(b) If propeller shaft does not turn and transmis-
sion is noisy, stop engine. Remove oil pan, and
check for debris. If pan is clear, remove transmis-
sion and check for damaged drive plate, converter,
oil pump, or input shaft.
(c) If propeller shaft does not turn and transmis-
sion is not noisy, perform hydraulic-pressure test to
determine if problem is hydraulic or mechanical.
DIAGNOSIS AND TESTING - ROAD TESTING
Before road testing, be sure the fluid level and con-
trol cable adjustments have been checked and
adjusted if necessary. Verify that diagnostic trouble
codes have been resolved.
Observe engine performance during the road test.
A poorly tuned engine will not allow accurate analy-
sis of transmission operation.
Operate the transmission in all gear ranges. Check
for shift variations and engine flare which indicates
slippage. Note if shifts are harsh, spongy, delayed,
early, or if part throttle downshifts are sensitive.
Slippage indicated by engine flare, usually means
clutch, band or overrunning clutch problems. If the
condition is advanced, an overhaul will be necessary
to restore normal operation.
A slipping clutch or band can often be determined
by comparing which internal units are applied in the
various gear ranges. The Clutch and Band Applica-
tion chart provides a basis for analyzing road test
results.
BR/BEAUTOMATIC TRANSMISSION - 42RE 21 - 143
AUTOMATIC TRANSMISSION - 42RE (Continued)