2001 DODGE RAM check engine light
[x] Cancel search: check engine lightPage 2783 of 2889
DIAGNOSIS AND TESTING - FIXED ORIFICE
TUBE
The fixed orifice tube can be checked for proper
operation using the following procedure. However,
the fixed orifice tube is only serviced as a part of the
liquid line unit. If the results of this test indicate
that the fixed orifice tube is obstructed or missing,
the entire liquid line unit must be replaced.
WARNING: THE LIQUID LINE BETWEEN THE CON-
DENSER OUTLET AND THE FIXED ORIFICE TUBE
CAN BECOME HOT ENOUGH TO BURN THE SKIN.
USE EXTREME CAUTION WHEN PERFORMING THE
FOLLOWING TEST.
(1) Confirm that the refrigerant system is properly
charged. (Refer to 24 - HEATING & AIR CONDI-
TIONING - DIAGNOSIS AND TESTING - A/C PER-
FORMANCE)
(2) Start the engine. Turn on the air conditioning
system and confirm that the compressor clutch is
engaged.
(3) Allow the air conditioning system to operate for
five minutes.
(4) Lightly and cautiously touch the liquid line
near the condenser outlet at the front of the engine
compartment. The liquid line should be hot to the
touch.
(5) Touch the liquid line near the evaporator inlet
at the rear of the engine compartment. The liquid
line should be cold to the touch.
(6) If there is a distinct temperature differential
between the two ends of the liquid line, the orifice
tube is in good condition. If there is little or no
detectable temperature differential between the two
ends of the liquid line, the orifice tube is obstructed
or missing and the liquid line must be replaced.
REMOVAL
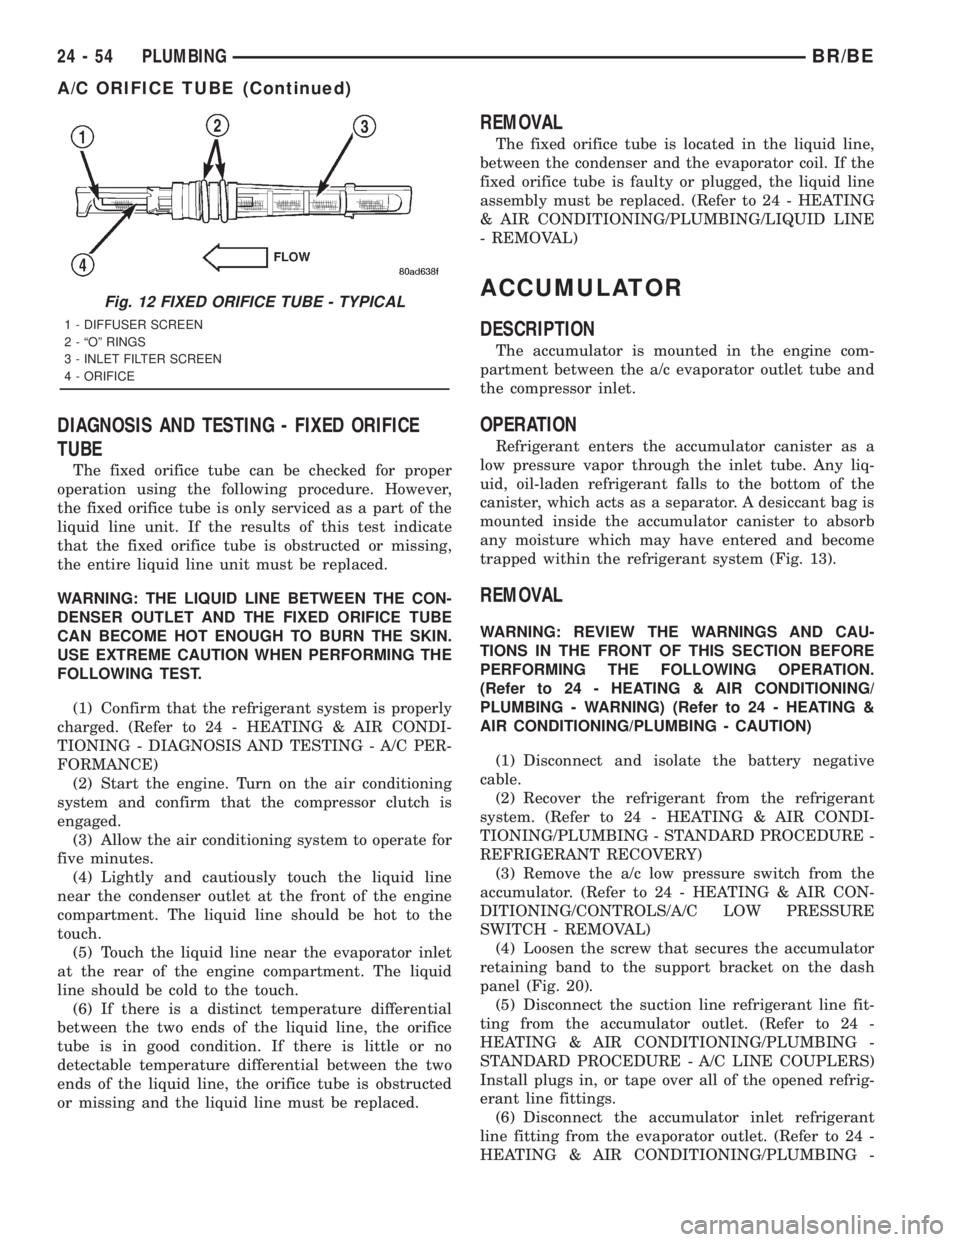
The fixed orifice tube is located in the liquid line,
between the condenser and the evaporator coil. If the
fixed orifice tube is faulty or plugged, the liquid line
assembly must be replaced. (Refer to 24 - HEATING
& AIR CONDITIONING/PLUMBING/LIQUID LINE
- REMOVAL)
ACCUMULATOR
DESCRIPTION
The accumulator is mounted in the engine com-
partment between the a/c evaporator outlet tube and
the compressor inlet.
OPERATION
Refrigerant enters the accumulator canister as a
low pressure vapor through the inlet tube. Any liq-
uid, oil-laden refrigerant falls to the bottom of the
canister, which acts as a separator. A desiccant bag is
mounted inside the accumulator canister to absorb
any moisture which may have entered and become
trapped within the refrigerant system (Fig. 13).
REMOVAL
WARNING: REVIEW THE WARNINGS AND CAU-
TIONS IN THE FRONT OF THIS SECTION BEFORE
PERFORMING THE FOLLOWING OPERATION.
(Refer to 24 - HEATING & AIR CONDITIONING/
PLUMBING - WARNING) (Refer to 24 - HEATING &
AIR CONDITIONING/PLUMBING - CAUTION)
(1) Disconnect and isolate the battery negative
cable.
(2) Recover the refrigerant from the refrigerant
system. (Refer to 24 - HEATING & AIR CONDI-
TIONING/PLUMBING - STANDARD PROCEDURE -
REFRIGERANT RECOVERY)
(3) Remove the a/c low pressure switch from the
accumulator. (Refer to 24 - HEATING & AIR CON-
DITIONING/CONTROLS/A/C LOW PRESSURE
SWITCH - REMOVAL)
(4) Loosen the screw that secures the accumulator
retaining band to the support bracket on the dash
panel (Fig. 20).
(5) Disconnect the suction line refrigerant line fit-
ting from the accumulator outlet. (Refer to 24 -
HEATING & AIR CONDITIONING/PLUMBING -
STANDARD PROCEDURE - A/C LINE COUPLERS)
Install plugs in, or tape over all of the opened refrig-
erant line fittings.
(6) Disconnect the accumulator inlet refrigerant
line fitting from the evaporator outlet. (Refer to 24 -
HEATING & AIR CONDITIONING/PLUMBING -
Fig. 12 FIXED ORIFICE TUBE - TYPICAL
1 - DIFFUSER SCREEN
2 - ªOº RINGS
3 - INLET FILTER SCREEN
4 - ORIFICE
24 - 54 PLUMBINGBR/BE
A/C ORIFICE TUBE (Continued)
Page 2832 of 2889
INSPECTION - BATTERY
When battery is easily accessible, check the test
indicator (green dot), terminal tightness and felt
(grease) washer on battery posts. Recharge battery as
required to assure that the green dot is visible.
When battery is not easily accessible check battery
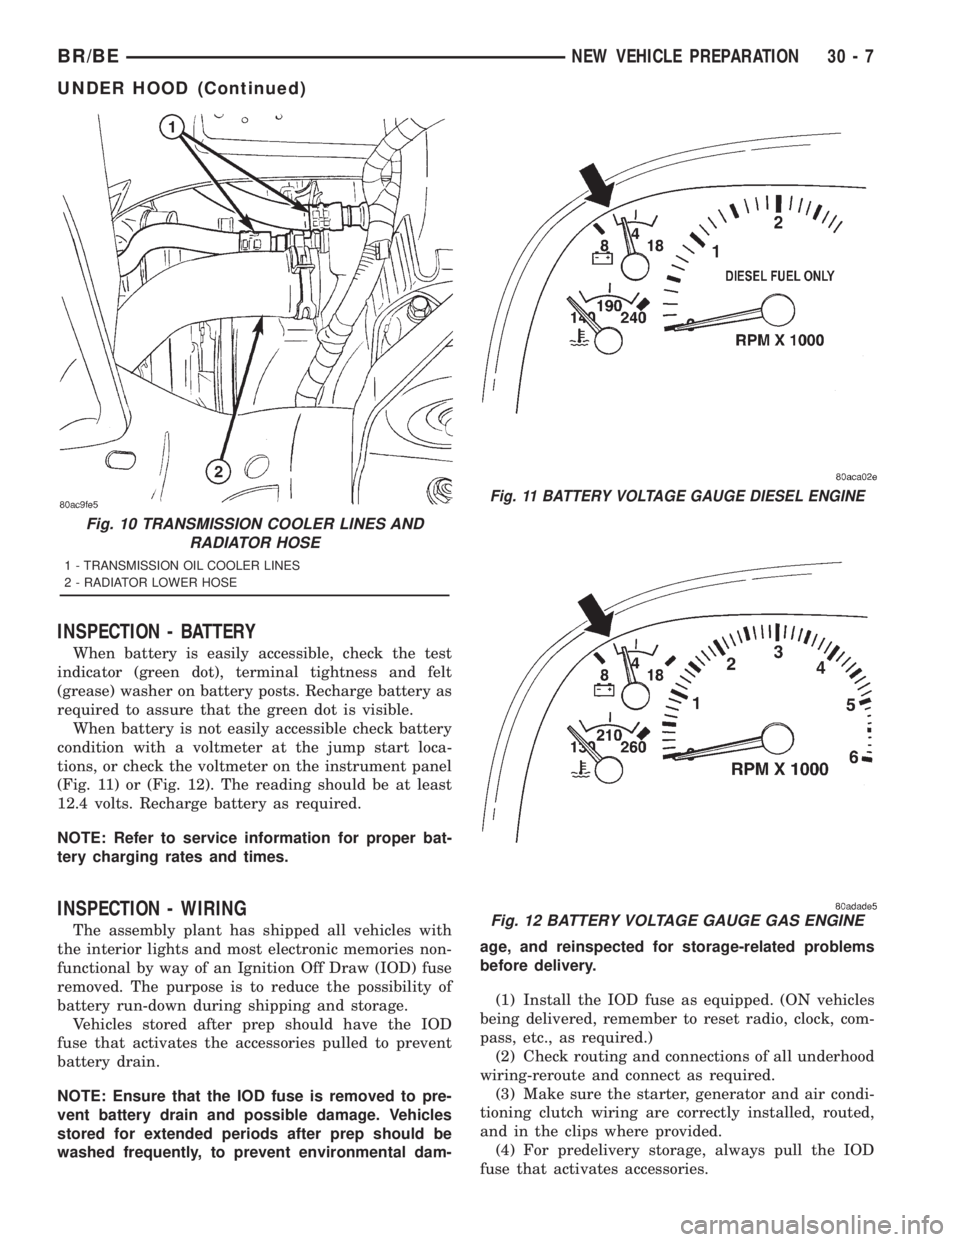
condition with a voltmeter at the jump start loca-
tions, or check the voltmeter on the instrument panel
(Fig. 11) or (Fig. 12). The reading should be at least
12.4 volts. Recharge battery as required.
NOTE: Refer to service information for proper bat-
tery charging rates and times.
INSPECTION - WIRING
The assembly plant has shipped all vehicles with
the interior lights and most electronic memories non-
functional by way of an Ignition Off Draw (IOD) fuse
removed. The purpose is to reduce the possibility of
battery run-down during shipping and storage.
Vehicles stored after prep should have the IOD
fuse that activates the accessories pulled to prevent
battery drain.
NOTE: Ensure that the IOD fuse is removed to pre-
vent battery drain and possible damage. Vehicles
stored for extended periods after prep should be
washed frequently, to prevent environmental dam-age, and reinspected for storage-related problems
before delivery.
(1) Install the IOD fuse as equipped. (ON vehicles
being delivered, remember to reset radio, clock, com-
pass, etc., as required.)
(2) Check routing and connections of all underhood
wiring-reroute and connect as required.
(3) Make sure the starter, generator and air condi-
tioning clutch wiring are correctly installed, routed,
and in the clips where provided.
(4) For predelivery storage, always pull the IOD
fuse that activates accessories.
Fig. 10 TRANSMISSION COOLER LINES AND
RADIATOR HOSE
1 - TRANSMISSION OIL COOLER LINES
2 - RADIATOR LOWER HOSE
Fig. 11 BATTERY VOLTAGE GAUGE DIESEL ENGINE
Fig. 12 BATTERY VOLTAGE GAUGE GAS ENGINE
BR/BENEW VEHICLE PREPARATION 30 - 7
UNDER HOOD (Continued)
Page 2840 of 2889
ROAD TEST
DESCRIPTION - ROAD TEST INSPECTION
The following items must be inspected during the
road test portion of the new vehicle inspection.
²Check neutral safety switch operation
²Check operation of shift/clutch interlock system
²Check operation of gauges and warning lights
²Check horn operation
²Check operation of turn signals and emergency
flashers
²Check all mirror adjustments, including day/
night function
²Check windshield wipers for proper wipe pattern
and intermittent mode (if equipped)
²Check washer spray pattern
²Check heater, defroster and air conditioning for
proper operation
²Check that the fan operates quietly
²Check the rear window defroster (if equipped)
²Leave air selection lever in the fresh air position
²Check the rear heater and air conditioning for
proper operation
²Check the rear air register locations
²Check that the indicator lamps operate properly
²Check the operation of the radio, cassette and/or
compact disc player, and that sound quality is good
²Ensure that the clock displays the correct time
²Check that the trip computer/maintenance
reminder operates in all modes
²Check all speed control functions
²Check the service brakes to ensure that they
stop the vehicle in a straight line, without noise,
shudder or vibration
²Check the brake warning light
²Check the parking brake operation
²Check the engine's performance
²Check the transmission's performance for
smooth, quiet operation. If the vehicle is a 4x4, check
that the transfer case shifts easily among all ranges
²Check Autostick function (if equipped)
²Check the vehicle's steering and handling
²The steering wheel should be centered when
traveling in a straight line
²The vehicle should not pull or vibrate
²Check for squeaks, rattles and wind noise
²Check any other vehicle aspects you believe are
important, but that may not be included on the New
Vehicle Preparation Form
²Fill fuel tank with specified grade of fuel
INSPECTION - FUEL
Fill fuel tank with specified grade of gasoline (reg-
ular, midgrade or premium).
INSPECTION - OTHER
As part of DaimlerChrysler's Customer One philos-
ophy, the ªOtherº blank is provided on the New Vehi-
cle Preparation Form. This is designed to encourage
you to check any aspects of vehicle operation that
you believe are important to your customers, but that
do not appear elsewhere on the form.
INSPECTION - SQUEAKS, RATTLES AND WIND
NOISE
(1) Make sure that the instrument panel, glove
box, seats, steering wheel and column are free from
squeaks and rattles. Tighten any obvious loose fas-
teners.
(2) Check that the windows and doors are free
from squeaks, rattles and wind noise.
(3) Check that the vehicle exterior is free from
squeaks, rattles and noise, front and rear.
(4) Make sure that all interior panels are free from
squeaks and rattles.
INSPECTION - STEERING AND HANDLING
(1) Check that the power assist works properly (if
equipped). Steering should not require excessive
effort.
(2) Make sure the steering wheel does not vibrate
at idle or road speed.
(3) Ensure that the steering wheel is centered
when traveling straight ahead.
(4) Check that the vehicle does not drift to one
side.
(5) Make sure that the vehicle does not vibrate/
shake.
INSPECTION - TRANSMISSION/TRANSFER
CASE
AUTOMATIC TRANSMISSION
(1) Make sure that the park lock holds the vehicle
With the vehicle on a grade, put automatic trans-
mission in PARK and slowly release the service
brake to see if park lock holds. If it does not hold, the
transmission requires further service.
(2) Make sure shift lever operates easily/ smoothly
(Fig. 36).
Check for smooth shifting. Check for proper
upshifting and downshifting.
MANUAL TRANSMISSION
(1) Check that the shifter operates easily (Fig. 38).
(2) Make sure that the clutch operates smoothly
(Fig. 37).
(3) Look for proper synchronization.
The gears should not grind.
BR/BENEW VEHICLE PREPARATION 30 - 15
Page 2842 of 2889
INSPECTION - PARKING BRAKE
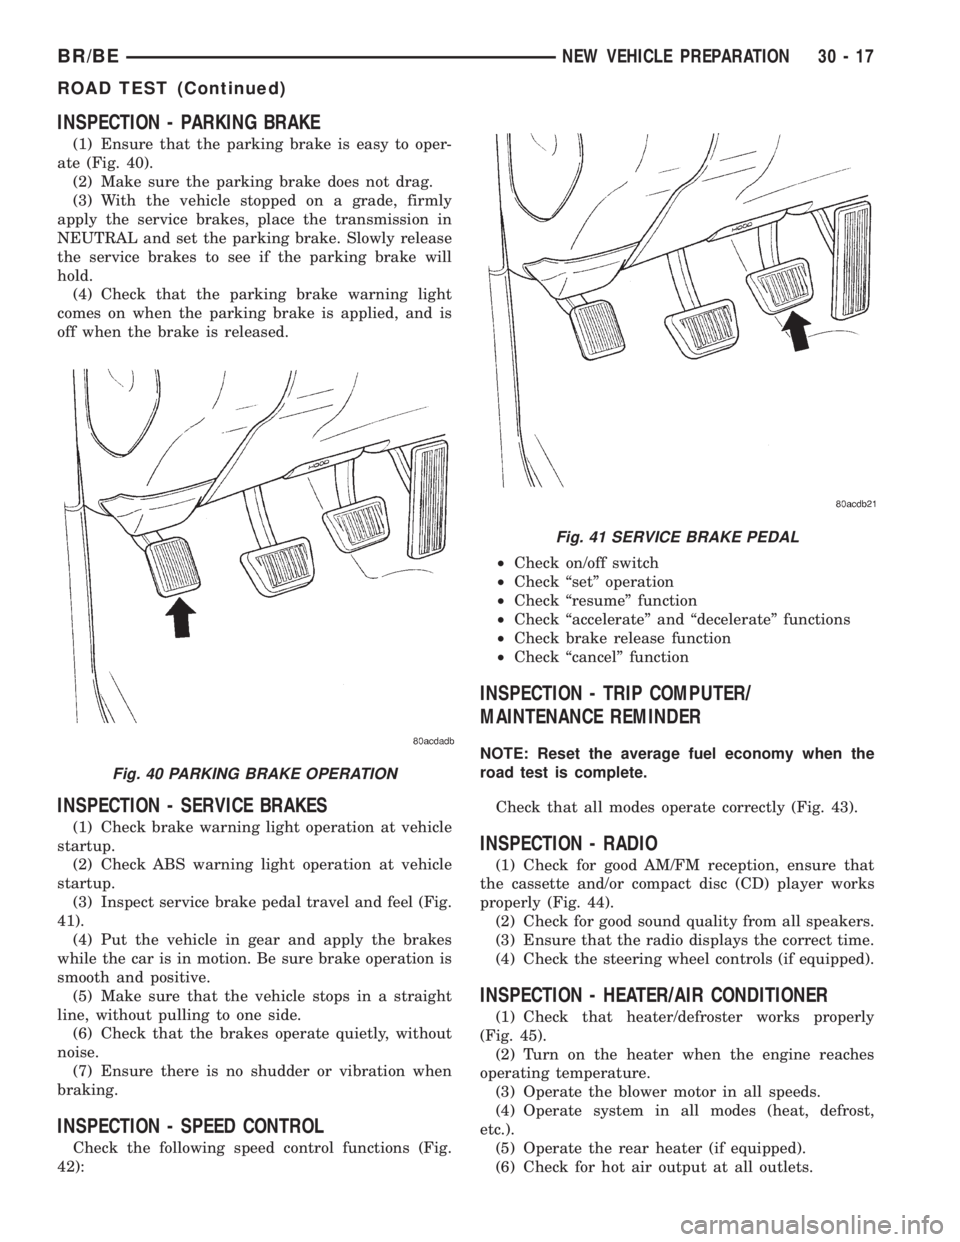
(1) Ensure that the parking brake is easy to oper-
ate (Fig. 40).
(2) Make sure the parking brake does not drag.
(3) With the vehicle stopped on a grade, firmly
apply the service brakes, place the transmission in
NEUTRAL and set the parking brake. Slowly release
the service brakes to see if the parking brake will
hold.
(4) Check that the parking brake warning light
comes on when the parking brake is applied, and is
off when the brake is released.
INSPECTION - SERVICE BRAKES
(1) Check brake warning light operation at vehicle
startup.
(2) Check ABS warning light operation at vehicle
startup.
(3) Inspect service brake pedal travel and feel (Fig.
41).
(4) Put the vehicle in gear and apply the brakes
while the car is in motion. Be sure brake operation is
smooth and positive.
(5) Make sure that the vehicle stops in a straight
line, without pulling to one side.
(6) Check that the brakes operate quietly, without
noise.
(7) Ensure there is no shudder or vibration when
braking.
INSPECTION - SPEED CONTROL
Check the following speed control functions (Fig.
42):²Check on/off switch
²Check ªsetº operation
²Check ªresumeº function
²Check ªaccelerateº and ªdecelerateº functions
²Check brake release function
²Check ªcancelº function
INSPECTION - TRIP COMPUTER/
MAINTENANCE REMINDER
NOTE: Reset the average fuel economy when the
road test is complete.
Check that all modes operate correctly (Fig. 43).
INSPECTION - RADIO
(1) Check for good AM/FM reception, ensure that
the cassette and/or compact disc (CD) player works
properly (Fig. 44).
(2) Check for good sound quality from all speakers.
(3) Ensure that the radio displays the correct time.
(4) Check the steering wheel controls (if equipped).
INSPECTION - HEATER/AIR CONDITIONER
(1) Check that heater/defroster works properly
(Fig. 45).
(2) Turn on the heater when the engine reaches
operating temperature.
(3) Operate the blower motor in all speeds.
(4) Operate system in all modes (heat, defrost,
etc.).
(5) Operate the rear heater (if equipped).
(6) Check for hot air output at all outlets.
Fig. 40 PARKING BRAKE OPERATION
Fig. 41 SERVICE BRAKE PEDAL
BR/BENEW VEHICLE PREPARATION 30 - 17
ROAD TEST (Continued)
Page 2844 of 2889
INSPECTION - MIRROR
(1) Check operation of rearview mirror's day/night
function (if equipped).
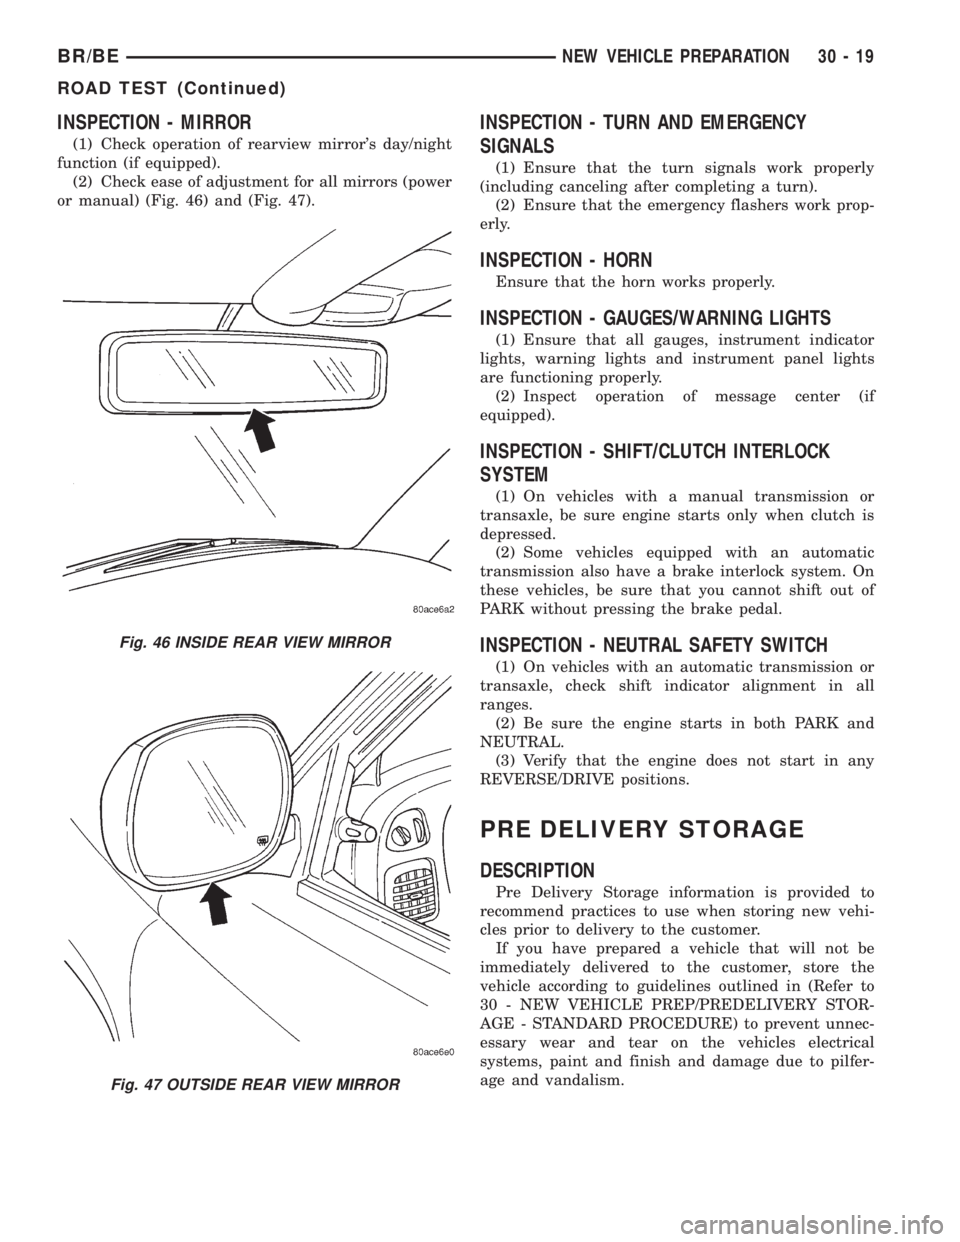
(2) Check ease of adjustment for all mirrors (power
or manual) (Fig. 46) and (Fig. 47).
INSPECTION - TURN AND EMERGENCY
SIGNALS
(1) Ensure that the turn signals work properly
(including canceling after completing a turn).
(2) Ensure that the emergency flashers work prop-
erly.
INSPECTION - HORN
Ensure that the horn works properly.
INSPECTION - GAUGES/WARNING LIGHTS
(1) Ensure that all gauges, instrument indicator
lights, warning lights and instrument panel lights
are functioning properly.
(2) Inspect operation of message center (if
equipped).
INSPECTION - SHIFT/CLUTCH INTERLOCK
SYSTEM
(1) On vehicles with a manual transmission or
transaxle, be sure engine starts only when clutch is
depressed.
(2) Some vehicles equipped with an automatic
transmission also have a brake interlock system. On
these vehicles, be sure that you cannot shift out of
PARK without pressing the brake pedal.
INSPECTION - NEUTRAL SAFETY SWITCH
(1) On vehicles with an automatic transmission or
transaxle, check shift indicator alignment in all
ranges.
(2) Be sure the engine starts in both PARK and
NEUTRAL.
(3) Verify that the engine does not start in any
REVERSE/DRIVE positions.
PRE DELIVERY STORAGE
DESCRIPTION
Pre Delivery Storage information is provided to
recommend practices to use when storing new vehi-
cles prior to delivery to the customer.
If you have prepared a vehicle that will not be
immediately delivered to the customer, store the
vehicle according to guidelines outlined in (Refer to
30 - NEW VEHICLE PREP/PREDELIVERY STOR-
AGE - STANDARD PROCEDURE) to prevent unnec-
essary wear and tear on the vehicles electrical
systems, paint and finish and damage due to pilfer-
age and vandalism.
Fig. 46 INSIDE REAR VIEW MIRROR
Fig. 47 OUTSIDE REAR VIEW MIRROR
BR/BENEW VEHICLE PREPARATION 30 - 19
ROAD TEST (Continued)
Page 2845 of 2889
STANDARD PROCEDURE - PRE DELIVERY
STORAGE
(1) If possible, store vehicles indoors, in clean, dry
places. If vehicles must be stored outdoors:
²Try to avoid storage locations that are near any
obvious sources of industrial or environmental con-
tamination (e.g., trees, factories, steam or vapor
vents, railroad tracks, etc.)
²Maintain tight security to help prevent pilferage
and vandalism, and inspect each vehicle regularly to
check for such damage
²If the vehicle must be parked on an incline, park
it with the front end higher than the rear; this will
prevent ªhydrostatic lockº caused by fuel draining
into the engine
²Rinse the vehicle at least once a week. Snow
should be washed away more often, since it can trap
harmful contaminants. Dry all horizontal surfaces
(2) The IOD fuse should be removed in order to
prevent battery drain and possible damage.
(3) Check the vehicle's coolant and anti-freeze pro-
tection.
(4) Check the vehicle's battery at least once a
month for a proper charge (at least 12.4 volts).
Charge the battery if necessary. This will help pre-
vent freezing and deterioration.
(5) Check the vehicle's tires and inflate them to
their maximum recommended levels. Move the vehi-
cles periodically to avoid ªflatspottingº the tires.
(6) Do not engage the parking brake; keep it in the
OFF position.
(7) Keep all windows closed, all doors locked, and
all trim covers intact and in place.
(8) Do not use chalks, crayons or any marker con-
taining abrasives on painted, plated or glass sur-
faces.
(9) Always use seat covers when moving a vehicle.
PROGRAMMABLE
ELECTRONIC FEATURES
DESCRIPTION
The programming of electronic features applies to
specific DaimlerChrysler Corporation vehicles. Not
all vehicles are equipped with these electronic fea-
tures, and not all vehicles equipped with electronic
features have all the available features. Programma-
ble electronic features are subject to change and may
be added or deleted from specific vehicle models.
(1) The programmable electronic features that may
be provided on the vehicle are:
²Rolling Power Door Locks
²Horn Chirp (When Doors Locked With Remote
Keyless Entry)²Headlamp Flash (When Doors Locked or
Unlocked With Remote Keyless Entry)
²Low Fuel Chime
²Remote Keyless Entry Door Unlock Sequence
²Headlights On Automatically With Wipers
²Turn Signal Chime
²12V Power Outlet
²Remote Unlock
²Remote Linked To Memory
²Headlamp Delay
²Service Interval
²Easy Exit Seat
(2) Programming any of the above features is to be
performed prior to vehicle delivery to the customer,
depending on customer preference.
NOTE: For all vehicles except Caravan/Town and
Country, the programming must be performed using
the DRB IIITscan tool. On Caravan/Town and Coun-
try vehicles the features can be programmed using
the DRB IIITscan tool or by button pushing
sequences. The customer can perform program-
ming, if desired, by following the instructions out-
lined in the owner manual.
OPERATION
NOTE: The programmable features provided on
vehicles need to be explained to the customer at
the time of sale. The customer's preferences con-
cerning the features should be noted and pro-
grammed accordingly during predelivery.
NOTE: When using the DRB IIITscan tool to enable/
disable any programmable electronic features, go to
the main menu item #9 on the DRB IIITscan tool.
This is ªCustomer Preferencesº. You must choose
ªCustomer Preferencesº on the main menu to pro-
gram the desired features.
ROLLING POWER DOOR LOCKS
With this feature enabled, the vehicle's door lock-
ing mechanisms automatically lock when the vehicle
reaches approximately 24 Km/h (15 mph).
HORN CHIRP
NOTE: This feature can be enabled with or without
the headlamp flash feature.
The horn chirp function is a feature that can be
enabled or disabled on vehicles equipped with
30 - 20 NEW VEHICLE PREPARATIONBR/BE
PRE DELIVERY STORAGE (Continued)
Page 2854 of 2889
CENTER HIGH MOUNTED STOP LAMP -
INSTALLATION........................8L-6
CENTER HIGH MOUNTED STOP LAMP -
REMOVAL...........................8L-6
CENTER HIGH MOUNTED STOP LAMP
UNIT - INSTALLATION..................8L-6
CENTER HIGH MOUNTED STOP LAMP
UNIT - REMOVAL.....................8L-6
CENTER SEAT ARMREST/CONSOLE -
INSTALLATION......................23-132
CENTER SEAT ARMREST/CONSOLE -
REMOVAL.........................23-132
CENTER SEAT ARMREST/LATCH COVER -
INSTALLATION......................23-132
CENTER SEAT ARMREST/LATCH COVER -
REMOVAL.........................23-132
CENTERING - STANDARD PROCEDURE,
CLOCKSPRING......................8O-11
CENTRAL TIMER MODULE - DIAGNOSIS
AND TESTING........................8E-4
CERTIFICATION LABEL - DESCRIPTION,
VEHICLE SAFETY..................Intro.-12
CHAIN COVER(S) - INSTALLATION,
TIMING BELT..........9-113,9-169,9-226,9-56
CHAIN COVER(S) - REMOVAL, TIMING
BELT ................9-113,9-169,9-225,9-56
CHAIN STRETCH - INSPECTION,
MEASURING TIMING....9-114,9-170,9-227,9-58
CHANNEL - INSTALLATION, GLASS RUN . . 23-70
CHANNEL - REMOVAL, GLASS RUN......23-70
CHARGE - STANDARD PROCEDURE,
REFRIGERANT SYSTEM...............24-46
CHARGE AIR COOLER AND PLUMBING -
CLEANING..........................11-18
CHARGE AIR COOLER AND PLUMBING -
DESCRIPTION.......................11-17
CHARGE AIR COOLER AND PLUMBING -
INSPECTION........................11-18
CHARGE AIR COOLER AND PLUMBING -
INSTALLATION.......................11-18
CHARGE AIR COOLER AND PLUMBING -
OPERATION.........................11-17
CHARGE AIR COOLER AND PLUMBING -
REMOVAL..........................11-17
CHARGING - DESCRIPTION.............8F-27
CHARGING - OPERATION..............8F-27
CHARGING - STANDARD PROCEDURE,
BATTERY............................8F-9
CHARGING SYSTEM - DIAGNOSIS AND
TESTING...........................8F-27
CHART, SPECIFICATIONS - TORQUE........5-3
CHART, SPECIFICATIONS -
TORQUE.............19-19,19-39,19-41,19-9
CHART, SPECIFICATIONS -
TORQUE.....................2-15,2-27,2-8
CHART, SPECIFICATIONS - TORQUE......22-11
CHARTS - DIAGNOSIS AND TESTING,
DIAGNOSIS......21-149,21-320,21-492,21-663
CHARTS - DIAGNOSIS AND TESTING,
SMOKE DIAGNOSIS...................9-234
CHASSIS ADAPTER BRACKET -
INSTALLATION, CAB...................13-9
CHASSIS ADAPTER BRACKET -
REMOVAL, CAB.......................13-9
CHECK - INSTALLATION...............23-78
CHECK - REMOVAL...................23-78
CHECK - STANDARD PROCEDURE,
COOLANT LEVEL......................7-16
CHECK - STANDARD PROCEDURE, FLUID
LEVEL..........21-199,21-370,21-545,21-715
CHECK - STANDARD PROCEDURE, OIL
PUMP VOLUME . . . 21-209,21-379,21-554,21-724
CHECK CABLE - INSTALLATION.........23-63
CHECK CABLE - REMOVAL.............23-62
CHECK GAUGES INDICATOR -
DESCRIPTION.......................8J-17
CHECK GAUGES INDICATOR -
OPERATION.........................8J-17
CHECK OUT - STANDARD PROCEDURE,
OWNER............................30-22
CHECK VALVE - DESCRIPTION, ONE WAY . 25-30
CHECK VALVE - DESCRIPTION, VACUUM
. . 24-28
CHECK VALVE - DIAGNOSIS AND
TESTING, ONE-WAY
..................25-30
CHECK VALVE - INSTALLATION, ONE
WAY
...............................25-30
CHECK VALVE - INSTALLATION, VACUUM
. 24-29
CHECK VALVE - OPERATION, ONE WAY
. . . 25-30CHECK VALVE - OPERATION, VACUUM....24-28
CHECK VALVE - REMOVAL, ONE WAY....25-30
CHECK VALVE - REMOVAL, VACUUM.....24-29
CHECKING BATTERY ELECTROLYTE
LEVEL - STANDARD PROCEDURE.........8F-8
CHECKING TRANSMISSION CLUTCH AND
BAND OPERATION - DIAGNOSIS AND
TESTING, AIR................21-147,21-318
CHECKS - DIAGNOSIS AND TESTING,
PRELIMINARY.........................7-4
CHILD TETHER - INSTALLATION..........8O-9
CHILD TETHER - REMOVAL.............8O-9
CHIME WARNING SYSTEM -
DESCRIPTION........................8B-1
CHIME WARNING SYSTEM - DIAGNOSIS
AND TESTING........................8B-2
CHIME WARNING SYSTEM - OPERATION . . . 8B-1
CHOKE RELAY - DESCRIPTION, RADIO....8A-8
CHOKE RELAY - DIAGNOSIS AND
TESTING, RADIO......................8A-8
CHOKE RELAY - INSTALLATION, RADIO....8A-9
CHOKE RELAY - OPERATION, RADIO......8A-8
CHOKE RELAY - REMOVAL, RADIO.......8A-9
CIGAR LIGHTER - DIAGNOSIS &
TESTING.........................8W-97-2
CIGAR LIGHTER OUTLET - DESCRIPTION . 8W-97-2
CIGAR LIGHTER OUTLET -
INSTALLATION....................8W-97-3
CIGAR LIGHTER OUTLET - OPERATION . 8W-97-2
CIGAR LIGHTER OUTLET - REMOVAL....8W-97-3
CIRCUIT ACTUATION TEST MODE -
DESCRIPTION........................25-1
CIRCUIT BREAKER - DESCRIPTION....8W-97-4
CIRCUIT BREAKER - DIAGNOSIS &
TESTING.........................8W-97-4
CIRCUIT SENSE - DESCRIPTION,
IGNITION...........................8E-17
CIRCUIT SENSE - OPERATION, IGNITION . . 8E-19
CIRCUITS - DIESEL - OPERATION,
NON-MONITORED....................25-23
CIRCUITS - GAS ENGINES - OPERATION,
NON-MONITORED....................25-22
CLAMPS - DESCRIPTION, HOSE...........7-2
CLAMPS - OPERATION, HOSE.............7-2
CLASSIFICATION OF LUBRICANTS -
STANDARD PROCEDURE.................0-3
CLEANER ELEMENT - INSTALLATION,
AIR ...............................9-245
CLEANER ELEMENT - REMOVAL, AIR.....9-244
CLEANING AND INSPECTION, OIL
COOLER & LINES....................9-296
CLEANING, APPEARANCE TIPS..........30-21
CLEANING/REVERSE FLUSHING -
STANDARD PROCEDURE, COOLING
SYSTEM............................7-16
CLEARANCE - STANDARD PROCEDURE,
CONNECTING ROD BEARING AND
CRANKSHAFT JOURNAL...............9-274
CLEARANCE - STANDARD PROCEDURE,
MAIN BEARING......................9-275
CLEARANCE LAMP - INSTALLATION.......8L-6
CLEARANCE LAMP - REMOVAL..........8L-6
CLOCKSPRING - DESCRIPTION.........8O-10
CLOCKSPRING - INSTALLATION.........8O-13
CLOCKSPRING - OPERATION...........8O-10
CLOCKSPRING - REMOVAL............8O-11
CLOCKSPRING CENTERING - STANDARD
PROCEDURE........................8O-11
CLOSURE PANEL TRIM - INSTALLATION,
REAR.............................23-121
CLOSURE PANEL TRIM - REMOVAL,
REAR.............................23-120
CLUB/QUAD CAB - INSTALLATION.......8O-20
CLUB/QUAD CAB - REMOVAL...........8O-19
CLUSTER - ASSEMBLY, INSTRUMENT....8J-13
CLUSTER - DESCRIPTION, INSTRUMENT . . . 8J-2
CLUSTER - DIAGNOSIS AND TESTING,
INSTRUMENT........................8J-6
CLUSTER - DISASSEMBLY, INSTRUMENT . . 8J-11
CLUSTER - INSTALLATION, INSTRUMENT . 8J-14
CLUSTER - OPERATION, INSTRUMENT.....8J-3
CLUSTER - REMOVAL, INSTRUMENT
.....8J-10
CLUSTER BEZEL - INSTALLATION
.......23-110
CLUSTER BEZEL - REMOVAL
..........23-109
CLUTCH - 3.9L/5.2L/5.9L/8.0L -
DESCRIPTION, FAN DRIVE VISCOUS
......7-56
CLUTCH - 3.9L/5.2L/5.9L/8.0L -
OPERATION, FAN DRIVE VISCOUS
........7-56CLUTCH - 5.9L DIESEL - DESCRIPTION,
FAN DRIVE VISCOUS...................7-57
CLUTCH - 5.9L DIESEL - OPERATION,
FAN DRIVE VISCOUS...................7-57
CLUTCH - ASSEMBLY, FRONT . . . 21-206,21-376,
21-550,21-721
CLUTCH - ASSEMBLY, REAR....21-248,21-419,
21-593,21-766
CLUTCH - CLEANING, REAR....21-247,21-418,
21-593,21-765
CLUTCH - DESCRIPTION.................6-1
CLUTCH - DESCRIPTION, A/C
COMPRESSOR.......................24-13
CLUTCH - DESCRIPTION, FRONT . 21-202,21-373,
21-548,21-718
CLUTCH - DESCRIPTION, OVERDRIVE . . . 21-214,
21-385,21-560,21-731
CLUTCH - DESCRIPTION, REAR . . 21-246,21-417,
21-591,21-764
CLUTCH - DIAGNOSTIC AND TESTING......6-2
CLUTCH - DISASSEMBLY, FRONT......21-202,
21-373,21-549,21-719
CLUTCH - DISASSEMBLY, REAR . 21-247,21-418,
21-592,21-765
CLUTCH - INSPECTION, A/C
COMPRESSOR.......................24-16
CLUTCH - INSPECTION, FRONT . . 21-205,21-376,
21-550,21-721
CLUTCH - INSPECTION, REAR . . . 21-248,21-419,
21-593,21-765
CLUTCH - INSTALLATION, A/C
COMPRESSOR.......................24-16
CLUTCH - OPERATION....................6-1
CLUTCH - OPERATION, A/C
COMPRESSOR.......................24-13
CLUTCH - OPERATION, FRONT . . 21-202,21-373,
21-548,21-718
CLUTCH - OPERATION, OVERDRIVE....21-214,
21-385,21-560,21-731
CLUTCH - OPERATION, REAR . . . 21-246,21-417,
21-592,21-764
CLUTCH - REMOVAL, A/C COMPRESSOR . . 24-14
CLUTCH - SPECIFICATIONS...............6-7
CLUTCH - WARNING....................6-2
CLUTCH AND BAND OPERATION -
DIAGNOSIS AND TESTING, AIR
CHECKING TRANSMISSION......21-147,21-318
CLUTCH AND BAND OPERATION -
DIAGNOSIS AND TESTING, AIR
TESTING TRANSMISSION.......21-490,21-661
CLUTCH BREAK-IN - STANDARD
PROCEDURE, A/C COMPRESSOR........24-13
CLUTCH CAM/OVERDRIVE PISTON
RETAINER - ASSEMBLY,
OVERRUNNING . . . 21-236,21-406,21-581,21-752
CLUTCH CAM/OVERDRIVE PISTON
RETAINER - CLEANING, OVERRUNNING . 21-236,
21-406,21-580,21-752
CLUTCH CAM/OVERDRIVE PISTON
RETAINER - DESCRIPTION,
OVERRUNNING . . . 21-235,21-405,21-580,21-751
CLUTCH CAM/OVERDRIVE PISTON
RETAINER - DISASSEMBLY,
OVERRUNNING . . . 21-235,21-405,21-580,21-751
CLUTCH CAM/OVERDRIVE PISTON
RETAINER - INSPECTION,
OVERRUNNING . . . 21-236,21-406,21-580,21-752
CLUTCH CAM/OVERDRIVE PISTON
RETAINER - OPERATION,
OVERRUNNING . . . 21-235,21-405,21-580,21-751
CLUTCH COIL - DIAGNOSIS AND
TESTING, A/C COMPRESSOR...........24-13
CLUTCH DISC - DESCRIPTION............6-7
CLUTCH DISC - INSTALLATION............6-9
CLUTCH DISC - OPERATION..............6-8
CLUTCH DISC - REMOVAL...............6-8
CLUTCH HOUSING - DIAGNOSIS AND
TESTING............................6-11
CLUTCH HOUSING - INSTALLATION.......6-13
CLUTCH HOUSING - REMOVAL...........6-13
CLUTCH PEDAL - INSTALLATION
.........6-19
CLUTCH PEDAL - REMOVAL
.............6-18
CLUTCH PEDAL POSITION SWITCH -
DESCRIPTION
........................6-22
CLUTCH PEDAL POSITION SWITCH -
OPERATION
..........................6-22
CLUTCH RELAY - DESCRIPTION, A/C
COMPRESSOR
.......................24-17
BR/BEINDEX 7
Description Group-Page Description Group-Page Description Group-Page
Page 2859 of 2889
DOOR CYLINDER LOCK SWITCH -
OPERATION..........................8N-5
DOOR CYLINDER LOCK SWITCH -
REMOVAL...........................8N-6
DOOR FORE/AFT - ADJUSTMENT, FRONT . . 23-68
DOOR GLASS - INSTALLATION..........23-69
DOOR GLASS - REMOVAL.............23-69
DOOR GLASS RUN WEATHERSTRIP -
INSTALLATION, FRONT...............23-154
DOOR GLASS RUN WEATHERSTRIP -
REMOVAL, FRONT...................23-153
DOOR INNER BELT WEATHERSTRIP -
INSTALLATION, FRONT...............23-154
DOOR INNER BELT WEATHERSTRIP -
REMOVAL, FRONT...................23-154
DOOR IN/OUT - ADJUSTMENT, FRONT....23-69
DOOR LATCH - ADJUSTMENT, FRONT....23-72
DOOR LOCKS - INSPECTION, DOORS.....30-11
DOOR OPENING SEAL - INSTALLATION . . 23-153
DOOR OPENING SEAL - REMOVAL......23-153
DOOR OUTER BELT WEATHERSTRIP -
INSTALLATION, FRONT...............23-154
DOOR OUTER BELT WEATHERSTRIP -
REMOVAL, FRONT...................23-154
DOOR SEAL - INSTALLATION, B-PILLAR . 23-152
DOOR SEAL - REMOVAL, B-PILLAR.....23-152
DOOR SECOND WEATHERSTRIP -
INSTALLATION, FRONT...............23-155
DOOR SECOND WEATHERSTRIP -
REMOVAL, FRONT...................23-154
DOOR SILL TRIM - INSTALLATION......23-121
DOOR SILL TRIM - REMOVAL.........23-121
DOOR SPEAKER - INSTALLATION, FRONT . 8A-20
DOOR SPEAKER - INSTALLATION, REAR . . 8A-21
DOOR SPEAKER - REMOVAL, FRONT.....8A-20
DOOR SPEAKER - REMOVAL, REAR......8A-21
DOOR UP/DOWN - ADJUSTMENT, FRONT . 23-69
DOOR UPPER CORNER SEAL -
INSTALLATION, FRONT...............23-154
DOOR UPPER CORNER SEAL -
REMOVAL, FRONT...................23-154
DOORS AND DOOR LOCKS -
INSPECTION........................30-11
DOORS AND LOCKS - INSPECTION,
WINDOWS..........................30-14
DOUBLE INVERTED FLARING -
STANDARD PROCEDURE.................5-8
DRAIN AND REFILL - STANDARD
PROCEDURE, FLUID.....21-851,21-885,21-922
DRAIN MANIFOLD - DESCRIPTION, FUEL . . 14-86
DRAIN MANIFOLD - INSTALLATION,
FUEL..............................14-86
DRAIN MANIFOLD - OPERATION, FUEL . . . 14-86
DRAIN MANIFOLD - REMOVAL, FUEL.....14-86
DRAINBACK VALVE - DESCRIPTION,
TORQUE CONVERTER....21-262,21-432,21-605,
21-778
DRAINBACK VALVE - OPERATION,
TORQUE CONVERTER....21-262,21-432,21-605,
21-778
DRAINBACK VALVE - STANDARD
PROCEDURE, TORQUE
CONVERTER.....21-262,21-432,21-606,21-778
DRAINING AT FUEL FILTER - STANDARD
PROCEDURES, WATER................14-56
DRAINING COOLING SYSTEM
3.9L/5.2L/5.9L/8.0L ENGINES -
STANDARD PROCEDURE................7-15
DRAINING COOLING SYSTEM 5.9L
DIESEL ENGINE - STANDARD
PROCEDURE.........................7-15
DRAW TEST - STANDARD PROCEDURE,
IGNITION-OFF.......................8F-15
DRIVE - DIAGNOSIS AND TESTING,
VISCOUS FAN....................7-56,7-58
DRIVE BELT - DIAGNOSIS AND TESTING,
ACCESSORY.................7-24,7-27,7-31
DRIVE BELTS - 3.9L/5.2L/5.9L -
INSTALLATION........................7-27
DRIVE BELTS - 3.9L/5.2L/5.9L -
REMOVAL...........................7-26
DRIVE BELTS - 5.9L DIESEL -
INSTALLATION
........................7-34
DRIVE BELTS - 5.9L DIESEL - REMOVAL
. . . 7-33
DRIVE BELTS - 8.0L - INSTALLATION
......7-30
DRIVE BELTS - 8.0L - REMOVAL
.........7-30
DRIVE INDICATOR - DIAGNOSIS AND
TESTING, FOUR-WHEEL
...............8J-29DRIVE VISCOUS CLUTCH - 3.9L/5.2L/
5.9L/8.0L - DESCRIPTION, FAN...........7-56
DRIVE VISCOUS CLUTCH - 3.9L/5.2L/
5.9L/8.0L - OPERATION, FAN............7-56
DRIVE VISCOUS CLUTCH - 5.9L
DIESEL - DESCRIPTION, FAN............7-57
DRIVE VISCOUS CLUTCH - 5.9L
DIESEL - OPERATION, FAN..............7-57
DRIVER AIRBAG - ASSEMBLY..........8O-17
DRIVER AIRBAG - DESCRIPTION........8O-14
DRIVER AIRBAG - DISASSEMBLY........8O-15
DRIVER AIRBAG - INSTALLATION.......8O-18
DRIVER AIRBAG - OPERATION..........8O-14
DRIVER AIRBAG - REMOVAL...........8O-14
DRIVER POWER SEAT SWITCH -
DESCRIPTION.......................8N-16
DRIVER POWER SEAT SWITCH -
DIAGNOSIS & TESTING...............8N-16
DRIVER POWER SEAT SWITCH -
INSTALLATION......................8N-17
DRIVER POWER SEAT SWITCH -
OPERATION.........................8N-16
DRIVER POWER SEAT SWITCH -
REMOVAL..........................8N-17
DRIVER SEAT HEATER SWITCH -
DESCRIPTION........................8G-7
DRIVER SEAT HEATER SWITCH -
INSTALLATION.......................8G-9
DRIVER SEAT HEATER SWITCH -
OPERATION..........................8G-7
DRIVER SEAT HEATER SWITCH -
REMOVAL.............................8G-9
DROP - STANDARD PROCEDURE,
TESTING FOR A VOLTAGE............8W-01-7
DRUM - ADJUSTMENT, REAR BRAKE......5-34
DRUM - CLEANING....................5-33
DRUM - DESCRIPTION.................5-32
DRUM - DIAGNOSIS AND TESTING,
BRAKE..............................5-33
DRUM - INSPECTION..................5-33
DRUM - OPERATION...................5-32
DRUM BRAKES - INSTALLATION, REAR
PARK BRAKE CABLE 2500/3500
SERIES WITH........................5-39
DRUM BRAKES - REMOVAL, REAR PARK
BRAKE CABLES 2500/3500 SERIES
WITH...............................5-38
DRUM IN HAT PARK BRAKE SHOES -
2500/3500 - INSTALLATION, REAR........5-42
DRUM IN HAT PARK BRAKE SHOES -
2500/3500 - REMOVAL, REAR...........5-41
DRUM MACHINING - STANDARD
PROCEDURE, BRAKE...................5-33
DUAL REAR WHEEL INSTALLATION -
STARDARD PROCEDURE...............22-10
DUCT ADAPTER - INSTALLATION,
DEFROSTER AND DEMISTER
...........24-35
DUCT ADAPTER - REMOVAL,
DEFROSTER AND DEMISTER
...........24-35
DUCTS - INSTALLATION, DEFROSTER
AND DEMISTER
......................24-35
DUCTS - REMOVAL, DEFROSTER AND
DEMISTER
..........................24-34
DUCTS - REMOVAL, INSTRUMENT
PANEL
.............................24-37
DUCTS - REMOVAL, INSTRUMENT
PANEL DEMISTER
....................24-37
DUTY ENGINE (1500 AND 2500 MODELS
EXCEPT 8.0L) MAINTENANCE
SCHEDULES, MAINTENANCE
SCHEDULES - LIGHT
....................0-7
DUTY ENGINE (FEDERAL ONLY - 2500
8.0L HD AND 3500 5.9L& 8.0L
MODELS) MAINTENANCE SCHEDULES
- DESCRIPTION, HEAVY
................0-17
DUTY TRUCK MAINTENANCE SCHEDULE
(8.0L 2500 & 3500 MODELS -
CALIFORNIA ONLY) - DESCRIPTION,
MEDIUM
............................0-13
DUTY/8.0L - DESCRIPTION, CATALYTIC
CONVERTER - 5.9L HEAVY
..............11-6
DUTY/8.0L - INSPECTION, CATALYTIC
CONVERTER - 5.9L HEAVY
..............11-7
DUTY/8.0L - INSPECTION, EXHAUST
PIPE - 5.9L HEAVY
....................11-9
DUTY/8.0L - INSPECTION, TAILPIPE -
5.9L HEAVY
.........................11-12DUTY/8.0L - INSTALLATION, CATALYTIC
CONVERTER - 5.9L HEAVY..............11-7
DUTY/8.0L - INSTALLATION, EXHAUST
PIPE - 5.9L HEAVY....................11-9
DUTY/8.0L - INSTALLATION, TAILPIPE -
5.9L HEAVY.........................11-12
DUTY/8.0L - OPERATION, CATALYTIC
CONVERTER - 5.9L HEAVY..............11-6
DUTY/8.0L - REMOVAL, CATALYTIC
CONVERTER - 5.9L HEAVY..............11-6
DUTY/8.0L - REMOVAL, EXHAUST PIPE -
5.9L HEAVY..........................11-8
DUTY/8.0L - REMOVAL, TAILPIPE - 5.9L
HEAVY .............................11-12
EASY ENTRY SEAT TRACK -
INSTALLATION......................23-142
EASY ENTRY SEAT TRACK - REMOVAL . . 23-142
ECM - DESCRIPTION..................8E-13
ECM - OPERATION...................8E-13
EFFECTS OF INCORRECT FLUID LEVEL -
DIAGNOSIS AND TESTING......21-199,21-370,
21-545,21-715
ELECTRICAL CONTROLS - DIAGNOSIS
AND TESTING, OVERDRIVE.....21-215,21-386,
21-579,21-732
ELECTROLYTE LEVEL - STANDARD
PROCEDURE, CHECKING BATTERY........8F-8
ELECTRONIC FEATURES - DESCRIPTION,
PROGRAMMABLE....................30-20
ELECTRONIC FEATURES - OPERATION,
PROGRAMMABLE....................30-20
ELECTRONIC GOVERNOR -
DESCRIPTION....21-194,21-365,21-540,21-710
ELECTRONIC GOVERNOR -
INSTALLATION....21-197,21-367,21-543,21-713
ELECTRONIC GOVERNOR - OPERATION
. 21-194,
21-365,21-541,21-711
ELECTRONIC GOVERNOR - REMOVAL
. . . 21-196,
21-367,21-542,21-712
ELEMENT - DESCRIPTION, HEATED
SEAT
..............................8G-10
ELEMENT - INSTALLATION, AIR
CLEANER
...........................9-245
ELEMENT - OPERATION, HEATED SEAT
. . . 8G-10
ELEMENT - REMOVAL, AIR CLEANER
.....9-244
ELEMENT AND SENSOR - DIAGNOSIS &
TESTING, HEATED SEAT
...............8G-11
EMERGENCY SIGNALS - INSPECTION,
TURN
..............................30-19
END SPLASH SHIELDS - INSTALLATION,
FRONT
.............................23-92
END SPLASH SHIELDS - REMOVAL,
FRONT
.............................23-92
ENGINE - DESCRIPTION, COOLING
SYSTEM FLOW - 3.9L/5.2L/5.9L
...........7-1
ENGINE - DESCRIPTION, FUEL
REQUIREMENTS - DIESEL
...............0-2
ENGINE - DIAGNOSIS AND TESTING,
COOLING SYSTEM DIESEL
..............7-12
ENGINE - DIAGNOSIS AND TESTING,
COOLING SYSTEM GAS
.................7-7
ENGINE - DIAGNOSIS AND TESTING,
DIESEL
.............................11-4
ENGINE - DIAGNOSIS AND TESTING,
GAS
................................11-4
ENGINE - ENGINE FIRING ORDER, 3.9L
V-6
.................................8I-2
ENGINE - IGNITION COIL RESISTANCE,
8.0L V-10
............................8I-3
ENGINE - INSTALLATION
...............9-241
ENGINE - INSTALLATION, DIESEL
........19-35
ENGINE - INSTALLATION, GASOLINE
.....19-35
ENGINE - REMOVAL
..................9-238
ENGINE - REMOVAL, DIESEL
...........19-33
ENGINE - REMOVAL, GASOLINE
.........19-33
ENGINE - SPARK PLUG CABLE ORDER,
8.0L V-10
............................8I-2
ENGINE - STANDARD PROCEDURE,
DRAINING COOLING SYSTEM 5.9L
DIESEL
.............................7-15
ENGINE - STANDARD PROCEDURE,
REFILLING COOLING SYSTEM 5.9L
DIESEL
.............................7-15
ENGINE - TORQUE, DIESEL
.............14-90
ENGINE - VISUAL INSPECTION, 8.0L
.....14-32
12 INDEXBR/BE
Description Group-Page Description Group-Page Description Group-Page