Page 3746 of 4284

INSTALLATION
(1) Mount the rubber isolation back onto the
splash shield mounting flanges at two locations.
(2) Connect fuel lines to the dosing pump and the
heater unit. The connectors should point towards the
heater fuel line.
(3) Use aviation style clamps to attach the hose to
the fuel pump nipples(Refer to 24 - HEATING & AIR
CONDITIONING/CABIN HEATER/FUEL LINE -
INSTALLATION).
(4) Connect the electrical connector to the fuel
pump by depressing the integral spring and pushing
the connector towards the dosing pump. Pull the con-
nector towards the heater to verify the installation.
(5) Verify function of the heater.
FUEL LINE
STANDARD PROCEDURE - CLEANING
(1) Remove the cabin heater fuel line(Refer to 24 -
HEATING & AIR CONDITIONING/CABIN HEAT-
ER/FUEL LINE - REMOVAL).
(2) With cabin heater line removed from vehicle
place a shop cloth on the fuel tank end of the fuelline to catch any residue, then apply a small amount
of air pressure to the other end of the fuel line.
(3) Check to see if air pressure is coming from the
tank end of the line. If pressure is flowing unre-
stricted the line is clean.
(4) If the line shows any signs of being restricted
after air pressure is applied, then the fuel line should
be replaced.
(5) Install the cabin heater line(Refer to 24 -
HEATING & AIR CONDITIONING/CABIN HEAT-
ER/FUEL LINE - INSTALLATION).
(6) Verify function of the heater.
REMOVAL
(1) Elevate vehicle on a lift taking note of the
heater exhaust tube flexible section.
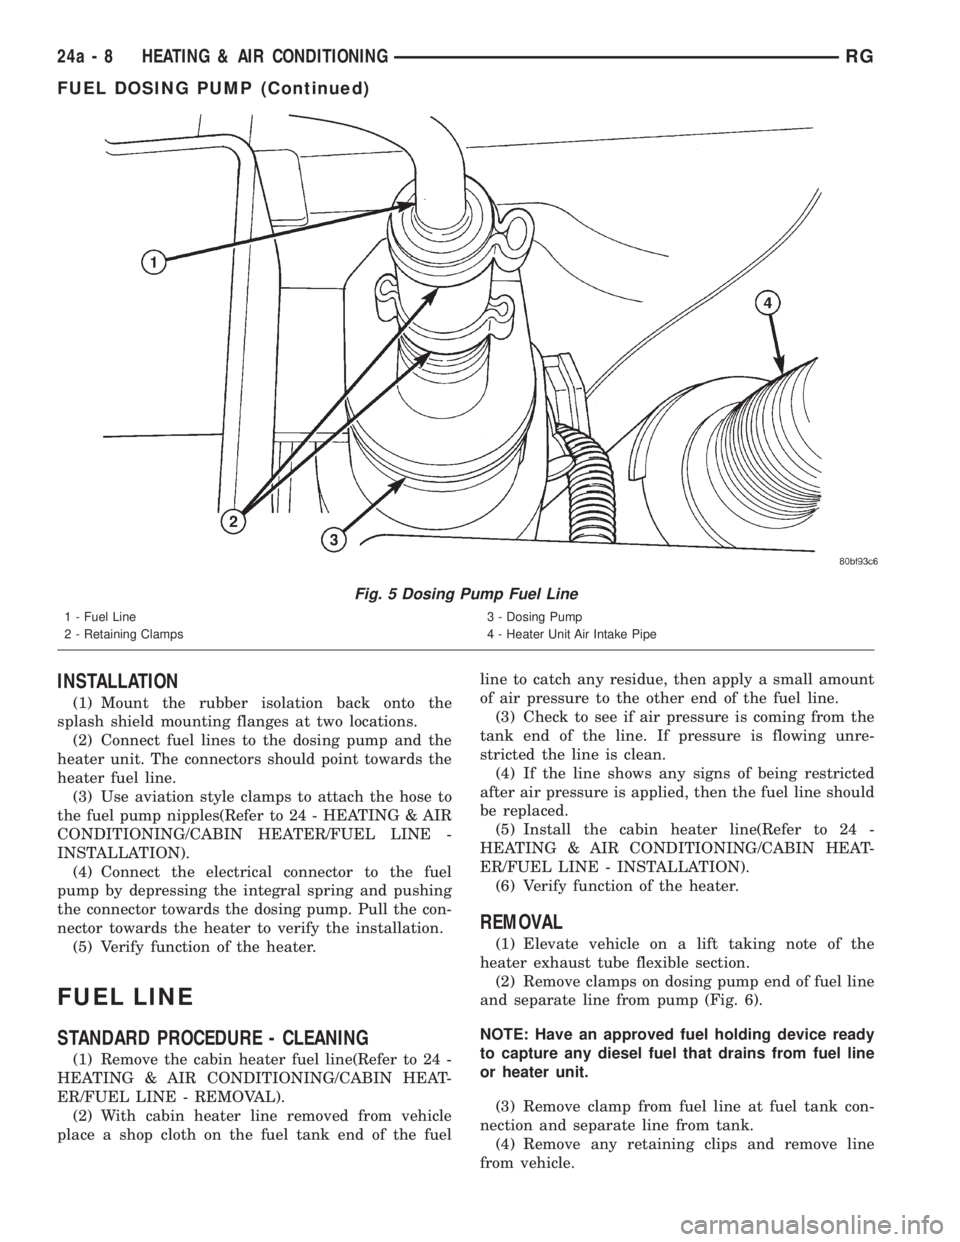
(2) Remove clamps on dosing pump end of fuel line
and separate line from pump (Fig. 6).
NOTE: Have an approved fuel holding device ready
to capture any diesel fuel that drains from fuel line
or heater unit.
(3) Remove clamp from fuel line at fuel tank con-
nection and separate line from tank.
(4) Remove any retaining clips and remove line
from vehicle.
Fig. 5 Dosing Pump Fuel Line
1 - Fuel Line
2 - Retaining Clamps3 - Dosing Pump
4 - Heater Unit Air Intake Pipe
24a - 8 HEATING & AIR CONDITIONINGRG
FUEL DOSING PUMP (Continued)
Page 3760 of 4284

EVAPORATIVE EMISSIONS
TABLE OF CONTENTS
page page
EVAPORATIVE EMISSIONS
OPERATION.............................10
EVAP/PURGE SOLENOID
DESCRIPTION...........................12
OPERATION.............................12
REMOVAL..............................12
INSTALLATION...........................12
FUEL FILLER CAP
DESCRIPTION...........................12
OPERATION.............................12
LEAK DETECTION PUMP
DESCRIPTION...........................13
OPERATION.............................13
REMOVAL..............................14INSTALLATION...........................14
ORVR
OPERATION.............................15
DIAGNOSIS AND TESTING.................16
VEHICLE DOES NOT FILL................16
P C V VA LV E
DESCRIPTION...........................17
DIAGNOSIS AND TESTING.................17
PCV SYSTEM INSPECTION...............17
VAPOR CANISTER
DESCRIPTION...........................18
OPERATION.............................18
REMOVAL..............................18
INSTALLATION...........................19
EVAPORATIVE EMISSIONS
OPERATION - EVAPORATION CONTROL
SYSTEM
The evaporation control system prevents the emis-
sion of fuel tank vapors into the atmosphere. When
fuel evaporates in the fuel tank, the vapors pass
through vent hoses or tubes to an activated carbon
filled evaporative canister. The canister temporarily
holds the vapors. The Powertrain Control Module
(PCM) allows intake manifold vacuum to draw
vapors into the combustion chambers during certain
operating conditions (Fig. 1).All engines use a proportional purge solenoid sys-
tem. The PCM controls vapor flow by operating the
purge solenoid. Refer to Proportional Purge Solenoid
in this section.
NOTE: The evaporative system uses specially man-
ufactured hoses. If they need replacement, only use
fuel resistant hose. Also the hoses must be able to
pass an Ozone compliance test.
NOTE: For more information on Onboard Refueling
Vapor Recovery (ORVR), refer to the Fuel Delivery
section.
25 - 10 EVAPORATIVE EMISSIONSRS
Page 3762 of 4284

EVAP/PURGE SOLENOID
DESCRIPTION
All vehicles use a proportional purge solenoid. The
solenoid regulates the rate of vapor flow from the
EVAP canister to the throttle body. The PCM oper-
ates the solenoid.
OPERATION
During the cold start warm-up period and the hot
start time delay, the PCM does not energize the sole-
noid. When de-energized, no vapors are purged.
The proportional purge solenoid operates at a fre-
quency of 200 hz and is controlled by an engine con-
troller circuit that senses the current being applied
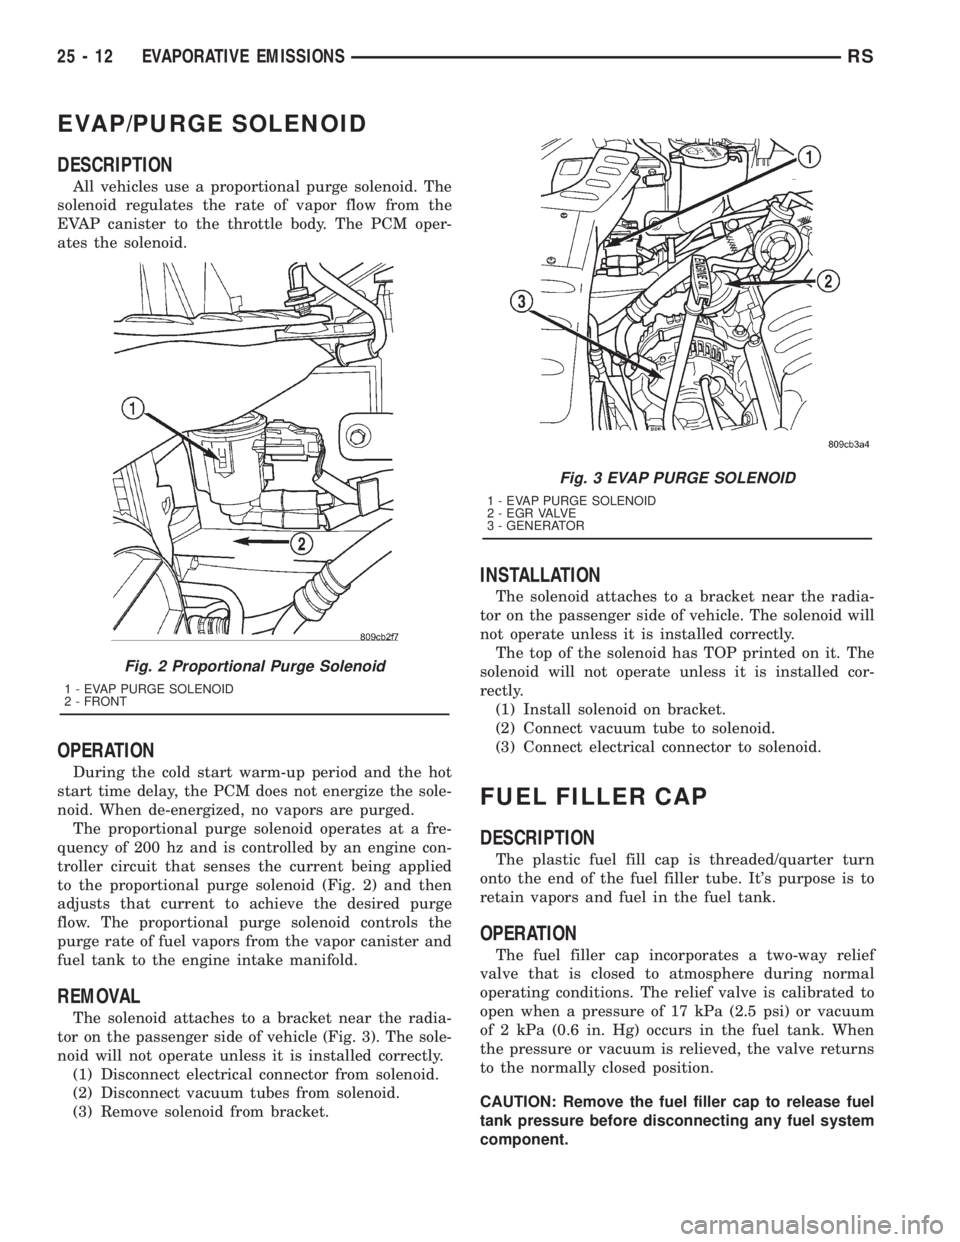
to the proportional purge solenoid (Fig. 2) and then
adjusts that current to achieve the desired purge
flow. The proportional purge solenoid controls the
purge rate of fuel vapors from the vapor canister and
fuel tank to the engine intake manifold.
REMOVAL
The solenoid attaches to a bracket near the radia-
tor on the passenger side of vehicle (Fig. 3). The sole-
noid will not operate unless it is installed correctly.
(1) Disconnect electrical connector from solenoid.
(2) Disconnect vacuum tubes from solenoid.
(3) Remove solenoid from bracket.
INSTALLATION
The solenoid attaches to a bracket near the radia-
tor on the passenger side of vehicle. The solenoid will
not operate unless it is installed correctly.
The top of the solenoid has TOP printed on it. The
solenoid will not operate unless it is installed cor-
rectly.
(1) Install solenoid on bracket.
(2) Connect vacuum tube to solenoid.
(3) Connect electrical connector to solenoid.
FUEL FILLER CAP
DESCRIPTION
The plastic fuel fill cap is threaded/quarter turn
onto the end of the fuel filler tube. It's purpose is to
retain vapors and fuel in the fuel tank.
OPERATION
The fuel filler cap incorporates a two-way relief
valve that is closed to atmosphere during normal
operating conditions. The relief valve is calibrated to
open when a pressure of 17 kPa (2.5 psi) or vacuum
of 2 kPa (0.6 in. Hg) occurs in the fuel tank. When
the pressure or vacuum is relieved, the valve returns
to the normally closed position.
CAUTION: Remove the fuel filler cap to release fuel
tank pressure before disconnecting any fuel system
component.
Fig. 2 Proportional Purge Solenoid
1 - EVAP PURGE SOLENOID
2 - FRONT
Fig. 3 EVAP PURGE SOLENOID
1 - EVAP PURGE SOLENOID
2 - E G R VA LV E
3 - GENERATOR
25 - 12 EVAPORATIVE EMISSIONSRS
Page 3768 of 4284

VAPOR CANISTER
DESCRIPTION
There are 2 EVAP canisters on the vehicle. The vac-
uum and vapor tubes connect to the top of the canister.
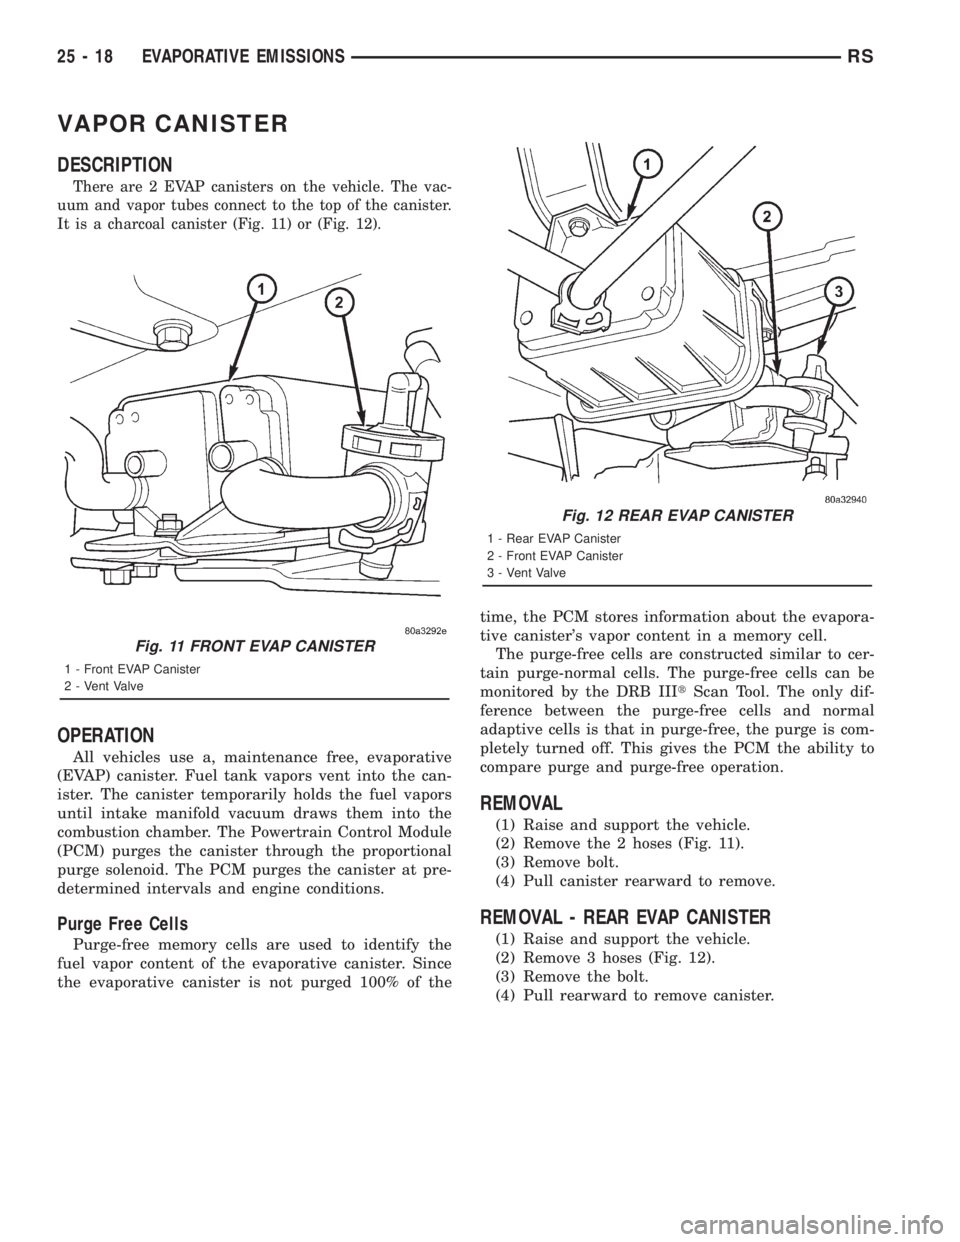
It is a charcoal canister (Fig. 11) or (Fig. 12).
OPERATION
All vehicles use a, maintenance free, evaporative
(EVAP) canister. Fuel tank vapors vent into the can-
ister. The canister temporarily holds the fuel vapors
until intake manifold vacuum draws them into the
combustion chamber. The Powertrain Control Module
(PCM) purges the canister through the proportional
purge solenoid. The PCM purges the canister at pre-
determined intervals and engine conditions.
Purge Free Cells
Purge-free memory cells are used to identify the
fuel vapor content of the evaporative canister. Since
the evaporative canister is not purged 100% of thetime, the PCM stores information about the evapora-
tive canister's vapor content in a memory cell.
The purge-free cells are constructed similar to cer-
tain purge-normal cells. The purge-free cells can be
monitored by the DRB IIItScan Tool. The only dif-
ference between the purge-free cells and normal
adaptive cells is that in purge-free, the purge is com-
pletely turned off. This gives the PCM the ability to
compare purge and purge-free operation.
REMOVAL
(1) Raise and support the vehicle.
(2) Remove the 2 hoses (Fig. 11).
(3) Remove bolt.
(4) Pull canister rearward to remove.
REMOVAL - REAR EVAP CANISTER
(1) Raise and support the vehicle.
(2) Remove 3 hoses (Fig. 12).
(3) Remove the bolt.
(4) Pull rearward to remove canister.
Fig. 11 FRONT EVAP CANISTER
1 - Front EVAP Canister
2 - Vent Valve
Fig. 12 REAR EVAP CANISTER
1 - Rear EVAP Canister
2 - Front EVAP Canister
3 - Vent Valve
25 - 18 EVAPORATIVE EMISSIONSRS
Page:
< prev 1-8 9-16 17-24