2001 CHRYSLER VOYAGER engine
[x] Cancel search: enginePage 4070 of 4284
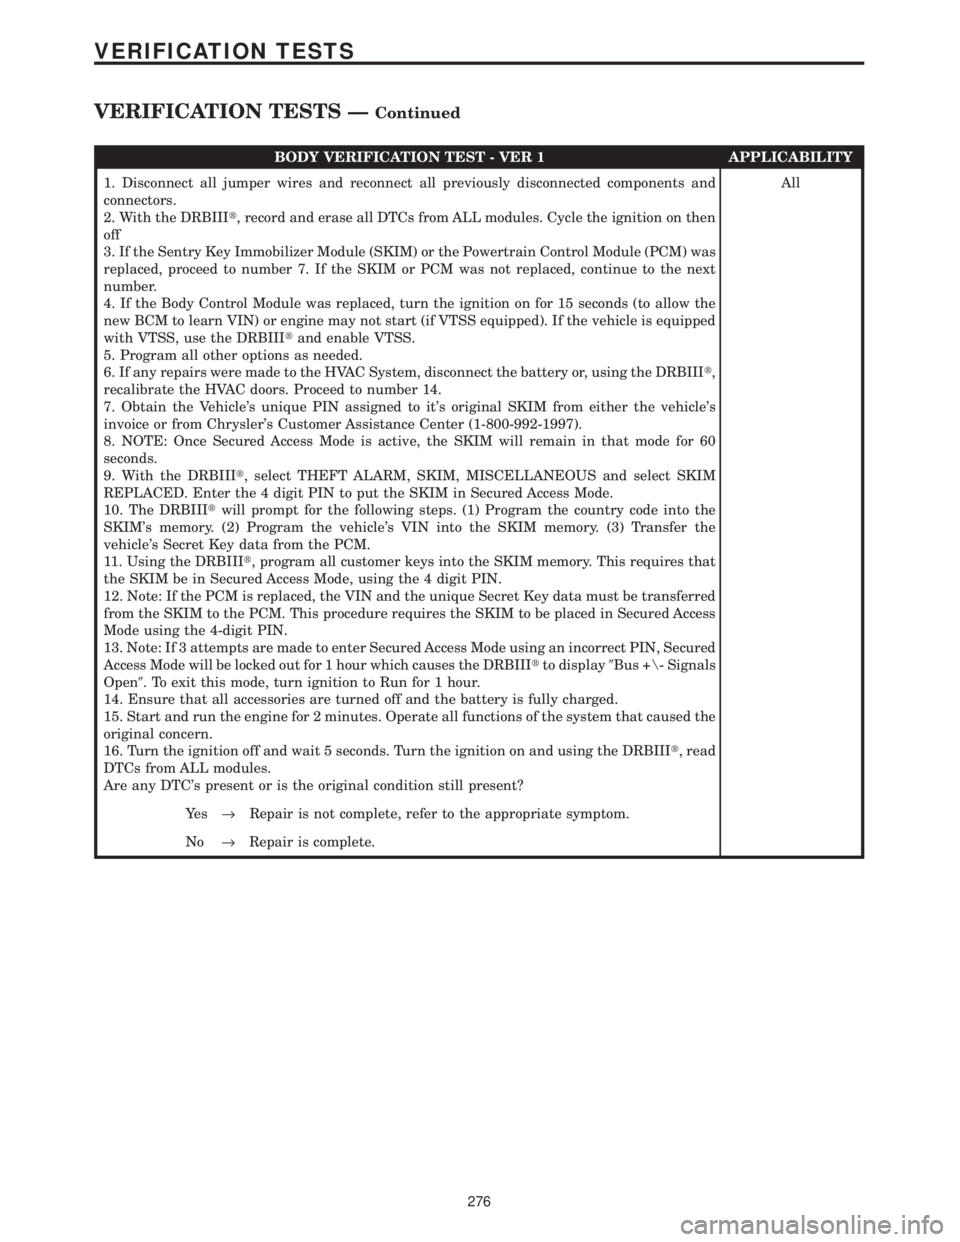
BODY VERIFICATION TEST - VER 1 APPLICABILITY
1. Disconnect all jumper wires and reconnect all previously disconnected components and
connectors.
2. With the DRBIIIt, record and erase all DTCs from ALL modules. Cycle the ignition on then
off
3. If the Sentry Key Immobilizer Module (SKIM) or the Powertrain Control Module (PCM) was
replaced, proceed to number 7. If the SKIM or PCM was not replaced, continue to the next
number.
4. If the Body Control Module was replaced, turn the ignition on for 15 seconds (to allow the
new BCM to learn VIN) or engine may not start (if VTSS equipped). If the vehicle is equipped
with VTSS, use the DRBIIItand enable VTSS.
5. Program all other options as needed.
6. If any repairs were made to the HVAC System, disconnect the battery or, using the DRBIIIt,
recalibrate the HVAC doors. Proceed to number 14.
7. Obtain the Vehicle's unique PIN assigned to it's original SKIM from either the vehicle's
invoice or from Chrysler's Customer Assistance Center (1-800-992-1997).
8. NOTE: Once Secured Access Mode is active, the SKIM will remain in that mode for 60
seconds.
9. With the DRBIIIt, select THEFT ALARM, SKIM, MISCELLANEOUS and select SKIM
REPLACED. Enter the 4 digit PIN to put the SKIM in Secured Access Mode.
10. The DRBIIItwill prompt for the following steps. (1) Program the country code into the
SKIM's memory. (2) Program the vehicle's VIN into the SKIM memory. (3) Transfer the
vehicle's Secret Key data from the PCM.
11. Using the DRBIIIt, program all customer keys into the SKIM memory. This requires that
the SKIM be in Secured Access Mode, using the 4 digit PIN.
12. Note: If the PCM is replaced, the VIN and the unique Secret Key data must be transferred
from the SKIM to the PCM. This procedure requires the SKIM to be placed in Secured Access
Mode using the 4-digit PIN.
13. Note: If 3 attempts are made to enter Secured Access Mode using an incorrect PIN, Secured
Access Mode will be locked out for 1 hour which causes the DRBIIItto display9Bus +\- Signals
Open9. To exit this mode, turn ignition to Run for 1 hour.
14. Ensure that all accessories are turned off and the battery is fully charged.
15. Start and run the engine for 2 minutes. Operate all functions of the system that caused the
original concern.
16. Turn the ignition off and wait 5 seconds. Turn the ignition on and using the DRBIIIt, read
DTCs from ALL modules.
Are any DTC's present or is the original condition still present?All
Ye s®Repair is not complete, refer to the appropriate symptom.
No®Repair is complete.
276
VERIFICATION TESTS
VERIFICATION TESTS ÐContinued
Page 4071 of 4284
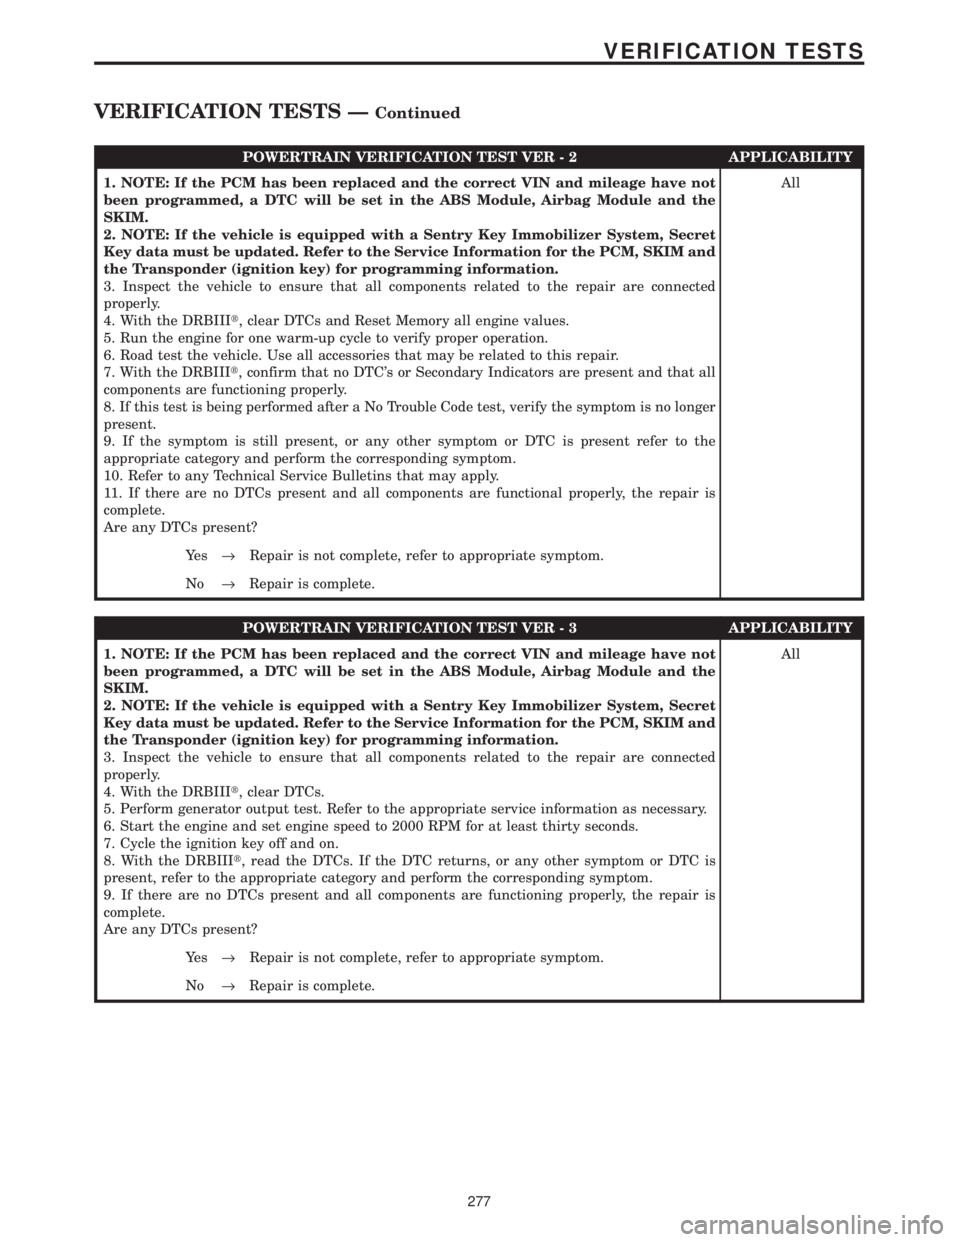
POWERTRAIN VERIFICATION TEST VER - 2 APPLICABILITY
1. NOTE: If the PCM has been replaced and the correct VIN and mileage have not
been programmed, a DTC will be set in the ABS Module, Airbag Module and the
SKIM.
2. NOTE: If the vehicle is equipped with a Sentry Key Immobilizer System, Secret
Key data must be updated. Refer to the Service Information for the PCM, SKIM and
the Transponder (ignition key) for programming information.
3. Inspect the vehicle to ensure that all components related to the repair are connected
properly.
4. With the DRBIIIt, clear DTCs and Reset Memory all engine values.
5. Run the engine for one warm-up cycle to verify proper operation.
6. Road test the vehicle. Use all accessories that may be related to this repair.
7. With the DRBIIIt, confirm that no DTC's or Secondary Indicators are present and that all
components are functioning properly.
8. If this test is being performed after a No Trouble Code test, verify the symptom is no longer
present.
9. If the symptom is still present, or any other symptom or DTC is present refer to the
appropriate category and perform the corresponding symptom.
10. Refer to any Technical Service Bulletins that may apply.
11. If there are no DTCs present and all components are functional properly, the repair is
complete.
Are any DTCs present?All
Ye s®Repair is not complete, refer to appropriate symptom.
No®Repair is complete.
POWERTRAIN VERIFICATION TEST VER - 3 APPLICABILITY
1. NOTE: If the PCM has been replaced and the correct VIN and mileage have not
been programmed, a DTC will be set in the ABS Module, Airbag Module and the
SKIM.
2. NOTE: If the vehicle is equipped with a Sentry Key Immobilizer System, Secret
Key data must be updated. Refer to the Service Information for the PCM, SKIM and
the Transponder (ignition key) for programming information.
3. Inspect the vehicle to ensure that all components related to the repair are connected
properly.
4. With the DRBIIIt, clear DTCs.
5. Perform generator output test. Refer to the appropriate service information as necessary.
6. Start the engine and set engine speed to 2000 RPM for at least thirty seconds.
7. Cycle the ignition key off and on.
8. With the DRBIIIt, read the DTCs. If the DTC returns, or any other symptom or DTC is
present, refer to the appropriate category and perform the corresponding symptom.
9. If there are no DTCs present and all components are functioning properly, the repair is
complete.
Are any DTCs present?All
Ye s®Repair is not complete, refer to appropriate symptom.
No®Repair is complete.
277
VERIFICATION TESTS
VERIFICATION TESTS ÐContinued
Page 4072 of 4284
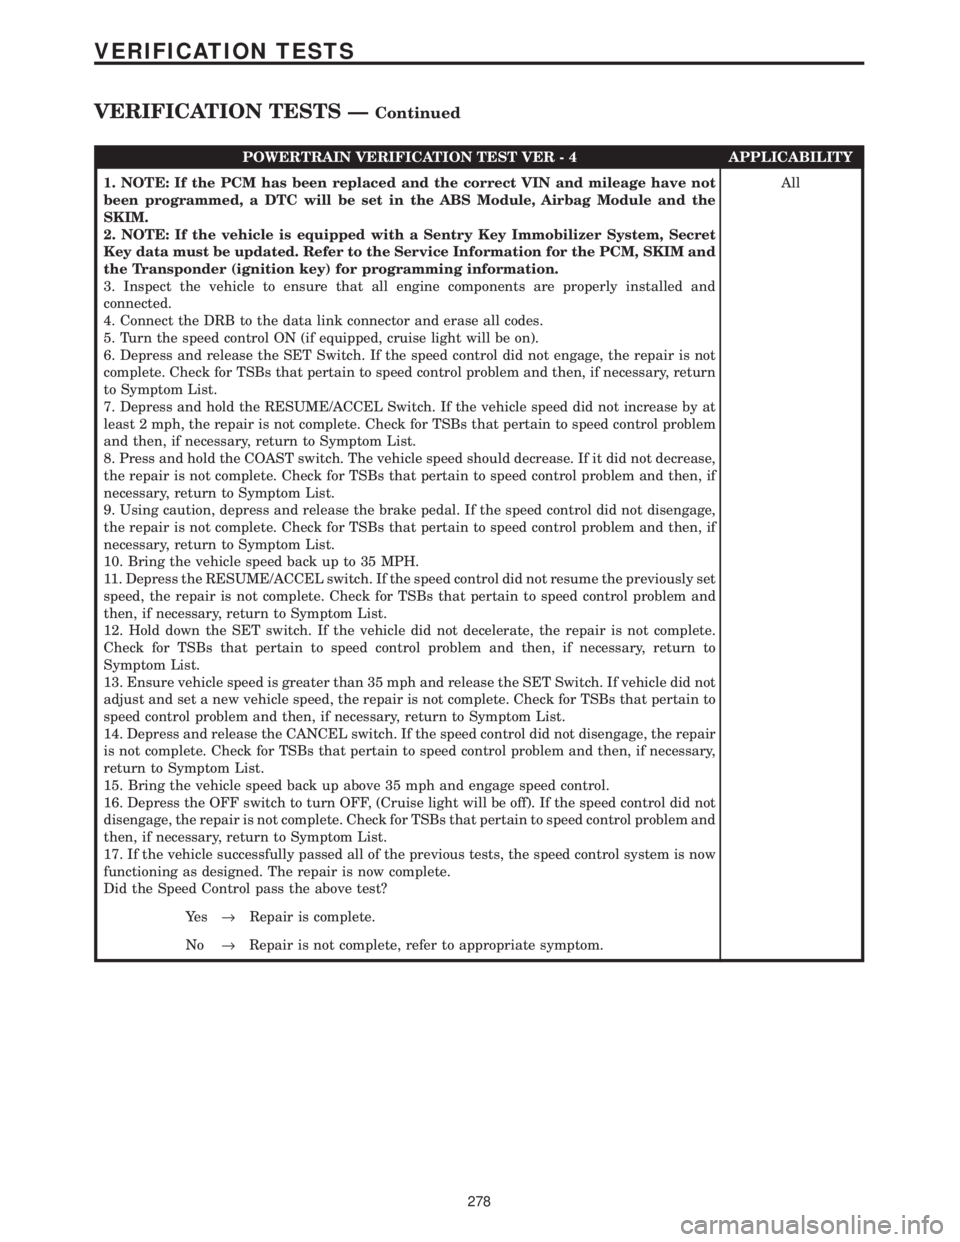
POWERTRAIN VERIFICATION TEST VER - 4 APPLICABILITY
1. NOTE: If the PCM has been replaced and the correct VIN and mileage have not
been programmed, a DTC will be set in the ABS Module, Airbag Module and the
SKIM.
2. NOTE: If the vehicle is equipped with a Sentry Key Immobilizer System, Secret
Key data must be updated. Refer to the Service Information for the PCM, SKIM and
the Transponder (ignition key) for programming information.
3. Inspect the vehicle to ensure that all engine components are properly installed and
connected.
4. Connect the DRB to the data link connector and erase all codes.
5. Turn the speed control ON (if equipped, cruise light will be on).
6. Depress and release the SET Switch. If the speed control did not engage, the repair is not
complete. Check for TSBs that pertain to speed control problem and then, if necessary, return
to Symptom List.
7. Depress and hold the RESUME/ACCEL Switch. If the vehicle speed did not increase by at
least 2 mph, the repair is not complete. Check for TSBs that pertain to speed control problem
and then, if necessary, return to Symptom List.
8. Press and hold the COAST switch. The vehicle speed should decrease. If it did not decrease,
the repair is not complete. Check for TSBs that pertain to speed control problem and then, if
necessary, return to Symptom List.
9. Using caution, depress and release the brake pedal. If the speed control did not disengage,
the repair is not complete. Check for TSBs that pertain to speed control problem and then, if
necessary, return to Symptom List.
10. Bring the vehicle speed back up to 35 MPH.
11. Depress the RESUME/ACCEL switch. If the speed control did not resume the previously set
speed, the repair is not complete. Check for TSBs that pertain to speed control problem and
then, if necessary, return to Symptom List.
12. Hold down the SET switch. If the vehicle did not decelerate, the repair is not complete.
Check for TSBs that pertain to speed control problem and then, if necessary, return to
Symptom List.
13. Ensure vehicle speed is greater than 35 mph and release the SET Switch. If vehicle did not
adjust and set a new vehicle speed, the repair is not complete. Check for TSBs that pertain to
speed control problem and then, if necessary, return to Symptom List.
14. Depress and release the CANCEL switch. If the speed control did not disengage, the repair
is not complete. Check for TSBs that pertain to speed control problem and then, if necessary,
return to Symptom List.
15. Bring the vehicle speed back up above 35 mph and engage speed control.
16. Depress the OFF switch to turn OFF, (Cruise light will be off). If the speed control did not
disengage, the repair is not complete. Check for TSBs that pertain to speed control problem and
then, if necessary, return to Symptom List.
17. If the vehicle successfully passed all of the previous tests, the speed control system is now
functioning as designed. The repair is now complete.
Did the Speed Control pass the above test?All
Ye s®Repair is complete.
No®Repair is not complete, refer to appropriate symptom.
278
VERIFICATION TESTS
VERIFICATION TESTS ÐContinued
Page 4073 of 4284
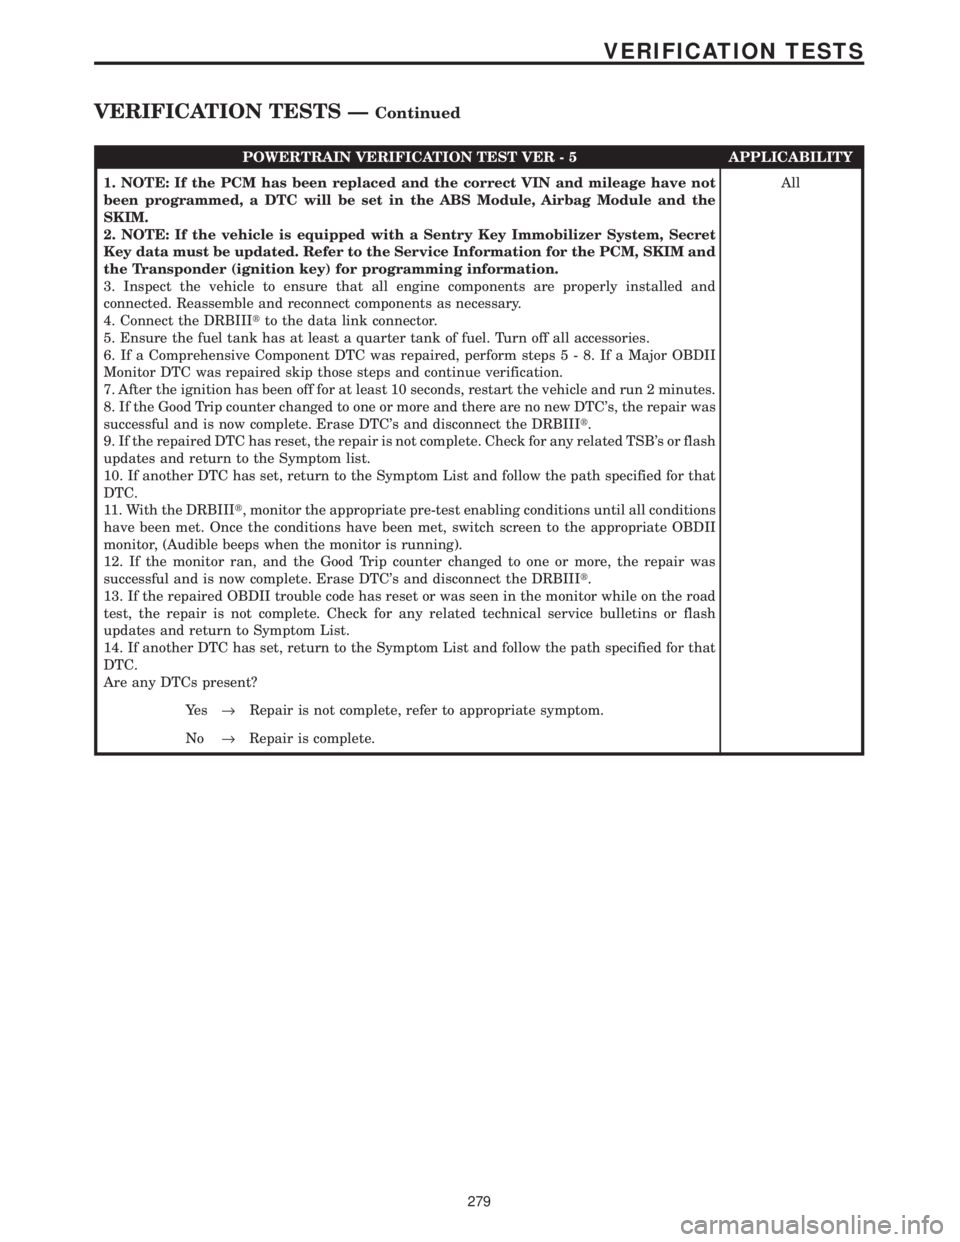
POWERTRAIN VERIFICATION TEST VER - 5 APPLICABILITY
1. NOTE: If the PCM has been replaced and the correct VIN and mileage have not
been programmed, a DTC will be set in the ABS Module, Airbag Module and the
SKIM.
2. NOTE: If the vehicle is equipped with a Sentry Key Immobilizer System, Secret
Key data must be updated. Refer to the Service Information for the PCM, SKIM and
the Transponder (ignition key) for programming information.
3. Inspect the vehicle to ensure that all engine components are properly installed and
connected. Reassemble and reconnect components as necessary.
4. Connect the DRBIIItto the data link connector.
5. Ensure the fuel tank has at least a quarter tank of fuel. Turn off all accessories.
6. If a Comprehensive Component DTC was repaired, perform steps5-8.IfaMajor OBDII
Monitor DTC was repaired skip those steps and continue verification.
7. After the ignition has been off for at least 10 seconds, restart the vehicle and run 2 minutes.
8. If the Good Trip counter changed to one or more and there are no new DTC's, the repair was
successful and is now complete. Erase DTC's and disconnect the DRBIIIt.
9. If the repaired DTC has reset, the repair is not complete. Check for any related TSB's or flash
updates and return to the Symptom list.
10. If another DTC has set, return to the Symptom List and follow the path specified for that
DTC.
11. With the DRBIIIt, monitor the appropriate pre-test enabling conditions until all conditions
have been met. Once the conditions have been met, switch screen to the appropriate OBDII
monitor, (Audible beeps when the monitor is running).
12. If the monitor ran, and the Good Trip counter changed to one or more, the repair was
successful and is now complete. Erase DTC's and disconnect the DRBIIIt.
13. If the repaired OBDII trouble code has reset or was seen in the monitor while on the road
test, the repair is not complete. Check for any related technical service bulletins or flash
updates and return to Symptom List.
14. If another DTC has set, return to the Symptom List and follow the path specified for that
DTC.
Are any DTCs present?All
Ye s®Repair is not complete, refer to appropriate symptom.
No®Repair is complete.
279
VERIFICATION TESTS
VERIFICATION TESTS ÐContinued
Page 4074 of 4284
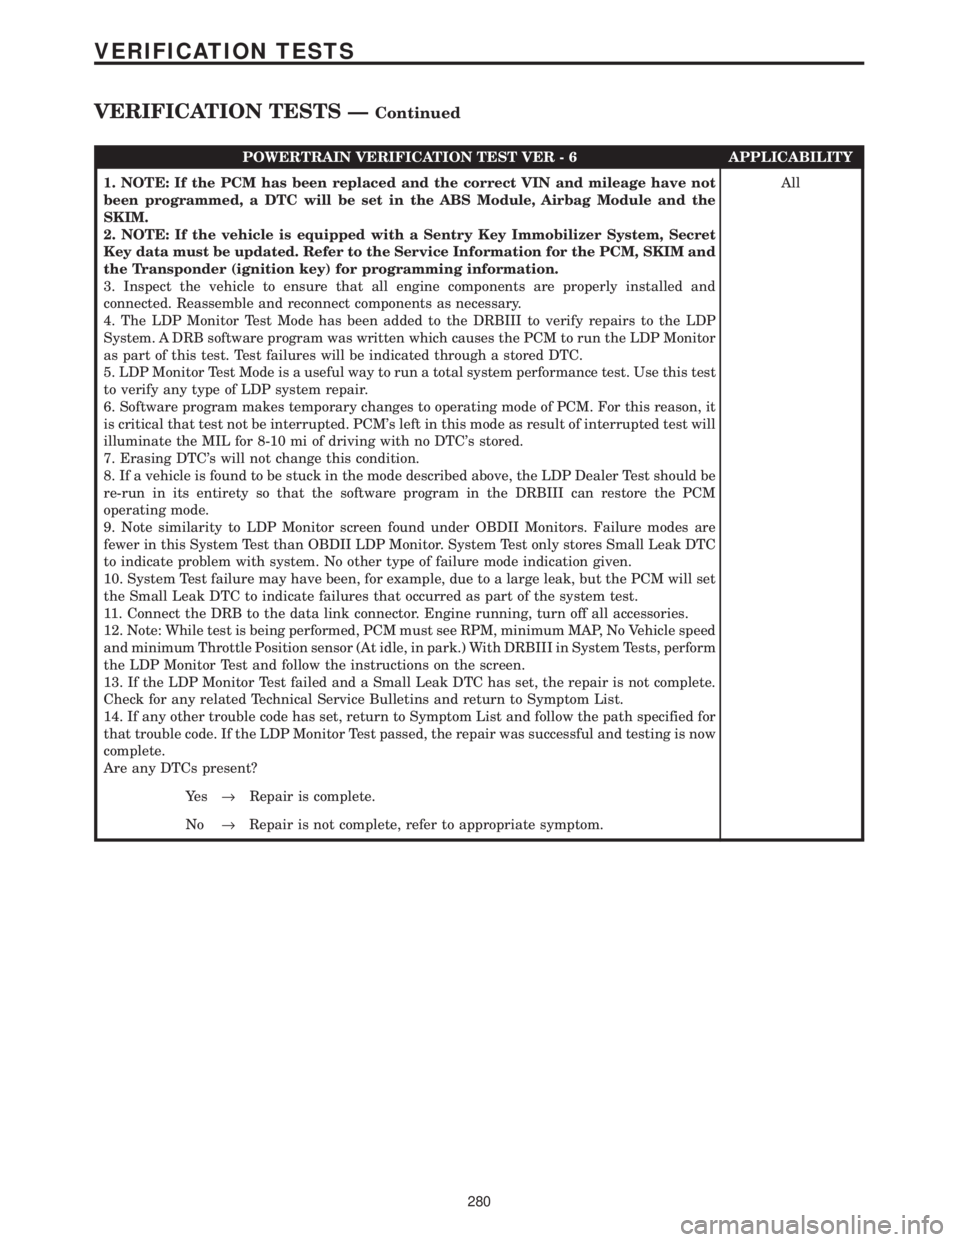
POWERTRAIN VERIFICATION TEST VER - 6 APPLICABILITY
1. NOTE: If the PCM has been replaced and the correct VIN and mileage have not
been programmed, a DTC will be set in the ABS Module, Airbag Module and the
SKIM.
2. NOTE: If the vehicle is equipped with a Sentry Key Immobilizer System, Secret
Key data must be updated. Refer to the Service Information for the PCM, SKIM and
the Transponder (ignition key) for programming information.
3. Inspect the vehicle to ensure that all engine components are properly installed and
connected. Reassemble and reconnect components as necessary.
4. The LDP Monitor Test Mode has been added to the DRBIII to verify repairs to the LDP
System. A DRB software program was written which causes the PCM to run the LDP Monitor
as part of this test. Test failures will be indicated through a stored DTC.
5. LDP Monitor Test Mode is a useful way to run a total system performance test. Use this test
to verify any type of LDP system repair.
6. Software program makes temporary changes to operating mode of PCM. For this reason, it
is critical that test not be interrupted. PCM's left in this mode as result of interrupted test will
illuminate the MIL for 8-10 mi of driving with no DTC's stored.
7. Erasing DTC's will not change this condition.
8. If a vehicle is found to be stuck in the mode described above, the LDP Dealer Test should be
re-run in its entirety so that the software program in the DRBIII can restore the PCM
operating mode.
9. Note similarity to LDP Monitor screen found under OBDII Monitors. Failure modes are
fewer in this System Test than OBDII LDP Monitor. System Test only stores Small Leak DTC
to indicate problem with system. No other type of failure mode indication given.
10. System Test failure may have been, for example, due to a large leak, but the PCM will set
the Small Leak DTC to indicate failures that occurred as part of the system test.
11. Connect the DRB to the data link connector. Engine running, turn off all accessories.
12. Note: While test is being performed, PCM must see RPM, minimum MAP, No Vehicle speed
and minimum Throttle Position sensor (At idle, in park.) With DRBIII in System Tests, perform
the LDP Monitor Test and follow the instructions on the screen.
13. If the LDP Monitor Test failed and a Small Leak DTC has set, the repair is not complete.
Check for any related Technical Service Bulletins and return to Symptom List.
14. If any other trouble code has set, return to Symptom List and follow the path specified for
that trouble code. If the LDP Monitor Test passed, the repair was successful and testing is now
complete.
Are any DTCs present?All
Ye s®Repair is complete.
No®Repair is not complete, refer to appropriate symptom.
280
VERIFICATION TESTS
VERIFICATION TESTS ÐContinued
Page 4075 of 4284
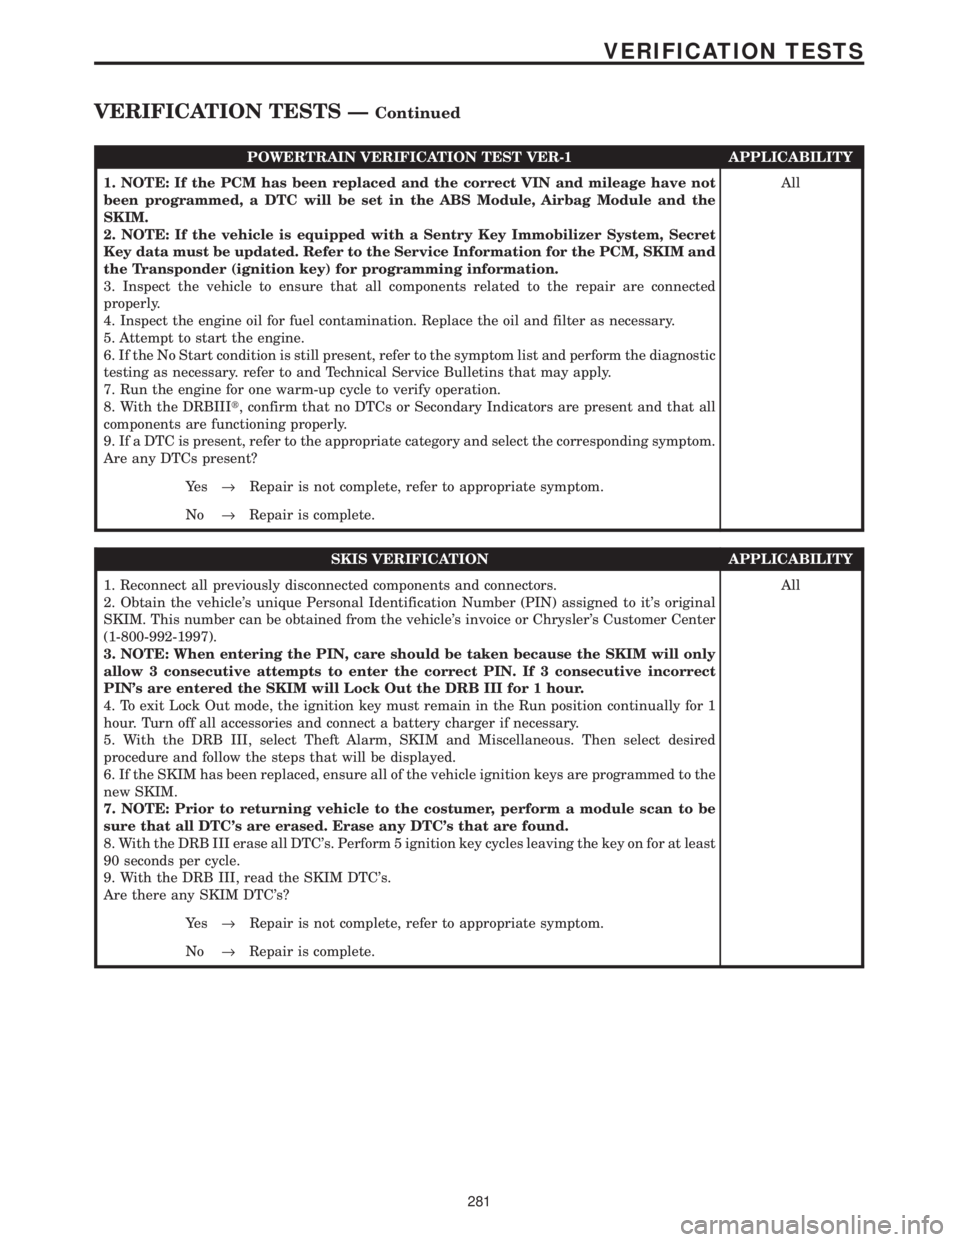
POWERTRAIN VERIFICATION TEST VER-1 APPLICABILITY
1. NOTE: If the PCM has been replaced and the correct VIN and mileage have not
been programmed, a DTC will be set in the ABS Module, Airbag Module and the
SKIM.
2. NOTE: If the vehicle is equipped with a Sentry Key Immobilizer System, Secret
Key data must be updated. Refer to the Service Information for the PCM, SKIM and
the Transponder (ignition key) for programming information.
3. Inspect the vehicle to ensure that all components related to the repair are connected
properly.
4. Inspect the engine oil for fuel contamination. Replace the oil and filter as necessary.
5. Attempt to start the engine.
6. If the No Start condition is still present, refer to the symptom list and perform the diagnostic
testing as necessary. refer to and Technical Service Bulletins that may apply.
7. Run the engine for one warm-up cycle to verify operation.
8. With the DRBIIIt, confirm that no DTCs or Secondary Indicators are present and that all
components are functioning properly.
9. If a DTC is present, refer to the appropriate category and select the corresponding symptom.
Are any DTCs present?All
Ye s®Repair is not complete, refer to appropriate symptom.
No®Repair is complete.
SKIS VERIFICATION APPLICABILITY
1. Reconnect all previously disconnected components and connectors.
2. Obtain the vehicle's unique Personal Identification Number (PIN) assigned to it's original
SKIM. This number can be obtained from the vehicle's invoice or Chrysler's Customer Center
(1-800-992-1997).
3. NOTE: When entering the PIN, care should be taken because the SKIM will only
allow 3 consecutive attempts to enter the correct PIN. If 3 consecutive incorrect
PIN's are entered the SKIM will Lock Out the DRB III for 1 hour.
4. To exit Lock Out mode, the ignition key must remain in the Run position continually for 1
hour. Turn off all accessories and connect a battery charger if necessary.
5. With the DRB III, select Theft Alarm, SKIM and Miscellaneous. Then select desired
procedure and follow the steps that will be displayed.
6. If the SKIM has been replaced, ensure all of the vehicle ignition keys are programmed to the
new SKIM.
7. NOTE: Prior to returning vehicle to the costumer, perform a module scan to be
sure that all DTC's are erased. Erase any DTC's that are found.
8. With the DRB III erase all DTC's. Perform 5 ignition key cycles leaving the key on for at least
90 seconds per cycle.
9. With the DRB III, read the SKIM DTC's.
Are there any SKIM DTC's?All
Ye s®Repair is not complete, refer to appropriate symptom.
No®Repair is complete.
281
VERIFICATION TESTS
VERIFICATION TESTS ÐContinued
Page 4088 of 4284
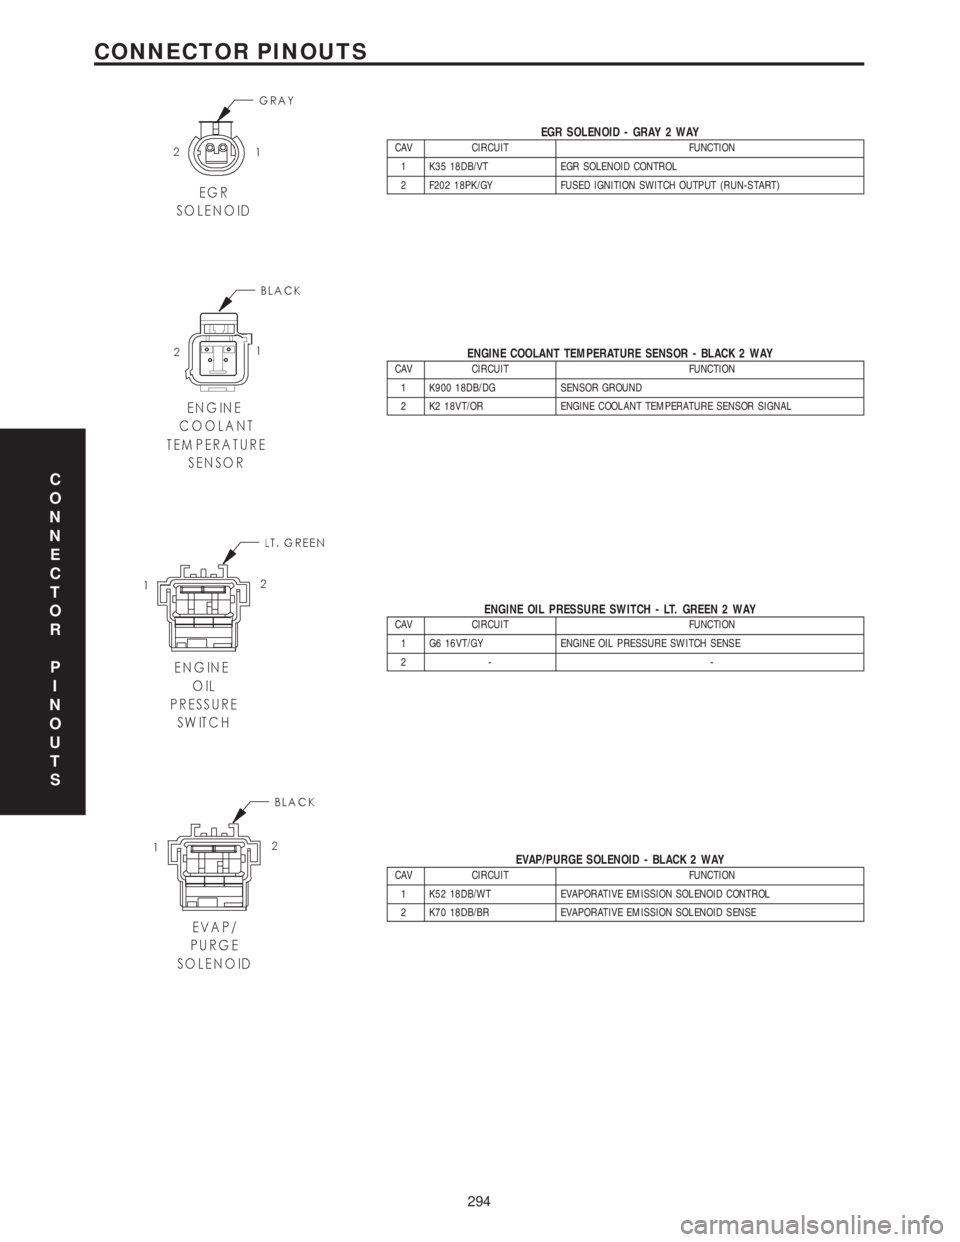
EGR SOLENOID - GRAY 2 WAYCAV CIRCUIT FUNCTION
1 K35 18DB/VT EGR SOLENOID CONTROL
2 F202 18PK/GY FUSED IGNITION SWITCH OUTPUT (RUN-START)
ENGINE COOLANT TEMPERATURE SENSOR - BLACK 2 WAYCAV CIRCUIT FUNCTION
1 K900 18DB/DG SENSOR GROUND
2 K2 18VT/OR ENGINE COOLANT TEMPERATURE SENSOR SIGNAL
ENGINE OIL PRESSURE SWITCH - LT. GREEN 2 WAYCAV CIRCUIT FUNCTION
1 G6 16VT/GY ENGINE OIL PRESSURE SWITCH SENSE
2- -
EVAP/PURGE SOLENOID - BLACK 2 WAYCAV CIRCUIT FUNCTION
1 K52 18DB/WT EVAPORATIVE EMISSION SOLENOID CONTROL
2 K70 18DB/BR EVAPORATIVE EMISSION SOLENOID SENSE
C
O
N
N
E
C
T
O
R
P
I
N
O
U
T
S
294
CONNECTOR PINOUTS
Page 4094 of 4284
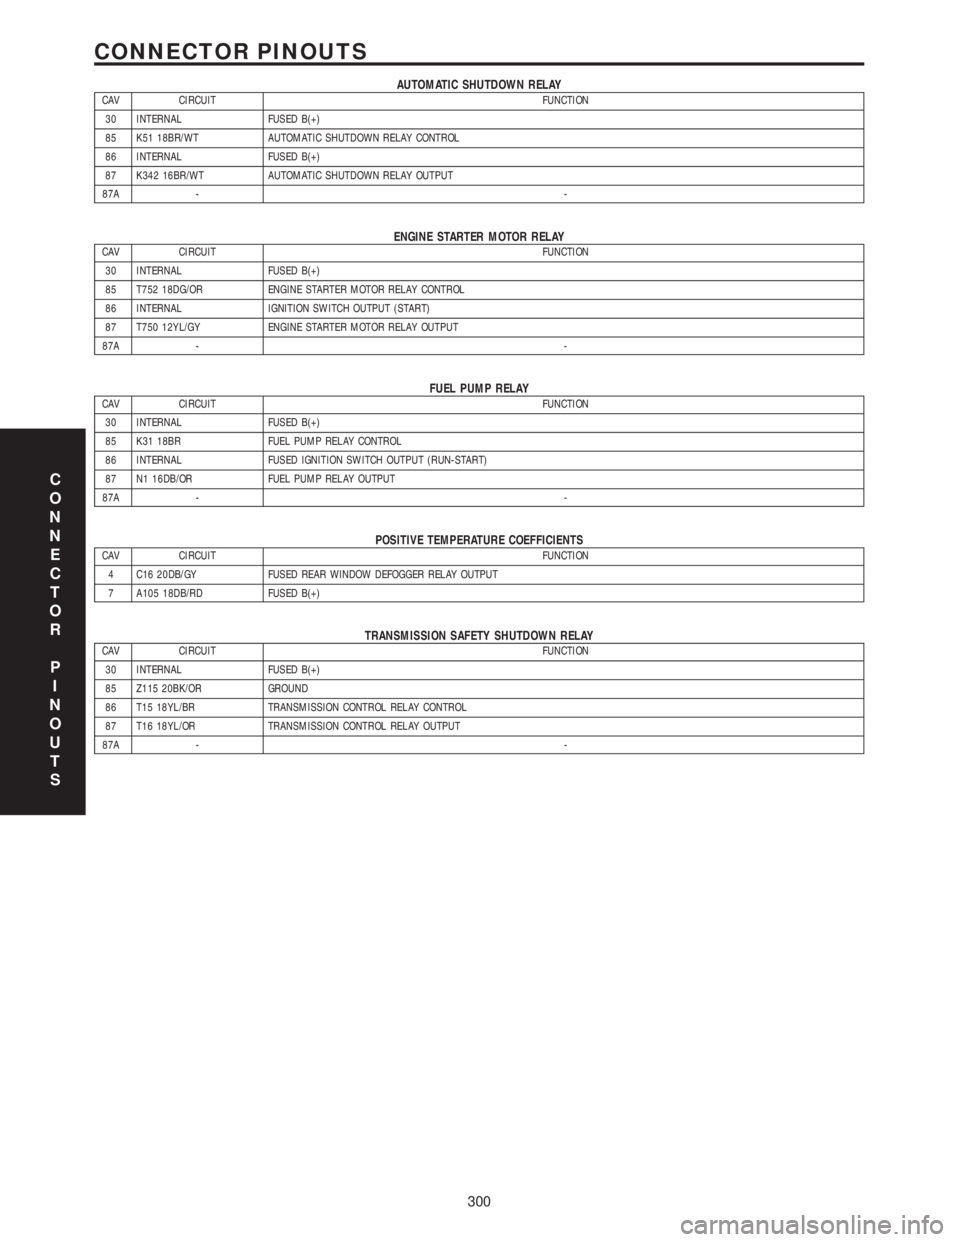
AUTOMATIC SHUTDOWN RELAYCAV CIRCUIT FUNCTION
30 INTERNAL FUSED B(+)
85 K51 18BR/WT AUTOMATIC SHUTDOWN RELAY CONTROL
86 INTERNAL FUSED B(+)
87 K342 16BR/WT AUTOMATIC SHUTDOWN RELAY OUTPUT
87A --
ENGINE STARTER MOTOR RELAYCAV CIRCUIT FUNCTION
30 INTERNAL FUSED B(+)
85 T752 18DG/OR ENGINE STARTER MOTOR RELAY CONTROL
86 INTERNAL IGNITION SWITCH OUTPUT (START)
87 T750 12YL/GY ENGINE STARTER MOTOR RELAY OUTPUT
87A --
FUEL PUMP RELAYCAV CIRCUIT FUNCTION
30 INTERNAL FUSED B(+)
85 K31 18BR FUEL PUMP RELAY CONTROL
86 INTERNAL FUSED IGNITION SWITCH OUTPUT (RUN-START)
87 N1 16DB/OR FUEL PUMP RELAY OUTPUT
87A --
POSITIVE TEMPERATURE COEFFICIENTSCAV CIRCUIT FUNCTION
4 C16 20DB/GY FUSED REAR WINDOW DEFOGGER RELAY OUTPUT
7 A105 18DB/RD FUSED B(+)
TRANSMISSION SAFETY SHUTDOWN RELAYCAV CIRCUIT FUNCTION
30 INTERNAL FUSED B(+)
85 Z115 20BK/OR GROUND
86 T15 18YL/BR TRANSMISSION CONTROL RELAY CONTROL
87 T16 18YL/OR TRANSMISSION CONTROL RELAY OUTPUT
87A --
C
O
N
N
E
C
T
O
R
P
I
N
O
U
T
S
300
CONNECTOR PINOUTS