Page 145 of 4770

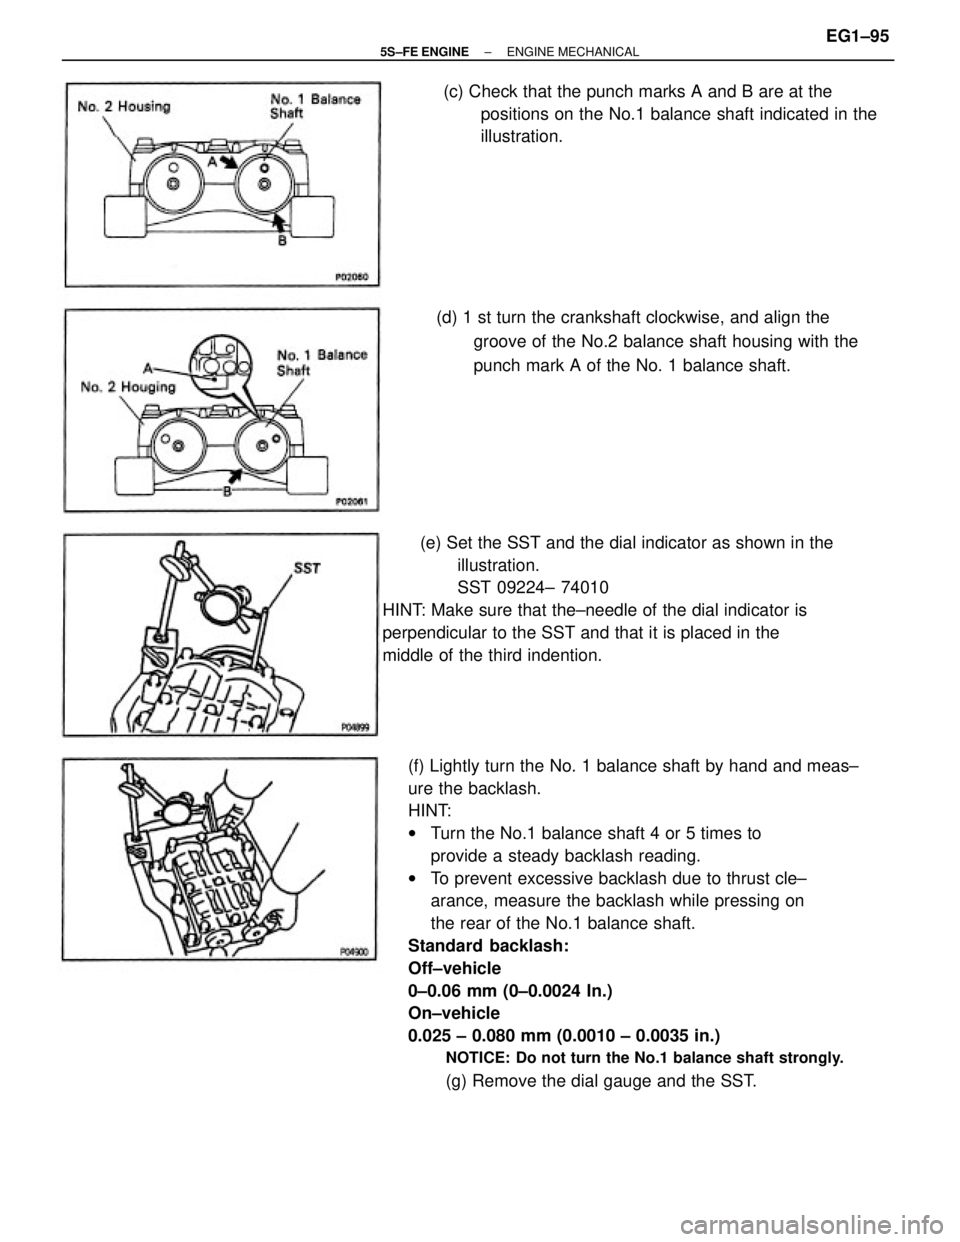
(f) Lightly turn the No. 1 balance shaft by hand and meas±
ure the backlash.
HINT:
wTurn the No.1 balance shaft 4 or 5 times to
provide a steady backlash reading.
wTo prevent excessive backlash due to thrust cle±
arance, measure the backlash while pressing on
the rear of the No.1 balance shaft.
Standard backlash:
Off±vehicle
0±0.06 mm (0±0.0024 In.)
On±vehicle
0.025 ± 0.080 mm (0.0010 ± 0.0035 in.)
NOTICE: Do not turn the No.1 balance shaft strongly.
(g) Remove the dial gauge and the SST. (e) Set the SST and the dial indicator as shown in the
illustration.
SST 09224± 74010
HINT: Make sure that the±needle of the dial indicator is
perpendicular to the SST and that it is placed in the
middle of the third indention.(d) 1 st turn the crankshaft clockwise, and align the
groove of the No.2 balance shaft housing with the
punch mark A of the No. 1 balance shaft. (c) Check that the punch marks A and B are at the
positions on the No.1 balance shaft indicated in the
illustration.
± 5S±FE ENGINEENGINE MECHANICALEG1±95
Page 146 of 4770

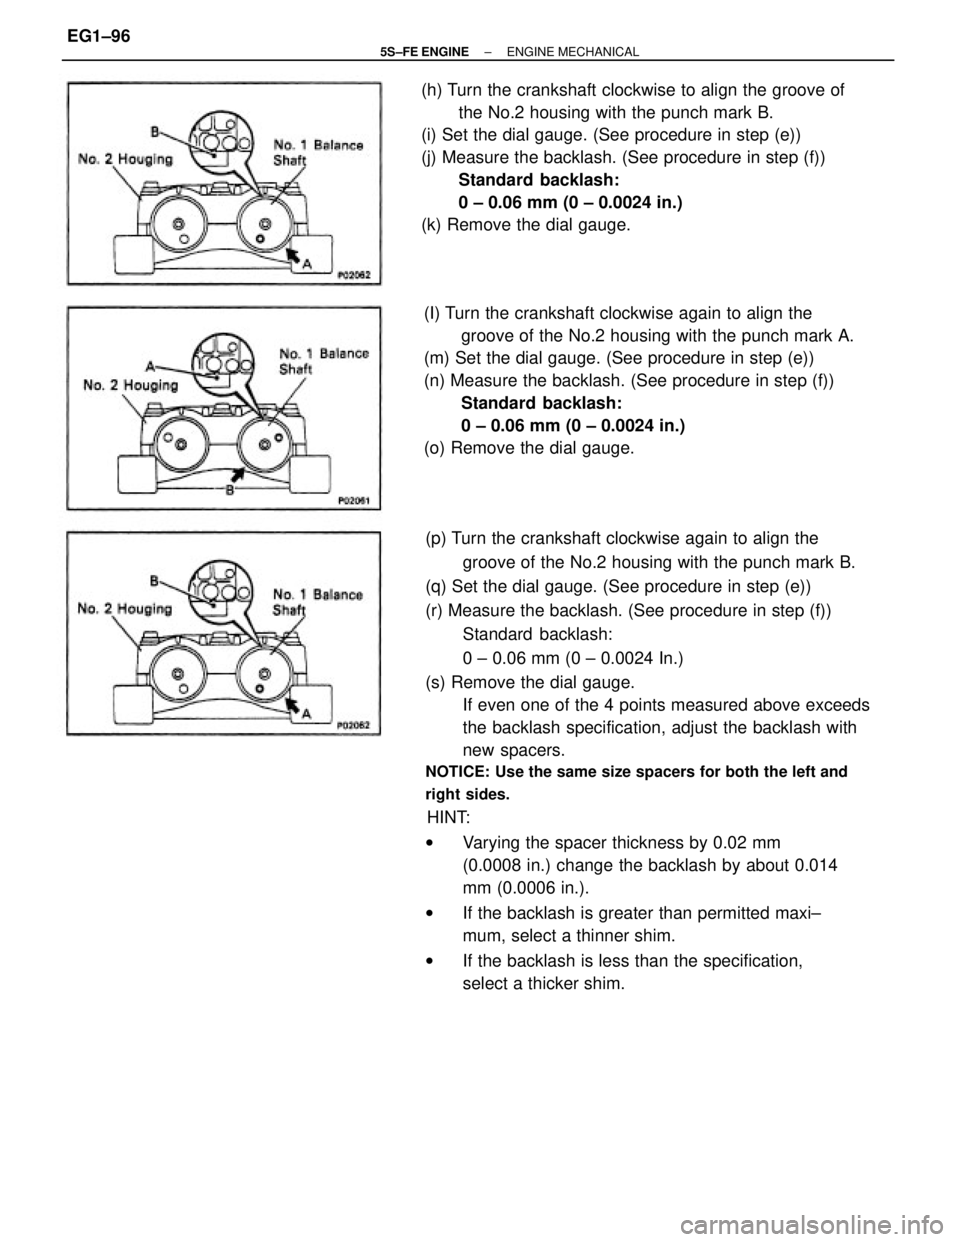
(p) Turn the crankshaft clockwise again to align the
groove of the No.2 housing with the punch mark B.
(q) Set the dial gauge. (See procedure in step (e))
(r) Measure the backlash. (See procedure in step (f))
Standard backlash:
0 ± 0.06 mm (0 ± 0.0024 In.)
(s) Remove the dial gauge.
If even one of the 4 points measured above exceeds
the backlash specification, adjust the backlash with
new spacers.
NOTICE: Use the same size spacers for both the left and
right sides.
HINT:
wVarying the spacer thickness by 0.02 mm
(0.0008 in.) change the backlash by about 0.014
mm (0.0006 in.).
wIf the backlash is greater than permitted maxi±
mum, select a thinner shim.
wIf the backlash is less than the specification,
select a thicker shim. (I) Turn the crankshaft clockwise again to align the
groove of the No.2 housing with the punch mark A.
(m) Set the dial gauge. (See procedure in step (e))
(n) Measure the backlash. (See procedure in step (f))
Standard backlash:
0 ± 0.06 mm (0 ± 0.0024 in.)
(o) Remove the dial gauge. (h) Turn the crankshaft clockwise to align the groove of
the No.2 housing with the punch mark B.
(i) Set the dial gauge. (See procedure in step (e))
(j) Measure the backlash. (See procedure in step (f))
Standard backlash:
0 ± 0.06 mm (0 ± 0.0024 in.)
(k) Remove the dial gauge.
± 5S±FE ENGINEENGINE MECHANICALEG1±96
Page 184 of 4770
BALANCE SHAFT BACKLASH
ADJUSTMENT ON VEHICLE
1. CHECK BACKLASH OF CRANKSHAFT GEAR AND
NO.1 BALANCE SHAFT GEAR
NOTICE: Backlash between the crankshaft gear and No.1
balance shaft gear varies with the rotation of the balance
shaft and the deviation of the crankshaft gear.
Accordingly, it is necessary to measure the backlash at
the 4 points shown in the illustration on the left.
(a) Rotate the crankshaft 2 or 3 times to settle the crank±
shaft gear and No. 1 balance shaft gear.
(b) When No.1 piston is at TDC, check that the punch
marks C shown in the illustration of the balance shafts
are aligned with the grooves of the No. 2 housing.
(d) First turn the crankshaft clockwise, and align the
groove of the No.2 balance shaft housing with the
punch mark A of the No. 1 balance shaft. (c) Check that the punch marks A and B are at the
positions on the No.1 balance shaft indicated in the
illustration.
± 5S±FE ENGINEENGINE MECHANICALEG1±134
Page 185 of 4770

(f) Gently turn the No.1 balance shaft by hand, until
resistance is felt, and measure the backlash.
HINT:
wRotate the No. 1 balance shaft 4 or 5 times to
provide a steady backlash reading.
wTo prevent excessive backlash due to thrust cle±
arance, measure the backlash while pressing on
the rear of the No.1 balance shaft.
Standard backlash (use SST):
0.060 ± 0.100 mm (0.0024 ± 0.0039 In.)
NOTICE: Do not turn the No.1 balance shaft strongly.
(g) Remove the dial gauge and the SST.
(h) Turn the crankshaft clockwise to align the groove of
the No.2 housing with the punch mark B.
(i) Set the dial gauge. (See procedure in step (e))
(j) Measure the backlash. (See procedure in step (f))
Standard backlash ( use SST ):
0.080 ± 0.100 mm (0.0024 ± 0.0039 in.)
(k) Remove the dial gauge. (e) Position the SST and dial indicator as shown in the
illustration.
SST 09224 ± 74010
HINT: Make sure that the stem of the dial indicator is
perpendicular to the SST and that it is placed in the
middle of the 3rd indentation.
± 5S±FE ENGINEENGINE MECHANICALEG1±135
Page 186 of 4770

(p) Turn the crankshaft clockwise again to align the
groove of the No.2 housing with the punch mark B.
(q) Set the dial gauge. (See procedure in step (e))
(r) Measure the backlash. (See procedure in step (f))
Standard backlash( use SST ):
0.06 ± 0.100 mm (0.0024 ± 0.0039 in.)
(s) Remove the dial gauge.
If even one of the 4 points measured above exceeds
the backlash specification, adjust the backlash with
new spacers.
NOTICE: Use the same size spacers for both the left and
right sides.
HINT:
wVarying the spacer thickness by 0.02 mm
(0.0008 in.) changes the backlash by about 0.042
mrn (0.0017 in.).
wIf the backlash is greater than permitted maxi±
mum, select a thinner shim.
wIf the backlash is less than the specification,
select a thicker shim. (I) Turn the crankshaft clockwise again to align the
groove of the No.2 housing with the punch mark A.
(m) Set the dial gauge. (See procedure in step (e))
(n) Measure the backlash. (See procedure in step (f))
Standard backlash ( use SST ):
0.060 ± 0.100 mm (0.0024 ± 0.0039 in.)
(o) Remove the dial gauge.
± 5S±FE ENGINEENGINE MECHANICALEG1±136
Page 259 of 4770

(b) Apply vacuum to the throttle opener.
(c) Insert a 0.60 mm (0.024 in.) thickness gauge between
the throttle stop screw and stop lever.
(d) Connect the test probe of an ohmmeter to the termi±
nals IDL and E2 of the sensor.
(e) Gradually turn the sensor clockwise until the ohmmeter
deflects, and secure it with the 2 set screws. 3. INSPECT THROTTLE POSITION SENSOR
(a) Apply vacuum to the throttle opener.
(b) Insert a thickness gauge between the throttle stop
screw and stop lever.
(c) Using an ohmmeter, measure the resistance between
each terminal. 2. INSPECT THROTTLE VALVE
(a) Apply vacuum to the throttle opener.
(b) Check that there is no clearance between the throttle
stop screw and throttle lever when the throttle valve
is fully closed.
4. IF NECESSARY, ADJUST THROTTLE POSITION
SENSOR
(a) Loosen the 2 set screws of the sensor.
Clearance between
lever and stop screw
Throttle valve fully
open 0.50 mm (0.020 in.)
0.70 mm (0.028 in.)Between terminals
2.0 ± 10.2 k� 2.3 k� or less 0.2 ± 5.7 k�
0 mm (0 in.)
2.5 ± 5.9 k� Resistance
VTA ± E2
VTA ± E2IDL±E2IDL±E2
Infinity
VC ± E2
± 5S±FE ENGINEMFI/SFI SYSTEMEG1±209
Page 603 of 4770

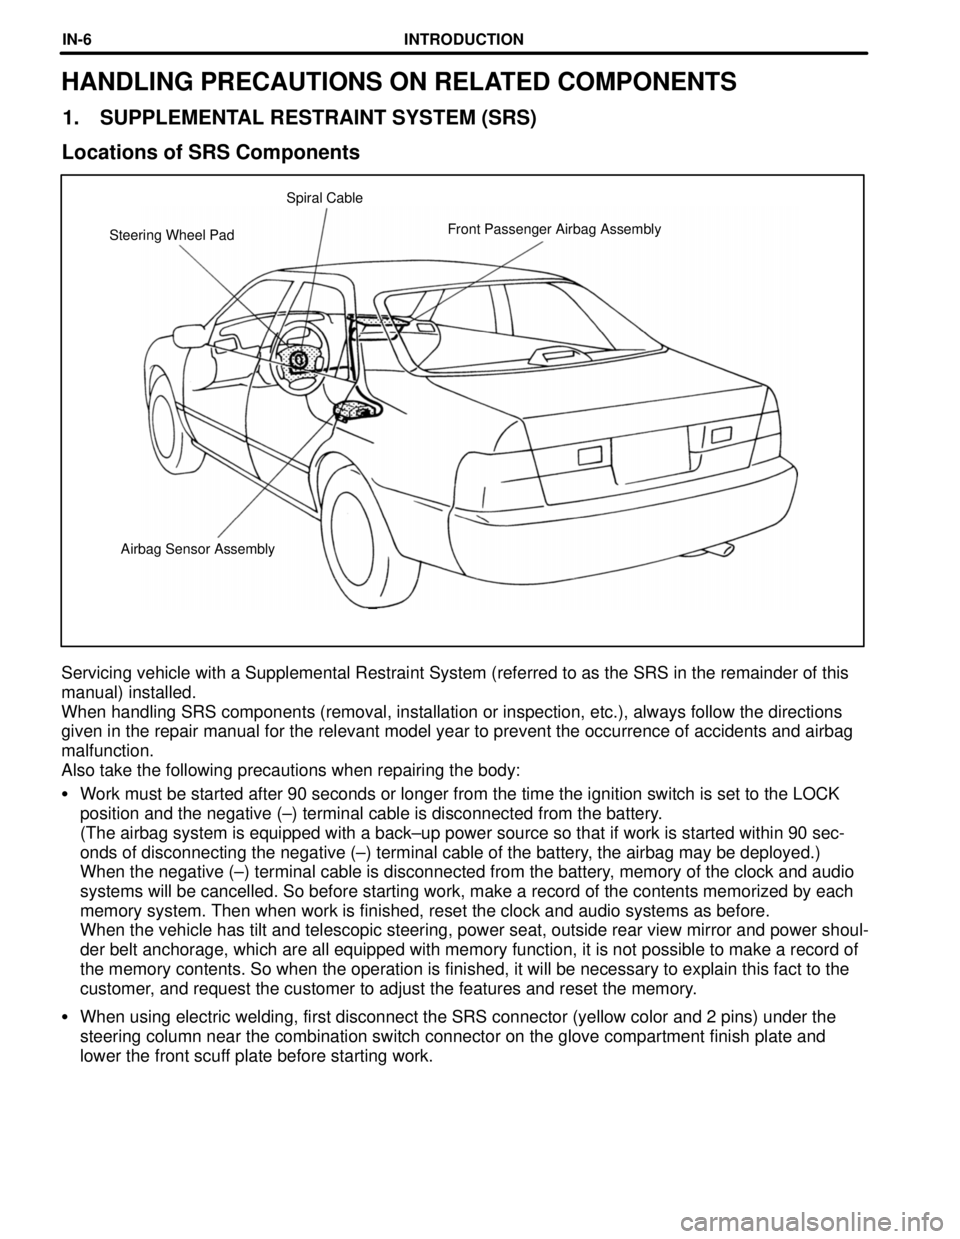
Airbag Sensor Assembly Steering Wheel PadFront Passenger Airbag Assembly Spiral Cable
HANDLING PRECAUTIONS ON RELATED COMPONENTS
1. SUPPLEMENTAL RESTRAINT SYSTEM (SRS)
Locations of SRS Components
Servicing vehicle with a Supplemental Restraint System (referred to as the SRS in the remainder of this
manual) installed.
When handling SRS components (removal, installation or inspection, etc.), always follow the directions
given in the repair manual for the relevant model year to prevent the occurrence of accidents and airbag
malfunction.
Also take the following precautions when repairing the body:
�Work must be started after 90 seconds or longer from the time the ignition switch is set to the LOCK
position and the negative (±) terminal cable is disconnected from the battery.
(The airbag system is equipped with a back±up power source so that if work is started within 90 sec-
onds of disconnecting the negative (±) terminal cable of the battery, the airbag may be deployed.)
When the negative (±) terminal cable is disconnected from the battery, memory of the clock and audio
systems will be cancelled. So before starting work, make a record of the contents memorized by each
memory system. Then when work is finished, reset the clock and audio systems as before.
When the vehicle has tilt and telescopic steering, power seat, outside rear view mirror and power shoul-
der belt anchorage, which are all equipped with memory function, it is not possible to make a record of
the memory contents. So when the operation is finished, it will be necessary to explain this fact to the
customer, and request the customer to adjust the features and reset the memory.
�When using electric welding, first disconnect the SRS connector (yellow color and 2 pins) under the
steering column near the combination switch connector on the glove compartment finish plate and
lower the front scuff plate before starting work.
INTRODUCTIONIN-6
Page 789 of 4770

'99camry U
23
TESTING THE SYSTEM
1. Open all the windows.
2. Set the system as described above.
The doors should be locked with the
key or wireless remote control transmit-
ter. Be sure to wait until the indicator
light goes off or starts flashing.
3. Unlock any door from the inside. The
system should activate the alarm.
4. Stopping the alarm as described above.
5. Repeat this operation for the other
doors, trunk and hood. When testing on
the hood, also check that the system
is activated when the battery terminal
is disconnected and then reconnected.
If the system does not work properly,
have it checked by your Toyota dealer.
Fuel tank cap
1. To open the fuel filler door, pull the
lever up.
When refueling, turn off the engine.
CAUTION
�Do not smoke, cause sparks or al-
low open flames when refueling.
The fumes are flammable.
�When opening the cap, do not re-
move the cap quickly. In hot weath-
er, fuel under pressure could cause
injury by spraying out of the filler
neck if the cap is suddenly re-
moved.
2. To remove the fuel tank cap, turn
the cap slowly counterclockwise,
then pause slightly before removing
it. After removing the cap, hang it
on the cap hanger.
It is not unusual to hear a slight swoosh
when the cap is opened. When installing,
turn the cap clockwise till you hear a
click.
If the cap is not tightened securely, the
malfunction indicator lamp comes on.
Make sure the cap is tightened securely.