Page 4105 of 4770
SFI SYSTEM
SF±5
1504 Author�: Date�:
(g) Observe these precautions when connecting the fuel
tube connector (quick ty")
S05382
Retainer
S05050
Click Sound
S05358
TOYOTA
Hand±Held Tester
± SFI (1MZ±FE)SFI SYSTEM
SF±5
1504 Author�: Date�:
(g) Observe these precautions when connecting the fuel
tube connector (quick type).
(1) Do not reuse the retainer removed from the pipe.
(2) Must use hands without using tools when to remove
the retainer from the pipe.
(3) Check if there is any damage or foreign objects on
the connected part of the pipe.
(4) Match the axis of the connector with axis of the pipe,
and push in the connector until the retainer makes
a ºclickº sound. In case that the connections is tight,
apply little amount of new engine oil on the tip of the
pipe.
(5) After having finished the connection, check if the
pipe and the connector are securely connected by
pulling them.
(6) Check if there is any fuel leakage.
(h) Observe these precautions when handling nylon tube.
(1) Pay attention not to turn the connected part of the
nylon tube and the quick connector with force when
connecting them.
(2) Pay attention not to kink the nylon tube.
(3) Do not remove the EPDM protector on the outside
of the nylon tube.
(4) Must not close the piping with the nylon tube by
bending it.
(i) Check that there are no fuel leaks after doing mainte-
nance anywhere on the fuel system.
(1) Connect a TOYOTA hand±held tester to the DLC3.
(2) Turn the ignition switch ON and push the TOYOTA
hand±held tester main switch ON.
NOTICE:
Do not start the engine.
(3) Select the active test mode on the TOYOTA hand±
held tester.
(4) Please refer to the TOYOTA hand±held tester oper-
ator 's manual for further details.
(5) If you have no TOYOTA hand±held tester, connect
the positive (+) and negative (±) leads from the bat-
tery to the fuel pump connector.
(See page SF±6)
(6) Check that there are no leaks from any part of the
fuel system.
(7) Turn the ignition switch to LOCK.
(8) Disconnect the TOYOTA hand±held tester from the
DLC3.
Page 4167 of 4770
SF08L±03
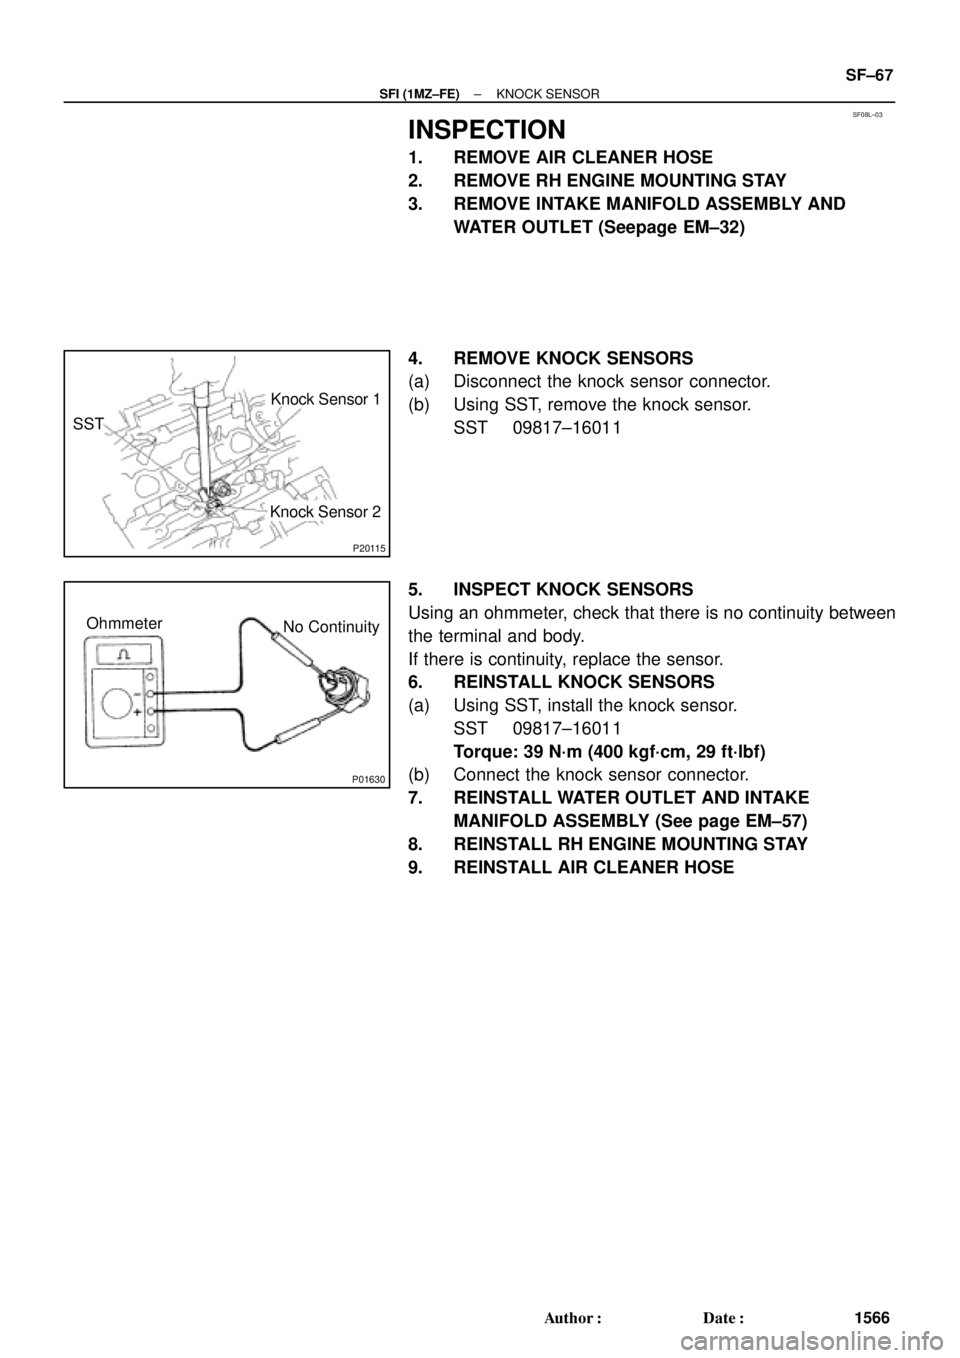
P20115
SSTKnock Sensor 1
Knock Sensor 2
P01630
Ohmmeter
No Continuity
± SFI (1MZ±FE)KNOCK SENSOR
SF±67
1566 Author�: Date�:
INSPECTION
1. REMOVE AIR CLEANER HOSE
2. REMOVE RH ENGINE MOUNTING STAY
3. REMOVE INTAKE MANIFOLD ASSEMBLY AND
WATER OUTLET (Seepage EM±32)
4. REMOVE KNOCK SENSORS
(a) Disconnect the knock sensor connector.
(b) Using SST, remove the knock sensor.
SST 09817±16011
5. INSPECT KNOCK SENSORS
Using an ohmmeter, check that there is no continuity between
the terminal and body.
If there is continuity, replace the sensor.
6. REINSTALL KNOCK SENSORS
(a) Using SST, install the knock sensor.
SST 09817±16011
Torque: 39 N´m (400 kgf´cm, 29 ft´lbf)
(b) Connect the knock sensor connector.
7. REINSTALL WATER OUTLET AND INTAKE
MANIFOLD ASSEMBLY (See page EM±57)
8. REINSTALL RH ENGINE MOUNTING STAY
9. REINSTALL AIR CLEANER HOSE
Page 4520 of 4770
 Advantages Of Using An On±Car Brake Lathe
Toyota Motor Corporation Engineers strongly recommend that an on±car brake lathe be used
for repair")
BR002±94
BRAKE VIBRATION AND/OR PULSATIONPage 4 of 6
3) Advantages Of Using An On±Car Brake Lathe
Toyota Motor Corporation Engineers strongly recommend that an on±car brake lathe be used
for repairing brake vibration and pulsation. This method improves rotor and hub combined
runout, and is the preferred method when compared to rotor replacement and off±the±car rotor
machining.
A. Technical Advantage of Caliper Mounted Brake Lathe
± Installing the brake lathe in the same position as the caliper results in minimal runout
relative to the caliper.
± Eliminating this runout minimizes the pad grinding on the rotor and reduces rotor
thickness variation.
B. Practical Use Benefits
± Resurfacing rotors on vehicles with rotor/hub assemblies can be performed easily.
± Vehicles with corrosion between hub and rotor flanges can be machined without
removing rotor from hub.
4) Rotor Replacement And Off±Car Brake Lathe Procedures
If an on±car brake lathe is not available at your dealership, it may be necessary to use an off±car
lathe or replace rotors. In order to ensure proper brake vibration and pulsation repairs, pay close
attention to the following precautions:
A. Off±Car Brake Lathe Precautions
± Perform routine maintenance of brake lathe components (clearance of arbor shaft to
adapters may need to be repaired).
± Clean all adapters and shaft to maintain accuracy of equipment.
± When installing rotor to machine, clean mud, rust, and/or foreign material from the
adapters and rotors.
± After installing rotor on machine, check rotor runout using dial indicator. If runout is
excessive, determine the cause and correct it.
± Follow lathe manufacturer repair procedures. Do not cut excessive amounts off rotor
during the first cut to save time.
Anytime a rotor is machined it must be measured for minimum rotor thickness. The
thickness for the rotor is never to be less than minimum thickness as specified in the
appropriate repair manual.
Page 4555 of 4770

Toyota Supports ASE CertificationPage 1 of 1
EG003-03Title:
SULFUR ODOR FROM EXHAUST
Models:
All Models
Technical Service
BULLETIN
February 24, 2003
Some owners of Toyota vehicles may experience a sulfur±like or ªrotten eggº odor from
the exhaust system. Sulfur is a natural component of crude oil from which gasoline is
refined and the amount of sulfur can be decreased through the refining process. The
amount of sulfur in fuel sold in California is regulated, however gasoline sold in other
states can have substantially higher sulfur content. Sulfur content also varies
considerably between gasoline brands and locations.
�All Models.
A sulfur odor emitted from the vehicle's tailpipe does not necessarily indicate that there is
an issue with the engine's running condition, but is most likely directly related to the fuel.
If the vehicle is exhibiting an excessive sulfur odor, the following checks should be
performed:
�If the MIL light is ON, check for DTCs and repair as necessary.
If no trouble is found after performing the above check, recommend the customer try a
different source of fuel.
Replacement of oxygen sensors, air/fuel ratio sensors or catalytic converters will not
reduce the odor and will therefore not
be considered warrantable.
OP CODEDESCRIPTIONTIMEOFPT1T2
N/ANot Applicable to Warranty±±±±
ENGINE
Introduction
Applicable
Vehicles
Repair
Procedure
Warranty
Information