Page 143 of 4770
9. REMOVE TIMING BELT AND PULLEYS
10. REMOVE CYLINDER HEAD
11. REMOVE WATER PUMP AND GENERATOR
ADJUSTING BAR
12. REMOVE OIL PAN AND OIL PUMP
13. REMOVE OIL FILTER
14. w/ OIL COOLER:
REMOVE OIL COOLER 4. REMOVE REAR END PLATE
Remove the bolt and end plate.
5. INSTALL ENGINE TO ENGINE STAND FOR
DISASSEMBLY
6. REMOVE GENERATOR
7. REMOVE DISTRIBUTOR1. M/T:
REMOVE CLUTCH COVER AND DISC
2. M/T:
REMOVE FLYWHEEL
3. A/T:
REMOVE DRIVE PLATE
15. REMOVE KNOCK SENSOR
Using SST, remove the knock sensor.
SST 09816 ± 300108. REMOVE PS PUMP BRACKET
Remove the 3 bolts and PS pump bracket.
PREPARATION FOR DISASSEMBLY
± 5S±FE ENGINEENGINE MECHANICALEG1±93
Page 1127 of 4770

Maintenance Log.
. Cars & Sienna
SCHEDULED MAINTENANCE LOGS35
90,000 Miles or 72 Months
❑Replace engine air filter❑Replace engine coolant
❑Replace engine oil and oil filter❑Rotate tires
❑Replace non-platinum spark plugs (Corolla, Paseo, Tercel)1
❑Repack front wheel bearings (Paseo, Tercel)
❑Re-torque drive shaft flange bolts (Sienna)
❑Replace timing belt (except Corolla)
❑Inspect the following:__
Ball joints and dust covers__
Drive shaft boots
__
Brake lines and hoses__
Exhaust pipes and mountings
__
Brake linings/drums and brake pads/discs__
Fuel tank cap gasket
__
Differential oil__
Steering gear box
__
Drive belts (non-ribbed)__
Steering linkage
__
Fuel lines and connections, fuel tank band__
Transmission fluid or oil
and fuel tank vapor vent system hoses
Additional Maintenance Items for Special Operating Conditions:*
❑Inspect nuts and bolts on body and chassis
❑Replace differential oil
❑Replace transmission fluid or oil
Date: __________________
Mileage: _______________
90,000 Miles or 72 Months
90,000 Miles or 72 Months
DEALER SERVICE VERIFICATION
1Required under the terms of the Emission Control Warranty.
Page 1143 of 4770

Maintenance Log.
. SUVs & Tacoma
SCHEDULED MAINTENANCE LOGS51
90,000 Miles or 72 Months
❑Replace engine air filter❑Replace engine coolant❑Replace engine oil and oil filter❑Rotate tires❑Replace limited-slip differential oil (Land Cruiser)1
❑Replace iridium spark plugs (Land Cruiser)2
❑Replace non-platinum spark plugs (Tacoma, 4Runner)2
❑Replace timing belt (except 4-cyl. Tacoma and 4Runner)❑Repack front wheel bearings (Tacoma 2WD)❑Lubricate propeller shaft and re-torque bolts (all 4WD except RAV4)❑Lubricate drive shaft bushings (4WD Tacoma without ADD)❑Re-torque drive shaft flange bolts (all 4WD except Land Cruiser)❑Inspect the following:__
Ball joints and dust covers__
Exhaust pipes and mountings
__
Brake lines and hoses__
Fuel tank cap gasket
__
Brake linings/drums and brake pads/discs__
Limited-slip differential oil
(4WD RAV4)1
__
Differential oil__
Steering gear box
__
Drive belts__
Steering linkage
__
Drive shaft boots__
Transfer case oil (4WD models)
__
Fuel lines and connections, fuel tank band__
Transmission fluid or oil
and fuel tank vapor vent system hoses
Additional Maintenance Items for Special Operating Conditions:*❑Inspect nuts and bolts on body and chassis❑Replace differential oil (including limited-slip)❑Replace transfer case oil (4WD models)❑Replace transmission fluid or oil
Date: __________________
Mileage: _______________
90,000 Miles or 72 Months
90,000 Miles or 72 Months
DEALER SERVICE VERIFICATION1If vehicle is equipped with limited-slip differential.2Required under the terms of the Emission Control Warranty.
Page 2353 of 4770
CO069±04
S05599
S05924
S05963
1
2
3
± COOLING (5S±FE)WATER PUMP
CO±5
1579 Author�: Date�:
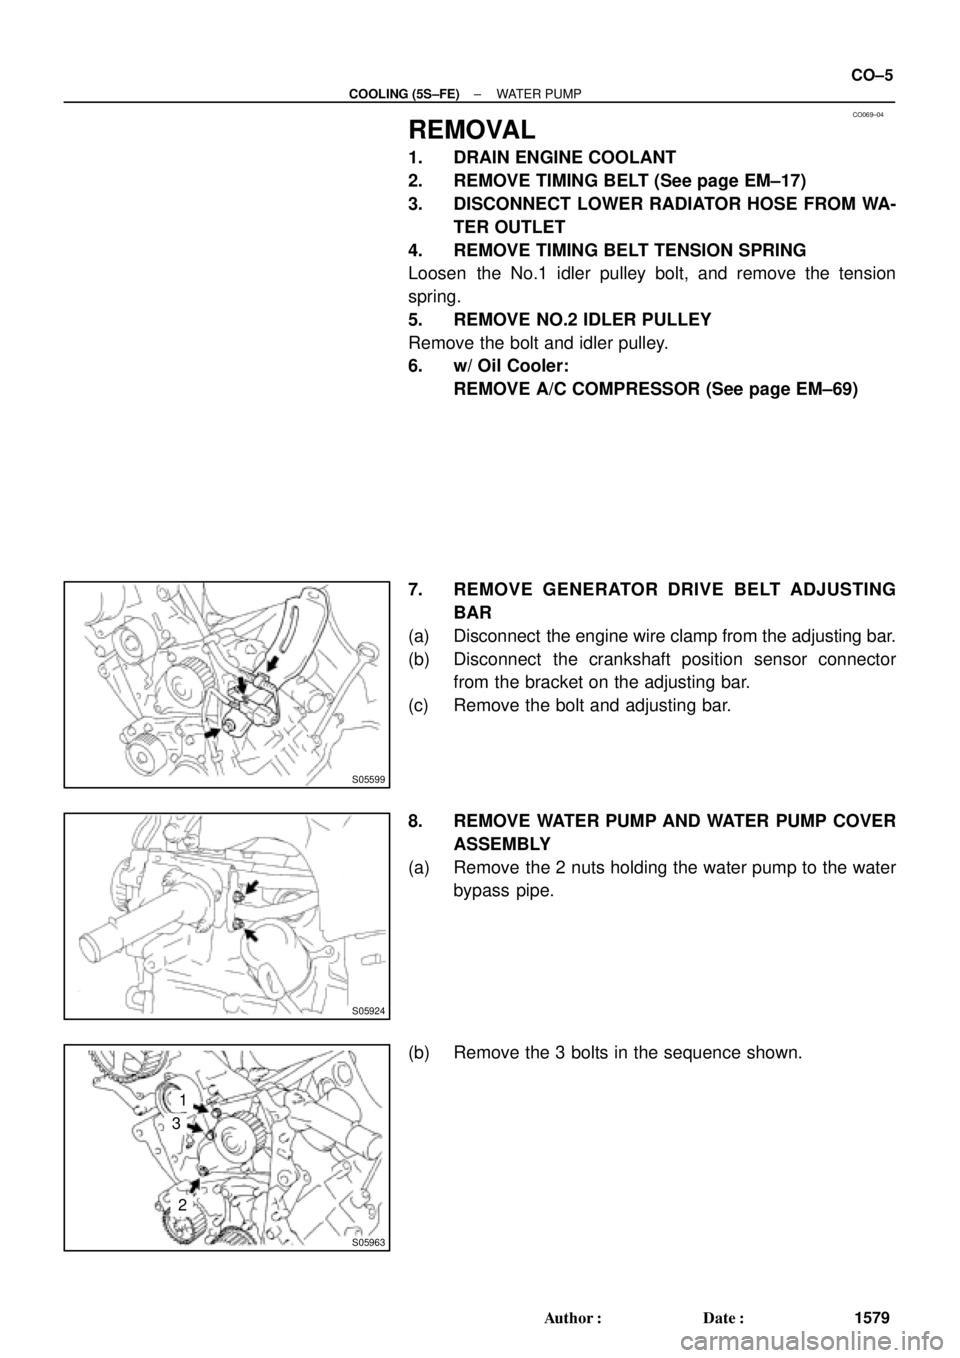
REMOVAL
1. DRAIN ENGINE COOLANT
2. REMOVE TIMING BELT (See page EM±17)
3. DISCONNECT LOWER RADIATOR HOSE FROM WA-
TER OUTLET
4. REMOVE TIMING BELT TENSION SPRING
Loosen the No.1 idler pulley bolt, and remove the tension
spring.
5. REMOVE NO.2 IDLER PULLEY
Remove the bolt and idler pulley.
6. w/ Oil Cooler:
REMOVE A/C COMPRESSOR (See page EM±69)
7. REMOVE GENERATOR DRIVE BELT ADJUSTING
BAR
(a) Disconnect the engine wire clamp from the adjusting bar.
(b) Disconnect the crankshaft position sensor connector
from the bracket on the adjusting bar.
(c) Remove the bolt and adjusting bar.
8. REMOVE WATER PUMP AND WATER PUMP COVER
ASSEMBLY
(a) Remove the 2 nuts holding the water pump to the water
bypass pipe.
(b) Remove the 3 bolts in the sequence shown.
Page 2388 of 4770
CO03E±03
P12942
CO±6
± COOLING (1MZ±FE)WATER PUMP
1614 Author�: Date�:
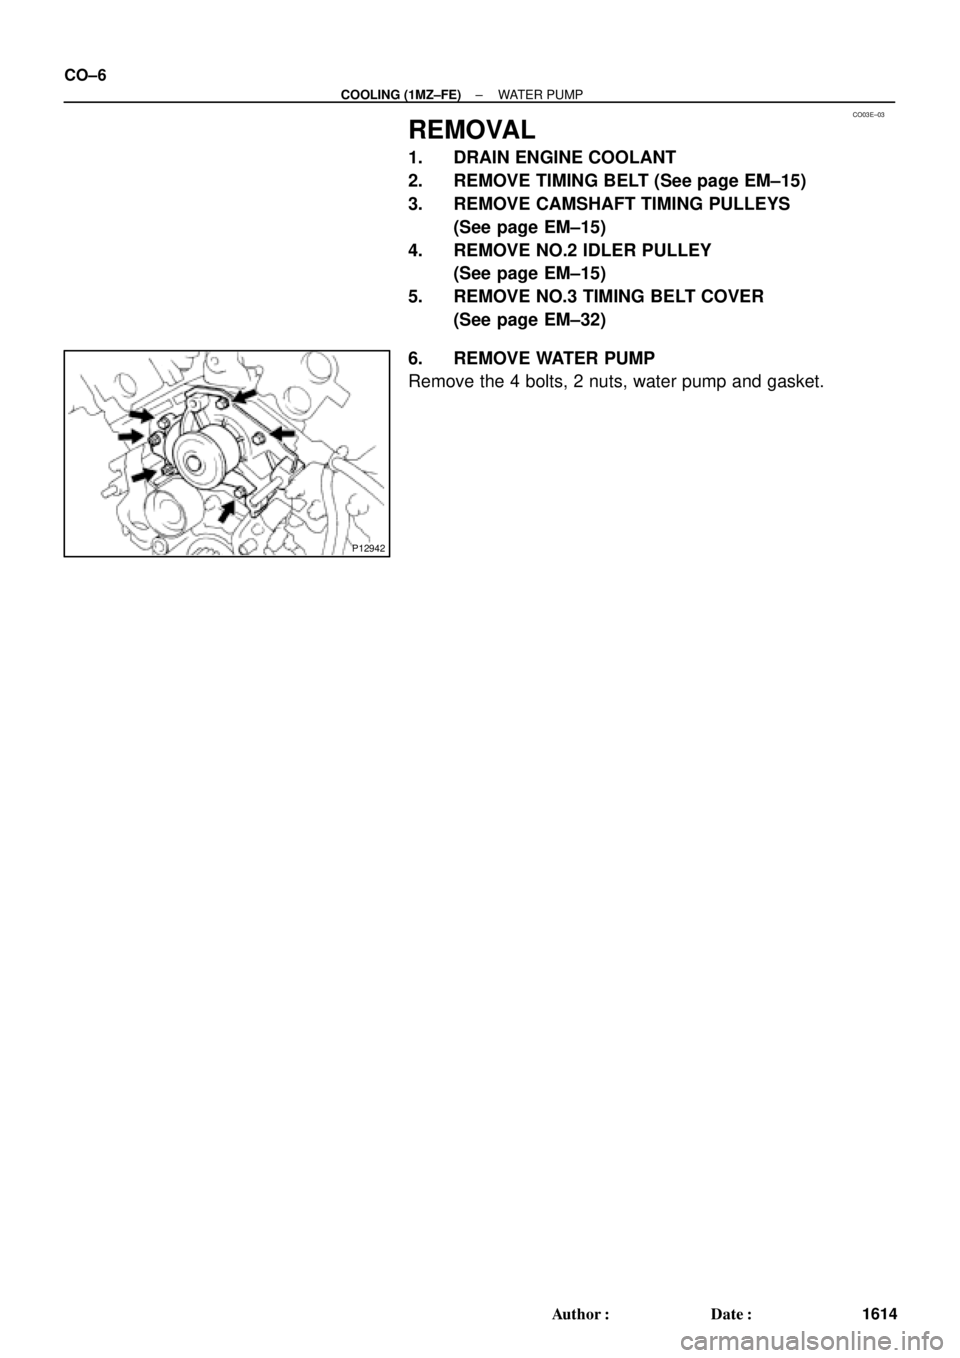
REMOVAL
1. DRAIN ENGINE COOLANT
2. REMOVE TIMING BELT (See page EM±15)
3. REMOVE CAMSHAFT TIMING PULLEYS
(See page EM±15)
4. REMOVE NO.2 IDLER PULLEY
(See page EM±15)
5. REMOVE NO.3 TIMING BELT COVER
(See page EM±32)
6. REMOVE WATER PUMP
Remove the 4 bolts, 2 nuts, water pump and gasket.
Page 2390 of 4770
CO0SO±01
P12942
CO±8
± COOLING (1MZ±FE)WATER PUMP
1616 Author�: Date�:
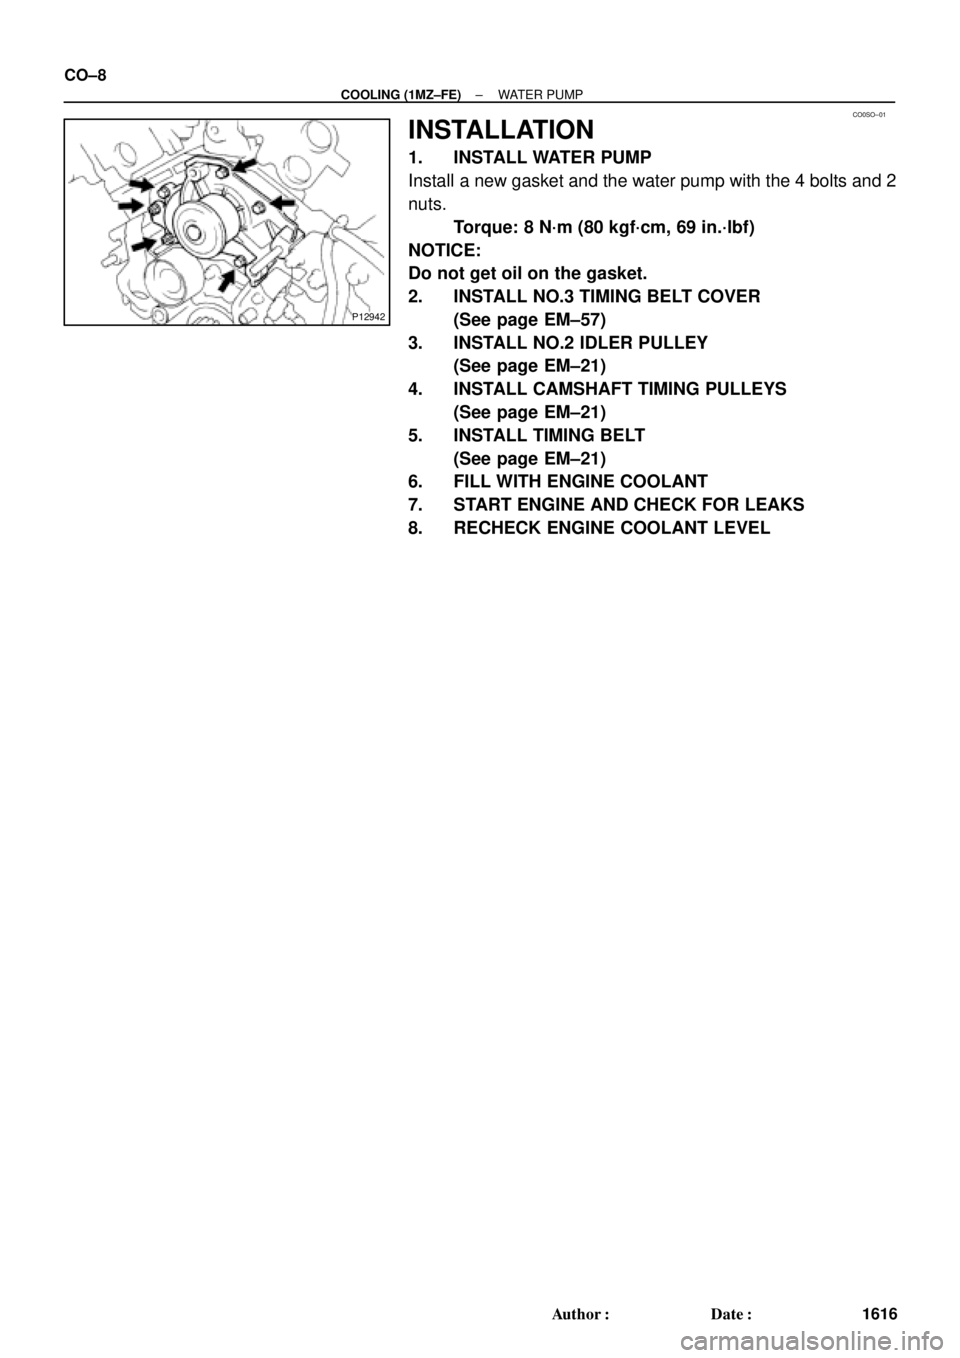
INSTALLATION
1. INSTALL WATER PUMP
Install a new gasket and the water pump with the 4 bolts and 2
nuts.
Torque: 8 N´m (80 kgf´cm, 69 in.´lbf)
NOTICE:
Do not get oil on the gasket.
2. INSTALL NO.3 TIMING BELT COVER
(See page EM±57)
3. INSTALL NO.2 IDLER PULLEY
(See page EM±21)
4. INSTALL CAMSHAFT TIMING PULLEYS
(See page EM±21)
5. INSTALL TIMING BELT
(See page EM±21)
6. FILL WITH ENGINE COOLANT
7. START ENGINE AND CHECK FOR LEAKS
8. RECHECK ENGINE COOLANT LEVEL
Page 3409 of 4770
EM084±04
S05609
S05249
S05296
S05597
± ENGINE MECHANICAL (5S±FE)TIMING BELT
EM±17
1189 Author�: Date�:
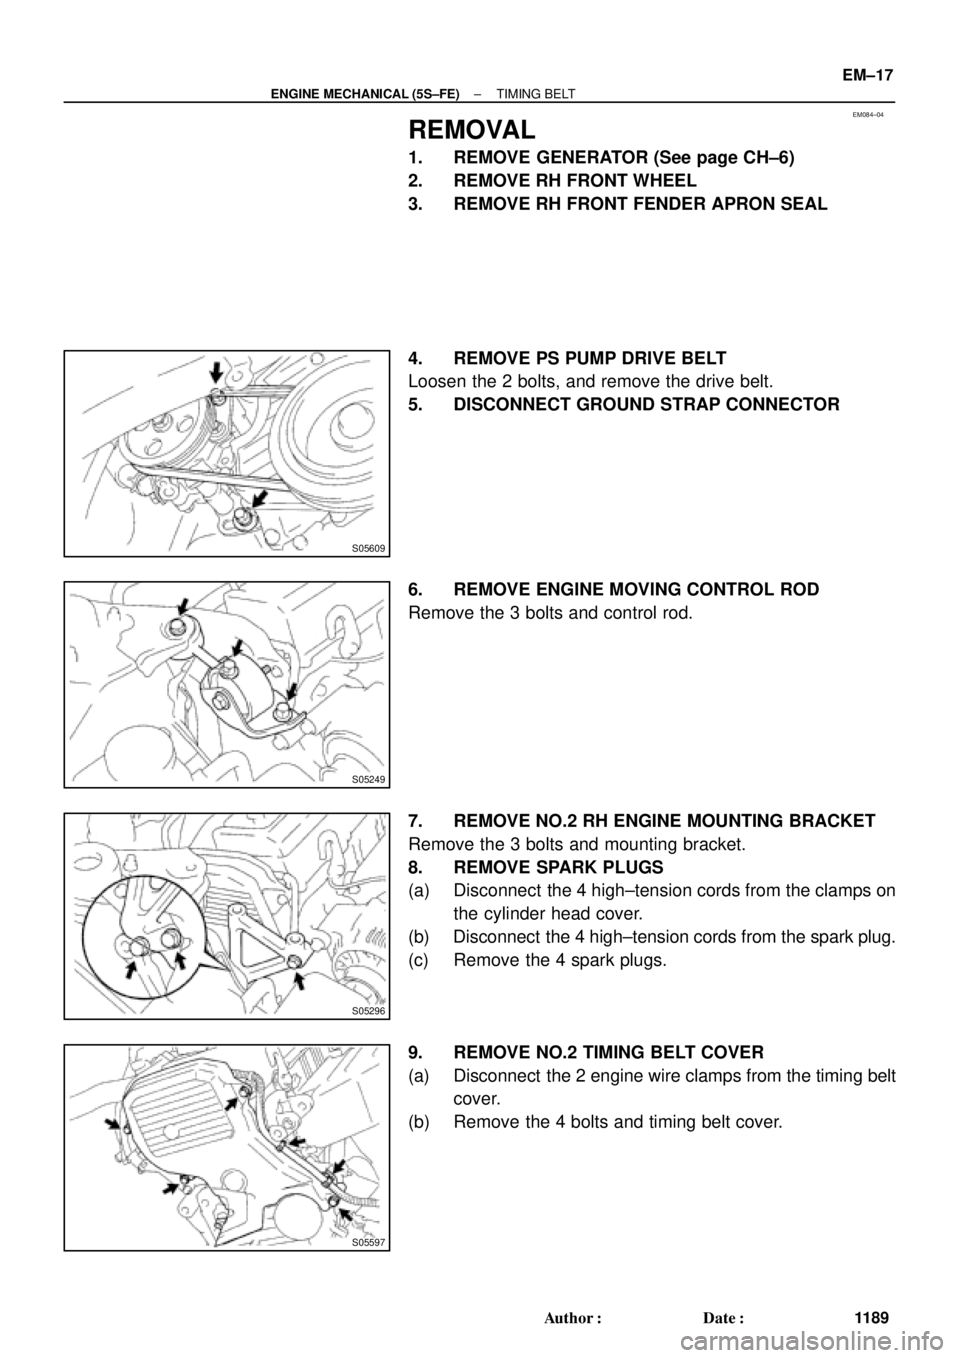
REMOVAL
1. REMOVE GENERATOR (See page CH±6)
2. REMOVE RH FRONT WHEEL
3. REMOVE RH FRONT FENDER APRON SEAL
4. REMOVE PS PUMP DRIVE BELT
Loosen the 2 bolts, and remove the drive belt.
5. DISCONNECT GROUND STRAP CONNECTOR
6. REMOVE ENGINE MOVING CONTROL ROD
Remove the 3 bolts and control rod.
7. REMOVE NO.2 RH ENGINE MOUNTING BRACKET
Remove the 3 bolts and mounting bracket.
8. REMOVE SPARK PLUGS
(a) Disconnect the 4 high±tension cords from the clamps on
the cylinder head cover.
(b) Disconnect the 4 high±tension cords from the spark plug.
(c) Remove the 4 spark plugs.
9. REMOVE NO.2 TIMING BELT COVER
(a) Disconnect the 2 engine wire clamps from the timing belt
cover.
(b) Remove the 4 bolts and timing belt cover.
Page 3412 of 4770
TIMING BELT
1192 Author�: Date�:
(2) After aligning the matchmark, hold the timing belt.
And turn the crankshaft pull")
A02590TurnHold
S05612
SST
S05591
S05944
S05614
EM±20
± ENGINE MECHANICAL (5S±FE)TIMING BELT
1192 Author�: Date�:
(2) After aligning the matchmark, hold the timing belt.
And turn the crankshaft pulley counterclockwise,
and align its groove with timing mark º0º of the No.1
timing belt cover.
(b) Remove the pulley bolt.
(c) Using SST, remove the pulley.
SST 09950±50012 (09951±05010, 09952±05010,
09953±05010, 09953±05020, 09954±05020,
09954±05010)
HINT:
�Either of 2 types of pulley may be used, each with its own
bolt size, type A(09954±05020) and type B
(09954±05010).
�When re±using timing belt:
Remove the pulley without turning it.
14. REMOVE NO.1 TIMING BELT COVER
(a) Disconnect the crankshaft position sensor wire from the
clamp on the timing belt cover.
(b) Disconnect the clamp of the crankshaft position sensor
wire from the timing belt cover.
(c) Remove the 4 bolts and timing belt cover.
15. REMOVE TIMING BELT GUIDE
16. REMOVE TIMING BELT
HINT:
When re±using timing belt:
Draw a direction arrow on the timing belt (in the direction of en-
gine revolution), and place matchmarks on the timing belt and
crankshaft timing pulley.
17. REMOVE NO.1 IDLER PULLEY AND TENSION
SPRING
Remove the bolt, pulley and tension spring.
18. REMOVE NO.2 IDLER PULLEY
Remove the bolt and pulley.