2000 TOYOTA CAMRY change time
[x] Cancel search: change timePage 4427 of 4770

Toyota Supports ASE CertificationPage 1 of 4
AX005±99Title:
TOYOTA VIP RS3000 PROGRAMMING
Models:
All Models
Technical Service
BULLETIN
April 9, 1999
This bulletin describes the procedures that are used to program the two±button remote
control for vehicles that are equipped with the dealer or port installed option (PIO), not
the factory security system. For factory security system remote control programming,
refer to the appropriate vehicle repair manual.
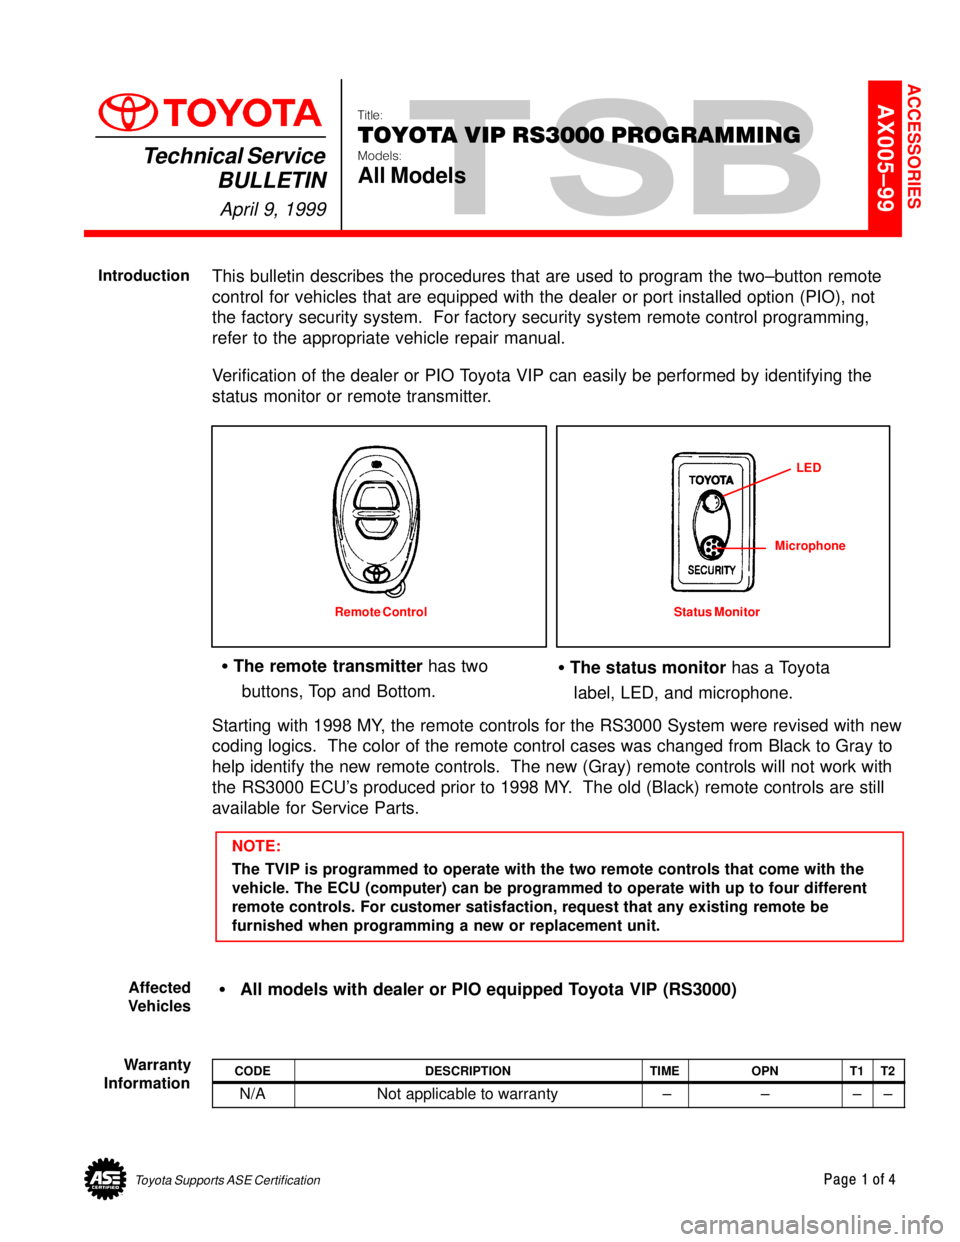
Verification of the dealer or PIO Toyota VIP can easily be performed by identifying the
status monitor or remote transmitter.
� The remote transmitter has two
buttons, Top and Bottom.� The status monitor has a Toyota
label, LED, and microphone.
Remote Control Status MonitorLED
Microphone
Starting with 1998 MY, the remote controls for the RS3000 System were revised with new
coding logics. The color of the remote control cases was changed from Black to Gray to
help identify the new remote controls. The new (Gray) remote controls will not work with
the RS3000 ECU's produced prior to 1998 MY. The old (Black) remote controls are still
available for Service Parts.
NOTE:
The TVIP is programmed to operate with the two remote controls that come with the
vehicle. The ECU (computer) can be programmed to operate with up to four different
remote controls. For customer satisfaction, request that any existing remote be
furnished when programming a new or replacement unit.
�All models with dealer or PIO equipped Toyota VIP (RS3000)
CODEDESCRIPTIONTIMEOPNT1T2
N/ANot applicable to warranty ±±±±
ACCESSORIES
Introduction
Affected
Vehicles
Warranty
Information
Page 4431 of 4770

Toyota Supports ASE CertificationPage 1 of 2
AX005±00Title:
RS3000 TVIP AUTOMATIC DOOR LOCK
FEATURE PROGRAMMING
Models:
All Models
Technical Service
BULLETIN
April 14, 2000
As a convenience feature, the RS3000 TVIP system is programmed to automatically lock
all of the vehicle's doors (for vehicles equipped with power door locks) when the ignition
key is turned to ªONº or ªSTARTº, and unlock them when the key is turned back to ªACCº
or ªLOCKº. The initial factory setting of this programmable feature is ªONº. For some
customers however, this feature is not desirable due to instances of passenger lockout
when the driver enters the vehicle first and starts the ignition.
For vehicles equipped with RS3000 TVIP, this bulletin advises the dealers to
communicate the following information to the customers at vehicle delivery:
1. Inform the customers of the RS3000 system's automatic (ignition controlled) door
lock/unlock feature.
2. Inquire about the customers' preference for it to be set ªONº or ªOFFº.
3. Reprogram the feature's setting according to the customer's preference.
To change the feature's operation mode, follow the programming procedures on page 2.
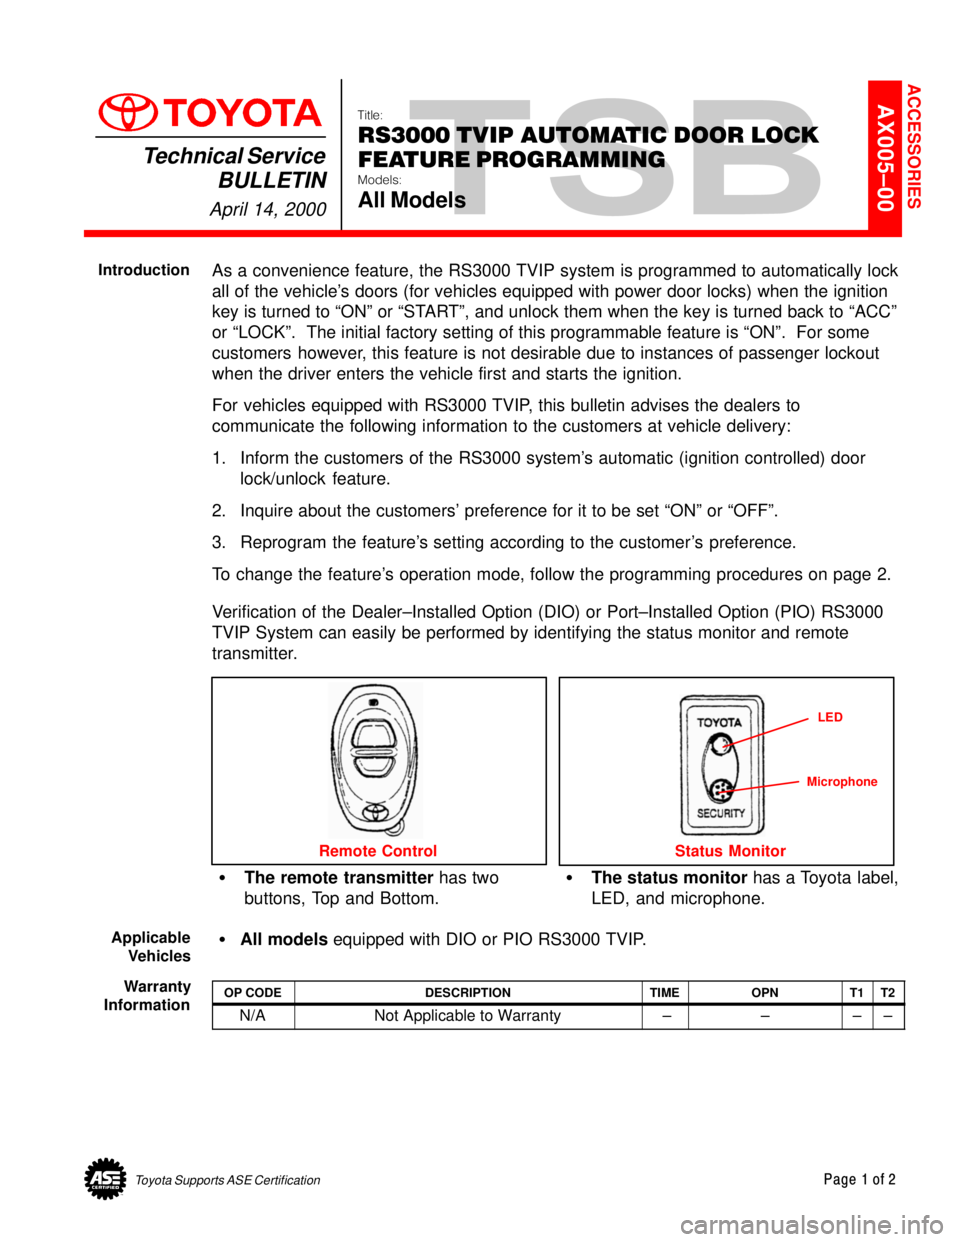
Verification of the Dealer±Installed Option (DIO) or Port±Installed Option (PIO) RS3000
TVIP System can easily be performed by identifying the status monitor and remote
transmitter.
�The remote transmitter has two
buttons, Top and Bottom.�The status monitor has a Toyota label,
LED, and microphone.
Remote Control
LED
Status Monitor
Microphone
�All models equipped with DIO or PIO RS3000 TVIP.
OP CODEDESCRIPTIONTIMEOPNT1T2
N/ANot Applicable to Warranty ±±±±
ACCESSORIES
Introduction
Applicable
Vehicles
Warranty
Information
Page 4432 of 4770

RS30000 TVIP AUTOMATIC DOOR LOCK FEATURE PROGRAMMING ± AX005±00 April 14, 2000
Page 2 of 2
AUTOMATIC (IGNITION±CONTROLLED) DOOR LOCKING/UNLOCKING FUNCTION
The factory setting for the Automatic Door Locking/Unlocking Function is ªONº.
To change this feature's operation, follow the steps below:
1. Sit in the driver's seat with driver's door open.
2. Insert the key into the ignition switch, and turn it to ªONº position (not ªACCº)
5 times (ON > LOCK > ON > LOCK > ON > LOCK > ON > LOCK > ON) within a
10 second period.
System Response: The STATUS MONITOR's LED turns on, and the PIEZO
BUZZER sounds once.
NOTE:
You must perform the next steps within 30 seconds.
3. Select the customer's preferred operating mode.
ModeProgramming StepProgramming Completion
AUTOMATIC DOOR
LOCKING/UNLOCKING ªONºClose the driver's door.
Turn the ignition switch to the
ªLOCKº position.
System Response:
The PIEZO BUZZER sounds
once, and the exterior lights
flash once.
AUTOMATIC DOOR
LOCKING/UNLOCKING ªOFFºClose the driver's door,
then open and close it
one more time.
Turn the ignition switch to the
ªLOCKº position.
System Response:
The PIEZO BUZZER sounds
twice, and the exterior lights
flash twice.
Programming
Procedure
Page 4433 of 4770

Toyota Supports ASE CertificationPage 1 of 2
AX006±99Title:
RS3000 TVIP PROGRAMMING CHANGES
FOR GBS
Models:
All Models
Technical Service
BULLETIN
April 23, 1999
Starting with 1999 MY, the programming in the RS3000 ECU for the Glass Breakage
Sensor (GBS) to trigger the alarm has been changed to improve the Toyota Vehicle
Intrusion Protection (TVIP) system's theft warning feature when glass breakage or impact
to the glass is detected.
Previous operation of GBS (for 1998 MY and prior):
�Upon (first) detection of breakage of the vehicle's glass, the GBS will sound the
security system for 5 seconds (3 horn honks).
�If there is a second detection of glass breakage, within 5 seconds of the first
detection, the security system will sound for the full duration of 59 seconds.
Improved operation of GBS (from 1999 MY):
�Upon (first) detection of breakage of the vehicle's glass, the GBS will sound the
security system for 20 seconds.
�If there is a second detection of glass breakage, the security system will sound for the
full duration of 59 seconds, regardless of time between the first and second
detections.
�After the first detection, any subsequent detection will trigger the alarm for the full
duration of 59 seconds as long as the security system is armed. The GBS trigger
cycle will reset once the security system is disarmed and then rearmed.
This improvement is intended to enhance the previous trigger cycle of the security
system and ward off an intruder.
The color of the previous (1998 MY and prior) RS3000 ECU was black. The new
RS3000 ECU color is gray.
�All Models
PREVIOUS PART NUMBERCURRENT PART NUMBERPART NAME
08585±00921SAMERS3000 Base Kit
OP CODEDESCRIPTIONTIMEOPNT1T2
N/ANot applicable to warranty ±±±±
ACCESSORIES
Introduction
Affected
Vehicles
Parts
Information
Warranty
Information
Page 4435 of 4770

Toyota Supports ASE CertificationPage 1 of 1
AX007±00Title:
INTERCHANGEABILITY OF ACCESSORY
ALLOY WHEELS
Models:
'99 ± '01 Avalon, Camry, Solara & Sienna
Technical Service
BULLETIN
September 22, 2000
This bulletin introduces a new accessory alloy wheel for 1999 through 2001 model year
Avalon, Camry, Solara and Sienna vehicles. This new wheel is similar in appearance to
an existing alloy wheel. This bulletin points out that the two wheels are not
interchangeable.
�1999 ± 2001 model year Avalon, Camry, Solara & Sienna.
WHEELWHEEL PART NUMBERREMARK
Style 1, Split 5 SpokePT351±00990Conical (Tapered) Seat Lug Nut
Style 2, Split 5 SpokePT351±00991Flat Seat Lug Nut
Flat Seat Lug Nut Conical (Tapered)
Seat Lug Nut
Every applicable vehicle must be installed with all four wheels of the same part number.
In cases where replacement of one wheel is necessitated, it must be replaced by a wheel
of the same part number. Replacement of one part number with the other is permitted
only as a set of four wheels.
The service part numbers for the lug nuts are not interchangeable.
WHEEL PART NUMBERLUG NUT PART NUMBERLUG NUT DESCRIPTION
PT351±00990PT351±00990±LNConical (Tapered) Seat
PT351±00991PT351±12009±01Flat Seat
The service part numbers for the center caps are not interchangeable.
WHEEL PART NUMBERCENTER CAP PART NUMBER
PT351±00990PT351±00991±WC
PT351±00991PT351±00991±CC
OP CODEDESCRIPTIONTIMEOPNT1T2
N/ANot Applicable to Warranty ±±±±
ACCESSORIES
Introduction
Applicable
Vehicles
Parts
Information
Warranty
Information
Page 4451 of 4770

Toyota Supports ASE CertificationPage 1 of 1
BO005±99
Title:
CAMRY CENTER CONSOLE LATCH
IMPROVEMENTS
Models:
'97±'99 Camry
Technical Service
BULLETIN
March 26, 1999
The center console compartment door has been changed to improve the durability of the
console box latch.
�1997 ± 1999 Camrys produced before VIN:
4T1BG ** K * XU414881 (L4)
4T1BF ** K * XU076659 (V6)
4T1BG ** K * XU867323 (L4)
4T1BF ** K * XU930092 (V6)
PREVIOUS PART #CURRENT PART #PART NAME
58910±AA010±XX58910±AA011±XXConsole Box Assembly
58905±AA010±XX58905±AA011±XXConsole Compartment Door
�On vehicles produced before the production change, replace the Rear Console Box
with P/N 58910±AA011±XX. Refer to Repair Manual, page BO±72 for detailed repair
procedures.
NOTE:
On vehicles produced after the production change, replace the console compartment
door only. These vehicles can be identified by a metal hinge on the console
compartment door.
OP CODEDESCRIPTIONTIMEOPNT1T2
743641R & R Rear Console Box Assembly0.358910±AA010±XX5412
743931R & R Rear Console Compartment Door0.258905±AA010±XX5412
Applicable Warranty*:
This repair is covered under the Toyota Basic Warranty. This warranty is in effect for
36 months or 36,000 miles, whichever occurs first, from the vehicle's in±service date.
* Warranty application is limited to correction of a problem based upon a customer's specific complaint.
BODY
Introduction
Affected
Vehicles
Parts
Information
Repair
Procedure
Warranty
Information
Page 4454 of 4770

Toyota Supports ASE CertificationPage 1 of 1
BO009±00
Title:
LOOSE CENTER HVAC VENT
ADJUSTMENT
Models:
'98 ± '99 CBU Camry
Technical Service
BULLETIN
April 28, 2000
TSB Revision Notice:
The information updated in this TSB is red
and underlined.
A repair procedure has been made available to remedy customer complaints regarding
loose vertical adjustment of the center vents on 1998 ± 1999 CBU Camry.
�1998 through 1999 model year Japan built Camry.
MODEL/PLANTSTARTING VIN
2000 MY Japan Built CamryJT2BG2*K*X03390182000 MY Japan Built CamryJT2BF2*K*X0200364
PART NUMBERPART NUMBERQUANTITY
90202±05129Washer2
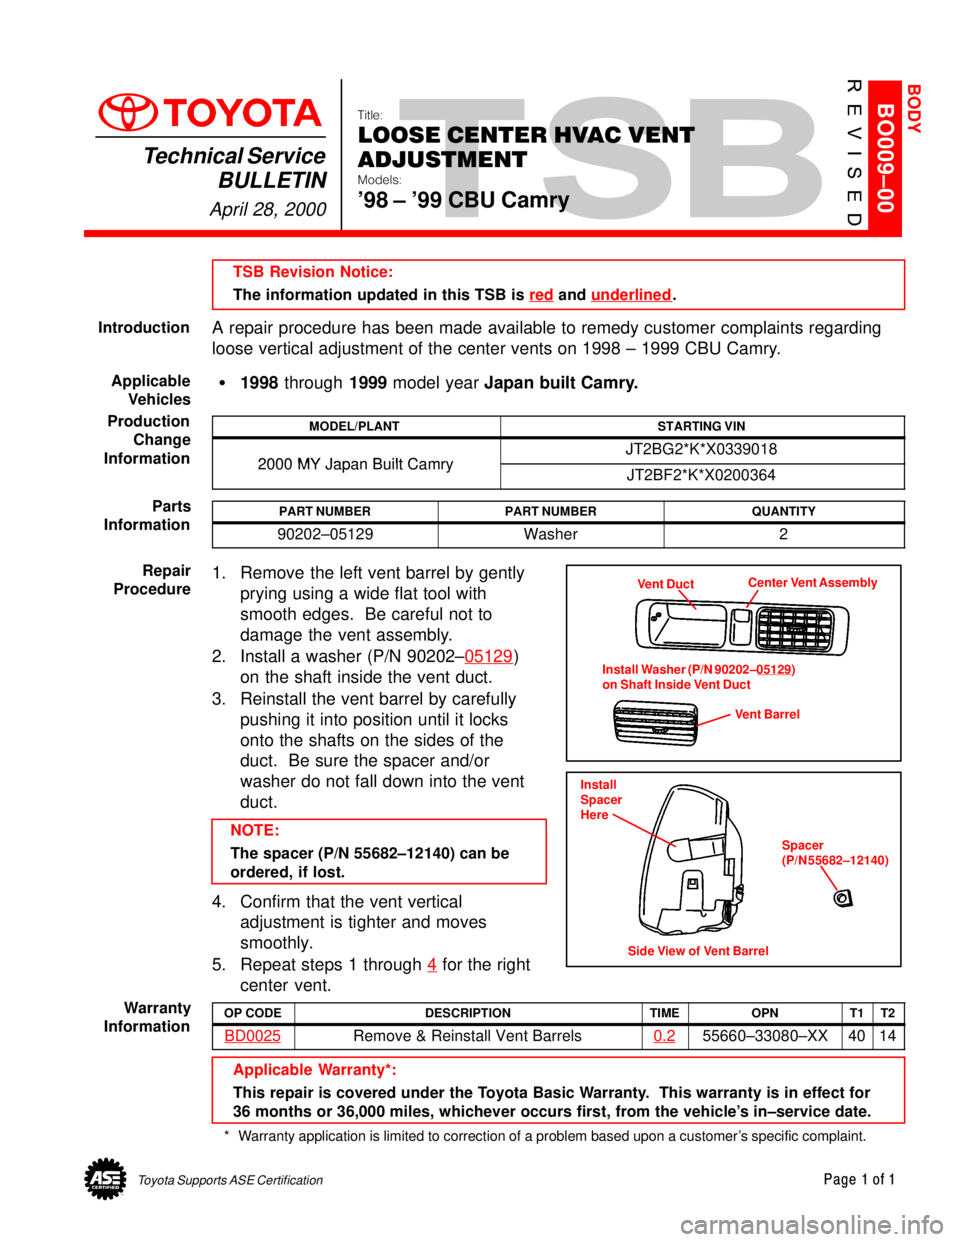
1. Remove the left vent barrel by gently
prying using a wide flat tool with
smooth edges. Be careful not to
damage the vent assembly.
2. Install a washer (P/N 90202±05129
)
on the shaft inside the vent duct.
3. Reinstall the vent barrel by carefully
pushing it into position until it locks
onto the shafts on the sides of the
duct. Be sure the spacer and/or
washer do not fall down into the vent
duct.
NOTE:
The spacer (P/N 55682±12140) can be
ordered, if lost.
4. Confirm that the vent vertical
adjustment is tighter and moves
smoothly.
5. Repeat steps 1 through 4
for the right
center vent.
OP CODEDESCRIPTIONTIMEOPNT1T2
BD0025Remove & Reinstall Vent Barrels0.255660±33080±XX4014
Applicable Warranty*:
This repair is covered under the Toyota Basic Warranty. This warranty is in effect for
36 months or 36,000 miles, whichever occurs first, from the vehicle's in±service date.
* Warranty application is limited to correction of a problem based upon a customer's specific complaint.
BODY
Introduction
Applicable
Vehicles
Production
Change
Information
Parts
Information
Vent DuctCenter Vent Assembly
Vent Barrel Install Washer (P/N 90202±05129
)
on Shaft Inside Vent Duct
Repair
Procedure
Side View of Vent Barrel Install
Spacer
Here
Spacer
(P/N 55682±12140)
Warranty
Information
Page 4475 of 4770

Toyota Supports ASE CertificationPage 1 of 1
BO017-03Title:
TRIM GARNISH LOOSE
Models:
All Models
Technical Service
BULLETIN
September 9, 2003
TSB REVISION NOTICE:
March 3, 2004: The TSB has been changed to include new inspection and
replacement instructions.
Previous versions of this TSB should be discarded.
Customers may experience an interior trim panel either loose or fitting poorly due to a
deformed or missing panel attachment clips. When a trim garnish (A, B, C or D pillar
garnish, door trim panel, etc.) is removed and reinstalled using the old clips, there is a
possibility that the garnish may exhibit a loose condition. To prevent this condition from
occurring, please use the following procedures.
All Models ± All trim panel attachment clips must be inspected prior to reassembly and
replaced if any damage or wear is detected. If no damage is visible, the clip may be
reused. Always check to make sure that the garnish is properly attached after
reinstallation of all interior trim panels.
2002 ± 2004 model year Camry and 2004 model year Solara ± When removing the
A±pillar garnish panels, replace the white plastic attachment clips (P/N 90467±A0025).
�All models.
OP CODEDESCRIPTIONTIMEOFPT1T2
N/ANot Applicable to Warranty±±±±
BODY
Introduction
Inspection/
Replacement
Procedure
Applicable
Vehicles
Warranty
Information