Page 2202 of 4770
I03356
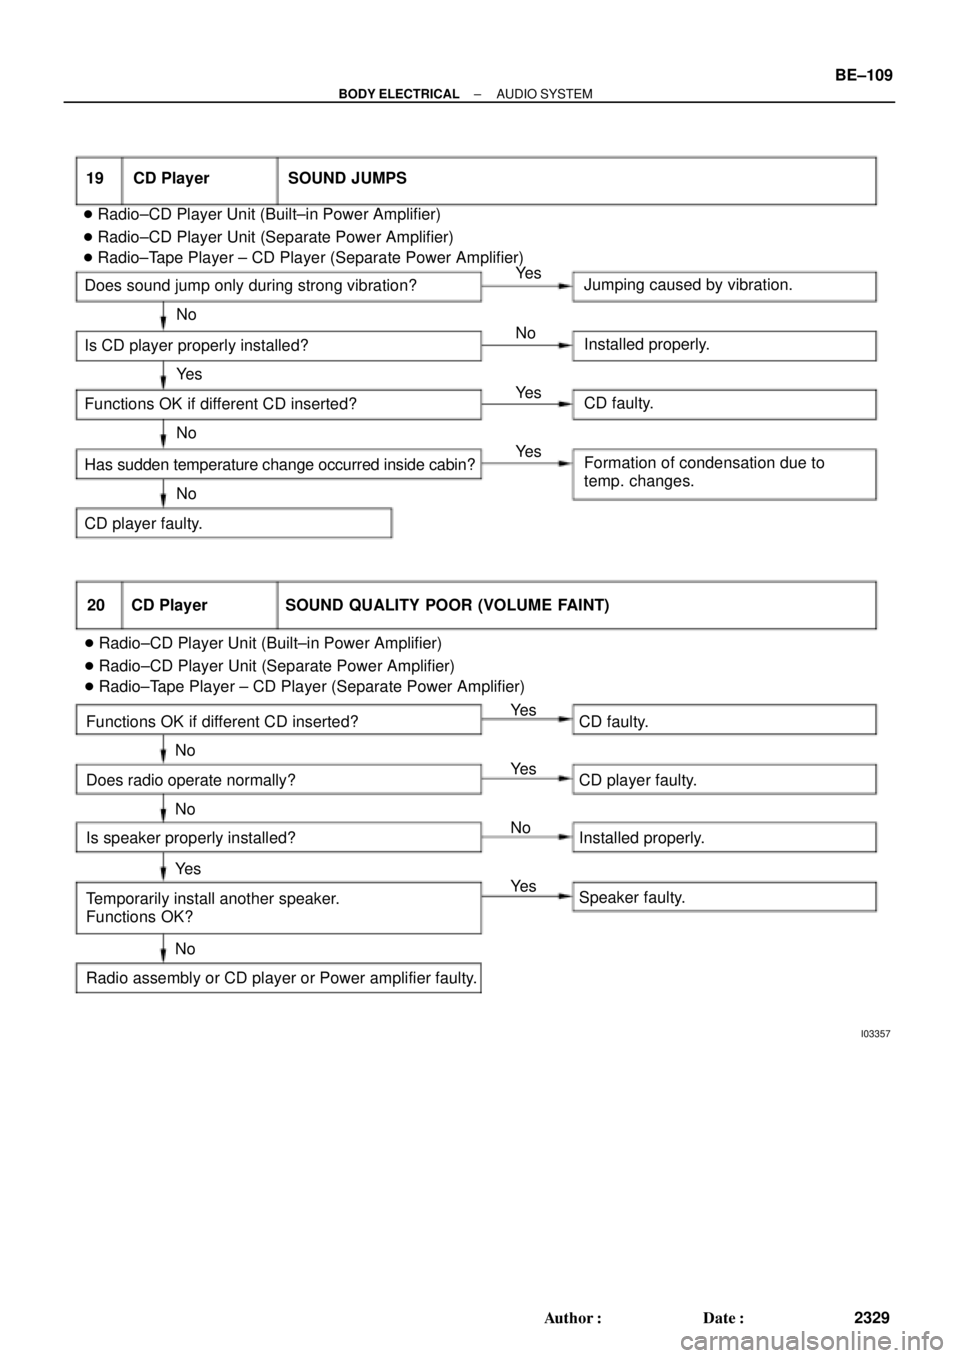
18 CD Player POWER COMING IN, BUT CD PLAYER NOT OPERATING
Is CD inserted with correct side up?
Function OK if different CD inserted?
Does radio operate normally?Insert correctly.
CD faulty.
Is temperature inside cabin hot?
Protective circuit in
operation.
Has sudden temperature change
occurred inside cabin?
CD player faulty.
Does continuity exist in speaker wire harness?
Temporarily install another speaker.
Functions OK?
Hissing sound from speaker?
Radio assembly faulty.
Recheck system after repair.Speaker wire harness faulty.
Speaker faulty.
Power amplifier faulty.
Recheck system after repair. No
Ye s Ye s
Ye s
Ye s
Ye s
Ye s
Ye sYe s No
No
No
No
No No No � Radio±CD Player Unit (Built±in Power Amplifier)
� Radio±CD Player Unit (Separate Power Amplifier)
� Radio±Tape Player ± CD Player (Separate Power Amplifier)
Formation of condensation
due to temp. changes. BE±108
± BODY ELECTRICALAUDIO SYSTEM
2328 Author�: Date�:
Page 2203 of 4770

I03357
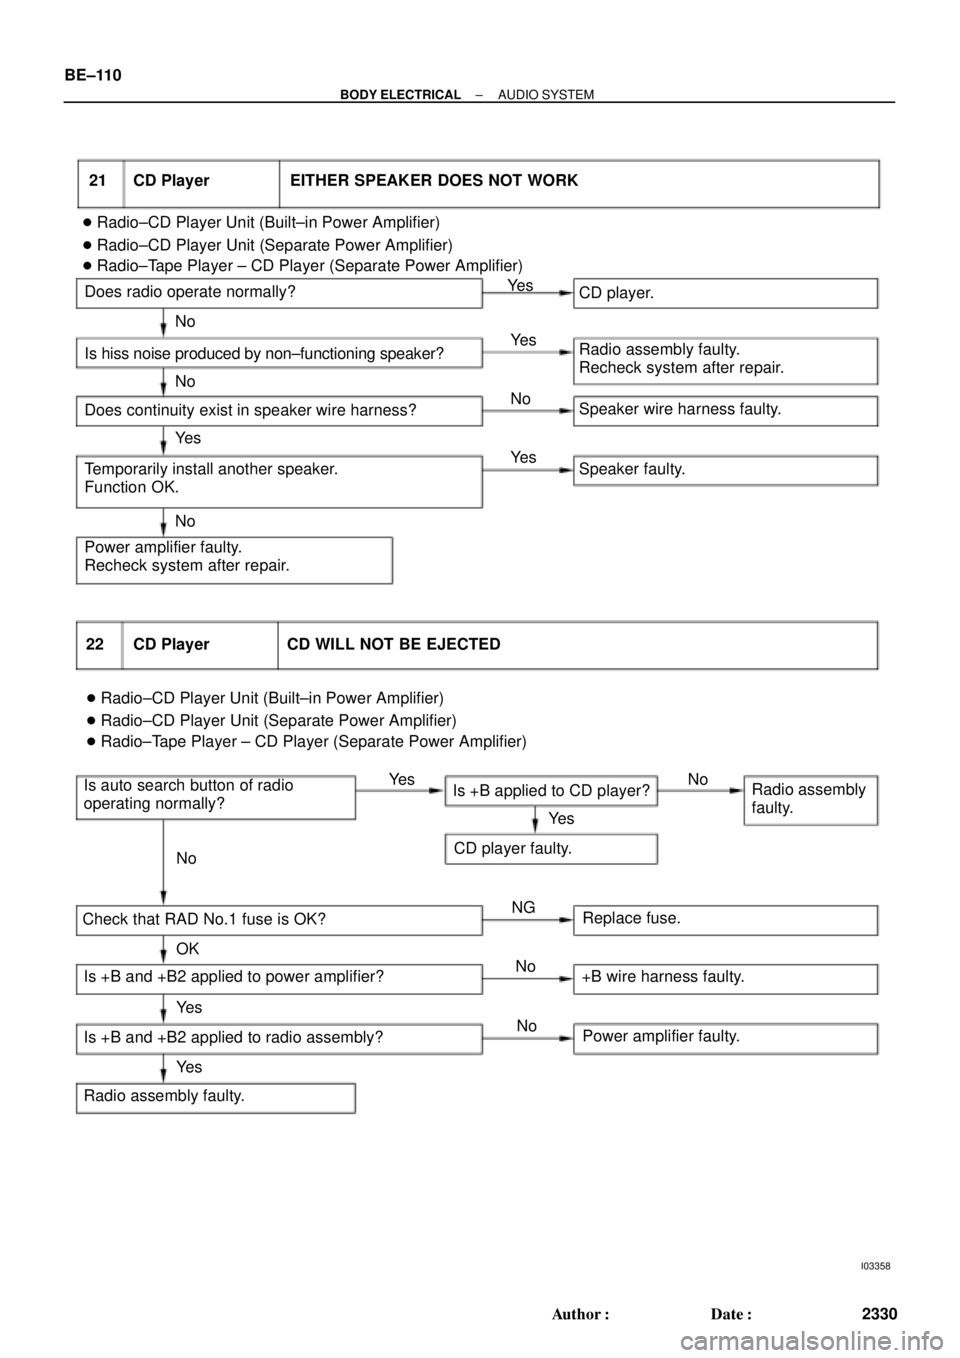
19 CD Player SOUND JUMPS
Jumping caused by vibration.
Installed properly.
CD faulty.
Formation of condensation due to
temp. changes. No No
No
NoYe s
Ye s
Ye s Ye s Does sound jump only during strong vibration?
Is CD player properly installed?
Functions OK if different CD inserted?
Has sudden temperature change occurred inside cabin?
CD player faulty. � Radio±CD Player Unit (Built±in Power Amplifier)
� Radio±CD Player Unit (Separate Power Amplifier)
� Radio±Tape Player ± CD Player (Separate Power Amplifier)
� Radio±CD Player Unit (Built±in Power Amplifier)
� Radio±CD Player Unit (Separate Power Amplifier)
� Radio±Tape Player ± CD Player (Separate Power Amplifier) 20 CD Player SOUND QUALITY POOR (VOLUME FAINT)
Functions OK if different CD inserted?
Does radio operate normally?
Is speaker properly installed?
Temporarily install another speaker.
Functions OK?
Radio assembly or CD player or Power amplifier faulty.CD faulty.
CD player faulty.
Installed properly.
Speaker faulty. Ye s
No Ye s
Ye s Ye s No
No
No
± BODY ELECTRICALAUDIO SYSTEM
BE±109
2329 Author�: Date�:
Page 2204 of 4770

I03358
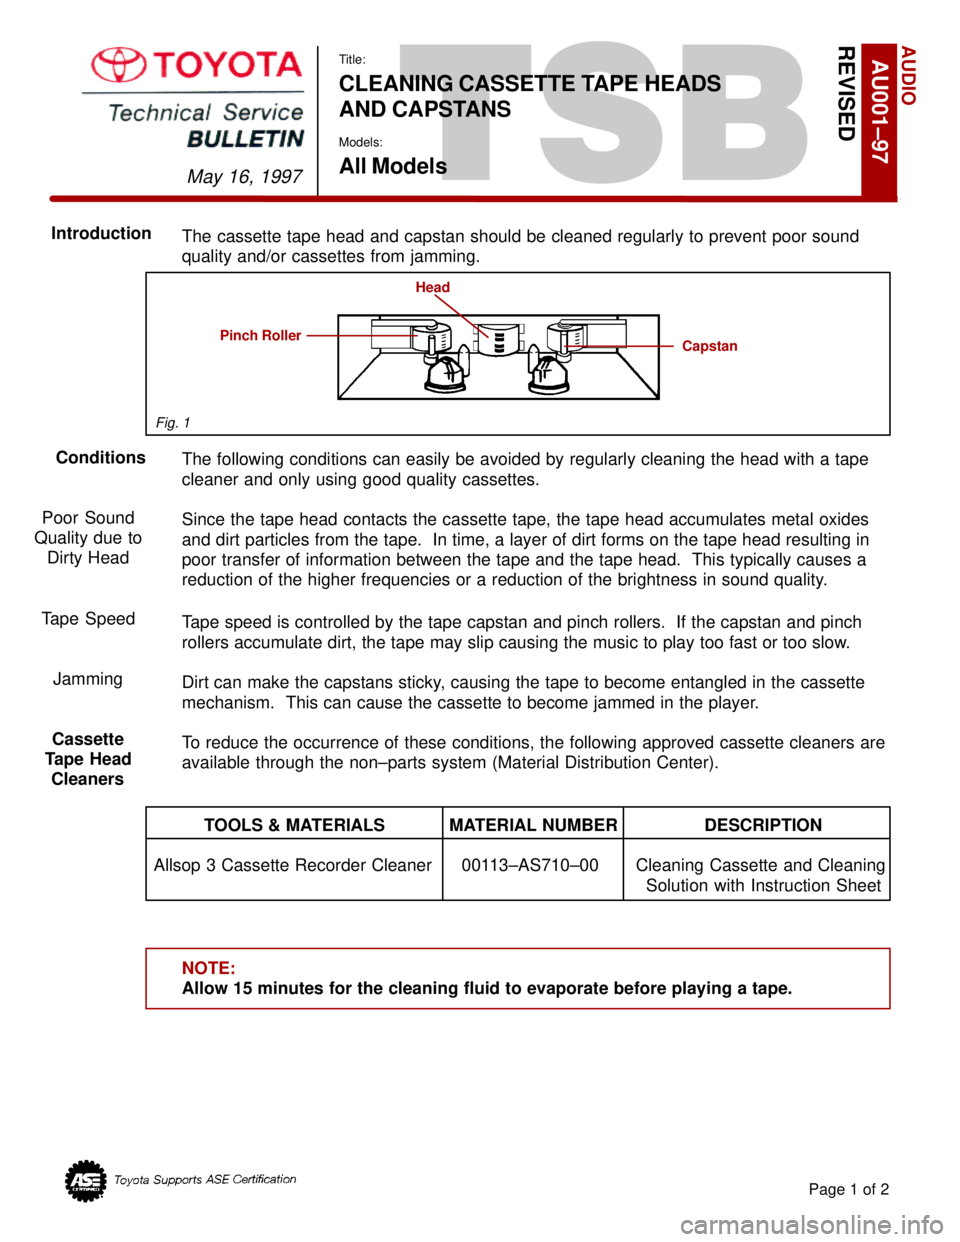
Does radio operate normally?
Is hiss noise produced by non±functioning speaker?
Does continuity exist in speaker wire harness?
Temporarily install another speaker.
Function OK.
Power amplifier faulty.
Recheck system after repair.CD player.
Radio assembly faulty.
Recheck system after repair.
Speaker wire harness faulty.
Speaker faulty. Ye sYe s
Ye s
Ye s No
No
NoNo 21 CD Player EITHER SPEAKER DOES NOT WORK
22 CD Player CD WILL NOT BE EJECTED
Is auto search button of radio
operating normally?Is +B applied to CD player?Radio assembly
faulty.
CD player faulty. Ye s N o
Ye s
No
Check that RAD No.1 fuse is OK?Replace fuse.
Is +B and +B2 applied to power amplifier?
Is +B and +B2 applied to radio assembly?
Radio assembly faulty.+B wire harness faulty.
Power amplifier faulty. OK
Ye s
Ye sNG
No
No � Radio±CD Player Unit (Built±in Power Amplifier)
� Radio±CD Player Unit (Separate Power Amplifier)
� Radio±Tape Player ± CD Player (Separate Power Amplifier)
� Radio±CD Player Unit (Built±in Power Amplifier)
� Radio±CD Player Unit (Separate Power Amplifier)
� Radio±Tape Player ± CD Player (Separate Power Amplifier) BE±110
± BODY ELECTRICALAUDIO SYSTEM
2330 Author�: Date�:
Page 4416 of 4770

TSB
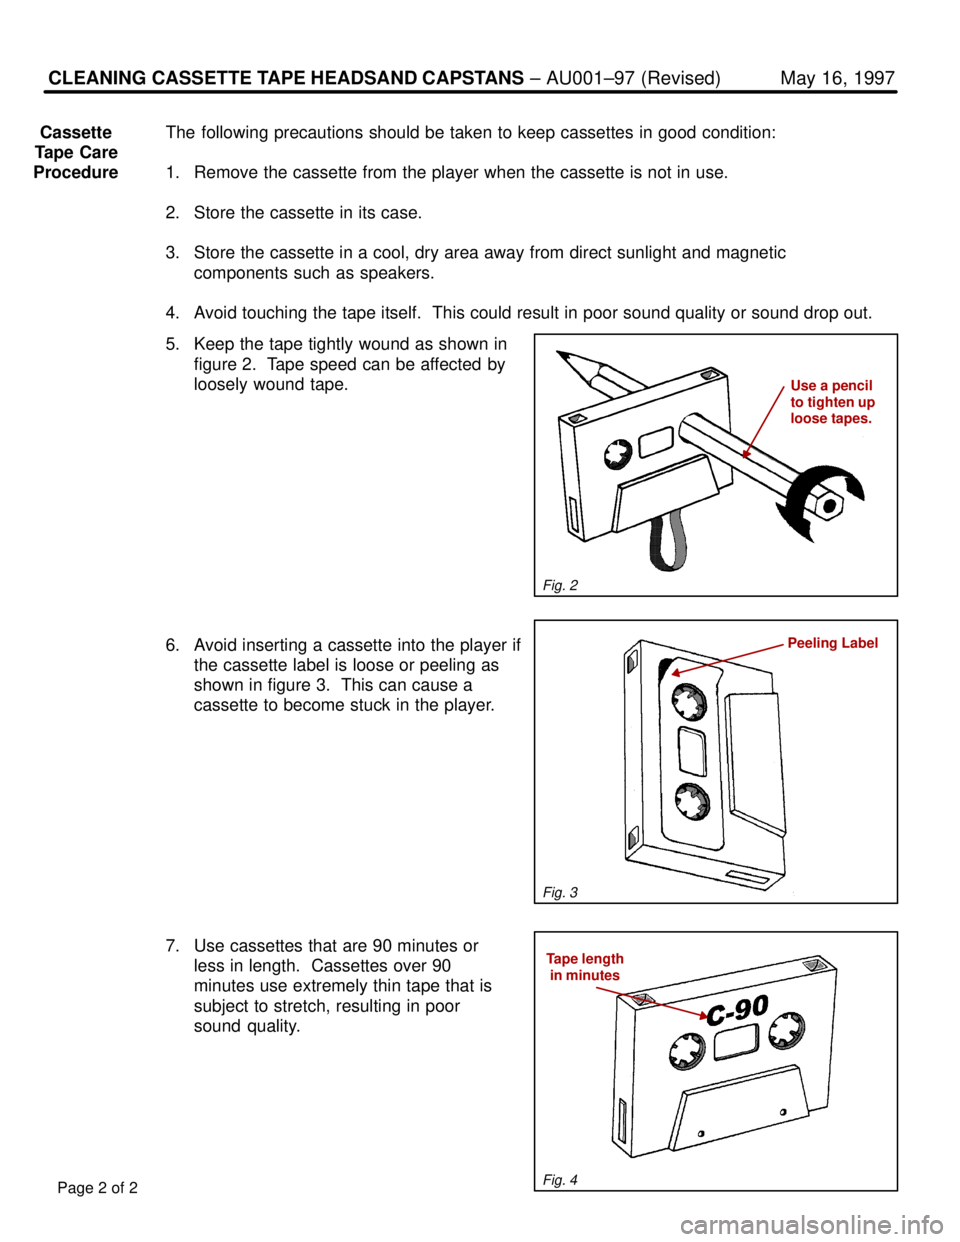
The cassette tape head and capstan should be cleaned regularly to prevent poor sound
quality and/or cassettes from jamming.
The following conditions can easily be avoided by regularly cleaning the head with a tape
cleaner and only using good quality cassettes.
Since the tape head contacts the cassette tape, the tape head accumulates metal oxides
and dirt particles from the tape. In time, a layer of dirt forms on the tape head resulting in
poor transfer of information between the tape and the tape head. This typically causes a
reduction of the higher frequencies or a reduction of the brightness in sound quality.
Tape speed is controlled by the tape capstan and pinch rollers. If the capstan and pinch
rollers accumulate dirt, the tape may slip causing the music to play too fast or too slow.
Dirt can make the capstans sticky, causing the tape to become entangled in the cassette
mechanism. This can cause the cassette to become jammed in the player.
To reduce the occurrence of these conditions, the following approved cassette cleaners are
available through the non±parts system (Material Distribution Center).
TOOLS & MATERIALS MATERIAL NUMBER DESCRIPTION
Allsop 3 Cassette Recorder Cleaner 00113±AS710±00 Cleaning Cassette and Cleaning
Solution with Instruction Sheet
NOTE:
Allow 15 minutes for the cleaning fluid to evaporate before playing a tape.
AUDIO
May 16, 1997
Title:
CLEANING CASSETTE TAPE HEADS
AND CAPSTANS
Models:
All Models
Page 1 of 2
AU001±97REVISED
Conditions Introduction
Poor Sound
Quality due to
Dirty Head
Tape Speed
Jamming
Cassette
Tape Head
Cleaners
Capstan
Head
Pinch Roller
Fig. 1
Page 4417 of 4770

CLEANING CASSETTE TAPE HEADSAND CAPSTANS ± AU001±97 (Revised) May 16, 1997
The following precautions should be taken to keep cassettes in good condition:
1. Remove the cassette from the player when the cassette is not in use.
2. Store the cassette in its case.
3. Store the cassette in a cool, dry area away from direct sunlight and magnetic
components such as speakers.
4. Avoid touching the tape itself. This could result in poor sound quality or sound drop out.
5. Keep the tape tightly wound as shown in
figure 2. Tape speed can be affected by
loosely wound tape.
6. Avoid inserting a cassette into the player if
the cassette label is loose or peeling as
shown in figure 3. This can cause a
cassette to become stuck in the player.
7. Use cassettes that are 90 minutes or
less in length. Cassettes over 90
minutes use extremely thin tape that is
subject to stretch, resulting in poor
sound quality.
Page 2 of 2
Cassette
Tape Care
Procedure
Peeling Label
Use a pencil
to tighten up
loose tapes.
Tape length
in minutes
Fig. 2
Fig. 3
Fig. 4