Page 208 of 447

7D-10 TRANSFER
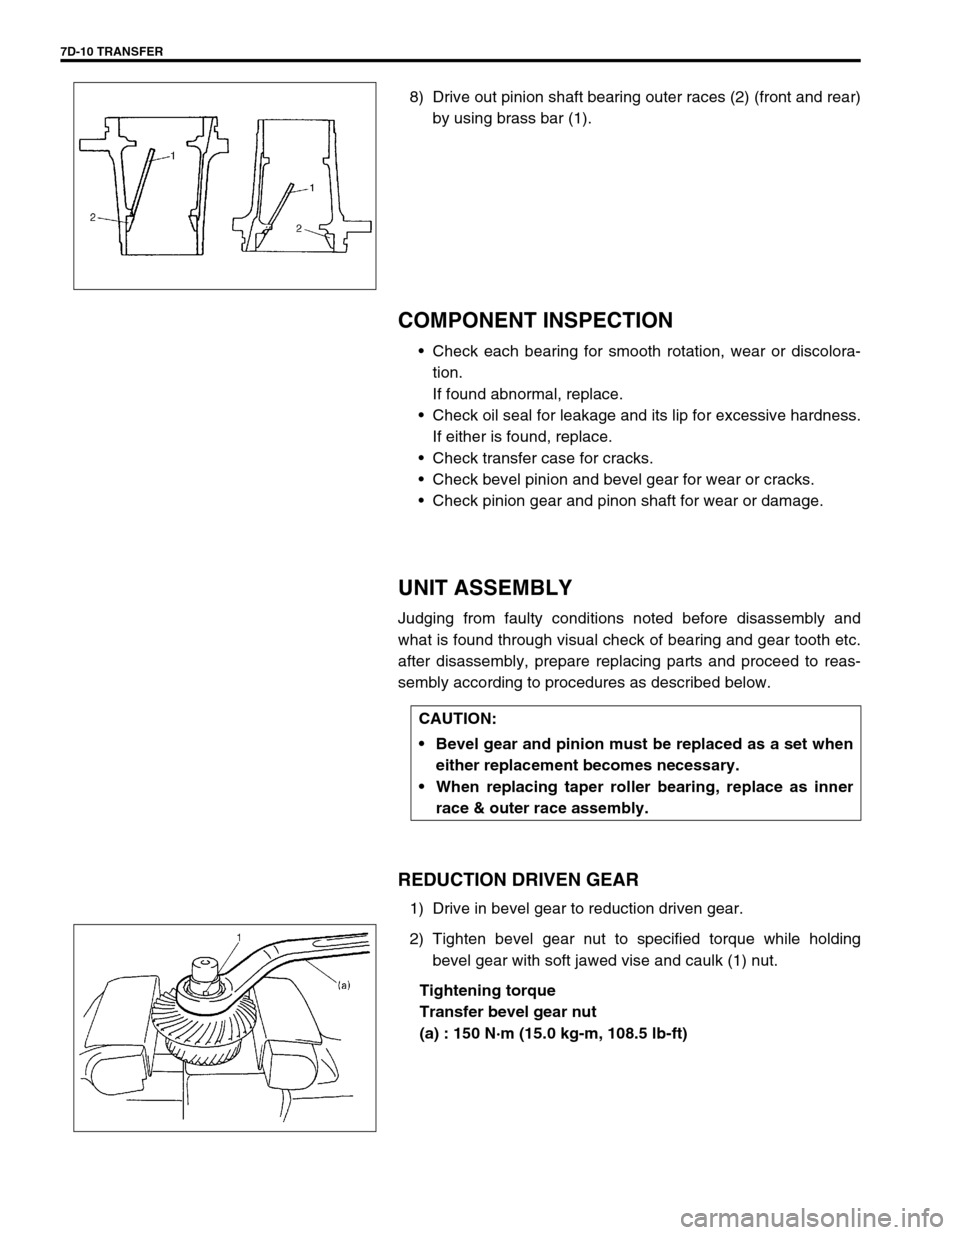
8) Drive out pinion shaft bearing outer races (2) (front and rear)
by using brass bar (1).
COMPONENT INSPECTION
Check each bearing for smooth rotation, wear or discolora-
tion.
If found abnormal, replace.
Check oil seal for leakage and its lip for excessive hardness.
If either is found, replace.
Check transfer case for cracks.
Check bevel pinion and bevel gear for wear or cracks.
Check pinion gear and pinon shaft for wear or damage.
UNIT ASSEMBLY
Judging from faulty conditions noted before disassembly and
what is found through visual check of bearing and gear tooth etc.
after disassembly, prepare replacing parts and proceed to reas-
sembly according to procedures as described below.
REDUCTION DRIVEN GEAR
1) Drive in bevel gear to reduction driven gear.
2) Tighten bevel gear nut to specified torque while holding
bevel gear with soft jawed vise and caulk (1) nut.
Tightening torque
Transfer bevel gear nut
(a) : 150 N·m (15.0 kg-m, 108.5 lb-ft)
CAUTION:
Bevel gear and pinion must be replaced as a set when
either replacement becomes necessary.
When replacing taper roller bearing, replace as inner
race & outer race assembly.
Page 213 of 447

TRANSFER 7D-15
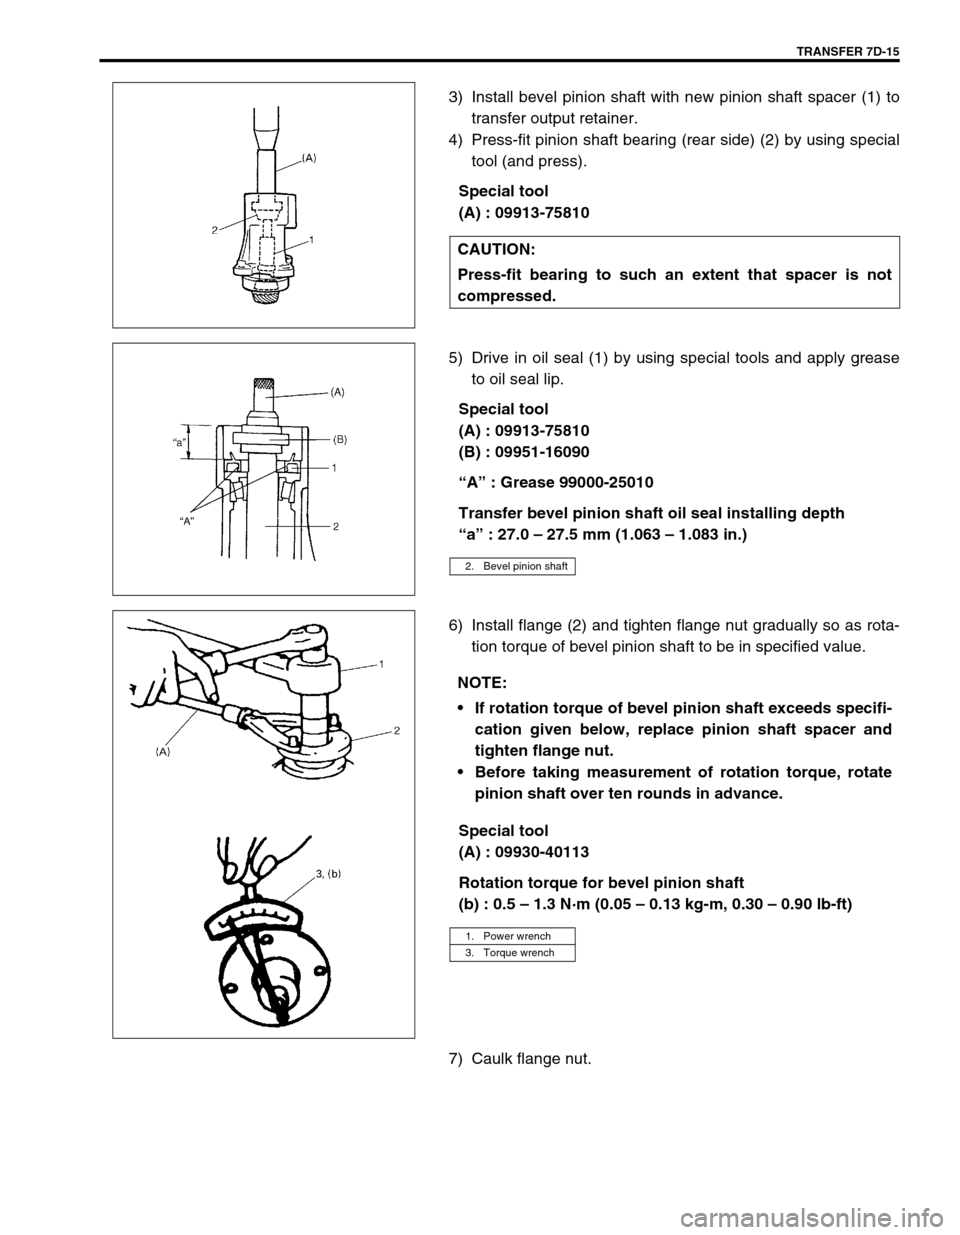
3) Install bevel pinion shaft with new pinion shaft spacer (1) to
transfer output retainer.
4) Press-fit pinion shaft bearing (rear side) (2) by using special
tool (and press).
Special tool
(A) : 09913-75810
5) Drive in oil seal (1) by using special tools and apply grease
to oil seal lip.
Special tool
(A) : 09913-75810
(B) : 09951-16090
“A” : Grease 99000-25010
Transfer bevel pinion shaft oil seal installing depth
“a” : 27.0 – 27.5 mm (1.063 – 1.083 in.)
6) Install flange (2) and tighten flange nut gradually so as rota-
tion torque of bevel pinion shaft to be in specified value.
Special tool
(A) : 09930-40113
Rotation torque for bevel pinion shaft
(b) : 0.5 – 1.3 N·m (0.05 – 0.13 kg-m, 0.30 – 0.90 lb-ft)
7) Caulk flange nut.CAUTION:
Press-fit bearing to such an extent that spacer is not
compressed.
2. Bevel pinion shaft
NOTE:
If rotation torque of bevel pinion shaft exceeds specifi-
cation given below, replace pinion shaft spacer and
tighten flange nut.
Before taking measurement of rotation torque, rotate
pinion shaft over ten rounds in advance.
1. Power wrench
3. Torque wrench
Page 216 of 447

7D-18 TRANSFER
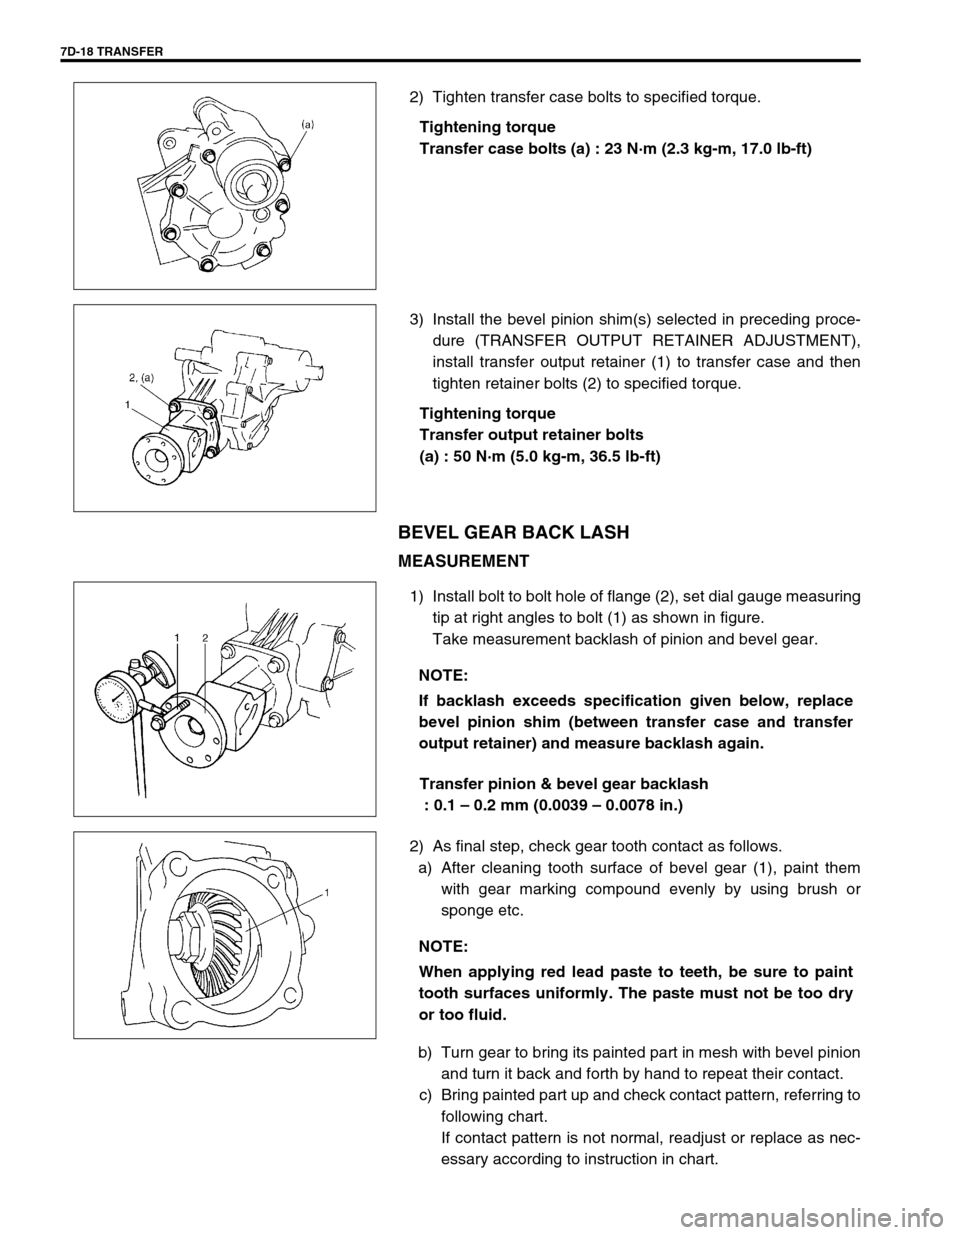
2) Tighten transfer case bolts to specified torque.
Tightening torque
Transfer case bolts (a) : 23 N·m (2.3 kg-m, 17.0 lb-ft)
3) Install the bevel pinion shim(s) selected in preceding proce-
dure (TRANSFER OUTPUT RETAINER ADJUSTMENT),
install transfer output retainer (1) to transfer case and then
tighten retainer bolts (2) to specified torque.
Tightening torque
Transfer output retainer bolts
(a) : 50 N·m (5.0 kg-m, 36.5 lb-ft)
BEVEL GEAR BACK LASH
MEASUREMENT
1) Install bolt to bolt hole of flange (2), set dial gauge measuring
tip at right angles to bolt (1) as shown in figure.
Take measurement backlash of pinion and bevel gear.
Transfer pinion & bevel gear backlash
: 0.1 – 0.2 mm (0.0039 – 0.0078 in.)
2) As final step, check gear tooth contact as follows.
a) After cleaning tooth surface of bevel gear (1), paint them
with gear marking compound evenly by using brush or
sponge etc.
b) Turn gear to bring its painted part in mesh with bevel pinion
and turn it back and forth by hand to repeat their contact.
c) Bring painted part up and check contact pattern, referring to
following chart.
If contact pattern is not normal, readjust or replace as nec-
essary according to instruction in chart.
NOTE:
If backlash exceeds specification given below, replace
bevel pinion shim (between transfer case and transfer
output retainer) and measure backlash again.
NOTE:
When applying red lead paste to teeth, be sure to paint
tooth surfaces uniformly. The paste must not be too dry
or too fluid.
Page 218 of 447

7D-20 TRANSFER
UNIT INSTALLATION
Install transfer assembly (2) by reversing removal procedure and
noting following points.
Tighten transfer mounting bolts (3) to specified torque.
Tightening torque
Transfer mounting bolts (a) : 50 N·m (5.0 kg-m, 36.5 lb-ft)
Tighten rear mounting bracket bolts (1) to specified torque.
Tightening torque
Transfer rear mounting bracket bolts
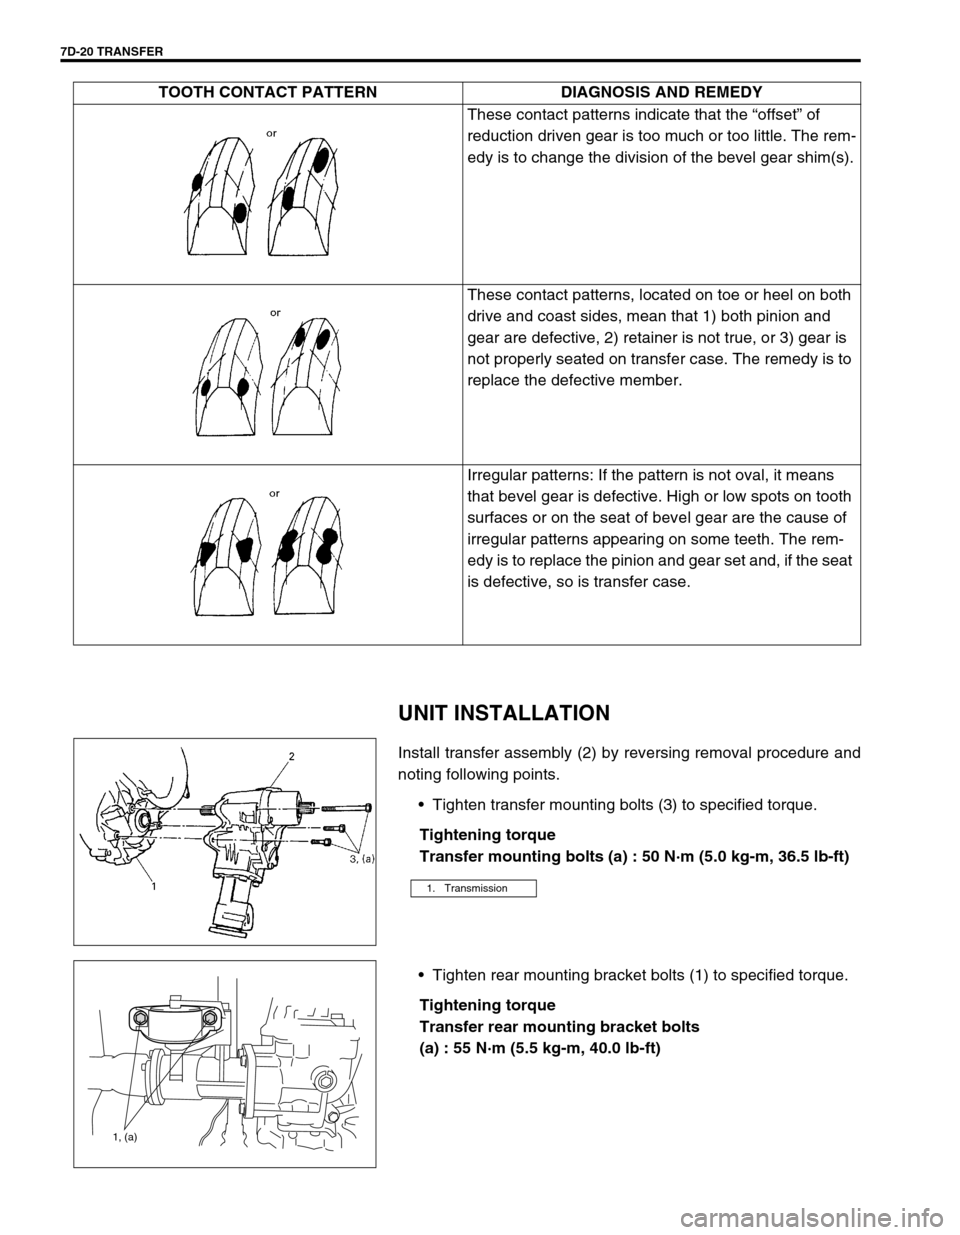
(a) : 55 N·m (5.5 kg-m, 40.0 lb-ft)These contact patterns indicate that the “offset” of
reduction driven gear is too much or too little. The rem-
edy is to change the division of the bevel gear shim(s).
These contact patterns, located on toe or heel on both
drive and coast sides, mean that 1) both pinion and
gear are defective, 2) retainer is not true, or 3) gear is
not properly seated on transfer case. The remedy is to
replace the defective member.
Irregular patterns: If the pattern is not oval, it means
that bevel gear is defective. High or low spots on tooth
surfaces or on the seat of bevel gear are the cause of
irregular patterns appearing on some teeth. The rem-
edy is to replace the pinion and gear set and, if the seat
is defective, so is transfer case. TOOTH CONTACT PATTERN DIAGNOSIS AND REMEDY
1. Transmission
1, (a)
Page 219 of 447
TRANSFER 7D-21
Tighten mounting bolt and mounting bracket bolts and nuts
to specified torque.
Tightening torque
Transfer rear mounting bracket nuts
(a) : 50 N·m (5.0 kg-m, 36.5 lb-ft)
Transfer mounting bolt
(b) : 55 N·m (5.5 kg-m, 40.0 lb-ft)
Transfer rear mounting bracket No.2 bolts
(c) : 55 N·m (5.5 kg-m, 40.0 lb-ft)
Tighten transfer stiffener bolts (4) to specified torque.
Tightening torque
Transfer stiffener bolts (a) : 50 N·m (5.0 kg-m, 36.5 lb-ft)
Tighten exhaust pipe bolts.
Tightening torque
Exhaust pipe bolts
(a) : 50 N·m (5.0 kg-m, 36.5 lb-ft)
Install right side drive shaft, refer to Section 4A.
Install propeller shaft and tighten propeller shaft bolts and
center support bolts to specified torque (refer to Section 4B).
Fill gear oil to transfer as specified, refer to OIL CHANGE of
ON-VEHICLE SERVICE.
Check oil level and leakage.
(a)
(b)
(c)
1. Transmission
2. Transfer
3. Stiffener
1. Exhaust No.1 pipe
2. Exhaust No.2 pipe
1
(a)(a)2
Page 220 of 447
7D-22 TRANSFER
TIGHTENING TORQUE SPECIFICATION
REQUIRED SERVICE MATERIAL
SPECIAL TOOL
Fastening partTightening torque
Nm kg-m lb-ft
Transfer oil level/filler and drain plugs 21 2.1 15.5
Transfer bevel gear nut 150 15.0 108.5
Transfer case bolts 23 2.3 17.0
Transfer output retainer bolts 50 5.0 36.5
Transfer mounting bolts 50 5.0 36.5
Transfer rear mounting bracket bolts 55 5.5 40.0
Transfer rear mounting bracket nuts 50 5.5 36.5
Transfer mounting bolt 55 5.5 40.0
Transfer rear mounting bracket No.2 bolts 55 5.5 40.0
Transfer stiffener bolts 50 5.0 36.5
Exhaust pipe bolts 50 5.0 36.5
MaterialRecommended SUZUKI products
(Part Number)Use
Lithium grease SUZUKI SUPER GREASE A
(99000-25010)Oil seal lips
Sealant SUZUKI BOND NO. 1216B
(99000-31230)Oil drain plug
Oil level plug
Mating surface of transfer case
09913-65135 09925-58210 09941-54911 09924-84510-005
Bearing puller Oil seal installer Bearing outer race
removerBearing installer attach-
ment
Page 223 of 447
REAR DIFFERENTIAL 7F-1
6F1
6F2
6G
6H
6K
7A
7A1
7B1
7C1
7E
7F
7F
8B
8C
8D
8E
9
10
10A
10B
SECTION 7F
REAR DIFFERENTIAL
CONTENTS
GENERAL DESCRIPTION ............................... 7F-2
VISCOUS COUPLING .................................. 7F-2
DIAGNOSIS ...................................................... 7F-3
ON-VEHICLE SERVICE ................................... 7F-4
OIL CHANGE ................................................ 7F-4
UNIT REPAIR OVERHAUL .............................. 7F-5
DIFFERENTIAL UNIT ................................... 7F-6
UNIT DISASSEMBLY ................................... 7F-7SUB-ASSEMBLY REPAIR............................ 7F-8
VISCOUS COUPLING .............................. 7F-8
REAR DIFFERENTIAL............................ 7F-10
UNIT ASSEMBLY ....................................... 7F-20
TIGHTENING TORQUE SPECIFICATION..... 7F-20
REQUIRED SERVICE MATERIAL................. 7F-21
SPECIAL TOOL ............................................. 7F-21
Page 224 of 447
7F-2 REAR DIFFERENTIAL
GENERAL DESCRIPTION
The differential assembly uses a hypoid bevel pinion and gear.
The differential assembly is decisive in that the drive power is concentrated there. Therefore, use of genuine
parts and specified torque is compulsory. Further, because of sliding tooth meshing with high pressure between
bevel pinion and gear, it is mandatory to lubricate them by hypoid gear oil.
VISCOUS COUPLING
The 4WD vehicle is equipped with a viscous coupling (1) in front of the rear differential.
The 4WD mechanism used for this vehicle distributes optimum driving force to the front and rear wheels accord-
ing to road conditions and driving conditions.